首发:Rice 嵌入式开发技术分享
作者:RiceDIY
背景
- 最近在测试BLE模块,本来想用别家的产品来测试我的BLE模块,经过一番询问,别家的BLE的MASTER模式只能配对自家的SLAVE模式。也就是说他不能配对我的BLE模块,这就让我郁闷了。绝望。
- 手机的BLE调试助手又不能自动化测试,需要手动调试。太麻烦。
- 之前我也写过一篇文章《Android BLE 开发》--初学者,这个安卓原生APP,对于一个没有任何安卓基础的我,花了3天的时间干了这个四不像的BLE安卓调试工具。原生的APP搭建环境就非常痛苦了,更何况开发。想要再次开发,想想还是算了。
- 所以想了想,最容易,也是最方便的还是微信小程序。微信小程序提供的丰富的API,所以开发起来还是比较方便的。在微信小程序中对应的知识点:JavaScript + WXSS + WXML。
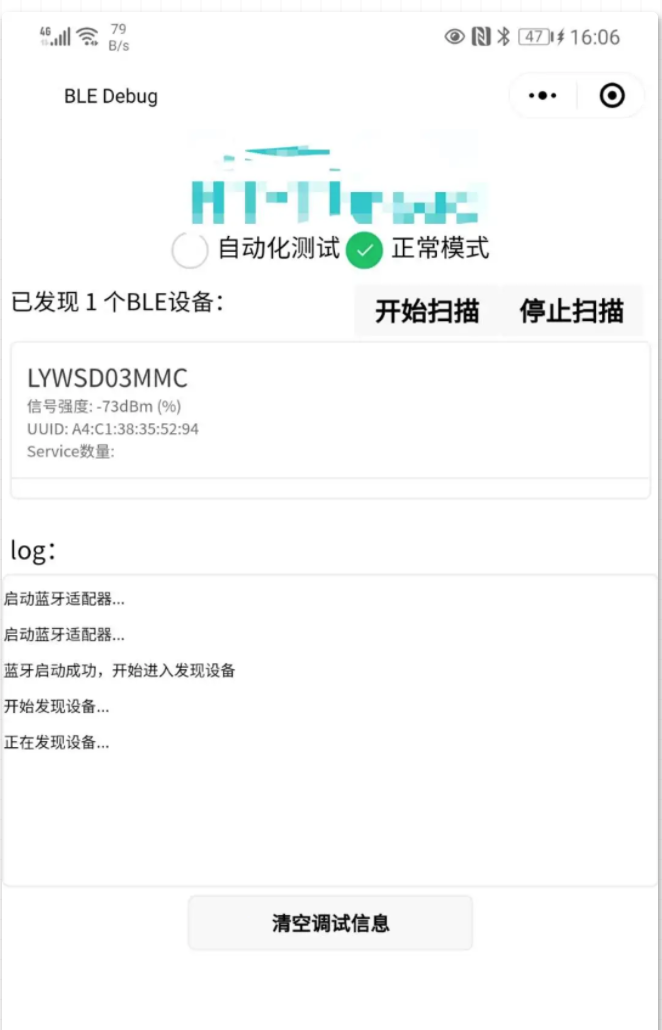
- 现学现卖,0基础,干了3天,开发了一个微信小程序。这个小程序支持功能:
- 自动化测试,和正常模式(跟BLE调试助手一样)
- 可以显示所有的测试报告(时间,测试结果等)
- 我对小程序没有基础,临时抱佛脚,欢迎来喷。嘻嘻嘻
- 这个小程序将纳入我的R-Plan开源项目。github链接:https://github.com/RiceChen/R\_Plan.git。功能会不断完善。
准备工作
- 需要注册微信小程序开发账号
- 下载微信开发者工具
- 了解小程序相关知识-官方文档
开始编写程序(万事俱备只欠东风)
- 创建工程(微信开发者工具使用详情,可以通过官方文档查看,这里就不详细说明)
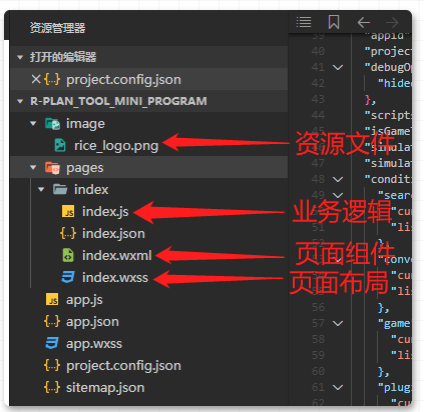
- 文件说明:我的这个小程序主要为3个主要文件。index.js, index.wxml,index.wxss。
- index.wxml 代码说明:
- 放置logo:
<view class="rice_logo">
    <image src="../../image/rice_logo.png" style="width: 227px; height: 100px;"></image>
</view>- 扫描相关组件:
<view class="devices_summary">
  <view>
    <text>已发现 {{devices.length}} 个BLE设备:</text>
    <view class="devices_scan_btn">
      <button size="mini" style="width:22vw; font-size: 4vw" bindtap="openBluetoothAdapter">开始扫描</button>
      <button size="mini" style="width:22vw; font-size: 4vw" bindtap="closeBluetoothAdapter">停止扫描</button>
    </view>
  </view>
</view> - 扫描结果列表组件:
<scroll-view class="device_list" scroll-y scroll-with-animation>
  <view wx:for="{{devices}}" wx:key="index"
   data-device-id="{{item.deviceId}}"
   data-name="{{item.name || item.localName}}"
   bindtap="bindcreateBLEConnection"
   class="device_item"
   hover-class="device_item_hover">
    <view style="font-size: 16px; color: #333;">{{item.name}}</view>
    <view style="font-size: 10px">信号强度: {{item.RSSI}}dBm ({{utils.max(0, item.RSSI + 100)}}%)</view>
    <view style="font-size: 10px">UUID: {{item.deviceId}}</view>
    <view style="font-size: 10px">Service数量: {{utils.len(item.advertisServiceUUIDs)}}</view>
  </view>
</scroll-view> - 连接设备后的窗体,这个需要连接成功才会显示, 并且获取到可写特征值是,才会显示写数据按钮:
<view class="connected_info" wx:if="{{connected}}">
  <text>已连接到{{name}}</text>
  <view class="data_title">接收数据:</view>
  <view class="read_data">
    <textarea style="height: 3em" placeholder="接收到的数据"/>
  </view>
  <view class="data_title">发送数据:</view>
  <view class="write_data">
    <textarea bindblur="bindWriteData" style="height: 4em" placeholder="输入要发送的数据" />
  </view>
  <view class="operation">
    <view class="data-type" wx:if="{{canWrite}}">
    <!-- <view class="data-type"> -->
      <radio-group bindchange="dataTypeSelect">
        <label class="radio">
          <radio value="hex" checked="false"/>HEX
        </label>
        <label class="radio">
          <radio value="ascii" checked="true" />ASCII
        </label>
      </radio-group>
    </view>
    <view class="devices_func_btn">
      <button wx:if="{{canWrite}}" size="mini" style="width:22vw; font-size: 4vw" bindtap="writeBLECharacteristicValue">写数据</button>
      <button size="mini" style="width:22vw; font-size: 4vw" bindtap="closeBLEConnection">断开连接</button>
    </view>
  </view>
</view> - 调试信息打印:
<view class="log_title">log:</view>
<scroll-view class="log_list" scroll-y scroll-with-animation>
  <text style="font-size: 10px">{{log_list}}</text>
</scroll-view>
<button class="clear_log" bindtap="bindClearLog">清空调试信息</button> - index.wxss 代码说明:
- 这个文件主要是界面的布局设置,关于这方面,建议学习学习CSS。这里我就不描述了。其实我也不熟悉。
- index.js 代码说明:
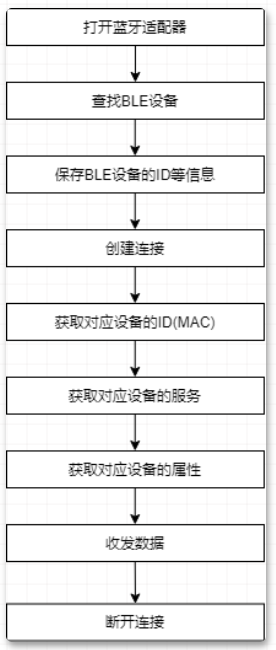
- 讲解代码之前我们来说说连接BLE设备流程,这个是我理解的流程。
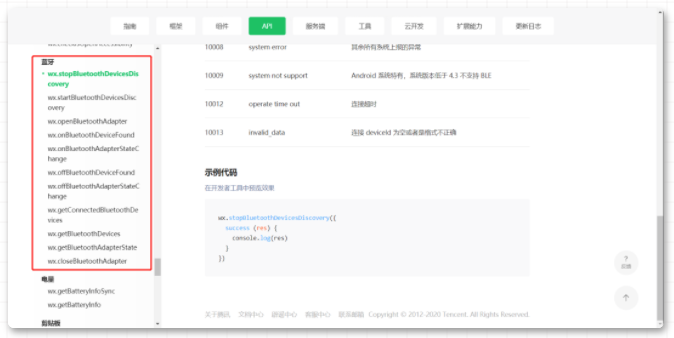
- 微信官方文档对BLE的相关的API有相应的说明。
- 打开蓝牙适配,初始化蓝牙设备,在每次进行初始化时会将所有状态清空,如果适配器已打开,进入设备查找流程。
openBluetoothAdapter() {
  this.printLog("启动蓝牙适配器...");

  this.setData({
    devices: [],
    connected: false,
    chs: [],
    canWrite: false,
  })

  wx.openBluetoothAdapter({
    success: (res) => {
      this.printLog("蓝牙启动成功,开始进入发现设备");
      this.startBluetoothDevicesDiscovery()
    },
    fail: (res) => {
      this.printInfo("请先打开蓝牙")
      if (res.errCode === 10001) {
        wx.onBluetoothAdapterStateChange(function (res) {
          if (res.available) {
            this.printLog("蓝牙启动成功,开始进入发现设备");
            this.startBluetoothDevicesDiscovery()
          }
        })
      }
    }
  })
}, - 关闭蓝牙设备。
closeBluetoothAdapter() {
  this.printLog("停止扫描");
  wx.closeBluetoothAdapter()
  this.stopBluetoothDevicesDiscovery()
  this._discoveryStarted = false
}, - 开始搜寻附近的蓝牙外围设备。
startBluetoothDevicesDiscovery() {
  if(this._discoveryStarted) {
    this.printLog("已经正在发现设备...")
    return
  }
  this._discoveryStarted = true
  wx.startBluetoothDevicesDiscovery({
    allowDuplicatesKey: true,
    success: (res) => {
      this.printLog("开始发现设备...")
      this.onBluetoothDeviceFound()
    },
  })
}, - 停止搜寻附近的蓝牙外围设备。
stopBluetoothDevicesDiscovery() {
  this.printLog('停止发现设备')
  this._discoveryStarted = false
  wx.stopBluetoothDevicesDiscovery()
}, - 监听寻找到新设备的事件,这里会将所有搜索到的设备显示在列表组件中。
onBluetoothDeviceFound() {
  this.printLog('正在发现设备...')
  wx.onBluetoothDeviceFound((res) => {
    res.devices.forEach(device => {
      if (!device.name && !device.localName) {
        return
      }
      const foundDevices = this.data.devices
      const idx = inArray(foundDevices, 'deviceId', device.deviceId)
      const data = {}

      if (idx === -1) {
        data[`devices[${foundDevices.length}]`] = device
      } else {
        data[`devices[${idx}]`] = device
      }
      this.setData(data)
    })
  })
}, - 在上面的代码是搜索设备的的相关处理函数,接下来分析一下连接设备,以及通信的代码
- 创建连接,如果连接成功,则获取对应设备的所有服务。
bindcreateBLEConnection(e) {
  const ds = e.currentTarget.dataset
  const deviceId = ds.deviceId
  const name = ds.name
  this.printLog("开始连接设备 [" + name + "]")
  wx.createBLEConnection({
    deviceId,
    success: (res) => {
      this.setData({
        connected: true,
        name,
        deviceId,
      })
      this.getBLEDeviceServices(deviceId)
    }
  })
  // this.stopBluetoothDevicesDiscovery()
}, - 获取对应设备的服务, 获取成功,则进行获取某个服务中的特征值。
getBLEDeviceServices(deviceId) {
  this.printLog("获取设备服务: " + deviceId)
  wx.getBLEDeviceServices({
    deviceId,
    success: (res) => {
      for (let i = 0; i < res.services.length; i++) {
        if (res.services[i].isPrimary) {
          this.getBLEDeviceCharacteristics(deviceId, res.services[i].uuid)
          return
        }
      }
    }
  })
}, - 遍历服务中的特征值,特征包括:read,write,notify。
getBLEDeviceCharacteristics(deviceId, serviceId) {
  this.printLog('开始获取设备属性: ' + deviceId + serviceId)
  wx.getBLEDeviceCharacteristics({
    deviceId,
    serviceId,
    success: (res) => {
      this.printLog('成功获取设备属性')
      for (let i = 0; i < res.characteristics.length; i++) {
        let item = res.characteristics[i]
        if (item.properties.read) {
          wx.readBLECharacteristicValue({
            deviceId,
            serviceId,
            characteristicId: item.uuid,
          })
        }
        if (item.properties.write) {
          this.setData({
            canWrite: true
          })
          this._deviceId = deviceId
          this._serviceId = serviceId
          this._characteristicId = item.uuid
          // this.writeBLECharacteristicValue()
        }
        if (item.properties.notify || item.properties.indicate) {
          wx.notifyBLECharacteristicValueChange({
            deviceId,
            serviceId,
            characteristicId: item.uuid,
            state: true,
          })
        }
      }
    },
    fail(res) {
      this.printLog('设备属性获取失败')
    }
  })
}, - 我写的这个demo只介绍发送数据。并且只有只有可写特征的设备才有写数据按钮。发送数据代码。
writeBLECharacteristicValue() {
  var that = this;
  if(this.data.dataType)
  {
    var buffer = stringToBytes(this.data.sendData)
    that.printLog("发送数据:" + this.data.sendData)
    console.log("ascii")
  }
  else
  {
    console.log("hex")
  }

  wx.writeBLECharacteristicValue({
    deviceId: this._deviceId,
    serviceId: this._serviceId,
    characteristicId: this._characteristicId,
    value: buffer,
    success (res) {
      // that.printLog("发送数据:" + that.data.sendData)
      // that.printLog("发送数据成功");
    },
    fail (res) {
      that.printLog("发送数据失败")
    }
  })
}, - 调试信息相关函数
- 在log窗体中显示打印信息。
printLog:function(log) {
  var logs = this.data.logs;
  logs.push(log);
  this.setData({log_list: logs.join('\n')})
}, - 在消息提示框中打印信息。其实这里是对shouToast的封装
printInfo:function(info) {
  wx.showToast({
    title: info,
    icon: 'none',
    duration: 1200,
    mask: true
  })
}, - 打印log时,增加时间戳。
printTimer:function() {
  var timestamp = Date.parse(new Date())
  timestamp = timestamp / 1000;
  var n = timestamp * 1000;
  var date = new Date(n);
  //年
  var Y = date.getFullYear();
  //月
  var M = (date.getMonth() + 1 < 10 ? '0' + (date.getMonth() + 1) : date.getMonth() + 1);
  //日
  var D = date.getDate() < 10 ? '0' + date.getDate() : date.getDate();
  //时
  var h = date.getHours();
  //分
  var m = date.getMinutes();
  //秒
  var s = date.getSeconds();
  this.printLog("当前时间:" +Y+"-"+M+"-"+D+" "+h+":"+m+":"+s)
},
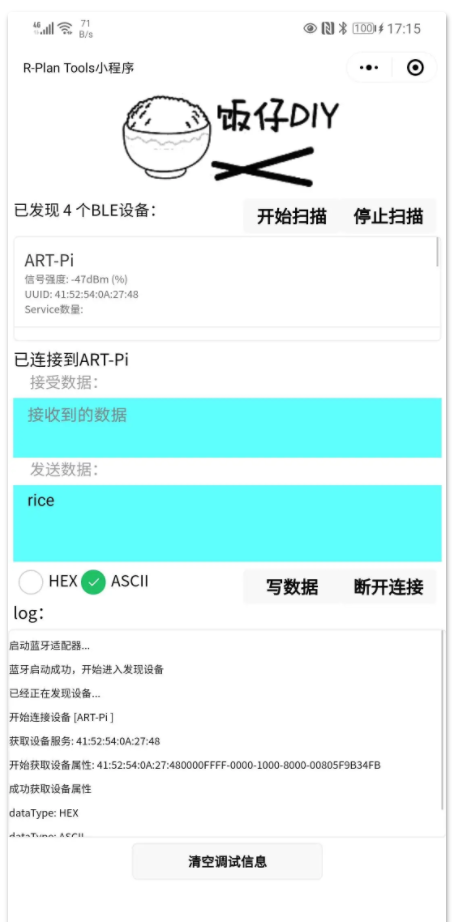
效果:
- 小程序的最终效果,通过发送数据:
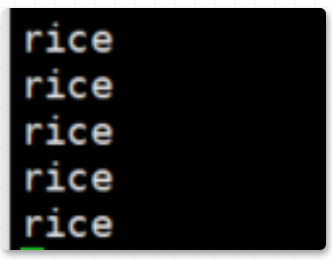
- 设备端的接收到数据打印的log:
注明:
- 上面的代码介绍是BLE基础功能的介绍,对于我的BLE 自动化测试部分的代码没有介绍,因为跟项目相关。不方便,如果有兴趣,欢迎私聊。
关注微信公众号『Rice嵌入式开发技术分享』,后台回复“微信”添加作者微信,备注”入群“,便可邀请进入技术交流群。
推荐阅读

