前言
经过一周多时间的探索,参考了n篇历程,跑通了俩个网络模型,这里记录一下VGG\_16网络模型的部署。全部操作都是在虚拟机的Ubuntu14.04操作系统中完成。
一、搭建系统开发环境
参考官方教程使用矽速科技提供的docker环境进行开发:
方法一,从docker hub下载,需要梯子
sudo docker pull zepan/zhouyi方法二,百度网盘下载
****# 链接:https://pan.baidu.com/s/1yaKB...\_oakdTnqgyn5fg
****# 密码:f8dr
在运行docker指令前需要安装docker,安装过程如下:
1.删除过去安装的docker
sudo apt-get remove docker docker-engine docker.io
2.更新源
 sudo apt-get update
3.安装依赖关系
sudo apt-get install apt-transport-https ca-certificates curl gnupg2 software-properties-common
4.添加信任docker的GPG公钥
curl -fsSL https://download.docker.com/linux/ubuntu/gpg | sudo apt-key add -
5.添加软件仓库
 sudo add-apt-repository \
       "deb [arch=amd64] https://mirrors.tuna.tsinghua.edu.cn/docker-ce/linux/ubuntu \
       $(lsb_release -cs) \
       stable"
6.安装docker
sudo apt-get update
sudo apt-get install docker-ce
参考链接:(https://blog.csdn.net/qq_40423339/article/details/87885086)
gunzip zhouyi_docker.tar.gz
sudo docker load --input zhouyi_docker.tar
下载好docker后即可运行其中的例程测试环境是否正常:
sudo docker run -i -t zepan/zhouyi  /bin/bash
cd ~/demos/tflite
./run_sim.sh
python3 quant_predict.py
二、生成模型文件
在进入docker目前 NN compiler 支持pb,tflite,caffemodel,onnx格式,用户需要先转换自己的模型格式到对应格式
常见预训练模型文件在 github上可以下载:
模型下载地址
下载好预训练的ckpt文件后,转换ckpt到冻结的pb文件, 这里建议使用tf1.13\~1.15之间的版本,然后克隆Tensorflow的models至系统目录下的/tf目录下。
git clone https://github.com/tensorflow/models.gitcd /tf/models-master/models-master/research/slim执行如下操作:
\`# 导出图
python3 export\_inference\_graph.py
--alsologtostderr
--model\_name=vgg\_16
--image\_size=224
--labels\_offset=1 \
--output\_file=/tf/vgg\_16\_inf.pb
执行完后会在/tf下生成vgg\_16\_inf.pb文件。
克隆Tensorflow的tensorflow至系统目录下的/tf目录下:
git clone https://github.com/tensorflow...
cd /tf/tensorflow/tensorflow/python/tools
执行如下操作:
python3 freeze\_graph.py
--input\_graph=/tf/vgg\_16\_inf.pb
--input\_checkpoint=/tf/vgg\_16.ckpt
--input\_binary=true
--output\_node\_names= vgg\_16/fc8/BiasAdd
--output\_graph=/tf/vgg\_16\_frozen.pb
执行完后会在\tf下生成vgg\_16\_frozen.pb文件。
三、准备量化矫正数据集
从以下链接下载1000张不同的图片:
imagenet-sample-images
我的文件是放在/root/demos/pb/dataset下。
然后执行如下操作:
ls imagenet-sample-images | sort > image.txt
seq 0 999 > label.txt
paste -d ' ' image.txt label.txt > imagelabel.txt
得到每行都是"图片路径 label"的imagelabel.txt文件。
修改 demos/pb/dataset/ 里的 preprocess\_dataset.py文件。
img_dir='./imagenet-sample-images-master/'
label_file='./imagelabel.txt'

#RESNET PARAM
input_height=224
input_width=224
input_channel = 3
mean = [127.5, 127.5, 127.5]
var = 1
执行:python3 preprocess_dataset.py后生成 dataset.npy 和 label.npy 文件。四、生成input.bin文件和output\_ref.bin文件
修改demos/pb/config/ 里的 gen\_inputbin.py 文件。
input_height=224
input_width=224
input_channel = 3
mean = [127.5, 127.5, 127.5]
var = 1
将dataset/img/ILSVRC2012\_val\_00000003.JPEG图片复制demos/pb/config中,改名为1.jpg,然后执行以下命令:
python3 gen_inputbin.py得到input.bin文件。
output\_ref.bin文件使用了docker例程自带的,没有自己生成,目前不太清楚怎么生成,这里的1.jpg生成的input.bin是刚好与自带的output\_ref.bin对应的,如果更换测试图片可能需要修改output\_ref.bin文件。
五、编辑NN compiler配置文件
在得到pb和校准数据集后,我们就可以编辑NN编译器的配置文件来生成AIPU的可执行文件,这里主要是仿真实验,所以选择修改demos/pb/config里的resnet\_50\_run.cfg文件将其改名为vgg\_16\_run.cfg。
[Common]
mode=run

[Parser]
model_name = vgg_16
detection_postprocess =
model_domain = image_classification
output = vgg_16/fc8/squeezed
input_model = vgg_16_frozen.pb
input = input
input_shape = [1,224,224,3]

[AutoQuantizationTool]
model_name = vgg_16
quantize_method = SYMMETRIC
ops_per_channel = DepthwiseConv
calibration_data = dataset.npy
calibration_label =label.npy
preprocess_mode = normalize
quant_precision=int8
reverse_rgb = False
label_id_offset = 0

[GBuilder]
inputs=input.bin
simulator=aipu_simulator_z1
outputs=output_vgg_16.bin
profile= True
target=Z1_0701
我是将所有配置文件中提及的文件都放在了demos/pb/config中,然后运行如下指令:
aipubuild vgg_16_run.cfg执行后会生成output\_vgg\_16.bin文件。
执行过程如下:
[I] [Parser]: Parser done!
[I] Parse model complete
[I] Quantizing model....
[I] AQT start: model_name:vgg_16, calibration_method:MEAN, batch_size:1
[I] ==== read ir ================
[I]     float32 ir txt: /tmp/AIPUBuilder_1627468133.4193144/vgg_16.txt
[I]     float32 ir bin2: /tmp/AIPUBuilder_1627468133.4193144/vgg_16.bin
[I] ==== read ir DONE.===========
WARNING:tensorflow:From /usr/local/bin/aipubuild:8: The name tf.placeholder is deprecated. Please use tf.compat.v1.placeholder instead.

WARNING:tensorflow:From /usr/local/bin/aipubuild:8: The name tf.nn.max_pool is deprecated. Please use tf.nn.max_pool2d instead.

[I] ==== auto-quantization ======
WARNING:tensorflow:From /usr/local/bin/aipubuild:8: tf_record_iterator (from tensorflow.python.lib.io.tf_record) is deprecated and will be removed in a future version.
Instructions for updating:
Use eager execution and:
`tf.data.TFRecordDataset(path)`
WARNING:tensorflow:Entity <bound method ImageNet.data_transform_fn of <AIPUBuilder.AutoQuantizationTool.auto_quantization.data_set.ImageNet object at 0x7fda9b4f6940>> could not be transformed and will be executed as-is. Please report this to the AutoGraph team. When filing the bug, set the verbosity to 10 (on Linux, `export AUTOGRAPH_VERBOSITY=10`) and attach the full output. Cause: <cyfunction ImageNet.data_transform_fn at 0x7fdb0a7b8f60> is not a module, class, method, function, traceback, frame, or code object
WARNING:tensorflow:From /usr/local/lib/python3.6/dist-packages/tensorflow_core/python/autograph/impl/api.py:330: The name tf.FixedLenFeature is deprecated. Please use tf.io.FixedLenFeature instead.

WARNING:tensorflow:From /usr/local/lib/python3.6/dist-packages/tensorflow_core/python/autograph/impl/api.py:330: The name tf.parse_single_example is deprecated. Please use tf.io.parse_single_example instead.

WARNING:tensorflow:From /usr/local/lib/python3.6/dist-packages/tensorflow_core/python/framework/func_graph.py:915: The name tf.image.resize_images is deprecated. Please use tf.image.resize instead.

WARNING:tensorflow:From /usr/local/bin/aipubuild:8: DatasetV1.make_one_shot_iterator (from tensorflow.python.data.ops.dataset_ops) is deprecated and will be removed in a future version.
Instructions for updating:
Use `for ... in dataset:` to iterate over a dataset. If using `tf.estimator`, return the `Dataset` object directly from your input function. As a last resort, you can use `tf.compat.v1.data.make_one_shot_iterator(dataset)`.
WARNING:tensorflow:From /usr/local/bin/aipubuild:8: The name tf.global_variables_initializer is deprecated. Please use tf.compat.v1.global_variables_initializer instead.

WARNING:tensorflow:From /usr/local/bin/aipubuild:8: The name tf.local_variables_initializer is deprecated. Please use tf.compat.v1.local_variables_initializer instead.


[I]     step1: get max/min statistic value DONE
[I]     step2: quantization each op DONE
[I]     step3: build quantization forward DONE
[I]     step4: show output scale of end node:
[I]         layer_id: 22, layer_top:vgg_16/fc8/squeezed_0, output_scale:[5.831289]
[I] ==== auto-quantization DONE =
[I] Quantize model complete
[I] Building ...
[I] [common_options.h: 276] BuildTool version: 4.0.175. Build for target Z1_0701 at frequency 800MHz
[I] [common_options.h: 297] using default profile events to profile AIFF

[I] [IRChecker] Start to check IR: /tmp/AIPUBuilder_1627468133.4193144/vgg_16_int8.txt
[I] [IRChecker] model_name: vgg_16
[I] [IRChecker] IRChecker: All IR pass
[I] [graph.cpp : 846] loading graph weight: /tmp/AIPUBuilder_1627468133.4193144/vgg_16_int8.bin size: 0x83fc860
[I] [builder.cpp:1059] Total memory for this graph: 0x9098c90 Bytes
[I] [builder.cpp:1060] Text   section:    0x0000fb90 Bytes
[I] [builder.cpp:1061] RO     section:    0x00001700 Bytes
[I] [builder.cpp:1062] Desc   section:    0x00002000 Bytes
[I] [builder.cpp:1063] Data   section:    0x083f6800 Bytes
[I] [builder.cpp:1064] BSS    section:    0x00c4ee00 Bytes
[I] [builder.cpp:1065] Stack         :    0x00040400 Bytes
[I] [builder.cpp:1066] Workspace(BSS):    0x00310000 Bytes
[I] [main.cpp  : 467] # autogenrated by aipurun, do NOT modify!
LOG_FILE=log_default
FAST_FWD_INST=0
INPUT_INST_CNT=1
INPUT_DATA_CNT=2
CONFIG=Z1-0701
LOG_LEVEL=0
INPUT_INST_FILE0=/tmp/temp_721a386a133a26065c82c7d13368a.text
INPUT_INST_BASE0=0x0
INPUT_INST_STARTPC0=0x0
INPUT_DATA_FILE0=/tmp/temp_721a386a133a26065c82c7d13368a.ro
INPUT_DATA_BASE0=0x10000000
INPUT_DATA_FILE1=/tmp/temp_721a386a133a26065c82c7d13368a.data
INPUT_DATA_BASE1=0x20000000
OUTPUT_DATA_CNT=2
OUTPUT_DATA_FILE0=output_vgg_16.bin
OUTPUT_DATA_BASE0=0x29228800
OUTPUT_DATA_SIZE0=0x3e8
OUTPUT_DATA_FILE1=profile_data.bin
OUTPUT_DATA_BASE1=0x28846c00
OUTPUT_DATA_SIZE1=0x300
RUN_DESCRIPTOR=BIN[0]

[I] [main.cpp  : 118] run simulator:
aipu_simulator_z1 /tmp/temp_721a386a133a26065c82c7d13368a.cfg
[INFO]:SIMULATOR START!
[INFO]:========================================================================
[INFO]:                             STATIC CHECK
[INFO]:========================================================================
[INFO]:  INST START ADDR : 0x0(0)
[INFO]:  INST END ADDR   : 0xfb8f(64399)
[INFO]:  INST SIZE       : 0xfb90(64400)
[INFO]:  PACKET CNT      : 0xfb9(4025)
[INFO]:  INST CNT        : 0x3ee4(16100)
[INFO]:------------------------------------------------------------------------
[WARN]:[0803] INST WR/RD REG CONFLICT! PACKET 0x1c4: 0x472021b(POP R27,Rc7) vs 0x5f00000(MVI R0,0x0,Rc7), PACKET:0x1c4(452) SLOT:0 vs 3
[WARN]:[0803] INST WR/RD REG CONFLICT! PACKET 0x1d1: 0x472021b(POP R27,Rc7) vs 0x5f00000(MVI R0,0x0,Rc7), PACKET:0x1d1(465) SLOT:0 vs 3
[WARN]:[0803] INST WR/RD REG CONFLICT! PACKET 0x336: 0x472021b(POP R27,Rc7) vs 0x9f80020(ADD.S R0,R0,0x1,Rc7), PACKET:0x336(822) SLOT:0 vs 3
[WARN]:[0803] INST WR/RD REG CONFLICT! PACKET 0x4d3: 0x4520180(BRL R0) vs 0x47a03e5(ADD R5,R0,R31,Rc7), PACKET:0x4d3(1235) SLOT:0 vs 3
[INFO]:========================================================================
[INFO]:                             STATIC CHECK END
[INFO]:========================================================================

[INFO]:AIPU START RUNNING: BIN[0]
[INFO]:TOTAL TIME: 21.110196s.
[INFO]:SIMULATOR EXIT!
[I] [main.cpp  : 135] Simulator finished.
Total errors: 0,  warnings: 0
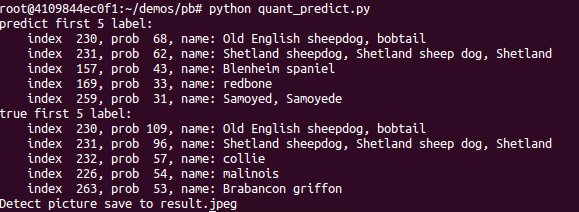
六、验证仿真结果
修改demos/pb/config/ 里的 quant\_predict.py 文件。修改内容如下:
outputfile = current_dir + '/output_vgg_16.bin'
npyoutput = np.fromfile(outputfile, dtype=np.int8)
运行:
python3 quant_predict.py得到如下对比结果:
附录
配置文件:
链接:https://pan.baidu.com/s/19\_8a7OovQycfm2QwOH\_AjQ
提取码:grqu


