写在前面的话
基于串口的指令调试总是作为基础功能出现在各个项目中。而这一小小的功能却已经包括了中断注册,回调函数,互斥量等嵌入式系统基本的软件逻辑。本文将从以下两个方面介绍XR806 SDK中Console系统。
- Console初始化流程
- 添加自定义指令
Console初始化流程
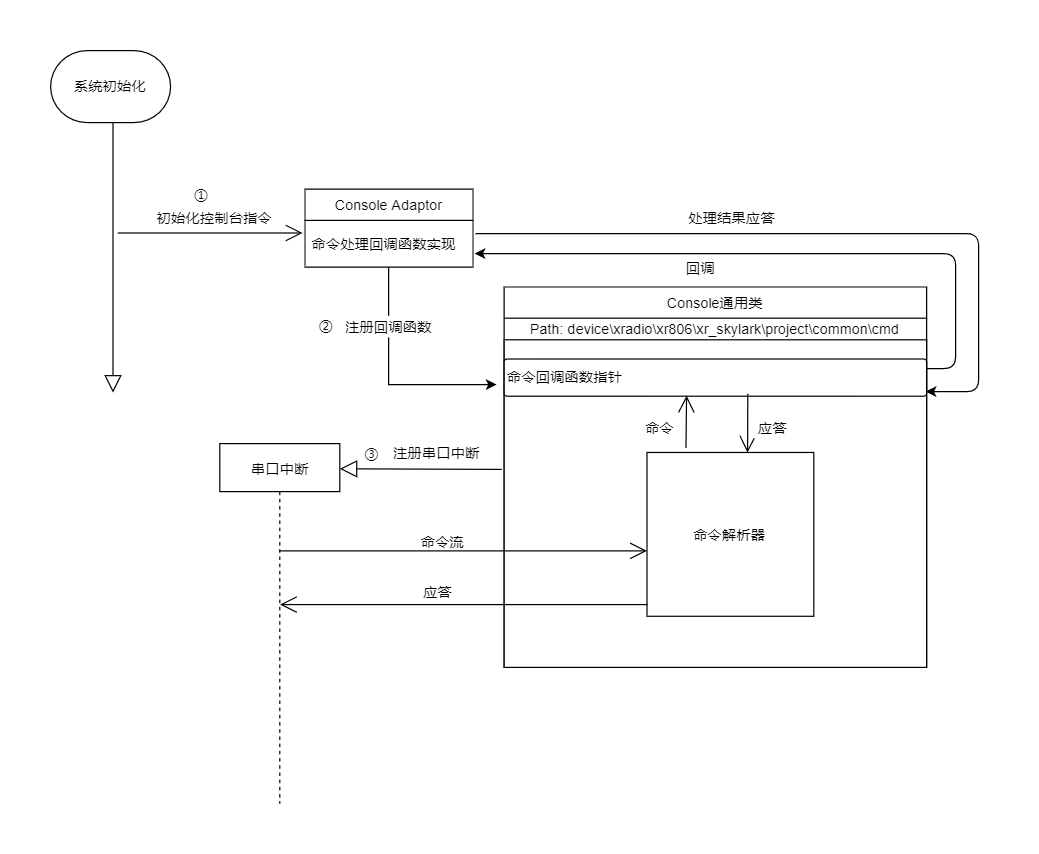
一个Console系统会包含指令的解析和指令处理两个部分。
指令解析部分几乎都是C语言的代码,并且可以做到跨平台通用,但指令处理部分会视不同平台有不一样的实现方法。所以很容易想到将他们两者分离,通过回调函数的方式进行调用。
如上图所示,开机过程会有初始化一个Console Adapter的操作,后者会向命令解析类注册回调函数(或者回调结构体),这类函数往往会以不同的指令头做区分,比如现有的代码中:
tatic const struct cmd_data g_main_cmds[] = {
    { "hm", cmd_hm_exec },
#if PRJCONF_NET_EN
    { "net", cmd_net_exec },
    { "rf", cmd_rf_exec },
    { "lmac", cmd_lmac_exec },
#endif
    ...
};hm指令大家应该不陌生,Wifi连接的指令就是hm net sta enable
注册好回调函数后,Console解析类会在启动的时候注册串口回调函数,以实现对串口数据的监控。
device\xradio\xr806\xr_skylark\src\console\console.c
HAL_UART_EnableRxCallback(console->uart_id, console_rx_callback, uart);
接下来的操作就变成:
- 串口回调函数收到消息
- 收到换行符后,通知命令解析器做处理
- 命令解析器根据指令头部,选择回调函数
- 回调函数做进一步的实现。
如何添加自定义指令
/**
 * Cmd List:
 * user set value [int]
 * user get value
 *
 */
这两条指令用于设置一个变量的值以及取回一个变量的值
参考device\xradio\xr806\adapter\console\src\command.c中的命令结构体,可以添加一行自定义的指令
我们定义两条指令:
static const struct cmd_data g_main_cmds[] = {
    { "hm", cmd_hm_exec },
#if PRJCONF_NET_EN
    { "net", cmd_net_exec },
    { "rf", cmd_rf_exec },
    { "lmac", cmd_lmac_exec },
#endif
    ...
#ifdef CONFIG_BTSNOOP
    { "btsnoop", cmd_btsnoop_exec },
#endif
    { "user", cmd_app_user_exec},  // <==== Add Here
};接着,新建cmd_app_user.c和cmd_app_user.h文件,定义及实现回调函数
enum cmd_status cmd_app_user_exec(char *cmd);使用Console自带的解析函数可以一串指令以空格分隔
int cmd_parse_argv(char *cmd, char *argv[], int size)有了指令个数和每一条指令,我们就可以对不同的指令做响应
    if (ret == 3) {
        if (strcmp(argv[0], "set") == 0) {
            // handle set
            int tmp;
            sscanf(argv[2], "%d", &tmp);
            cmd_app_user_set_value(tmp);
            HMCMD_DBG("current user value set: %d\n", cmd_app_user_get_value());
            return CMD_STATUS_OK;
        }
    } else if (ret == 2){
        if (strcmp(argv[0], "get") == 0){
            HMCMD_DBG("current user value get: %d\n", cmd_app_user_get_value());
            return CMD_STATUS_OK;
        }
    }
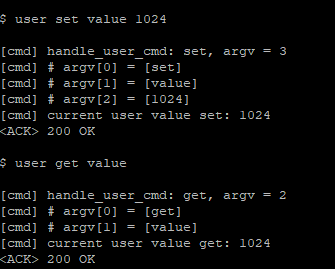
代码编写完成后烧录,打开Putty验证功能。
FAQ
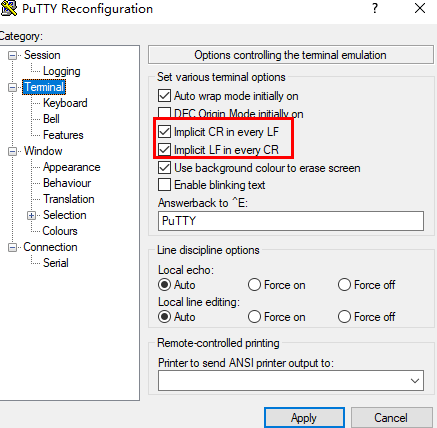
使用Putty通信的时候发现显示不正常
Putty官方文档是这样描述的:
4.3.3 ‘Implicit CR in every LF’
Most servers send two control characters, CR and LF, to start a new line of the screen. The CR character makes the cursor return to the left-hand side of the screen. The LF character makes the cursor move one line down (and might make the screen scroll).

Some servers only send LF, and expect the terminal to move the cursor over to the left automatically. If you come across a server that does this, you will see a stepped effect on the screen, like this:

First line of text
                  Second line
                             Third line
If this happens to you, try enabling the ‘Implicit CR in every LF’ option, and things might go back to normal:

First line of text
Second line
Third line
因此勾选以下两个选项即可


