本文基于wsl2搭建的ubuntu18.04 + vscode编辑器~~~~
linux小白从零开始的XR806体验 1.环境配置篇(详细说明我遇到的坑)
linux小白从零开始的XR806体验 2.使用vscode连接wsl搭建的ubuntu环境
在各位优秀工程师产出的指导博客的帮助下,我终于完成了官方3个demo的测试,完成了第一步输出hello word。
记录一下,同时说明下编译demo可能会遇到的问题,希望对你有所帮助(整理自试用群)
1编译我的第一个demo
请确保你已经走到了官方教程中hb build -f这一步。
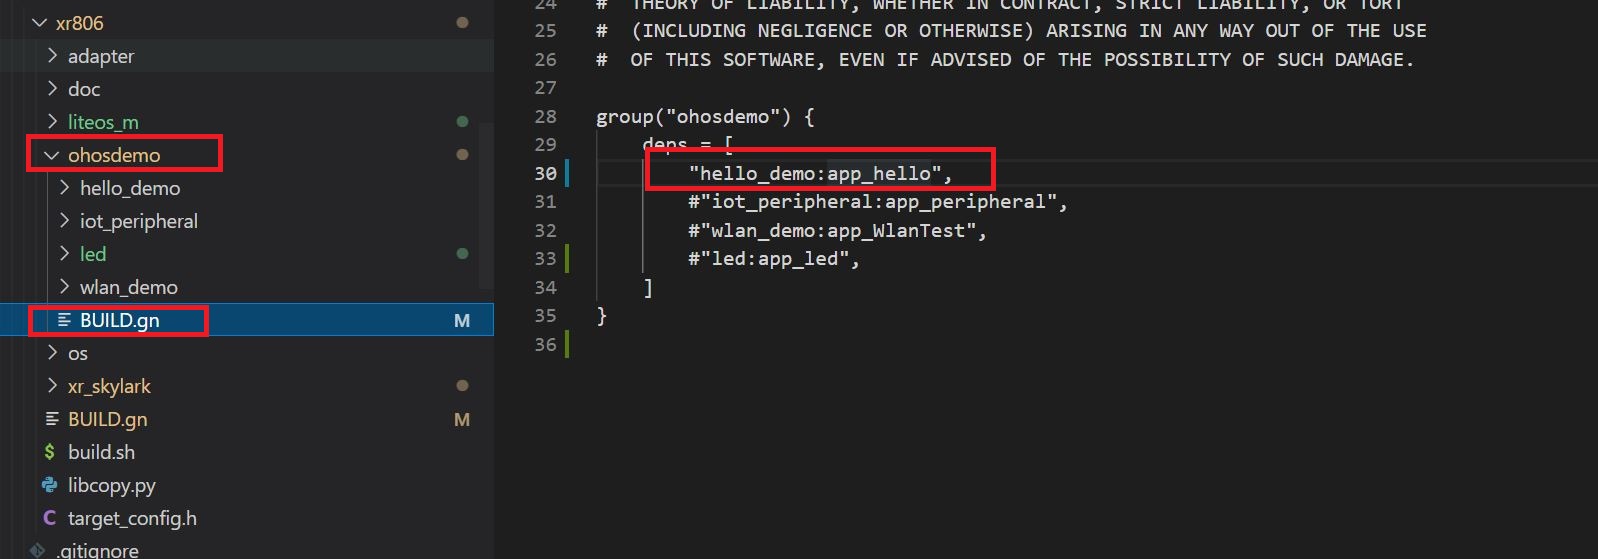
1.首先打开ohosdemo文件夹,打开BUILD.gn文件
2.去掉"hello_demo:app_hello"前的#号(如上图所示。#表示注释)
完成这一步,实际上就可以编译了,不过在此之前,我想先说一个对小白有帮助的概念,(大佬完全没必要看我的这篇教程吧~~ )
hello_demo:app_hello这行什么意思?
hello_demo:我们hello-world这里例程所属的文件夹
app_hello:这是hello_demo文件下内的build.gn里的内容,如下图
3.直接hb build -f编译了就可以了
4.烧录
在前面用vscode连接wsl教程里,我已经对ubuntu的进行了硬盘映射,所以我现在只需要像打开C盘,D盘一样,打开Ubuntu盘,按照路径找到我编译好的文件就可以了
Z:\home\shaon\device\xradio\xr806\xr_skylark\out
在out文件夹中找到xr_system.img,这个就是我们的编译文件,
然后在tools文件夹中找到phoenixMC_v3.1.21014b.exe
Z:\home\shaon\device\xradio\xr806\xr_skylark\tools
**上面的编译好的固件,和烧录工具,我都拷贝到外面了
烧录完毕后,你就可以打开串口调试助手,波特率选择115200,就可以看到hello world 啦
之后,去尝试编译其他demo,也是一样
编译其他demo可能会遇到问题
1.bin文件flash重叠
图片中,bin1的结束地址是0x18c00,而bin2的起始地址是0x17c00
bin2的起始地址应该大于0x18c00,所以导致报错,
解决方式:
按照上图路径,删除image.cfg,将image_auto_cal.cfg改成为image.cfg
或者赋值image_auto_cal.cfg里面的所有内容,替换到image.cfg内。
2.未安装32位支持库导致的编译报错,错误如下图所示
大佬发言👆👆👆
这个问题我没有遇到,群众有人遇到并解决了,所以我整理出来供大家参考
大佬提供的解决方式:
`sudo apt install qemu-user-static
sudo update-binfmts \ --install i386 /usr/bin/qemu-i386-static \ --magic \ '\x7fELF\x01\x01\x01\x03\x00\x00\x00\x00\x00\x00\x00\x00\x03\x00\x03\x00\x01\x00\x00\x00' \ --mask \ '\xff\xff\xff\xff\xff\xff\xff\xfc\xff\xff\xff\xff\xff\xff\xff\xff\xf8\xff\xff\xff\xff\xff\xff\xff'
sudo service binfmt-support start`
2.点亮板子上的led
2.1 在ohosdemo下新建一个led文件夹,将iot_peropheral这个demo内的所有内容赋值到led内
2.2分别修改两个BUILD.gn文件
修改led文件夹内的BUILD.gn将static_library("app_peripheral") 改成static_library("app_led")
这个名字你们可以自定义,之后和下一步对应就可以了
修改ohosdemo下的BUILD.gn文件,注释前面的demo,增加新的一行"led:app_led",上面解释过为什么这么写,忘了可以往上翻翻
2.3修改main.c
官方已经提供了参考例程,在我这里就是参考test_gpio.c(其实就是抄了)
参考参考,然后复制到mian.c内,
别忘了include GPIO相关的头文件
#include "iot_gpio.h"
看原理图,知道了小灯的IO口是21
下面贴我的mian文件内的代码
#include <stdio.h>
#include "ohos_init.h"
#include "kernel/os/os.h"
#include "iot_gpio.h"

#define GPIO_ID_PA21 21

static uint32_t g_irqCnt = 0;

static OS_Thread_t g_main_thread;

static void MainThread(void *arg)
{
    unsigned int gpio_id = GPIO_ID_PA21; /* GPIOA_PIN21 */
    unsigned int gpio_cnt = 0;

    IotGpioDir dir;

    printf("gpio%d output test start\r\n", gpio_id);
    IoTGpioInit(gpio_id);
    IoTGpioSetDir(gpio_id, IOT_GPIO_DIR_OUT);
    IoTGpioGetDir(gpio_id, &dir);
    printf("gpio%d getdir %d\r\n", gpio_id, dir);

    while (1) {
        printf("gpio%d output value hign\r\n", gpio_id);
        IoTGpioSetOutputVal(gpio_id, 1);
        OS_MSleep(500);
        printf("gpio%d output value low\r\n", gpio_id);
        IoTGpioSetOutputVal(gpio_id, 0);
        OS_MSleep(500);

        if (gpio_cnt++ >= 10) {
            break;
        }
    }

    IoTGpioDeinit(gpio_id);
    printf("gpio%d output test end\r\n", gpio_id);

}

void PeripheralTestMain(void)
{
    printf("\r\nPeripheral Test Start\r\n");

    if (OS_ThreadCreate(&g_main_thread, "MainThread", MainThread, NULL,
                OS_THREAD_PRIO_APP, 4 * 1024) != OS_OK) {
        printf("[ERR] Create MainThread Failed\n");
    }
}

SYS_RUN(PeripheralTestMain);
上面的程序中,PA21对应的值是21,那我假如想要换个IO口初始化,那这个IO口对应的值是多少?去哪里查?
在iot_gpio.c中可以看到
/home/shaon/device/xradio/xr806/adapter/hals/iot_hardware/wifiiot_lite/iot_gpio.c


typedef enum {
    GPIOA_PIN0 = 0,
    GPIOA_PIN1 = 1,
    GPIOA_PIN2 = 2,
    GPIOA_PIN3 = 3,
    GPIOA_PIN4 = 4,
    GPIOA_PIN5 = 5,
    GPIOA_PIN6 = 6,
    GPIOA_PIN7 = 7,
    GPIOA_PIN8 = 8,
    GPIOA_PIN9 = 9,
    GPIOA_PIN10 = 10,
    GPIOA_PIN11 = 11,
    GPIOA_PIN12 = 12,
    GPIOA_PIN13 = 13,
    GPIOA_PIN14 = 14,
    GPIOA_PIN15 = 15,
    GPIOA_PIN16 = 16,
    GPIOA_PIN17 = 17,
    GPIOA_PIN18 = 18,
    GPIOA_PIN19 = 19,
    GPIOA_PIN20 = 20,
    GPIOA_PIN21 = 21,
    GPIOA_PIN22 = 22,
    GPIOA_PIN23 = 23,
    GPIOA_PIN_MAX = GPIOA_PIN23,

    GPIOB_PIN0 = 24,
    GPIOB_PIN1 = 25,
    GPIOB_PIN2 = 26,
    GPIOB_PIN3 = 27,
    GPIOB_PIN4 = 28,
    GPIOB_PIN5 = 29,
    GPIOB_PIN6 = 30,
    GPIOB_PIN7 = 31,
    GPIOB_PIN8 = 32,
    GPIOB_PIN9 = 33,
    GPIOB_PIN10 = 34,
    GPIOB_PIN11 = 35,
    GPIOB_PIN12 = 36,
    GPIOB_PIN13 = 37,
    GPIOB_PIN14 = 38,
    GPIOB_PIN15 = 39,
    GPIOB_PIN16 = 40,
    GPIOB_PIN17 = 41,
    GPIOB_PIN18 = 42,
    GPIO_PIN_MAX
} IotGpioID;
最后,编译一下,烧录
3.做一盏呼吸灯
3.1直接将上的led复制下来,命名为pwm_led
3.2参考test_pwm.c文件中,pwm的用法
相关函数:
    IoTPwmInit(pwm_channl);
    IoTPwmStart(pwm_channl, pwm_duty_ratio, pwm_freq);
这里需要查询相应引脚的pwm值,PA21对应的pwm_channl=2
pwm_duty_ratio:占空比
pwm_freq:频率
上程序:
main.c
#include <stdio.h>
#include "ohos_init.h"
#include "kernel/os/os.h"
#include "iot_gpio.h"
#include "iot_pwm.h"


#define GPIO_ID_PA21 21

static uint32_t g_irqCnt = 0;

static OS_Thread_t g_main_thread;

static void MainThread(void *arg)
{
    unsigned int gpio_id = GPIO_ID_PA21; /* GPIOA_PIN21 */
    unsigned int pwm_delay_cnt = 0;
    unsigned int pwm_channl = 2;
    unsigned int pwm_duty_ratio = 20;
    unsigned int pwm_freq = 10000;

    printf("pwm test ch%d start\r\n", pwm_channl);
    printf("pwm ch%d output duty ratio = %d, freq = %d\r\n", pwm_channl,
           pwm_duty_ratio, pwm_freq);
    IoTGpioInit(gpio_id);//IO口初始化
    IoTGpioSetDir(gpio_id, IOT_GPIO_DIR_OUT); //设置IO口为输出
    IoTPwmInit(pwm_channl);  //初始化该IO口的PWM功能


    while (1) {
            //亮到暗
            for (int i = 0; i < pwm_duty_ratio; i++)
            {
                IoTPwmStart(pwm_channl, i, pwm_freq);
                OS_MSleep(100);
            }
                //暗到亮
            for (int i = pwm_duty_ratio; i > 0; i--) {
                IoTPwmStart(pwm_channl, i, pwm_freq);
                OS_MSleep(100);
            }

    }


}

void PeripheralTestMain(void)
{
    printf("\r\nPWM LED TEST\r\n");

    if (OS_ThreadCreate(&g_main_thread, "MainThread", MainThread, NULL,
                OS_THREAD_PRIO_APP, 4 * 1024) != OS_OK) {
        printf("[ERR] Create MainThread Failed\n");
    }
}

SYS_RUN(PeripheralTestMain);
pwm_led文件夹内build.gn
static_library("app_pwmled") {
   configs = []

   sources = [
      "src/main.c",
      "src/test_flash.c",
      "src/test_gpio.c",
      "src/test_i2c.c",
      "src/test_lowpower.c",
      "src/test_pwm.c",
      "src/test_reset.c",
      "src/test_uart.c",
      "src/test_watchdog.c",
   ]

   cflags = board_cflags

   include_dirs = board_include_dirs
   include_dirs += [
      "//kernel/liteos_m/kernel/arch/include",
      "include",
      "//base/iot_hardware/peripheral/interfaces/kits",
   ]
}
外部build.gn
group("ohosdemo") {
    deps = [
        #"hello_demo:app_hello",
        #"iot_peripheral:app_peripheral",
        #"wlan_demo:app_WlanTest",
        #"led:app_led",
        "pwm_led:app_pwmled",
    ]
}
呼吸灯就都差不多,就不传视频了,大家脑部一下。哈哈哈


