简介
申请到XR806开发板很高兴,因为它可以基于鸿蒙L0系统下开发。在试用中,这个开发板的编译环境的搭建,程序的编写,都走很多的弯路,遇到了很多的坑。编译环境的搭建就用了很长的时间。也谢谢群里的大佬的帮助和极术小姐姐的鼓励,才能完成这次测试。
编译环境
Windows下安装VMware虚拟机,虚拟机中安装Ubuntu20.04.2 64位桌面版。搭建教程是参考的【XR806开发板试用】shell脚本一键配置XR806开发环境。
总线舵机说明
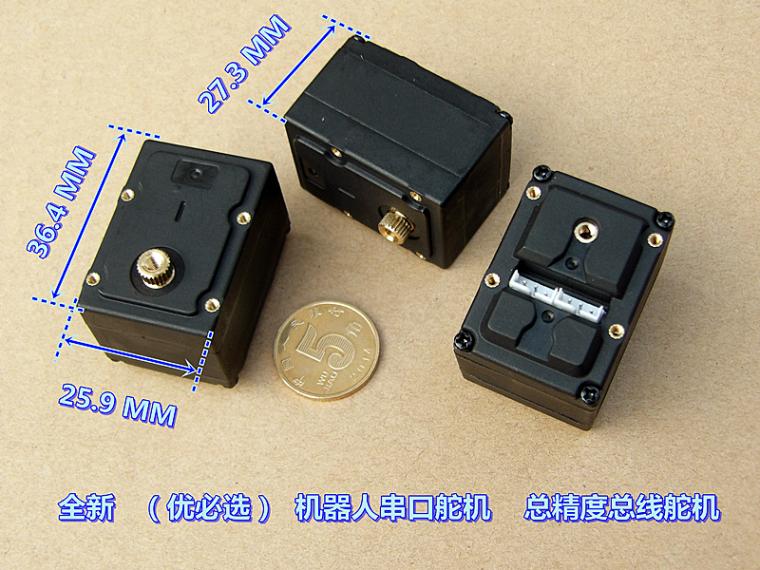
总线舵机:
舵机参数说明
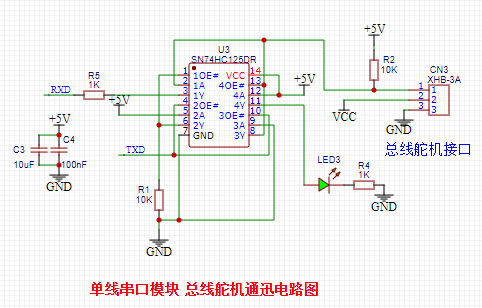
总线舵机是通过单线收发串口数据,通过之前做的RT-PI的扩展板实现。电路如图
工作原理
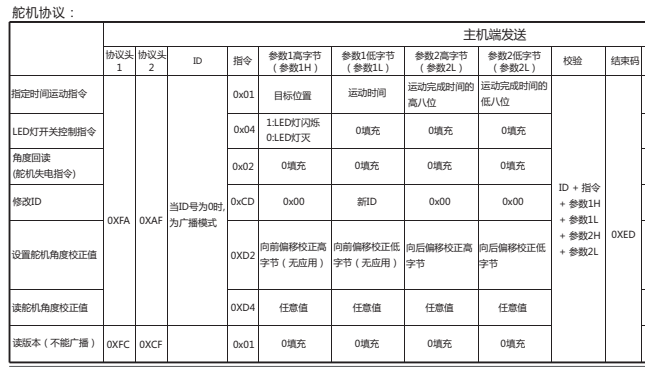
XR806通过UART1串口发送十位十六进制的数据,扩展板将串口数据转换为单线串口和舵机通讯,完成总线舵机的控制。
舵机数据协议图
程序说明
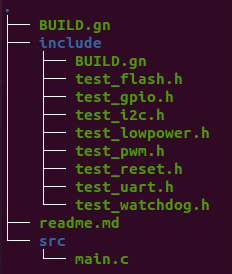
程序结构图
1.ohosdemo文件夹下的BUILD.gn文件
 group("ohosdemo"){
    deps = [
       #"TD-LED:app_TDLED",
       "uart_demo:app_uart",
      #"LED:app_led",
      # "hello_demo:app_hello",
        ]
        }
2.uart_demo文件夹下的BUILD.gn文件
  import("//device/xradio/xr806/liteos_m/config.gni")

    static\_library("app\_uart") {
      configs = \[\]

    sources = \[

      "src/main.c",
      #"src/test_flash.c",
      #"src/test_gpio.c",
      #"src/test_i2c.c",
      #"src/test_lowpower.c",
      #"src/test_pwm.c",
      #"src/test_reset.c",
      #"src/test_uart.c",
      #"src/test_watchdog.c",

     \]

     cflags = board\_cflags

     include\_dirs = board\_include\_dirs
     include\_dirs += \[

      "//kernel/liteos_m/kernel/arch/include",
      "include",
      "//base/iot_hardware/peripheral/interfaces/kits",

     \]
     }
3.uart_demo/src/main.c代码如下
#include <stdio.h>
#include "ohos\_init.h"
#include "kernel/os/os.h"
#include <string.h>
#include "iot\_uart.h"
#include "driver/chip/hal\_uart.h"
#define UARTID UART1\_ID
#define UART\_BUFFER\_MAXSIZE 50
#define UART\_RECEIVE\_DATALED 30
const uint8\_t play\_Buffer\[10\] = {0xFA,0xAF,0x00,0x01,0x96,0x00,0x00,0x00,0x97,0xED};
const uint8\_t play\_Buffer1\[10\] = {0xFA,0xAF,0x00,0x01,0x00,0x00,0x00,0x00,0x01,0xED};
static OS\_Thread\_t g\_main\_thread;
static int uart\_init(void)
{
HAL_Status status = HAL_ERROR;
UART_InitParam param;
param.baudRate = 115200; // 波特率为115200
param.dataBits = UART_DATA_BITS_8;
param.stopBits = UART_STOP_BITS_1;
param.parity = UART_PARITY_NONE;
param.isAutoHwFlowCtrl = 0;
status = HAL_UART_Init(UARTID, ¶m);
if (status != HAL_OK)
printf("uart init error %d\n", status);
return status;
}
static void MainThread(void \*arg)
{
unsigned char uart_buffer[UART_BUFFER_MAXSIZE];
uart_init();
while (1) {
HAL_UART_Transmit_Poll(UARTID, (uint8_t *)play_Buffer, 10);
LOS_Msleep(2000);
HAL_UART_Transmit_Poll(UARTID, (uint8_t *)play_Buffer1, 10);
LOS_Msleep(2000);
}
}
void UARTMain(void)
{
printf("UART Test Start\\n");
if (OS\_ThreadCreate(&g\_main\_thread, "MainThread", MainThread, NULL,
OS_THREAD_PRIO_APP, 4 * 1024) != OS_OK) {
printf("[ERR] Create MainThread Failed\n");
}
}
SYS\_RUN(UARTMain); // Harmony线程入口 


