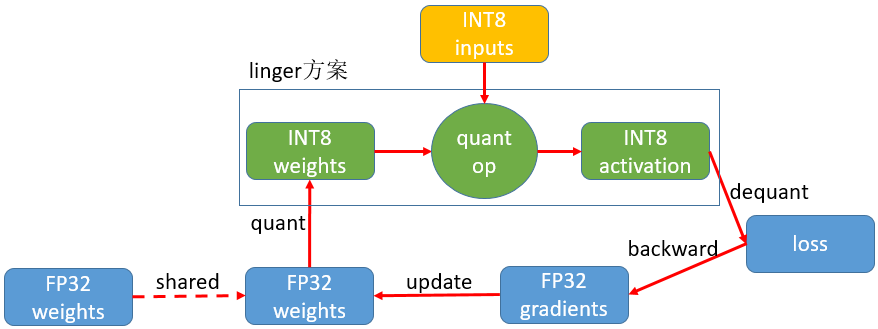
LLN是聆思科技开发的一种端到端的训练推理一体化工具,我们可以使用它来进行模型的量化训练和推理引擎部署。
一、初识工具链
- 量化训练组件
linger - 推理部署工具
thinker注意:目前LNN工具箱仅支持CSK6硬件平台。工具链目前也只能在Linux平台上运行,个人建议使用Ubuntu系统。
二、技术亮点
- 轻量级部署
- 闭环量化生态
- 高效开发
三、如何上手?
- 获取开发板
- 安装(配置)开发环境
- 训练模型
- 打包,部署
- 测试
四、linger和thinker环境安装
因为个人电脑的原因(配置比较低)只能使用docker环境来进行开发,采用的环境是CPU版本的。因此本文只介绍docker环境下CPU版本的工具链使用的各种相关操作,有其他需求的朋友请查看官方文档。 https://docs2.listenai.com/x/0m4Dxp7Ag
- 1、方案原理
- 2、安装docker(Ubuntu18.04)
2.1更新软件包
sudo apt updatesudo apt upgrade2.2安装docker依赖
apt-get install ca-certificates curl gnupg lsb-release2.3添加docker官方GPG秘钥
curl -fsSL http://mirrors.aliyun.com/docker-ce/linux/ubuntu/gpg | sudo apt-key add -2.4添加docker软件源
sudo add-apt-repository "deb [arch=amd64] http://mirrors.aliyun.com/docker-ce/linux/ubuntu $(lsb_release -cs) stable"2.5 安装docker
apt-get install docker-ce docker-ce-cli containerd.io2.6配置用户组
sudo usermod -aG docker $USER2.7运行docker
systemctl start docker2.8查看docker版本
sudo docker version

3.安装linger,使用cpu版本
sudo docker pull listenai/linger:1.1.1 #纯cpu版本镜像
运行镜像实例:
docker container run -it listenai/linger:1.1.1 /bin/bash4.安装thinker
sudo docker pull listenai/thinker:2.1.1运行镜像实例:
docker container run -it listenai/thinker:2.1.1 /bin/bash五、训练
5.1 浮点训练
下载数据集,
https://github.com/weiaicunzai/pytorch-cifar100- 5.2 使用VSCode打开项目工程,修改
train.py文件,注释第23行的tensorboard代码,(使用#注释)
from torch.utils.tensorboard import SummaryWriter- 5.3接着注释48-52行代码
# for name, para in last_layer.named_parameters():
#     if 'weight' in name:
#         writer.add_scalar('LastLayerGradients/grad_norm2_weights', para.grad.norm(), n_iter)
#     if 'bias' in name:
# writer.add_scalar('LastLayerGradients/grad_norm2_bias', para.grad.norm(), n_iter)- 5.4 注释62-63与68-71行的代码
 #update training loss for each iteration
# writer.add_scalar('Train/loss', loss.item(), n_iter)
# for name, param in net.named_parameters():
# layer, attr = os.path.splitext(name)
# attr = attr[1:]
# writer.add_histogram("{}/{}".format(layer, attr), param, epoch)- 5.5注释112-115行代码
#add informations to tensorboard
# if tb:
#     writer.add_scalar('Test/Average loss', test_loss / len(cifar100_test_loader.dataset), epoch)
# writer.add_scalar('Test/Accuracy', correct.float() / len(cifar100_test_loader.dataset), epoch)- 5.6注释177-189中的代码
    #since tensorboard can't overwrite old values
    #so the only way is to create a new tensorboard log
    # writer = SummaryWriter(log_dir=os.path.join(
    #         settings.LOG_DIR, args.net, settings.TIME_NOW))
    input_tensor = torch.Tensor(1, 3, 32, 32)
    if args.gpu:
        input_tensor = input_tensor.cuda()
    # writer.add_graph(net, input_tensor)

    #create checkpoint folder to save model
    # if not os.path.exists(checkpoint_path):
    #     os.makedirs(checkpoint_path)
    # checkpoint_path = os.path.join(checkpoint_path, '{net}-{epoch}-{type}.pth')
5.7注释236行代码
# writer.close()
这里的代码行数是我修改过代码之后的行数,具体的以自己的代码为准。- 5.8 运行程序,看程序是否能跑起来
python train.py -net resnet50注意:修改文件的时候要注意是否有写入权限,修改后的程序文件需要拷贝到docker环境中,在docker环境中执行5.8的指令。- 5.9 添加约束条件进行训练
    #导入linger
    import linger
    net=net
    dummy_input=torch.randn(8,3,32,32,requires_grad=True).cuda()#设置模型输入大小
    train_mode = "clamp"
    linger.trace_layers(net,net,dummy_input,fuse_bn=True)
    normalize_modules=(nn.Conv2d,nn.Linear,nn.BatchNorm2d)
    net=linger.normalize_layers(net,normalize_modules=normalize_modules,normalize_weight_value=8, normalize_bias_value=None,normalize_output_value=8)#模型量化参数设置
loss_function = nn.CrossEntropyLoss()- 5.10 修改
global_settings.py配置文件
#save weights file per SAVE_EPOCH epoch
SAVE_EPOCH = 1进行量化训练,训练完成之后会在pytorch-cifar100/checkpoint/...目录下边生成**.pth后缀的文件,接着进行量化训练。- 5.11 加载训练产生的文件,进行量化训练
    import linger
    net= net
    dummy_input = torch.randn(8,3,32,32,requires_grad=True)
    train_mode = "quant"
    linger.trace_layers(net,net,dummy_input,fuse_bn=True)
    noRmalize_modules=(nn.Conv2d,nn.Linear,nn.BatchNorm2d)
    replace_tuple=(nn.Conv2d,nn.Linear,nn.BatchNorm2d,nn.AvgPool2d)
    net = linger.normalize_layers(net,normalize_modules=noRmalize_modules,normalize_weight_value=8,normalize_bias_value=None,normalize_output_value=8)
    net = linger.init(net,quant_modules=replace_tuple,mode=linger.QuantMode.QValue)
net.load_state_dict(torch.load("./checkpoint/resnet50/Tuesday_29_August_2023_10h_57m_31s/resnet50-1-regular.pth"))- 5.12 修改不支持的算子(resnet.py)
import torch
import torch.nn as nn

class BasicBlock(nn.Module):
    """Basic Block for resnet 18 and resnet 34

    """

    #BasicBlock and BottleNeck block
    #have different output size
    #we use class attribute expansion
    #to distinct
    expansion = 1

    def __init__(self, in_channels, out_channels, stride=1):
        super().__init__()

        #residual function
        self.residual_function = nn.Sequential(
            nn.Conv2d(in_channels, out_channels, kernel_size=3, stride=stride, padding=1, bias=False),
            nn.BatchNorm2d(out_channels),
            nn.ReLU(inplace=True),
            nn.Conv2d(out_channels, out_channels * BasicBlock.expansion, kernel_size=3, padding=1, bias=False),
            nn.BatchNorm2d(out_channels * BasicBlock.expansion)
        )

        #shortcut
        self.shortcut = nn.Sequential()

        #the shortcut output dimension is not the same with residual function
        #use 1*1 convolution to match the dimension
        if stride != 1 or in_channels != BasicBlock.expansion * out_channels:
            self.shortcut = nn.Sequential(
                nn.Conv2d(in_channels, out_channels * BasicBlock.expansion, kernel_size=1, stride=stride, bias=False),
                nn.BatchNorm2d(out_channels * BasicBlock.expansion)
            )

    def forward(self, x):
        return nn.ReLU(inplace=True)(self.residual_function(x) + self.shortcut(x))

class BottleNeck(nn.Module):
    """Residual block for resnet over 50 layers

    """
    expansion = 4
    def __init__(self, in_channels, out_channels, stride=1):
        super().__init__()
        self.residual_function = nn.Sequential(
            nn.Conv2d(in_channels, out_channels, kernel_size=1, bias=False),
            nn.BatchNorm2d(out_channels),
            nn.ReLU(inplace=True),
            nn.Conv2d(out_channels, out_channels, stride=stride, kernel_size=3, padding=1, bias=False),
            nn.BatchNorm2d(out_channels),
            nn.ReLU(inplace=True),
            nn.Conv2d(out_channels, out_channels * BottleNeck.expansion, kernel_size=1, bias=False),
            nn.BatchNorm2d(out_channels * BottleNeck.expansion),
        )

        self.shortcut = nn.Sequential()

        if stride != 1 or in_channels != out_channels * BottleNeck.expansion:
            self.shortcut = nn.Sequential(
                nn.Conv2d(in_channels, out_channels * BottleNeck.expansion, stride=stride, kernel_size=1, bias=False),
                nn.BatchNorm2d(out_channels * BottleNeck.expansion)
            )

    def forward(self, x):
        return nn.ReLU(inplace=True)(self.residual_function(x) + self.shortcut(x))

class ResNet(nn.Module):

    def __init__(self, block, num_block, num_classes=100):
        super().__init__()

        self.in_channels = 64

        self.conv1 = nn.Sequential(
            nn.Conv2d(3, 64, kernel_size=3, padding=1, bias=False),
            nn.BatchNorm2d(64),
            nn.ReLU(inplace=True))
        #we use a different inputsize than the original paper
        #so conv2_x's stride is 1
        self.conv2_x = self._make_layer(block, 64, num_block[0], 1)
        self.conv3_x = self._make_layer(block, 128, num_block[1], 2)
        self.conv4_x = self._make_layer(block, 256, num_block[2], 2)
        self.conv5_x = self._make_layer(block, 512, num_block[3], 2)
        self.avg_pool = nn.AdaptiveAvgPool2d((1, 1))
        self.fc = nn.Linear(512 * block.expansion, num_classes)

    def _make_layer(self, block, out_channels, num_blocks, stride):
        """make resnet layers(by layer i didnt mean this 'layer' was the
        same as a neuron netowork layer, ex. conv layer), one layer may
        contain more than one residual block

        Args:
            block: block type, basic block or bottle neck block
            out_channels: output depth channel number of this layer
            num_blocks: how many blocks per layer
            stride: the stride of the first block of this layer

        Return:
            return a resnet layer
        """

        # we have num_block blocks per layer, the first block
        # could be 1 or 2, other blocks would always be 1
        strides = [stride] + [1] * (num_blocks - 1)
        layers = []
        for stride in strides:
            layers.append(block(self.in_channels, out_channels, stride))
            self.in_channels = out_channels * block.expansion

        return nn.Sequential(*layers)

    def forward(self, x):
        output = self.conv1(x)
        output = self.conv2_x(output)
        output = self.conv3_x(output)
        output = self.conv4_x(output)
        output = self.conv5_x(output)
        output = self.avg_pool(output)
        output = output.view(output.size(0), -1)
        output = self.fc(output)

        return output

def resnet18():
    """ return a ResNet 18 object
    """
    return ResNet(BasicBlock, [2, 2, 2, 2])

def resnet34():
    """ return a ResNet 34 object
    """
    return ResNet(BasicBlock, [3, 4, 6, 3])

def resnet50():
    """ return a ResNet 50 object
    """
    return ResNet(BottleNeck, [3, 4, 6, 3])

def resnet101():
    """ return a ResNet 101 object
    """
    return ResNet(BottleNeck, [3, 4, 23, 3])

def resnet152():
    """ return a ResNet 152 object
    """
    return ResNet(BottleNeck, [3, 8, 36, 3])
修改算子之后需要重新进行浮点训练,然后把pth文件保存下来,重新进行量化训练。
六、修改导图脚本
import linger
import torch
import torch.nn as nn
from models.resnet import resnet50

# 定义函数main,传入检查点文件路径、onnx文件路径、模型网络
def main(checkpoint_path: str, onnx_path:str, net):
    # 加载模型参数
    net.load_state_dict(torch.load(checkpoint_path))
    # 设置为评估模式
    net.eval()
    # 输入dummy数据,生成输出out
    out = net(dummy_input)
    # 使用torch.onnx.export将pytorch模型转化为onnx模型
    with torch.no_grad():
        torch.onnx.export(net,dummy_input,onnx_path,opset_version=11,
                          input_names=["input"],output_names=["output"])


if __name__ == '__main__':
    ch_path = "./checkpoint/resnet50/Tuesday_29_August_2023_11h_06m_05s/resnet50-1-regular.pth"
    onnx_path = "./resnet50.onnx"
    net = resnet50()
    # 定义dummy输入数据
    dummy_input=torch.randn(1,3,32,32,requires_grad=True)
    # 定义replace_tuple,表示需要替换的模块类型,用于模型量化
    replace_tuple =(nn.Conv2d,nn.Linear,nn.BatchNorm2d,nn.AvgPool2d)
    # 使用linger.trace_layers获取模型的BN信息,并进行BN融合
    linger.trace_layers(net,net,dummy_input,fuse_bn=True)
    # 使用linger.init进行模型量化
    net=linger.init(net,quant_modules=replace_tuple,mode=linger.QuantMode.QValue)
    # 运行main函数,将模型从pytorch格式转化为onnx格式
    main(ch_path,onnx_path,net)
1、执行脚本,导出计算图*.onnx文件。
2、接着在thinker中打包模型。指令需要根据自己的工程路径去修改。tpacker -g /**/onnxout.py -d True -o / */model.bin
PS:我这边生成的是如下2个文件:


