作者:Md. Khairul Alam
故事背景
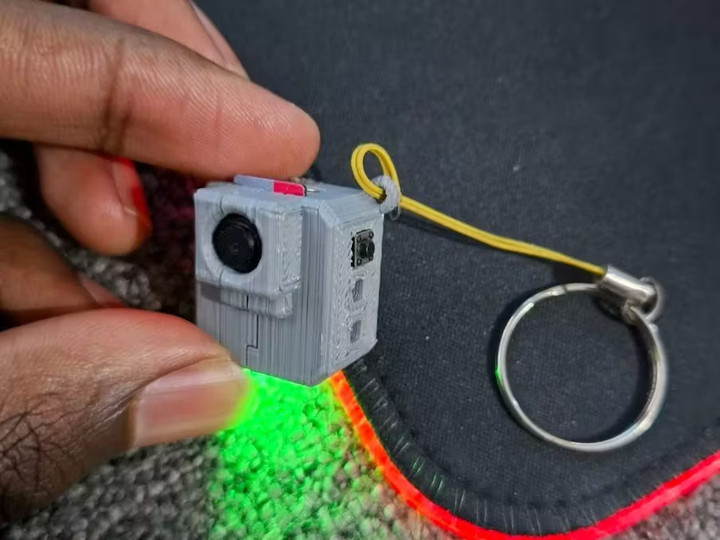
我一直对间谍小工具和微型电子产品非常着迷。我一直想创造一个可以装在口袋里的微型相机,能够悄无声息地捕捉精彩瞬间。随着技术的进步和像 Xiao ESP32S3 Sense 这样功能强大的微控制器的出现,我终于有机会实现这个梦想了。
使用实际部署模型的设备为 tinyML 项目收集图像数据通常也是一项挑战。因此,这款相机也是远程图像数据收集的有用设备。
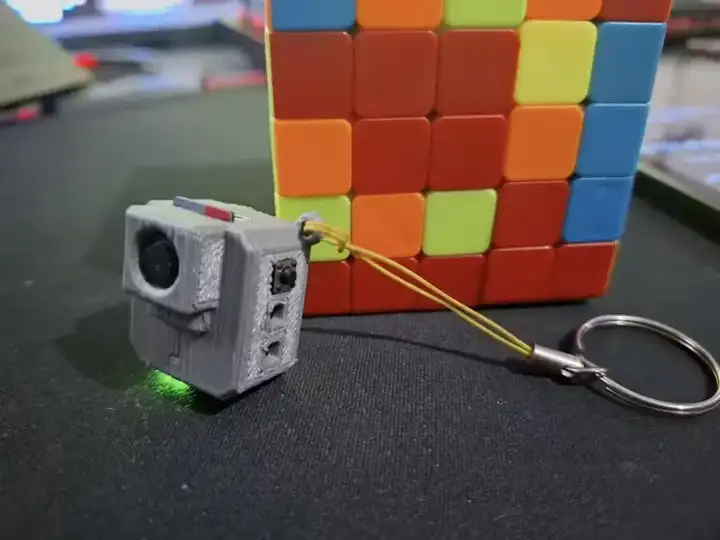
这个名为 “The Smallest DIY Spy Cam ”的项目是一个可以自己制作的小型摄像头。它既简单又经济实惠,是进入嵌入式电子世界的绝佳方式。
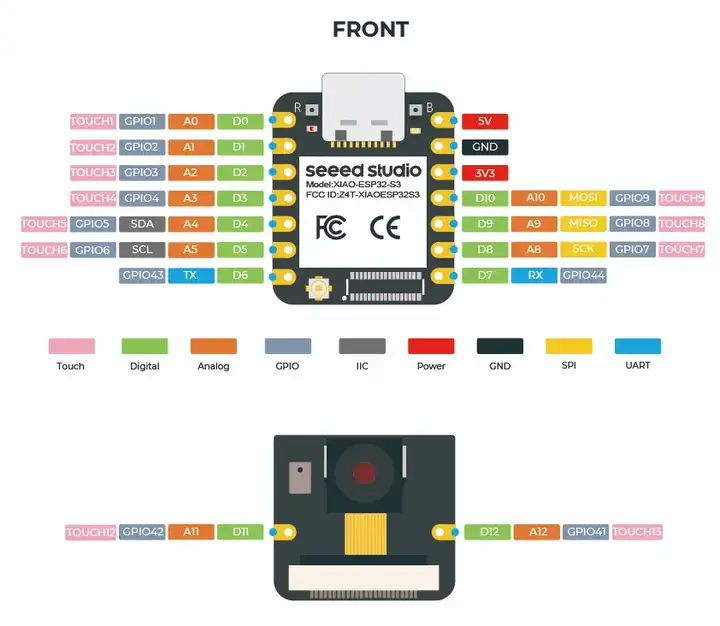
我们使用的 Xiao ESP32S3 Sense 具有体积小、功耗低、可扩展摄像头模块(sense)和功能强大等特点,非常适合制作最小的 DIY 间谍摄像头。
材料清单
硬件类
Seeed Studio XIAO ESP32S3 Sens
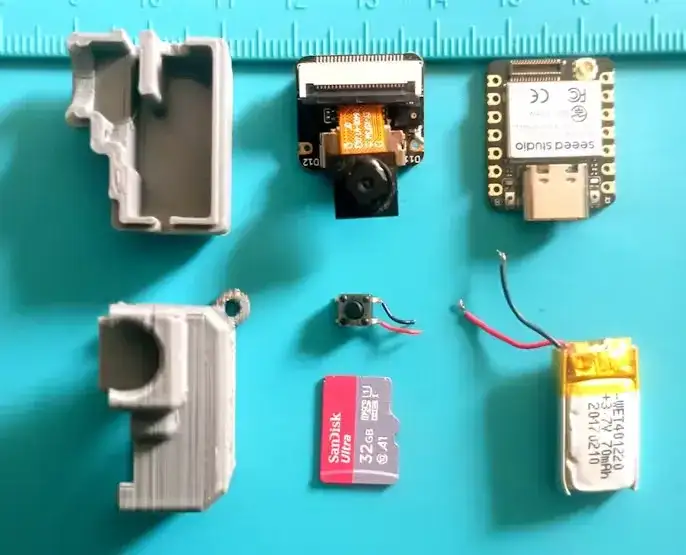
Li-Ion Battery 100mAh软件类
Arduino IDE
工具类
Solder Wire, Lead Free
Soldering iron (generic)
特点:
- 外形小巧: 这款相机采用 Xiao ESP32S3 Sense,体积非常小巧,易于隐藏。
- 按下按钮即可捕捉图像: 专用按钮可让您立即拍照。
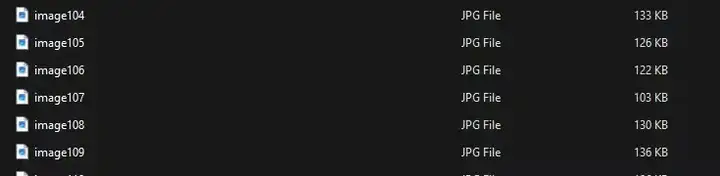
- 自动图像命名: 每张图片都以顺序文件名(image1、image2、image3 等)保存,因此您永远不会丢失捕获的图片。
- SD 卡存储: 图像可直接保存到 SD 卡中,便于传输到电脑上。
- 省电模式: 长按按钮可使设备进入深度睡眠状态,耗电量极低。当再次检测到长按按钮时,它会唤醒并打开 LED 指示灯。
组件:
- Xiao ESP32S3 Sense: 操作的大脑,提供处理能力和连接性。
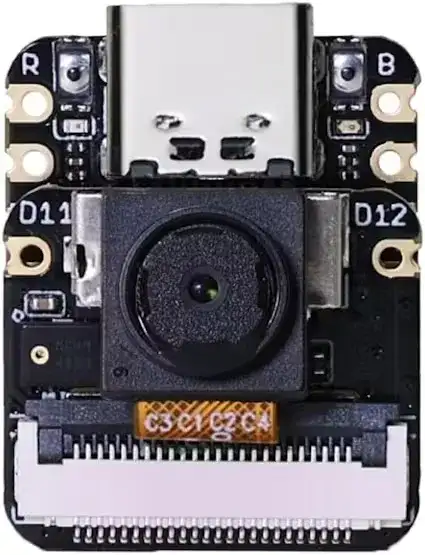
- XiaoCamera 模块:捕捉高质量图像。
- Micro SD 卡模块:存储拍摄的图像。
- 按钮:用于图像捕捉和电源控制。
- 锂电池:为相机供电。
- 电线: 将各部件连接在一起所必需的电线。
硬件组装
- 首先将摄像头模块连接到 Xiao ESP32S3 Sense。
- 然后,连接 SD 卡模块。确保接线正确,以免在数据存储过程中出现任何问题。
- 将捕捉按钮连接到 Xiao 的 GPIO 引脚 D0。
- 将锂电池焊接到 Xiao 的电池焊盘上,以获得便携式电源。
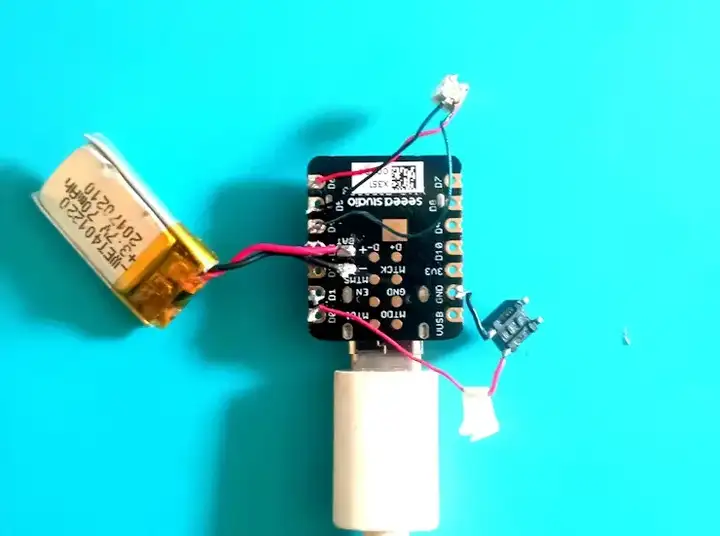
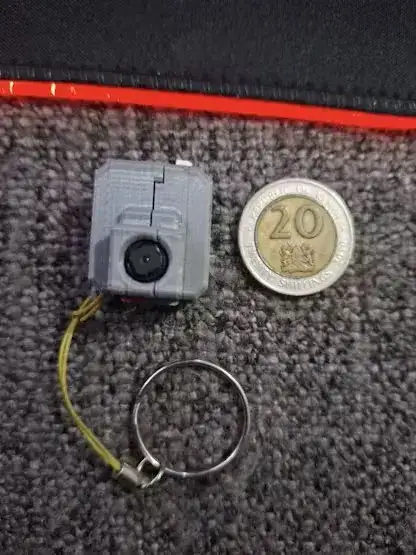
为我用的是廉价烙铁,所以焊接得不是很整齐,但这并不重要。您需要用 3D 打印相机的外壳。我附上了打印用的 STL 文件。这是完全组装好的相机与 20 KSH(可能只有一分钱大小)的对比。
软件配置
- 如果还没有 Arduino IDE,请下载。
- 克隆此项目的 GitHub 仓库。
- 在 Arduino IDE 中打开项目,并从板管理器中选择 Xiao ESP32S3 板。
以下是代码
这个 camera.ino 代码只是在按下按钮时捕捉图像,并按顺序将图像保存在 SD 卡中。
//camera.ino
#include "esp_camera.h"
#include "FS.h"
#include "SD.h"
#include "SPI.h"
// CAMERA_MODEL_XIAO_ESP32S3 // Has PSRAM
// CAMERA PINS
#define PWDN_GPIO_NUM     -1
#define RESET_GPIO_NUM    -1
#define XCLK_GPIO_NUM 10
#define SIOD_GPIO_NUM 40
#define SIOC_GPIO_NUM 39
#define Y9_GPIO_NUM 48
#define Y8_GPIO_NUM 11
#define Y7_GPIO_NUM 12
#define Y6_GPIO_NUM 14
#define Y5_GPIO_NUM 16
#define Y4_GPIO_NUM 18
#define Y3_GPIO_NUM 17
#define Y2_GPIO_NUM 15
#define VSYNC_GPIO_NUM 38
#define HREF_GPIO_NUM 47
#define PCLK_GPIO_NUM 13
#define LED_GPIO_NUM 21
#define capturePin      D0
unsigned long lastCaptureTime = 0; // Last shooting time
int imageCount = 1;                // File Counter
bool camera_sign = false;          // Check camera status
bool sd_sign = false;              // Check sd status
bool captureFlag = false;
// Save pictures to SD card
void photo_save(const char * fileName) {
// Take a photo
camera_fb_t *fb = esp_camera_fb_get();
if (!fb) {
Serial.println("Failed to get camera frame buffer");
return;
}
// Save photo to file
writeFile(SD, fileName, fb->buf, fb->len);
// Release image buffer
esp_camera_fb_return(fb);
Serial.println("Photo saved to file");
}
// SD card write file
void writeFile(fs::FS &fs, const char * path, uint8_t * data, size_t len){
Serial.printf("Writing file: %s\n", path);
File file = fs.open(path, FILE_WRITE);
if(!file){
Serial.println("Failed to open file for writing");
return;
}
if(file.write(data, len) == len){
Serial.println("File written");
} else {
Serial.println("Write failed");
}
file.close();
}
void setup() {
Serial.begin(115200);
pinMode(capturePin, INPUT_PULLUP);
camera_config_t config;
config.ledc_channel = LEDC_CHANNEL_0;
config.ledc_timer = LEDC_TIMER_0;
config.pin_d0 = Y2_GPIO_NUM;
config.pin_d1 = Y3_GPIO_NUM;
config.pin_d2 = Y4_GPIO_NUM;
config.pin_d3 = Y5_GPIO_NUM;
config.pin_d4 = Y6_GPIO_NUM;
config.pin_d5 = Y7_GPIO_NUM;
config.pin_d6 = Y8_GPIO_NUM;
config.pin_d7 = Y9_GPIO_NUM;
config.pin_xclk = XCLK_GPIO_NUM;
config.pin_pclk = PCLK_GPIO_NUM;
config.pin_vsync = VSYNC_GPIO_NUM;
config.pin_href = HREF_GPIO_NUM;
config.pin_sscb_sda = SIOD_GPIO_NUM;
config.pin_sscb_scl = SIOC_GPIO_NUM;
config.pin_pwdn = PWDN_GPIO_NUM;
config.pin_reset = RESET_GPIO_NUM;
config.xclk_freq_hz = 20000000;
config.frame_size = FRAMESIZE_UXGA;
config.pixel_format = PIXFORMAT_JPEG; // for streaming
config.grab_mode = CAMERA_GRAB_WHEN_EMPTY;
config.fb_location = CAMERA_FB_IN_PSRAM;
config.jpeg_quality = 12;
config.fb_count = 1;
// if PSRAM IC present, init with UXGA resolution and higher JPEG quality
//                      for larger pre-allocated frame buffer.
if(config.pixel_format == PIXFORMAT_JPEG){
if(psramFound()){
config.jpeg_quality = 10;
config.fb_count = 2;
config.grab_mode = CAMERA_GRAB_LATEST;
} else {
// Limit the frame size when PSRAM is not available
config.frame_size = FRAMESIZE_SVGA;
config.fb_location = CAMERA_FB_IN_DRAM;
}
} else {
// Best option for face detection/recognition
config.frame_size = FRAMESIZE_240X240;
#if CONFIG_IDF_TARGET_ESP32S3
config.fb_count = 2;
#endif
}
// camera init
esp_err_t err = esp_camera_init(&config);
if (err != ESP_OK) {
Serial.printf("Camera init failed with error 0x%x", err);
return;
}
camera_sign = true; // Camera initialization check passes
// Initialize SD card
if(!SD.begin(21)){
Serial.println("Card Mount Failed");
return;
}
uint8_t cardType = SD.cardType();
// Determine if the type of SD card is available
if(cardType == CARD_NONE){
Serial.println("No SD card attached");
return;
}
Serial.print("SD Card Type: ");
if(cardType == CARD_MMC){
Serial.println("MMC");
} else if(cardType == CARD_SD){
Serial.println("SDSC");
} else if(cardType == CARD_SDHC){
Serial.println("SDHC");
} else {
Serial.println("UNKNOWN");
}
sd_sign = true; // sd initialization check passes
Serial.println("*** XIAO ESP32S3 Spy Camera ***");
Serial.println("Press button to capture and save an image\n");
}
void loop() {
take_pic();
}
void take_pic()
{
if(camera_sign && sd_sign){
if (digitalRead(capturePin) == 0) { // checks when the button is pressed
delay(200); //delay for debouncing
Serial.println("\nImage Captured");
char filename[32];
sprintf(filename, "/image%d.jpg", imageCount);
photo_save(filename);
Serial.printf("Saved picture:%s\n", filename);
Serial.println("");
imageCount++;
}
}
}
高效捕捉图像
在这个增强版代码中:
- 单击:设备捕捉图像并将其保存到 SD 卡中。每张图像都按顺序命名,可避免在相机打开(从深度睡眠模式唤醒)时覆盖之前的图像。
- 长按:使设备进入深度休眠状态,通过关闭不必要的进程有效节约电能。再次长按将唤醒设备,使其能够继续捕捉图像。
这一功能使设备特别适用于长期使用或在偏远地区进行图像数据采集,因为在这些地区持续供电是不现实的。这对 TinyML 图像数据采集尤其有价值,它能使设备在需要时保持休眠状态,从而大大延长了设备在野外的电池寿命。
深度睡眠模式代码
//DeepSleep.ino
#include "esp_camera.h"
#include "FS.h"
#include "SD.h"
#include "SPI.h"
#include
#define PWDN_GPIO_NUM     -1
#define RESET_GPIO_NUM    -1
#define XCLK_GPIO_NUM 10
#define SIOD_GPIO_NUM 40
#define SIOC_GPIO_NUM 39
#define Y9_GPIO_NUM 48
#define Y8_GPIO_NUM 11
#define Y7_GPIO_NUM 12
#define Y6_GPIO_NUM 14
#define Y5_GPIO_NUM 16
#define Y4_GPIO_NUM 18
#define Y3_GPIO_NUM 17
#define Y2_GPIO_NUM 15
#define VSYNC_GPIO_NUM 38
#define HREF_GPIO_NUM 47
#define PCLK_GPIO_NUM 13
#define LED_GPIO_NUM 21
#define capturePin        D0
#define LEDAnode         D5
#define statusLED         D6
#define captureLED        D4
Preferences preferences;  // Preferences object to store non-volatile values
unsigned long lastPressTime = 0;  // Last button press start time
unsigned long pressDuration = 0;  // Duration of the button press
int imageCount = 1;  // File Counter
bool camera_sign = false;  // Check camera status
bool sd_sign = false;  // Check SD card status
void photo_save(const char * fileName) {
// Take a photo
camera_fb_t *fb = esp_camera_fb_get();
if (!fb) {
Serial.println("Failed to get camera frame buffer");
return;
}
// Save photo to file
writeFile(SD, fileName, fb->buf, fb->len);
// Release image buffer
esp_camera_fb_return(fb);
Serial.println("Photo saved to file");
}
void writeFile(fs::FS &fs, const char * path, uint8_t * data, size_t len){
Serial.printf("Writing file: %s\n", path);
File file = fs.open(path, FILE_WRITE);
if(!file){
Serial.println("Failed to open file for writing");
return;
}
if(file.write(data, len) == len){
Serial.println("File written");
} else {
Serial.println("Write failed");
}
file.close();
}
void setup() {
Serial.begin(115200);
pinMode(capturePin, INPUT_PULLUP);
pinMode(statusLED, OUTPUT);  // Initialize LED pin as an output
pinMode(LEDAnode, OUTPUT);
pinMode(captureLED, OUTPUT);
digitalWrite(LEDAnode, HIGH); //I am using a common anode RGB LED
digitalWrite(captureLED, HIGH);
// Initialize Preferences
preferences.begin("camera", false);
// Retrieve the stored image count from non-volatile memory
imageCount = preferences.getInt("imageCount", 1); // Default to 1 if not set
// Initialize camera
camera_config_t config;
config.ledc_channel = LEDC_CHANNEL_0;
config.ledc_timer = LEDC_TIMER_0;
config.pin_d0 = Y2_GPIO_NUM;
config.pin_d1 = Y3_GPIO_NUM;
config.pin_d2 = Y4_GPIO_NUM;
config.pin_d3 = Y5_GPIO_NUM;
config.pin_d4 = Y6_GPIO_NUM;
config.pin_d5 = Y7_GPIO_NUM;
config.pin_d6 = Y8_GPIO_NUM;
config.pin_d7 = Y9_GPIO_NUM;
config.pin_xclk = XCLK_GPIO_NUM;
config.pin_pclk = PCLK_GPIO_NUM;
config.pin_vsync = VSYNC_GPIO_NUM;
config.pin_href = HREF_GPIO_NUM;
config.pin_sscb_sda = SIOD_GPIO_NUM;
config.pin_sscb_scl = SIOC_GPIO_NUM;
config.pin_pwdn = PWDN_GPIO_NUM;
config.pin_reset = RESET_GPIO_NUM;
config.xclk_freq_hz = 20000000;
config.frame_size = FRAMESIZE_UXGA;
config.pixel_format = PIXFORMAT_JPEG;
config.grab_mode = CAMERA_GRAB_WHEN_EMPTY;
config.fb_location = CAMERA_FB_IN_PSRAM;
config.jpeg_quality = 12;
config.fb_count = 1;
if(config.pixel_format == PIXFORMAT_JPEG){
if(psramFound()){
config.jpeg_quality = 10;
config.fb_count = 2;
config.grab_mode = CAMERA_GRAB_LATEST;
} else {
config.frame_size = FRAMESIZE_SVGA;
config.fb_location = CAMERA_FB_IN_DRAM;
}
} else {
config.frame_size = FRAMESIZE_240X240;
}
esp_err_t err = esp_camera_init(&config);
if (err != ESP_OK) {
Serial.printf("Camera init failed with error 0x%x", err);
return;
}
camera_sign = true;
// Initialize SD card
if(!SD.begin(21)){
Serial.println("Card Mount Failed");
return;
}
uint8_t cardType = SD.cardType();
if(cardType == CARD_NONE){
Serial.println("No SD card attached");
return;
}
sd_sign = true;
Serial.println("*** XIAO ESP32S3 Spy Camera ***");
Serial.println("Press and hold the button to enter deep sleep.");
Serial.println("Press the button briefly to capture an image.");
esp_sleep_enable_ext0_wakeup(static_cast(capturePin), 0);
digitalWrite(statusLED, LOW);
digitalWrite(captureLED, HIGH);
}
void loop() {
handleButtonPress();
}
void handleButtonPress() {
int buttonState = digitalRead(capturePin);
if (buttonState == LOW) {
if (lastPressTime == 0) {
lastPressTime = millis();  // Record the press start time
}
pressDuration = millis() - lastPressTime;
if (pressDuration > 2000) {  // Long press detection (>2 seconds)
Serial.println("Long press detected: Going to deep sleep");
digitalWrite(statusLED, HIGH);
delay(1000);  // Delay to debounce before deep sleep
goToDeepSleep();  // Enter deep sleep
}
} else {
if (lastPressTime > 0 && pressDuration > 100 && pressDuration < 1000) {  // Short press detection
Serial.println("Short press detected: Taking picture");
digitalWrite(captureLED, LOW);
captureImage();
digitalWrite(captureLED, HIGH);
}
lastPressTime = 0;  // Reset timing when the button is released
pressDuration = 0;
}
}
void captureImage() {
char filename[32];
sprintf(filename, "/image%d.jpg", imageCount);
photo_save(filename);  // Capture the image and save it
Serial.printf("Saved picture: %s\n", filename);
imageCount++;
// Store the new imageCount in non-volatile memory
preferences.putInt("imageCount", imageCount);
}
void goToDeepSleep() {
// Store image count before going to sleep
preferences.putInt("imageCount", imageCount);
preferences.end();  // Close preferences
digitalWrite(statusLED, HIGH);
esp_deep_sleep_start();  // Enter deep sleep
}
- 将代码上传到您的 Xiao ESP32S3 Sense。
代码亮点
- 初始化:在设置过程中对摄像机、SD 卡和 LED 进行初始化。图像计数从非易失性存储器中存储和检索,确保按顺序保存图像,而不会覆盖现有文件。
- 图像捕捉:只需按下按钮即可捕捉图像并将其保存到 SD 卡中。
- 深度睡眠和唤醒:使用定时机制检测长按。如果按住按钮超过 2 秒钟,设备就会进入深度睡眠状态。当设备唤醒时,LED 灯亮起,表明它已准备好再次捕捉图像。
深度睡眠功能
// Deep Sleep Function
void goToDeepSleep() {
  // Save image count and other data
  preferences.putInt("imageCount", imageCount);
  preferences.end();  // Close preferences

  // Turn off LED before going to sleep
  digitalWrite(LED_GPIO_NUM, LOW);

  esp_deep_sleep_start();  // Enter deep sleep
}
处理按键:按钮逻辑检查短按(捕捉图像)和长按(进入深度睡眠)。
cpp
Copy code
void handleButtonPress() {
if (isButtonPressed()) {if (lastPressTime == 0) { lastPressTime = millis(); // Record the press start time } pressDuration = millis() - lastPressTime; if (pressDuration > 2000) { // Long press detection (>2 seconds) Serial.println("Long press detected: Going to deep sleep"); delay(500); // Delay to debounce before deep sleep // Turn off LED before going to sleep digitalWrite(LED_GPIO_NUM, LOW); goToDeepSleep(); // Enter deep sleep }} else {
if (lastPressTime > 0 && pressDuration > 200 && pressDuration < 1000) {  // Short press detection
  Serial.println("Short press detected: Taking picture");
  captureImage();
}

lastPressTime = 0;  // Reset timing when the button is released
pressDuration = 0;
}
}
运行情况:
上传代码并连接好一切后,使用电源按钮打开相机。按下捕捉按钮拍照图像将以唯一的顺序文件名保存在 SD 卡上。
以下是摄像机运行时串行监视器的输出结果
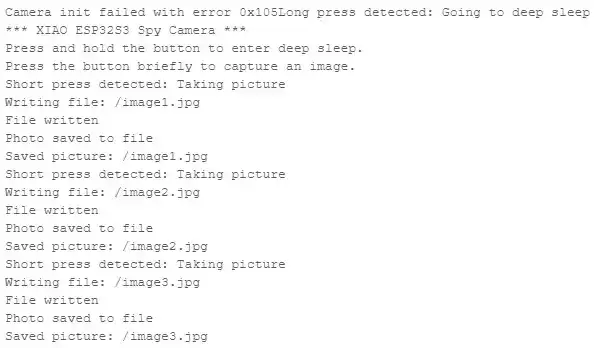
图像将这样保存:
图库:

相机拍摄的图像


未来改进:
虽然该项目功能齐全,但仍有改进的余地。以下是对未来版本的一些设想:
- 视频录制:拓展功能,捕捉视频短片。
- 无限传输:整合一项功能,以无线方式将图像发送到智能手机或者电脑
- 移动侦测:添加移动侦测功能,在检测到移动时自动捕捉图像
定制部件和外壳
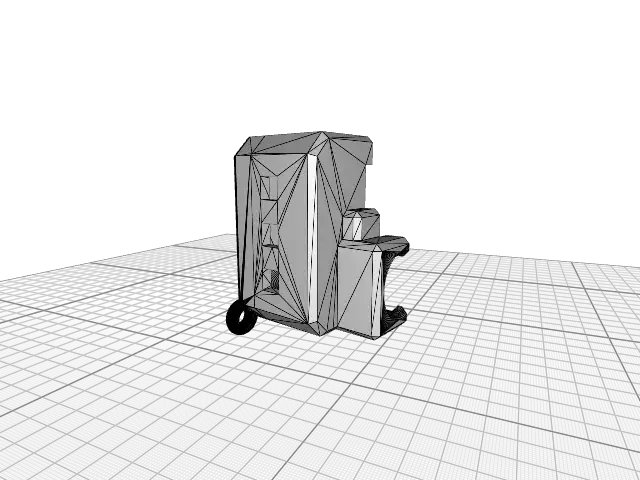

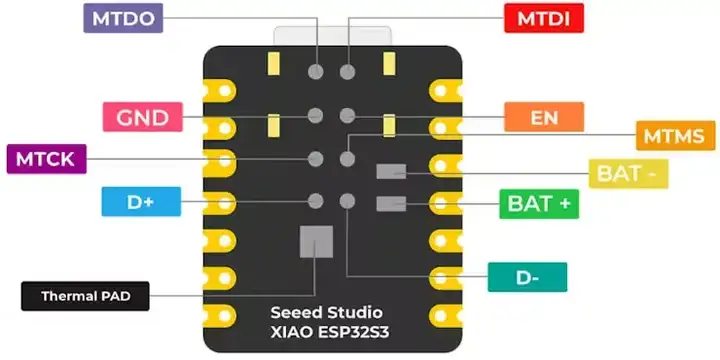
原理图