
作者:Katherine
来自:Fab academy
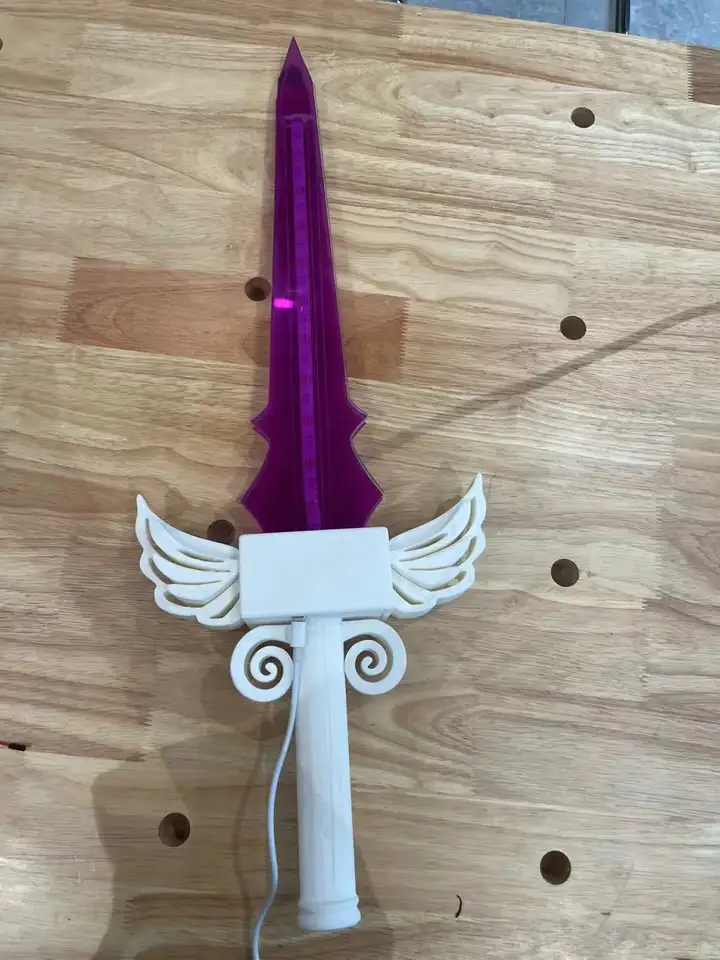
Fab Academy,源自麻省理工学院的先进教育项目,致力于培养具有全球视野的创新者和制造者。通过密集学习和实践,学生们掌握了从基础到高级的制造技术,学习了如何将创意转化为现实。今天小编给大家带来Fab academy学员Katherine的结课项目:Celestial Gerapbblade。这把剑不仅仅是一件单纯的武器更是内在力量和坚定不移的韧性的象征。在面对即将到来的任何挑战,不仅受到其钢铁般的力量的保护,而且受到内心深处坚定不移和不可动摇的信念的保护。

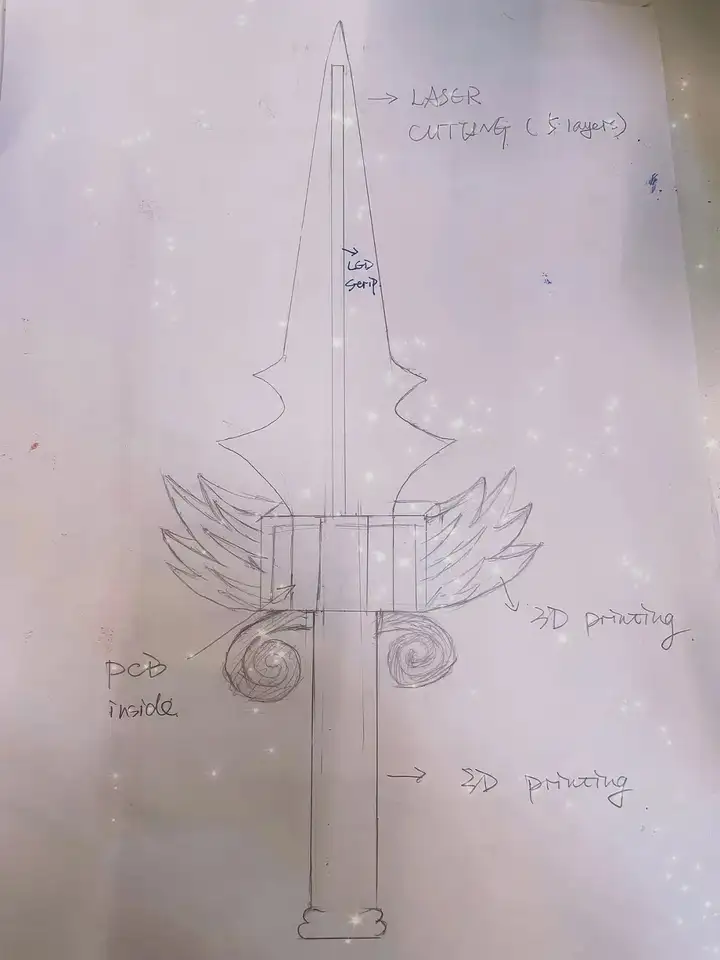
项目草图
功能介绍
- Celestial Gerapbblade通过微型机器学习具有识别不同姿势的非凡能力。当使用者采取不同的姿势或手势时,剑的智能系统就会开始行动。
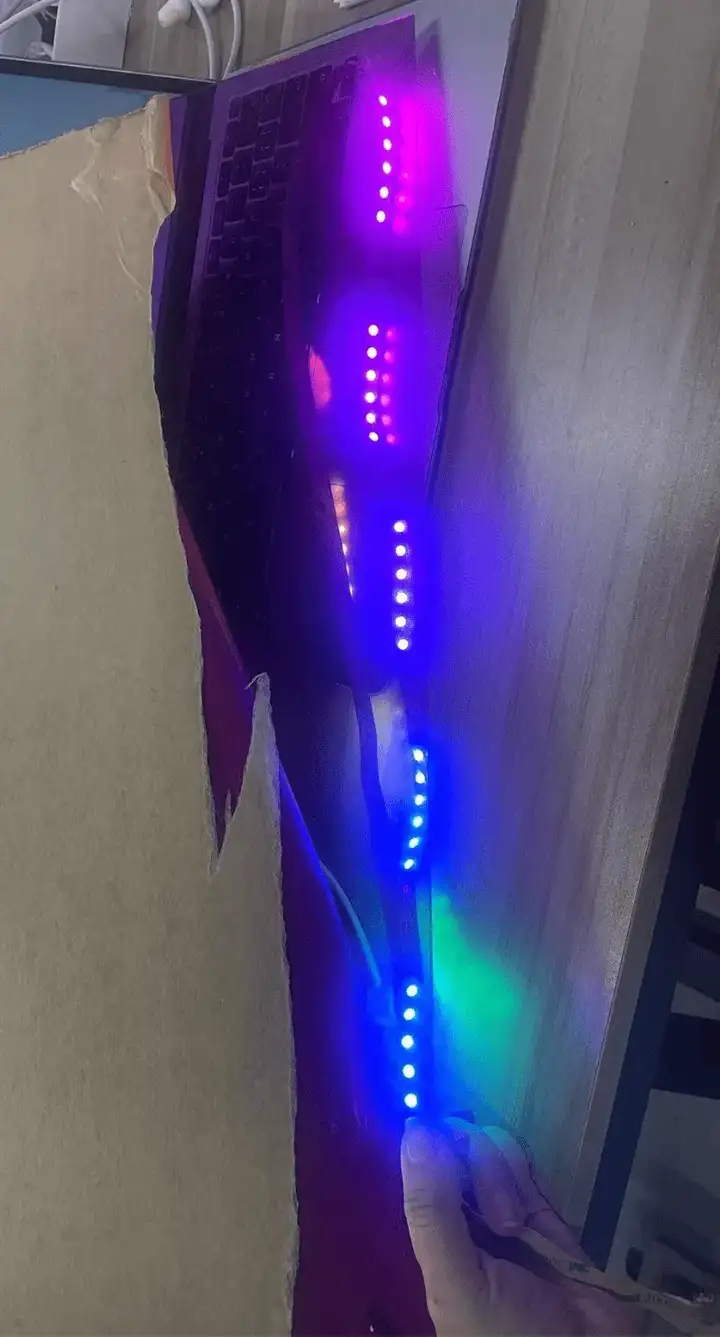
- 先进的机制控制嵌入其中的 neopixel,触发一连串独特而迷人的 LED 光效。每个姿势都对应着独特而迷人的灯光展示,为剑的存在增添了迷人和动态的元素。
- 灯光效果的颜色和图案不是随机的,而是经过精心校准和编排的,以增强Celestial Gerapbblade的整体美感和神奇的吸引力。就好像剑本身对使用者的一举一动做出反应和反应一样,创造出一种既令人敬畏又迷人的光与运动的交响乐。
材料清单
| 数量 | 物品 | 价格 |
|---|---|---|
| 1 | Seeed XIAO nRF82540 sense | 15.99$ |
| 1 | 紫色亚克力板 | 12$ |
| 1 | 透明亚克力板 | 6$ |
| 1 | 白色PLA | 10$ |
| 1 | Neo pixel -ws2812B | 4$ |
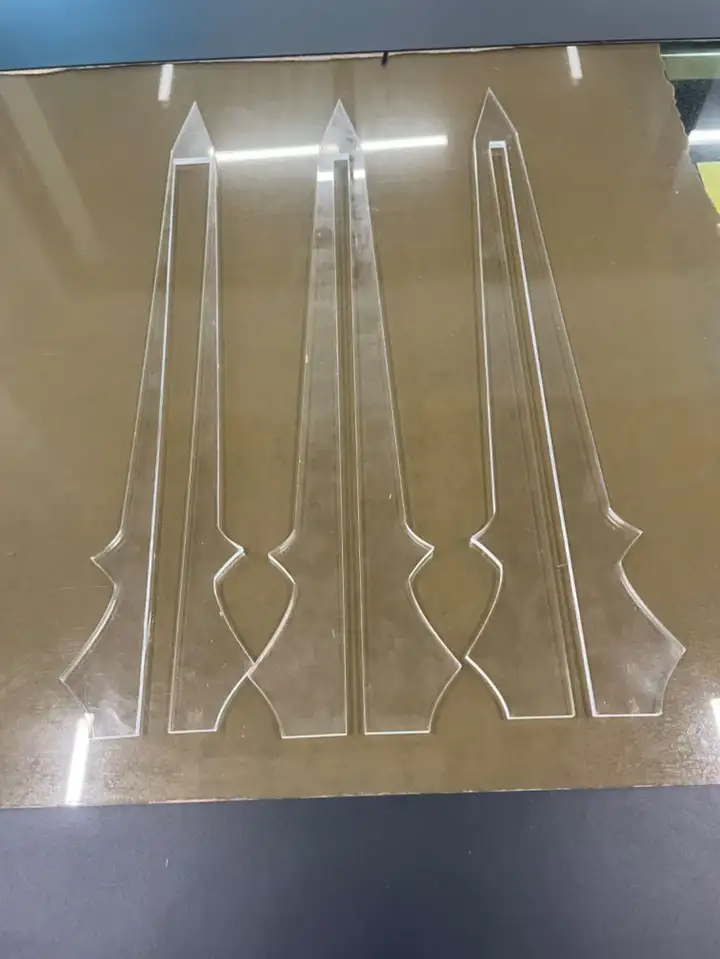
零件制造
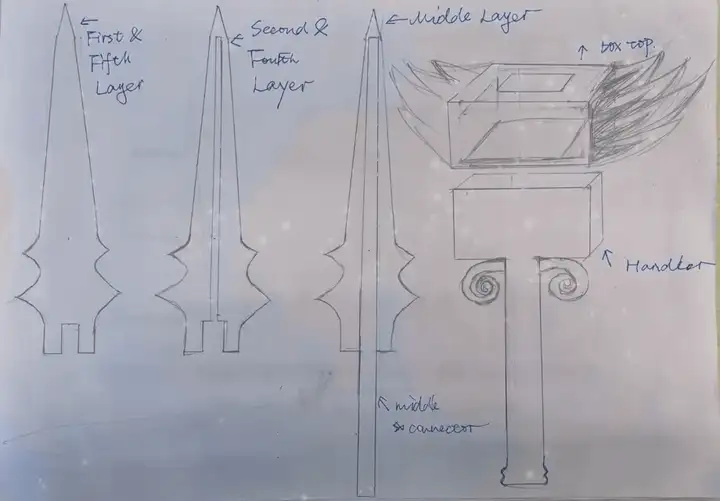
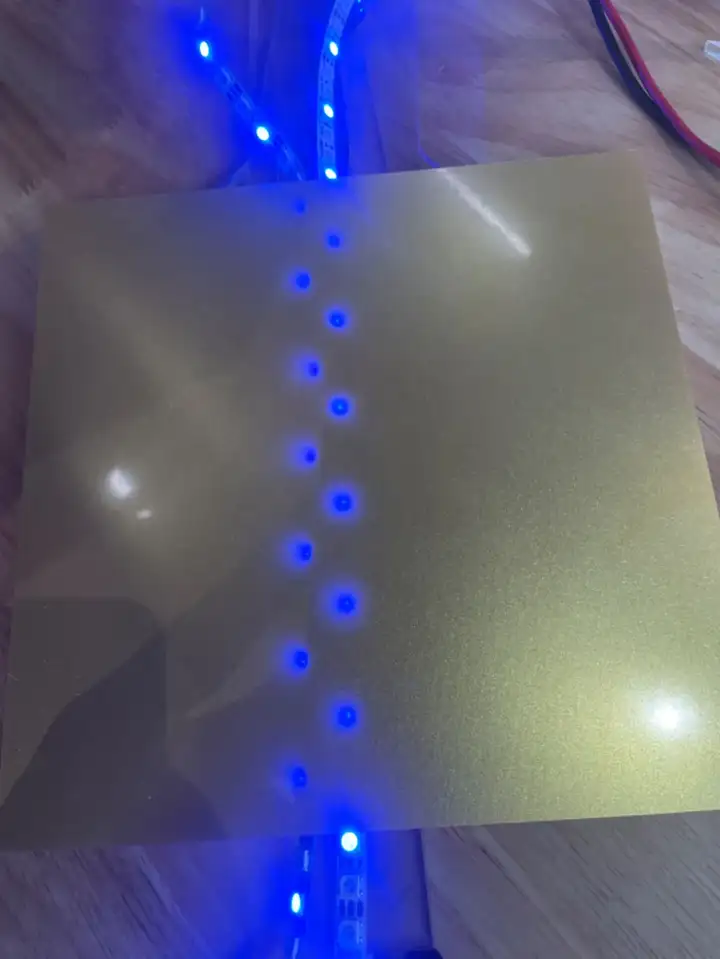
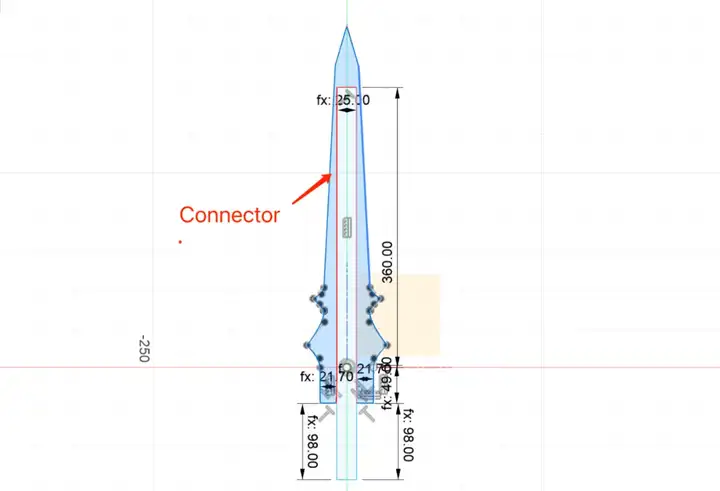
剑刃分为五层,将 LED 灯条和连接器嵌入内部。还有两层紫色的外层,让它看起来整洁美观。首先测量 LED 灯条的厚度和宽度,以便正确设计我的刀片。
- 中间层也将包括连接器部分,因此我使用了 5 毫米厚的透明亚克力,以使其更坚固地连接所有部件。
- 我的 LED 灯条的厚度为 3 毫米,所以我选择了 3 毫米的亚克力板作为第二层和第四层刀片,以使整个剑更轻。
- 第一层和第五层用作最外层的保护层。它们需要具有一定程度的透光率,同时还要呈现出美观的外观。我最初的想法是采用金色外壳;然而,这种金色未能提供足够的透光率。因此,我最终选择了紫色调。
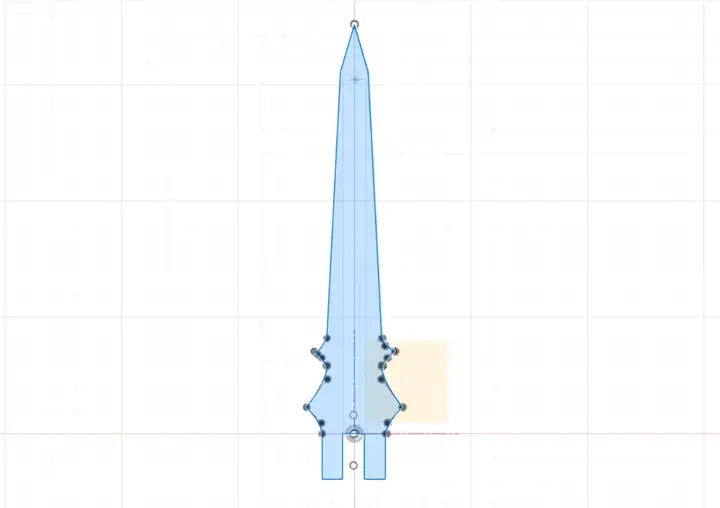
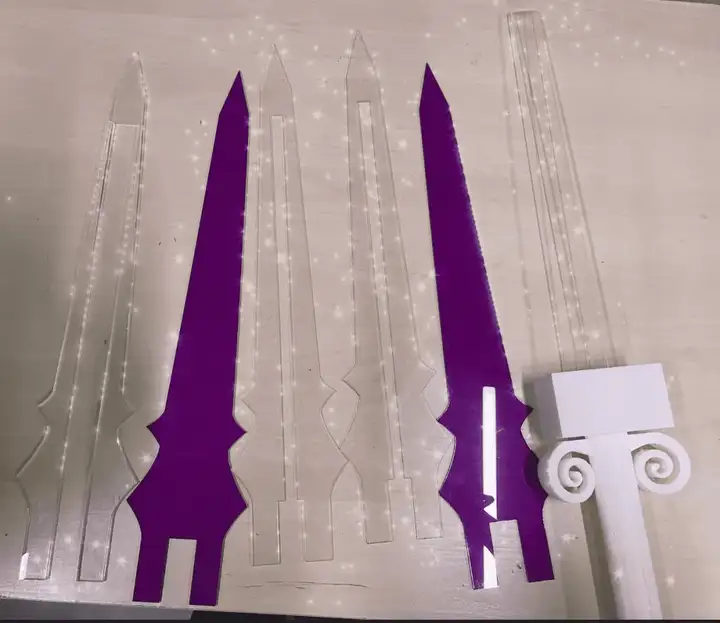
刀片零件第一代版本:
激光切割部分的最初概念是,只有中间层的连接器会插入剑盒进行连接。然而,在打印出剑壳的一个版本时,发现这种连接并不稳定。因此,对设计进行了修改。所有层都被延伸到一定程度上,并插入到剑盒中。
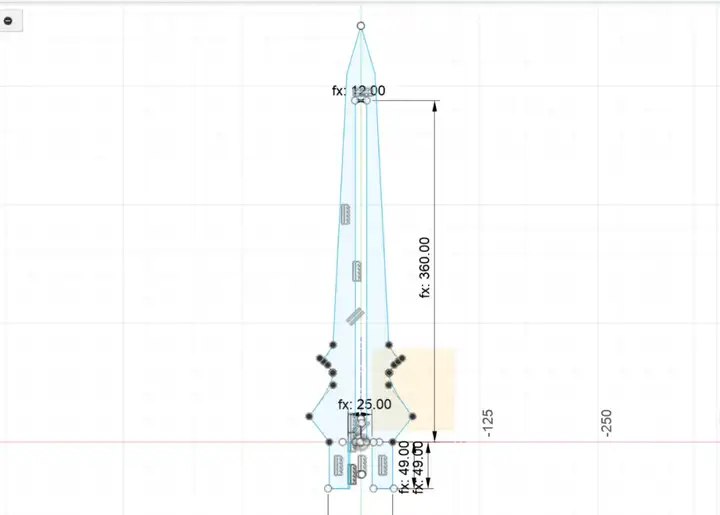
我的新设计草图文件:
第二层和第四层
中间层,包括要切割的连接器。
所有五层的最终切割成功:
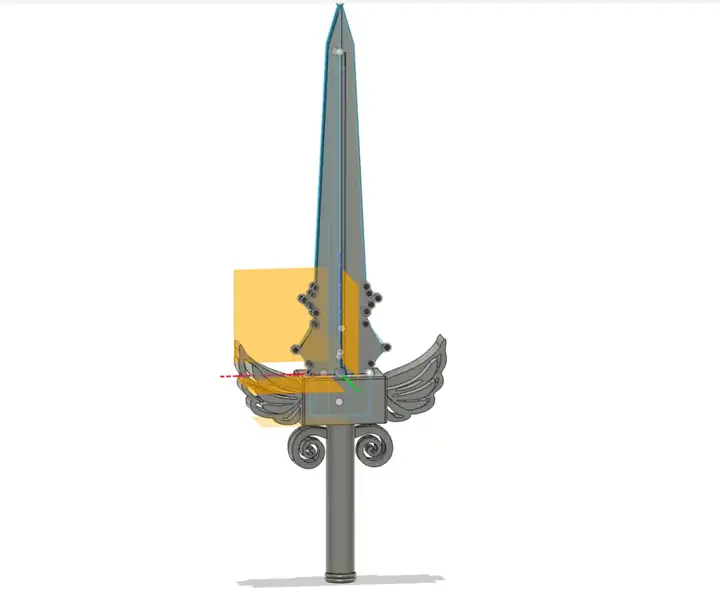
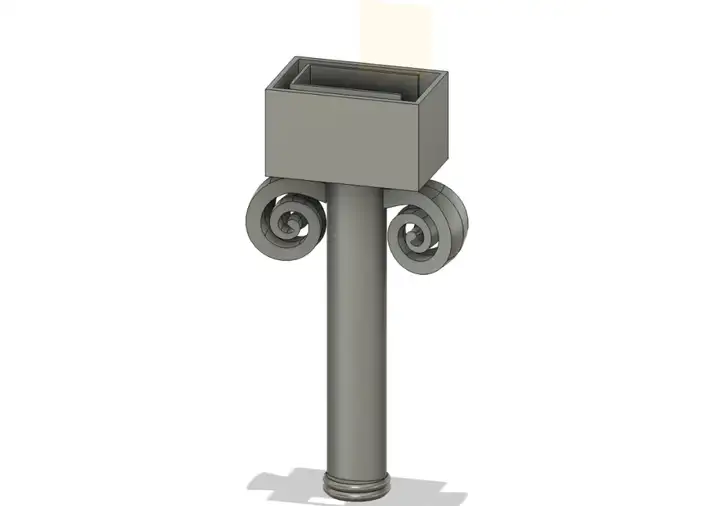
剑壳和剑柄的3D设计
我需要把PCB放在我的剑盒里,所以我把它设计成一个结构,上面和下壳子可以放在一起。上部盒子有翅膀,下部盒子留有空间放置 PCB 和未来的电池。手柄结合了罗马柱的设计。整把剑的3D设计如下:
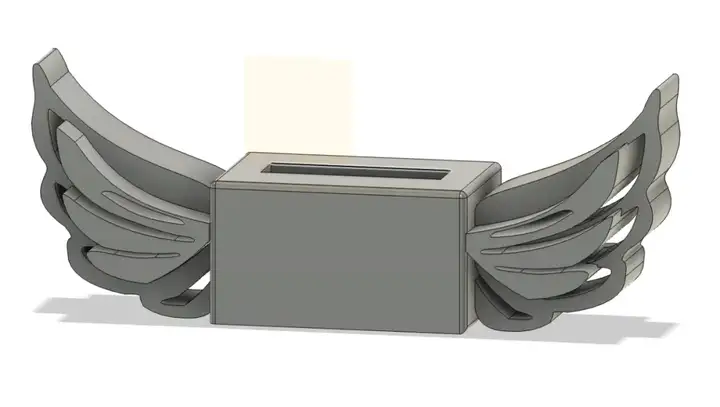
带翅膀的剑盒的3D设计
带内盒的剑柄3D设计
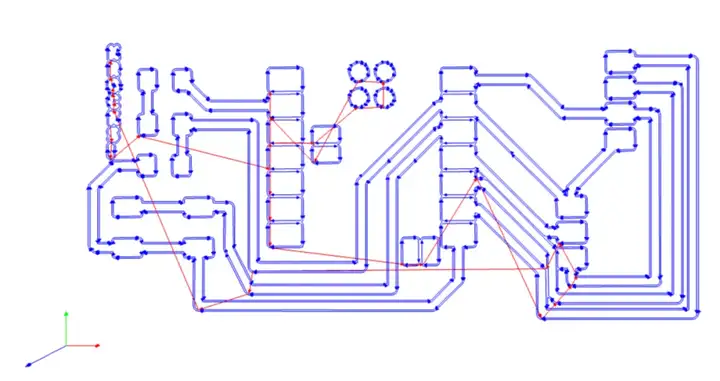
PCB设计 项目中,我使用KiCad进行PCB设计最终的PCB示意图:
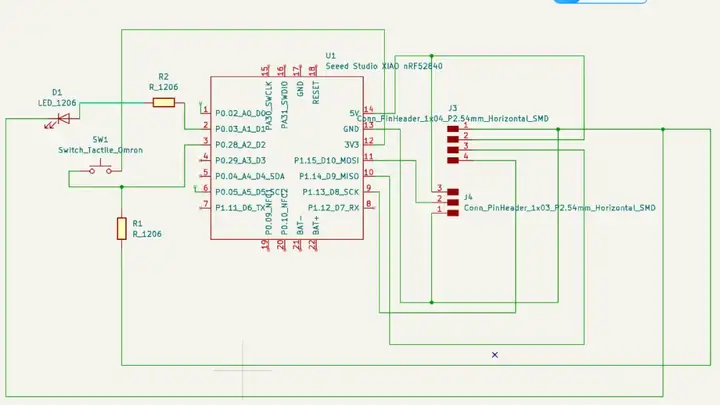
在PCB视图中重新分配组件:
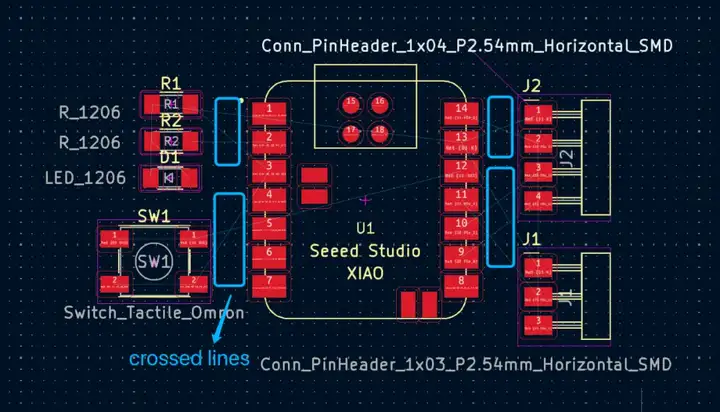
最终PCB设计
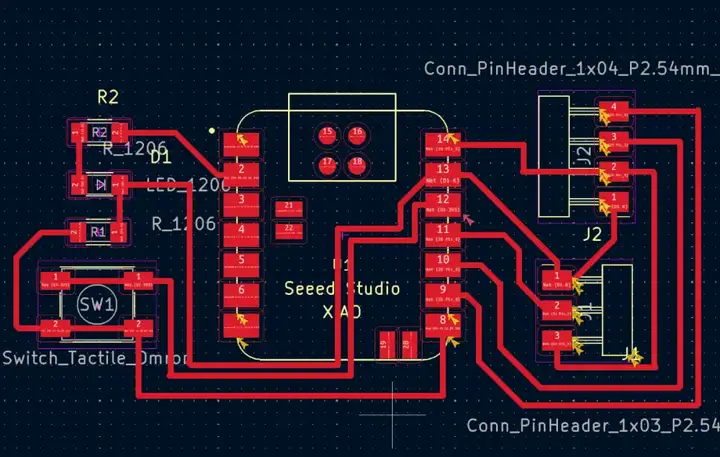
PCB铣削
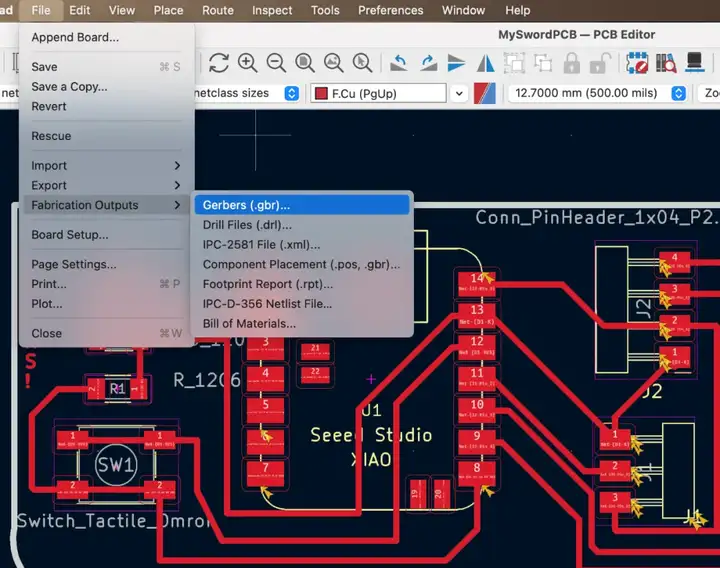
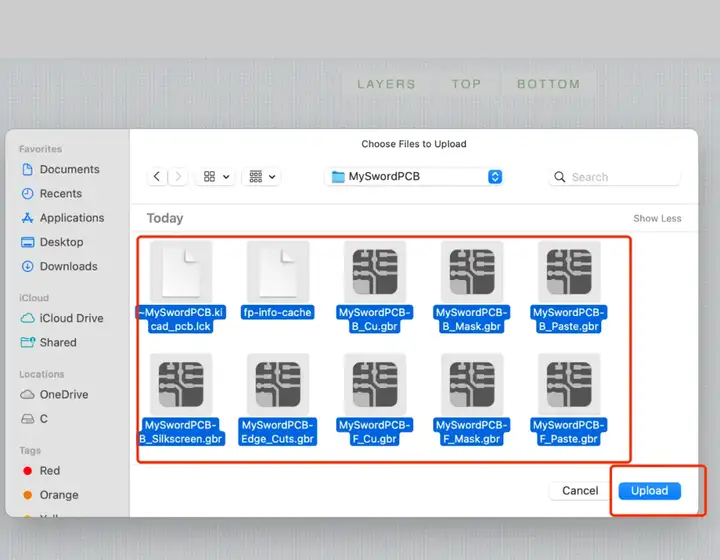
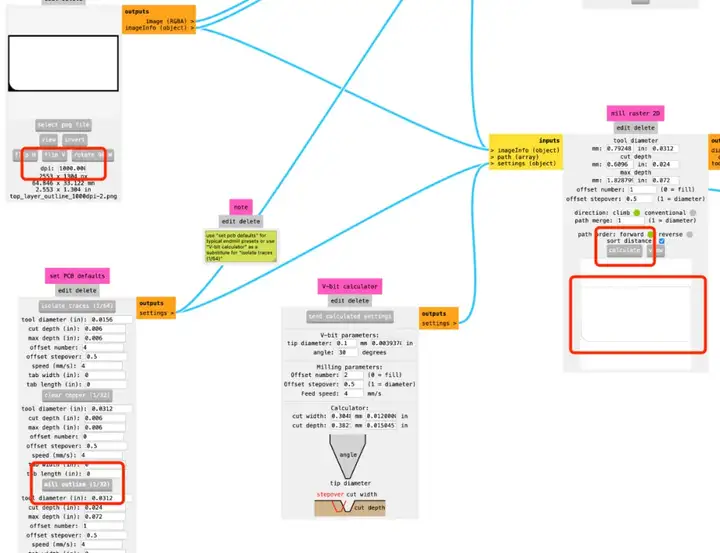
生成Gerber文件
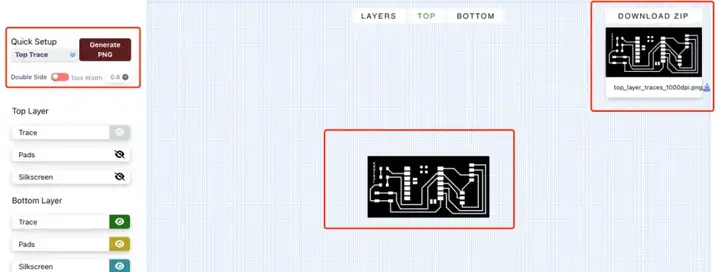
将Gerber文件转换为PNG
选择topTrace和TopCut以生成相应的png文件:
使用ModsCE生成G代码文件:需要生成不同的G代码文件,用于跟踪切割、轮廓切割和钻孔。对于跟踪文件,需要设置的参数如下:将 dpi 设置为 1000,对于 v-bit,您也可以根据您选择的实际 v 位更改参数,而不是使用默认参数。我选择的 V 位 20 20。
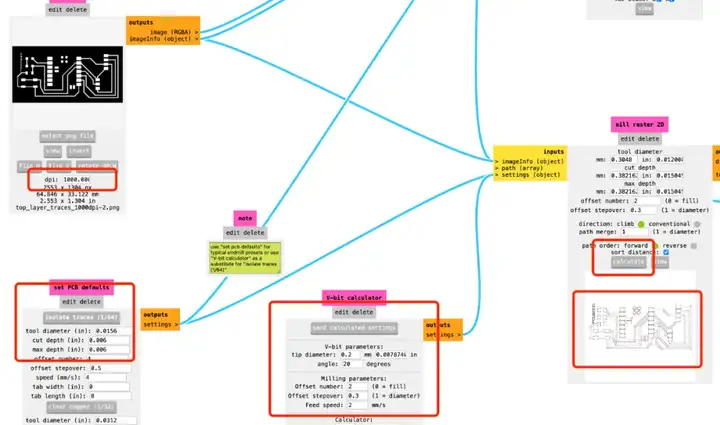
预览切割的痕迹:
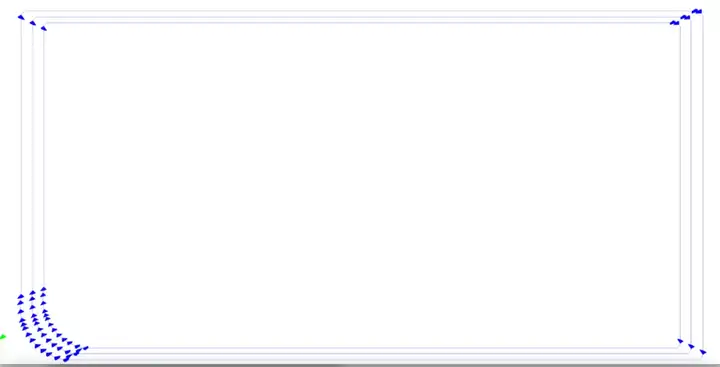
对于大纲文件,需要设置的参数如下:
将dpi设置为1000,其他使用默认参数就可以了。
预览切割痕迹:
使用机床铣削PCB:
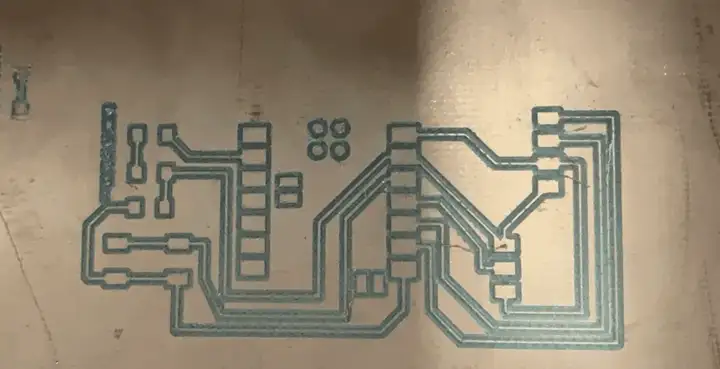
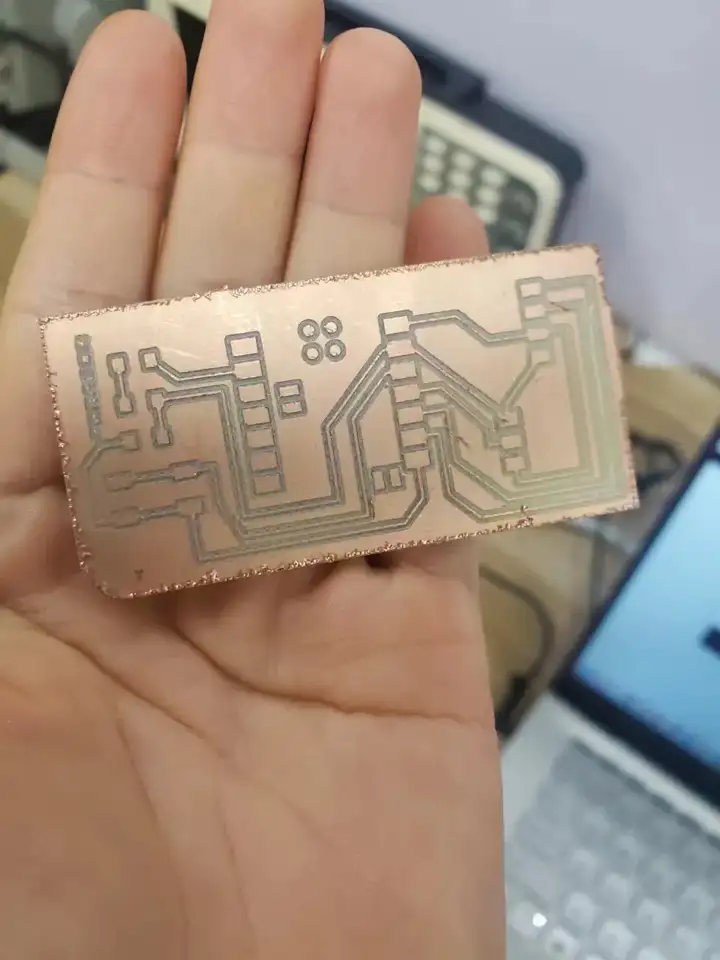
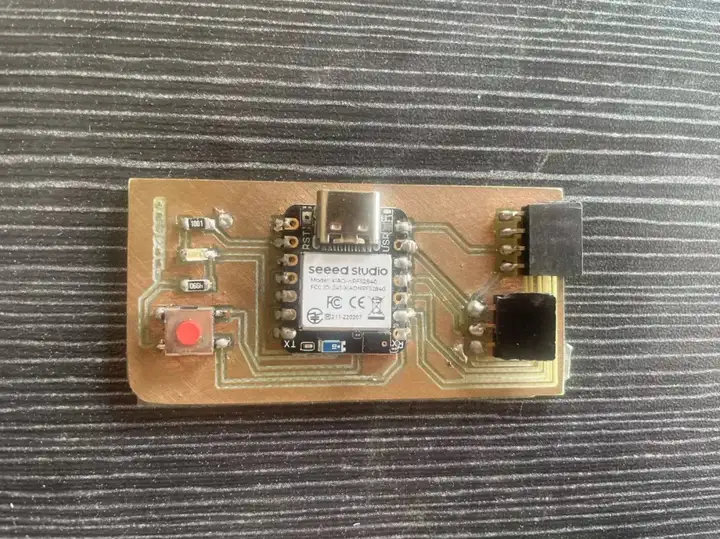
焊接电路板:
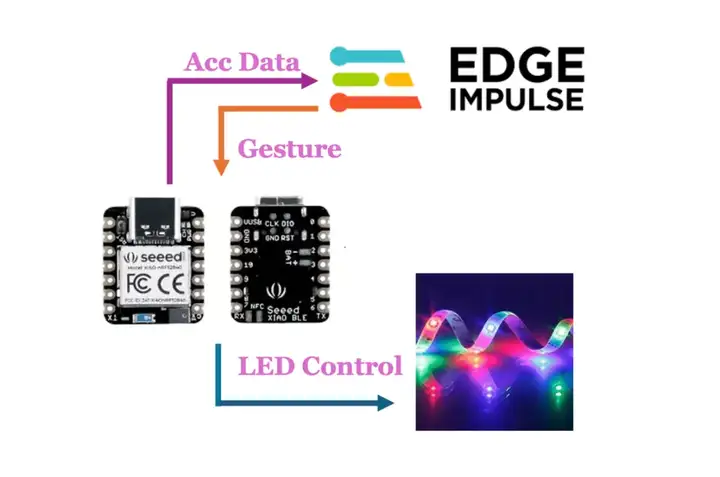
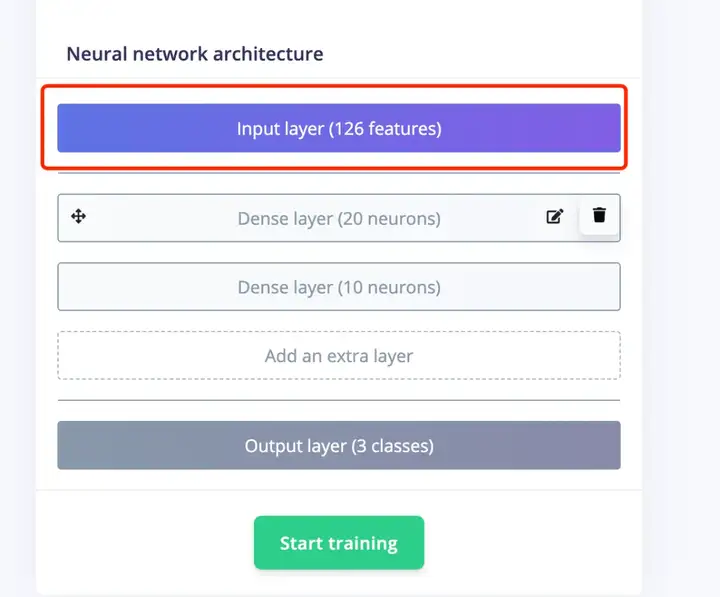
TinyML
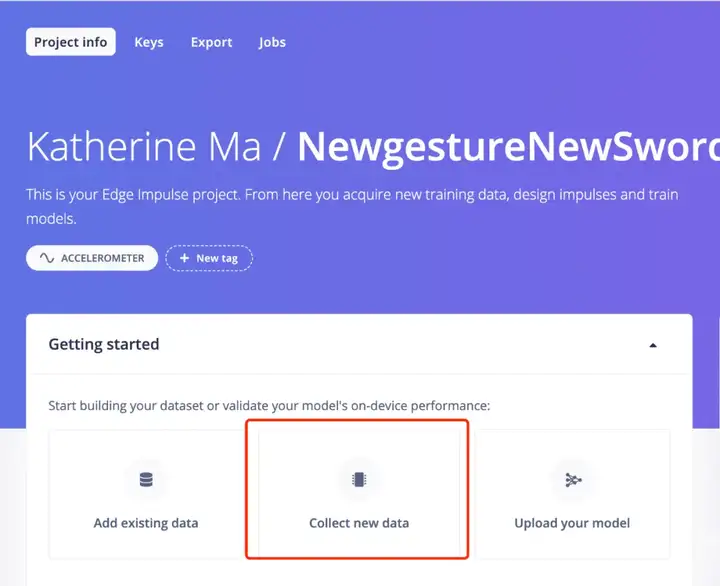
本项目使用Edge Impulse进行机器学习:打开Edge Impulse,为Celestial Gerapbblade创建新项目:

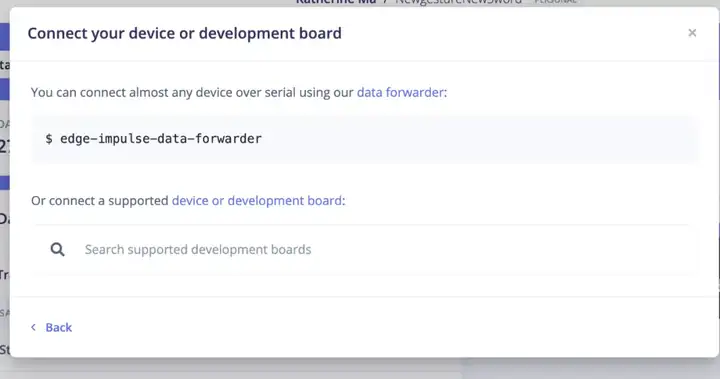
准备nRF52840进行感应收集:将ReadXIAOAccelerometer.ino 代码上传到 nRF52840 感应器中。成功获取三轴XYZ轴加速度数据:

连接Edge脉冲和前向加速度计数据:
返回Edge Impluse开始训练数据:

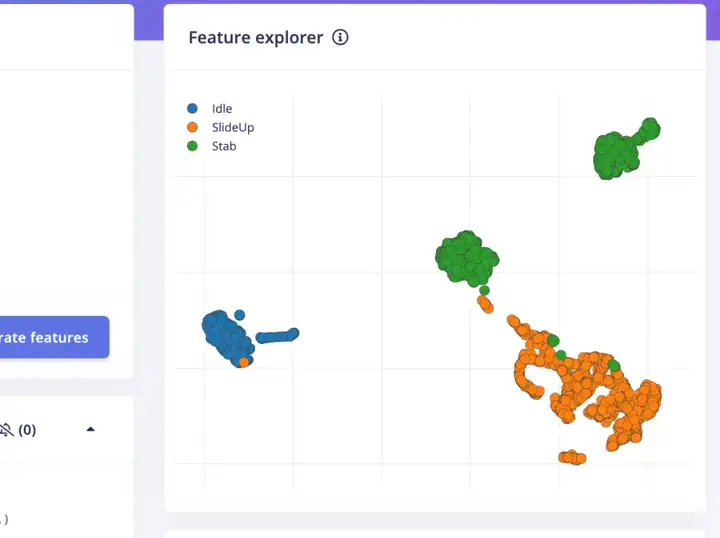
本项目中我创建了两组手势:
刺伤手势和SlideUp手势
使用训练数据生成特征和分类器。
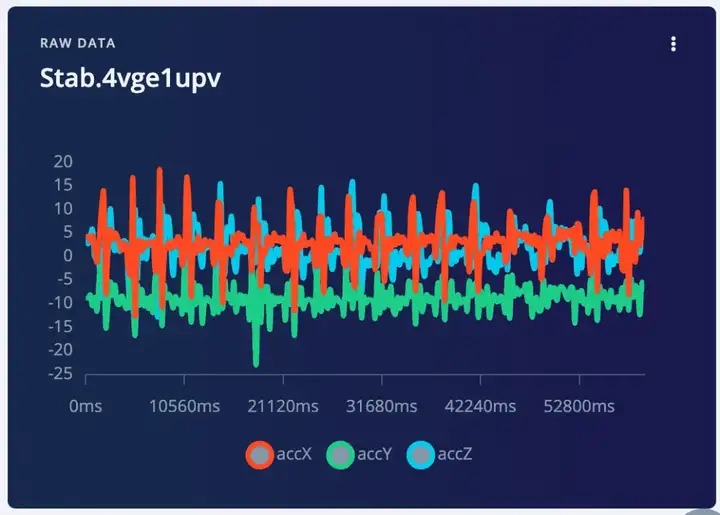
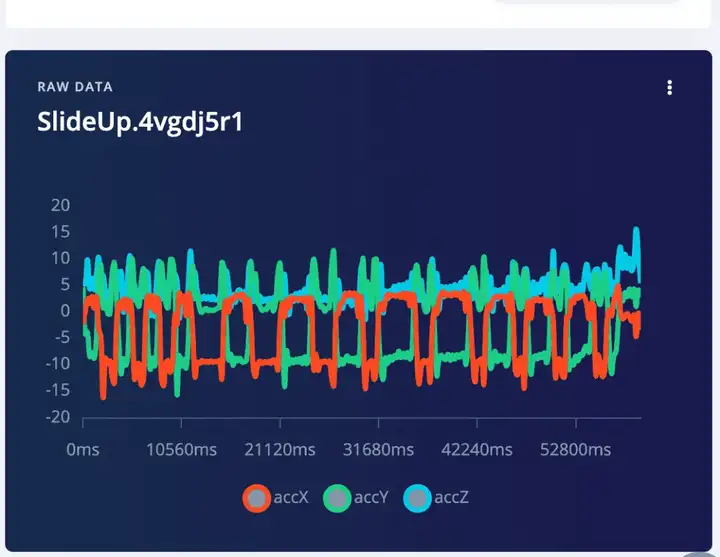
点击一个数据重新编码,然后你可以看到三个加速度计数据的三个波
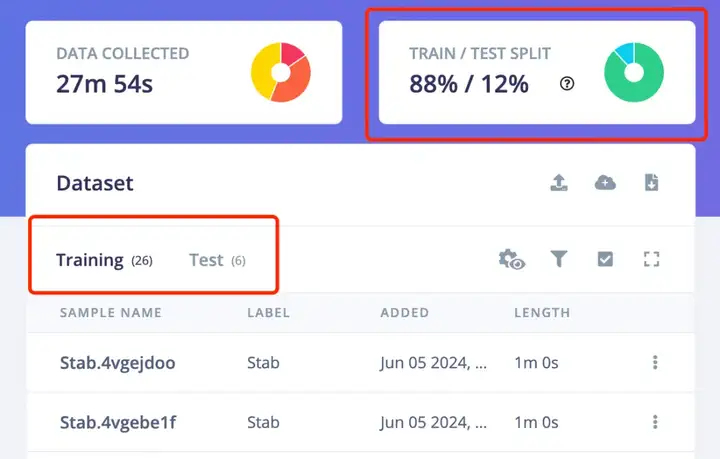
另一件非常重要的事情是确保训练数据和测试数据的百分比是 80% 到 20%。因为你还是需要一些数据来测试生成的模型的识别准确率。点击上面的“训练&测试”,你可以看到每个不同标签的训练数据和测试数据的比例。将现有数据移动到测试数据中,或对更多数据进行采样以进行测试。

光谱特性:尝试不同的参数,并在右侧观察结果,如果您不想太深入,请选择合适的参数。

继续进行特征生成,生成特征需要一段时间。然后,您可以继续操作 分类器 在面板左侧继续。
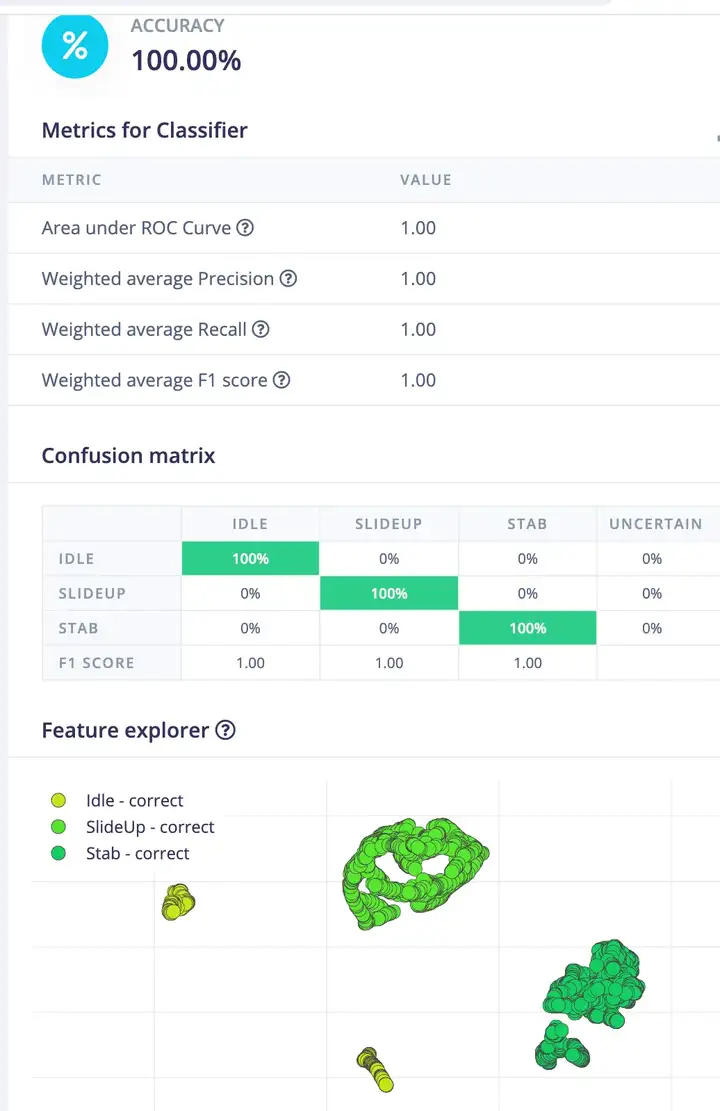
分类准确率为100%
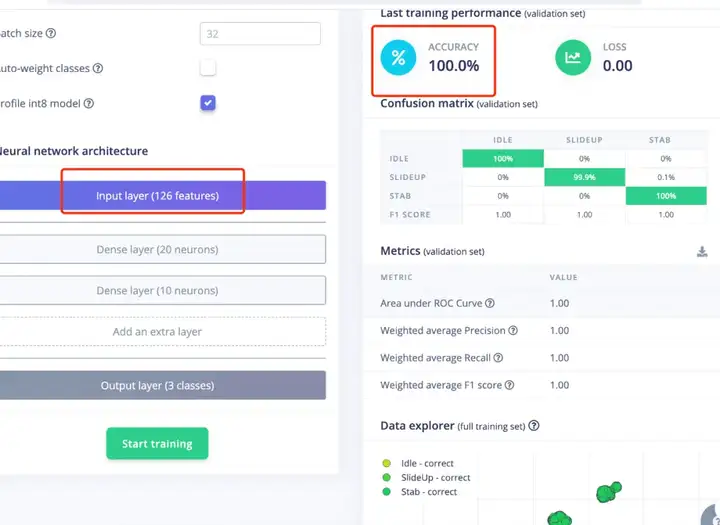
进入模块测试,查看结果。
生成Arduino库
进入“部署”,搜索“Arduino库”,点击构建


组装
将所有部件组装在一起,连接器已安装到手柄中。

连接PCB和LED灯带,放入盒子中,将LED灯带粘在连接器上
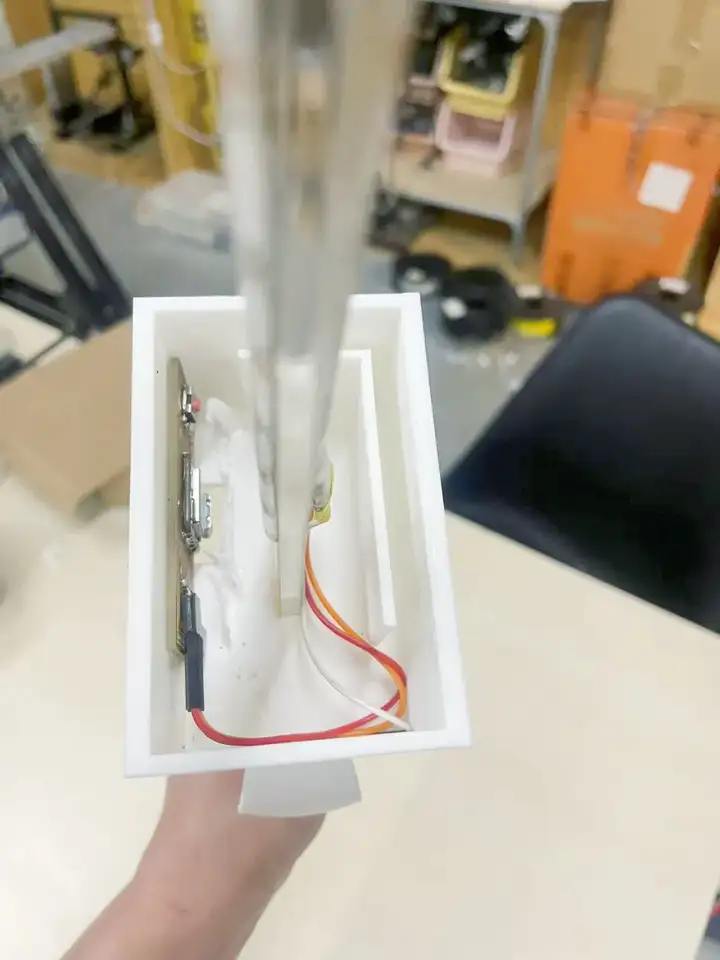
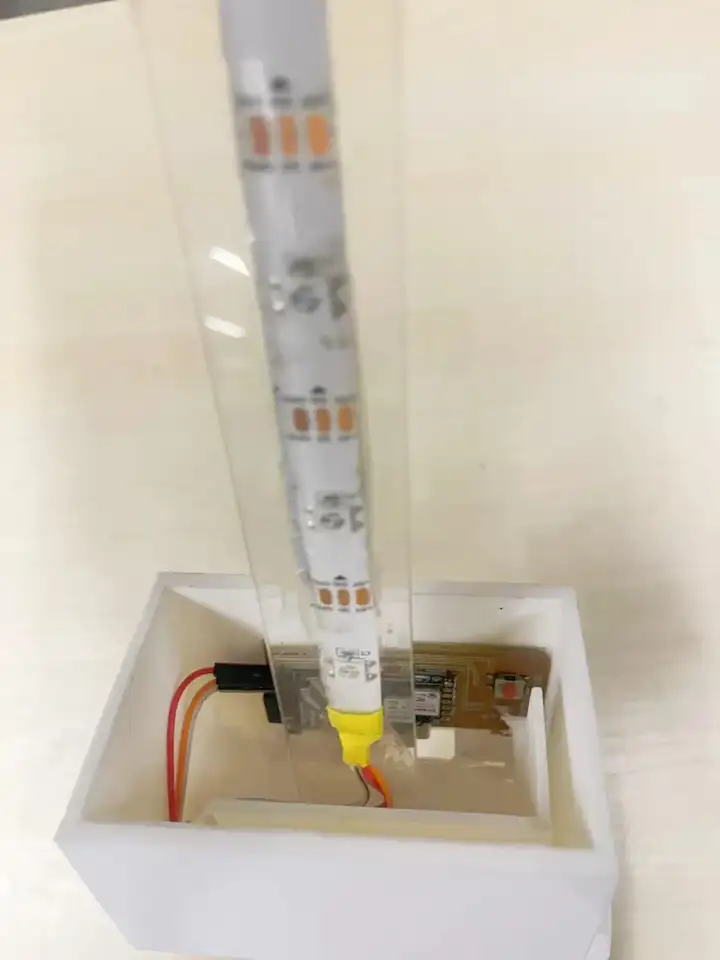
将带翼的盒子上部放在连接器的顶部,并将其与手柄的下部结合。

最后将激光切割部分从顶部慢慢滑下。
代码编程
对于Arduino编程部分,我详细阐述了第9周和第16周的LED灯效和手势识别的代码。最终项目的代码主要是将这两个代码组合在一起。
* Includes ---------------------------------------------------------------- */
/*#include  //replace the library name with yours*/
#include "NewgestureNewSword_inferencing.h"
#include "LSM6DS3.h"
#include
#ifdef __AVR__
#include   // Required for 16 MHz Adafruit Trinket
#endif

/* Constant defines -------------------------------------------------------- */
#define CONVERT_G_TO_MS2    9.80665f
#define MAX_ACCEPTED_RANGE  2.0f        // starting 03/2022, models are generated setting range to +-2, but this example use Arudino library which set range to +-4g. If you are using an older model, ignore this value and use 4.0f instead
#define INTERVAL_MS (1000 / (FREQUENCY_HZ + 1))
static unsigned long last_interval_ms = 0;


LSM6DS3 myIMU(I2C_MODE, 0x6A);  //I2C device address 0x6A


#define LED_PIN D10
#define LED_COUNT 22

// Declare our NeoPixel strip object:
Adafruit_NeoPixel strip(LED_COUNT, LED_PIN, NEO_GRB + NEO_KHZ800);
// Argument 1 = Number of pixels in NeoPixel strip
// Argument 2 = Arduino pin number (most are valid)
// Argument 3 = Pixel type flags, add together as needed:
//   NEO_KHZ800  800 KHz bitstream (most NeoPixel products w/WS2812 LEDs)
//   NEO_KHZ400  400 KHz (classic 'v1' (not v2) FLORA pixels, WS2811 drivers)
//   NEO_GRB     Pixels are wired for GRB bitstream (most NeoPixel products)
//   NEO_RGB     Pixels are wired for RGB bitstream (v1 FLORA pixels, not v2)
//   NEO_RGBW    Pixels are wired for RGBW bitstream (NeoPixel RGBW products)


unsigned long patternPrevious = 0;  // Previous Pattern Millis
int patternCurrent = 6;             // Current Pattern Number
int patternInterval = 10000;        // Pattern Interval (ms)
bool patternComplete = false;

int pixelInterval = 50;            // Pixel Interval (ms)
int pixelQueue = 0;                // Pattern Pixel Queue
int pixelCycle = 0;                // Pattern Pixel Cycle
uint16_t pixelNumber = LED_COUNT;  // Total Number of Pixels

static bool debug_nn = false; // Set this to true to see e.g. features generated from the raw signal

/**
* @brief      Arduino setup function
*/
void setup()
{
    // put your setup code here, to run once:
    Serial.begin(115200);
    // comment out the below line to cancel the wait for USB connection (needed for native USB)
    while (!Serial);
    Serial.println("Edge Impulse Inferencing Demo");

    if (!myIMU.begin()) {
        ei_printf("Failed to initialize IMU!\r\n");
    }
    else {
        ei_printf("IMU initialized\r\n");
    }

    if (EI_CLASSIFIER_RAW_SAMPLES_PER_FRAME != 3) {
        ei_printf("ERR: EI_CLASSIFIER_RAW_SAMPLES_PER_FRAME should be equal to 3 (the 3 sensor axes)\n");
        return;
    }
    #if defined(__AVR_ATtiny85__) && (F_CPU == 16000000)
       clock_prescale_set(clock_div_1);
    #endif
  // END of Trinket-specific code.

     strip.begin();             // INITIALIZE NeoPixel strip object (REQUIRED)
     strip.show();              // Turn OFF all pixels ASAP
     strip.setBrightness(127);  // Set BRIGHTNESS to about 1/5 (max = 255)
}

/**
 * @brief Return the sign of the number
 *
 * @param number
 * @return int 1 if positive (or 0) -1 if negative
 */
float ei_get_sign(float number) {
    return (number >= 0.0) ? 1.0 : -1.0;
}

/**
* @brief      Get data and run inferencing
*
* @param[in]  debug  Get debug info if true
*/
void loop()
{
    //ei_printf("\nStarting inferencing in 2 seconds...\n");

    delay(100);

    //ei_printf("Sampling...\n");

    // Allocate a buffer here for the values we'll read from the IMU
    float buffer[EI_CLASSIFIER_DSP_INPUT_FRAME_SIZE] = { 0 };
     char pregesture[5];
     const char* ptr = "hello";
     // 确保数组大小足够存储字符串和空字符


    for (size_t ix = 0; ix < EI_CLASSIFIER_DSP_INPUT_FRAME_SIZE; ix += 3) {
        // Determine the next tick (and then sleep later)
        uint64_t next_tick = micros() + (EI_CLASSIFIER_INTERVAL_MS * 1000);

        //IMU.readAcceleration(buffer[ix], buffer[ix + 1], buffer[ix + 2]);

        buffer[ix+0] = myIMU.readFloatAccelX();
        buffer[ix+1] = myIMU.readFloatAccelY();
        buffer[ix+2] = myIMU.readFloatAccelZ();


        for (int i = 0; i < 3; i++) {
            if (fabs(buffer[ix + i]) > MAX_ACCEPTED_RANGE) {
                buffer[ix + i] = ei_get_sign(buffer[ix + i]) * MAX_ACCEPTED_RANGE;
            }
        }

        buffer[ix + 0] *= CONVERT_G_TO_MS2;
        buffer[ix + 1] *= CONVERT_G_TO_MS2;
        buffer[ix + 2] *= CONVERT_G_TO_MS2;

        delayMicroseconds(next_tick - micros());

    }

    // Turn the raw buffer in a signal which we can the classify
    signal_t signal;
    int err = numpy::signal_from_buffer(buffer, EI_CLASSIFIER_DSP_INPUT_FRAME_SIZE, &signal);
    if (err != 0) {
        ei_printf("Failed to create signal from buffer (%d)\n", err);
        return;
    }

    // Run the classifier
    ei_impulse_result_t result = { 0 };

    err = run_classifier(&signal, &result, debug_nn);
    if (err != EI_IMPULSE_OK) {
        ei_printf("ERR: Failed to run classifier (%d)\n", err);
        return;
    }

    // print the predictions
   // ei_printf("Predictions ");
   // ei_printf("(DSP: %d ms., Classification: %d ms., Anomaly: %d ms.)",
   // result.timing.dsp, result.timing.classification, result.timing.anomaly);
    //ei_printf("\n");
    for (size_t ix = 0; ix < EI_CLASSIFIER_LABEL_COUNT; ix++) {

   // ei_printf("    %s: %.5f\n", result.classification[ix].label, result.classification[ix].value);
    if (result.classification[ix].value > .5) {

        ei_printf("Gesture now is %s \n", result.classification[ix]);
        if( result.classification[ix].label== "Idle")
        {

          rainbow(30);
         // delay(1000);
        }

       else if( result.classification[ix].label == "Stab")
        {
          theaterChase(strip.Color(200,   0, 0), 20); // Cyan
          Serial.println("Swipe red now");
          //delay(1000);
        }
        else if( result.classification[ix].label == "TakeItUP")
        {
          theaterChase(strip.Color(255,   0, 255), 20); // Cyan
          //Serial.println("ColorWipe Silver now");
          //delay(1000);
        }
        else if( result.classification[ix].label == "SlideUp")
        {
          colorWipe(strip.Color( 255, 0, 255), 30); // Anycolor
          Serial.println("ColorWipe Purple now");
          //delay(1000);
        }
        else
        {
          colorWipe(strip.Color( 126, 0, 89), 20); // Anycolor
        }

      }
    }
  }

    //  if (result.classification[ix].value > .5) {
    //     ei_printf("    %s: %.5f\n", result.classification[ix].label, result.classification[ix].value);
    // }
    // }

#if EI_CLASSIFIER_HAS_ANOMALY == 1
    ei_printf("anomaly score: %.3f\n", result.anomaly);
#endif


  uint32_t Wheel(byte WheelPos) {
    WheelPos = 255 - WheelPos;
    if (WheelPos < 85) {
      return strip.Color(255 - WheelPos * 3, 0, WheelPos * 3);
    }
    if (WheelPos < 170) {
      WheelPos -= 85;
      return strip.Color(0, WheelPos * 3, 255 - WheelPos * 3);
    }
    WheelPos -= 170;
    return strip.Color(WheelPos * 3, 255 - WheelPos * 3, 0);
  }

  void colorWipe(uint32_t color, int wait)
{


    for (int i = 0; i < pixelNumber; i++)
    {                                  // For each pixel in strip...
        strip.setPixelColor(i, color); //  Set pixel's color (in RAM)
                    //  Update strip to matc
    }
    strip.show();
    delay(wait);
    for (int i = 0; i < pixelNumber; i++)
    {                                  // For each pixel in strip...
        strip.setPixelColor(i, strip.Color(0, 0, 0)); //  Set pixel's color (in RAM)
        strip.show();
        delay(wait-10);               //  Update strip to matc
    }
     for (int i = 0; i < pixelNumber; i++)
    {                                  // For each pixel in strip...
        strip.setPixelColor(i, color); //  Set pixel's color (in RAM)
        strip.show();
        delay(wait);               //  Update strip to matc
    }
  }

 //Theatre-style crawling lights with rainbow effect
  void theaterChaseRainbow(uint8_t wait) {
    if (pixelInterval != wait)
      pixelInterval = wait;  //  Update delay time
    for(int a = 0; a < 3; a++){
    for (int i = 0; i < pixelNumber; i += 3) {
      strip.setPixelColor(i + pixelQueue, Wheel((i + pixelCycle) % 255));  //  Update delay time
    }
    strip.show();
    for (int i = 0; i < pixelNumber; i += 3) {
      strip.setPixelColor(i + pixelQueue, strip.Color(127, 127, 127));  //  Update delay time
    }
    strip.clear();
    delay(wait);
    }
    pixelQueue++;  //  Advance current queue
    pixelCycle++;  //  Advance current cycle
    if (pixelQueue >= 3)
      pixelQueue = 0;  //  Loop
    if (pixelCycle >= 256)
      pixelCycle = 0;  //  Loop
  }


void theaterChase(uint32_t color, int wait) {

  static uint32_t loop_count = 0;
  static uint16_t current_pixel = 0;

  pixelInterval = wait;                   //  Update delay time

  strip.clear();

  for(int c=current_pixel; c < pixelNumber; c += 3) {
    strip.setPixelColor(c, color);
  }
  strip.show();

  current_pixel++;
  if (current_pixel >= 3) {
    current_pixel = 0;
    loop_count++;
  }

  if (loop_count >= 3) {
    current_pixel = 0;
    loop_count = 0;
  }
}

  void rainbow(int wait) {
  // Hue of first pixel runs 5 complete loops through the color wheel.
  // Color wheel has a range of 65536 but it's OK if we roll over, so
  // just count from 0 to 5*65536. Adding 256 to firstPixelHue each time
  // means we'll make 5*65536/256 = 1280 passes through this loop:
  for(long firstPixelHue = 0; firstPixelHue < 65536; firstPixelHue += 256) {
    // strip.rainbow() can take a single argument (first pixel hue) or
    // optionally a few extras: number of rainbow repetitions (default 1),
    // saturation and value (brightness) (both 0-255, similar to the
    // ColorHSV() function, default 255), and a true/false flag for whether
    // to apply gamma correction to provide 'truer' colors (default true).
    strip.rainbow(firstPixelHue);
    // Above line is equivalent to:
    // strip.rainbow(firstPixelHue, 1, 255, 255, true);
    strip.show(); // Update strip with new contents
    delay(wait);  // Pause for a moment
  }
}

#if !defined(EI_CLASSIFIER_SENSOR) || EI_CLASSIFIER_SENSOR != EI_CLASSIFIER_SENSOR_ACCELEROMETER
#error "Invalid model for current sensor"
#endif
