
1 需求分析
WebServer/ApplicationServer分散在各个机器上,然而我们依旧想在Hadoop平台上进行统计分析,如何将日志收集到Hadoop平台呢?
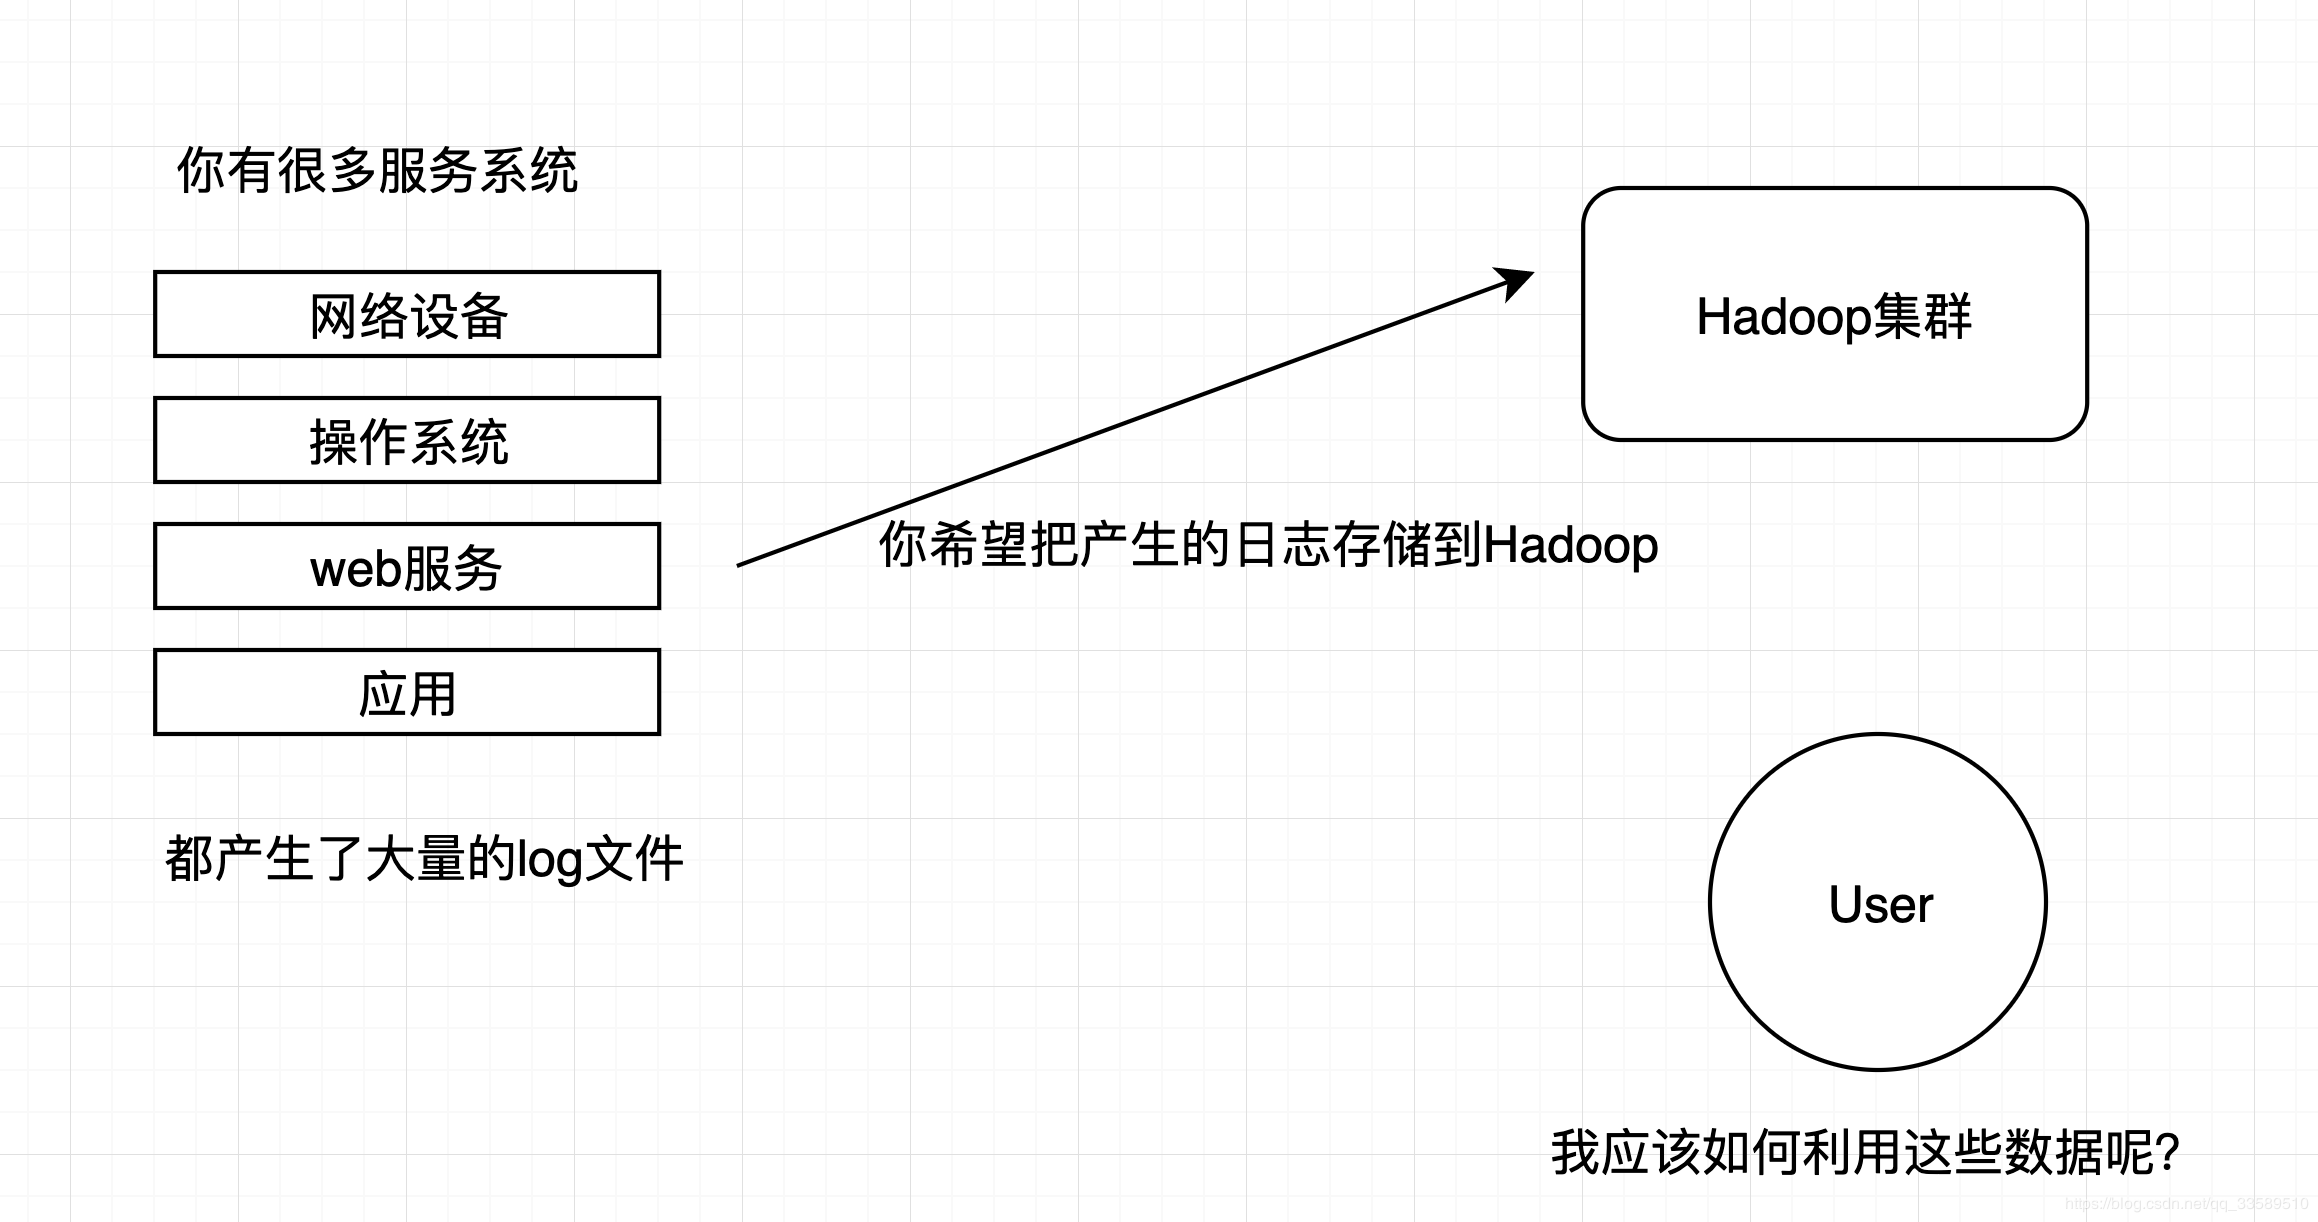
- 简单的这样吗?
shell cp hadoop集群的机器上;
hadoop fs -put ... /
显然该法面临着容错、负载均衡、高延迟、数据压缩等一系列问题
这显然已经无法满足需求了!
不如问问神奇的Flume呢???
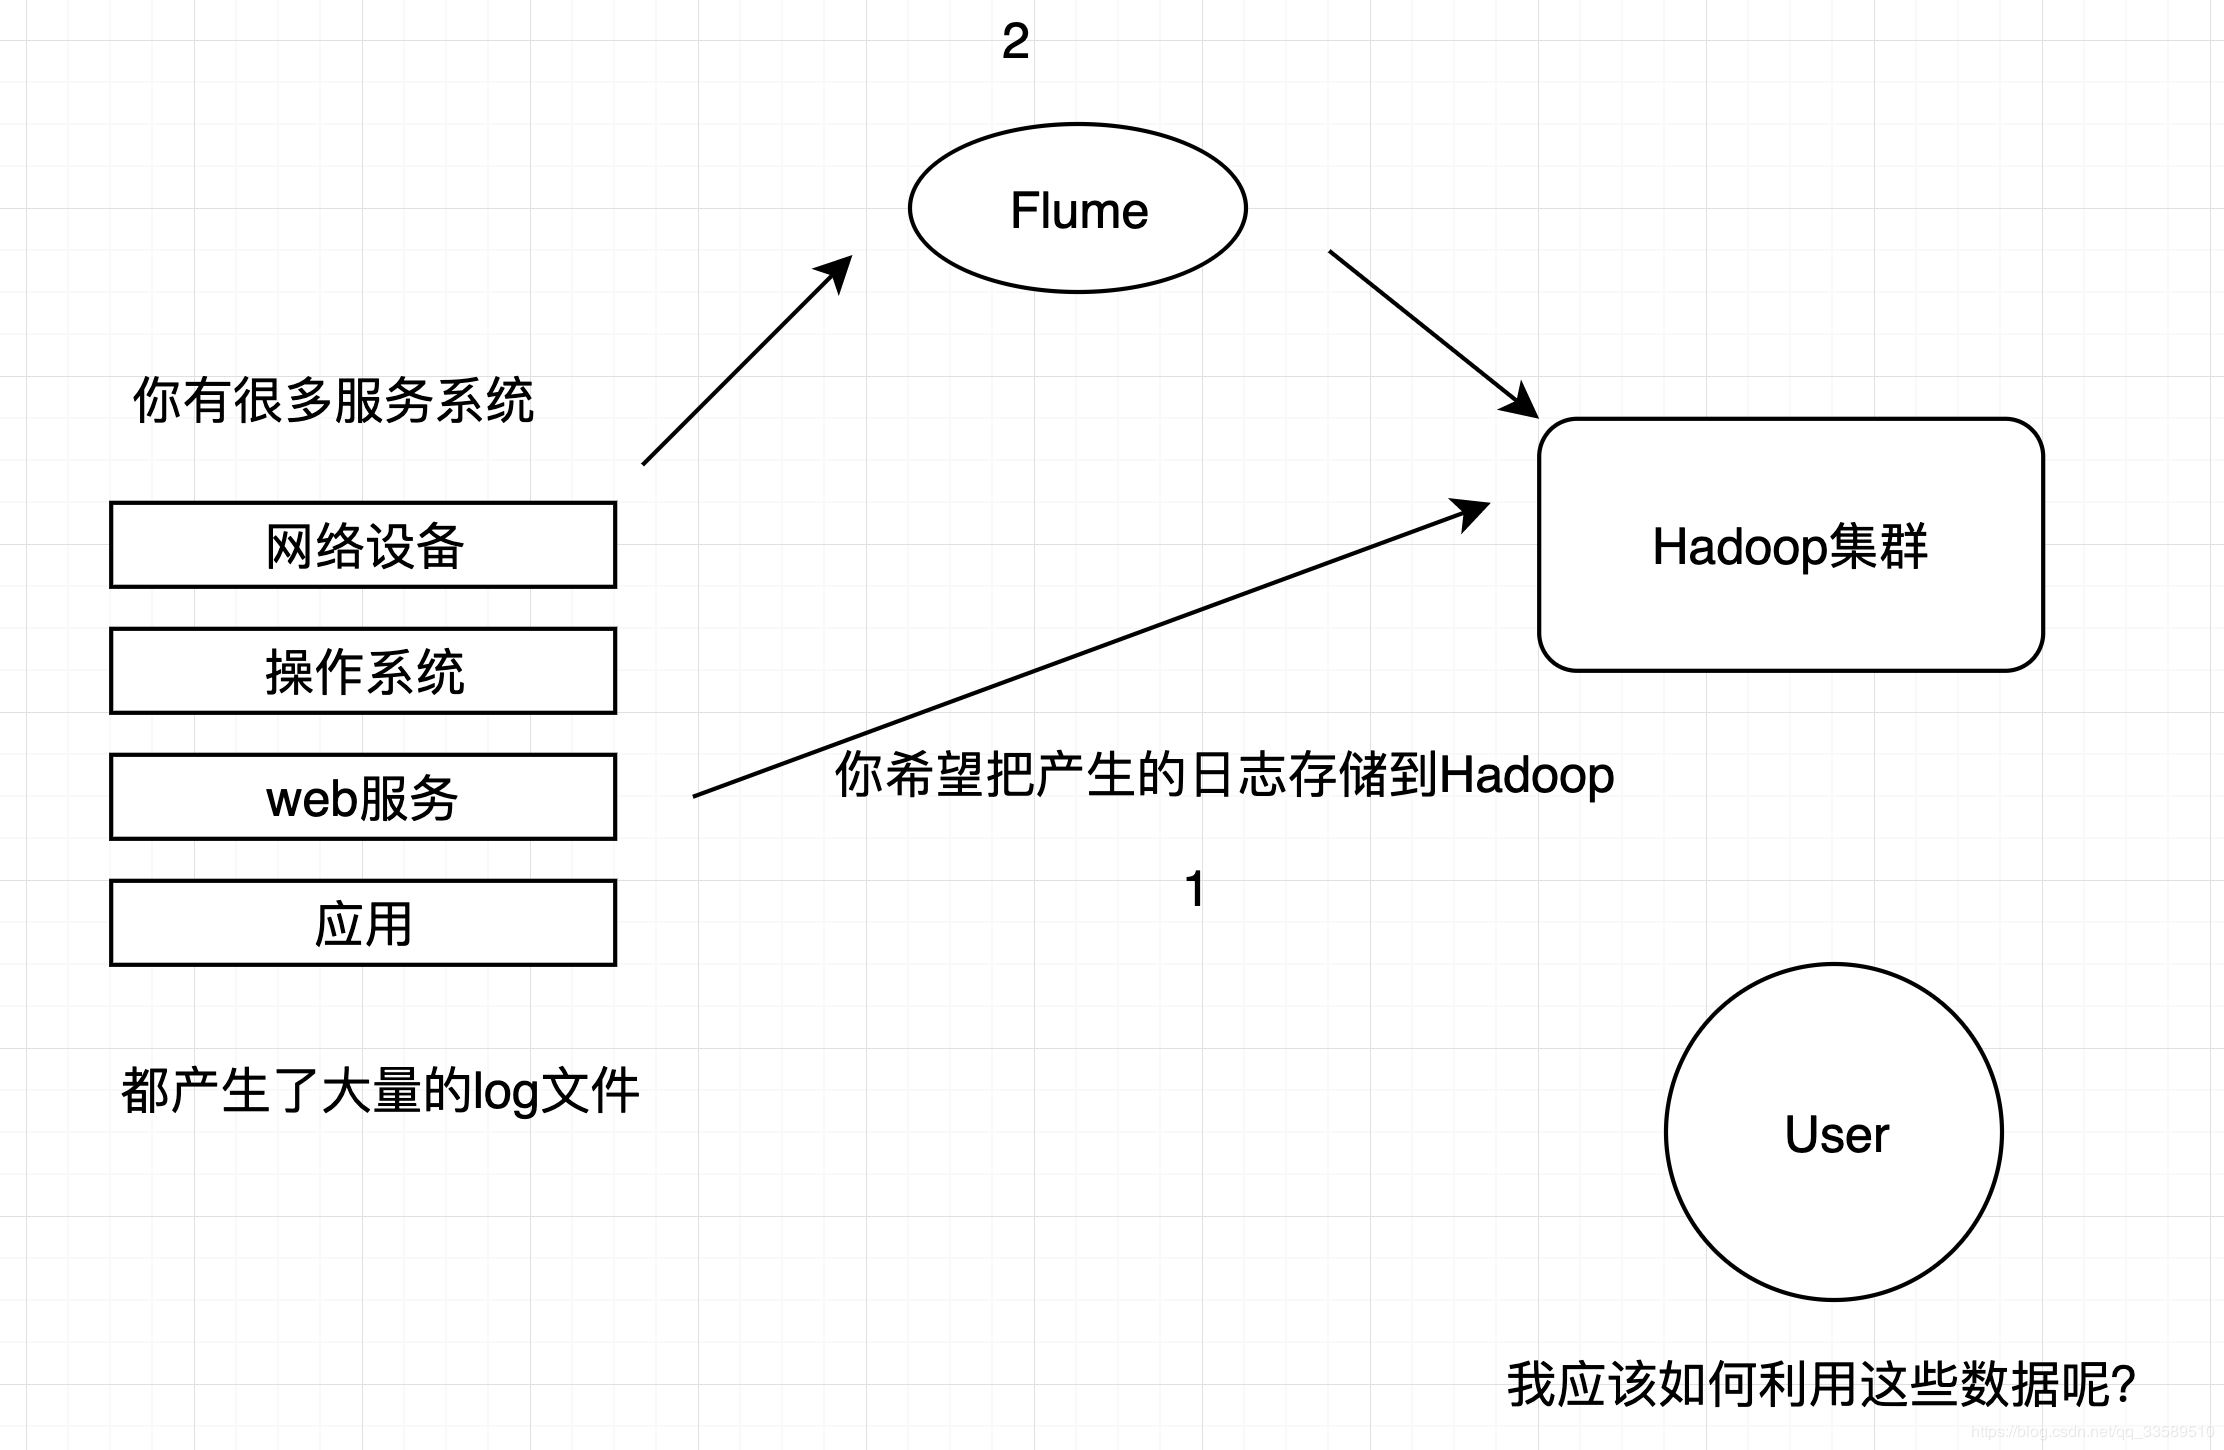
只需要配置文件,轻松解决以上问题!
2 Flume概述
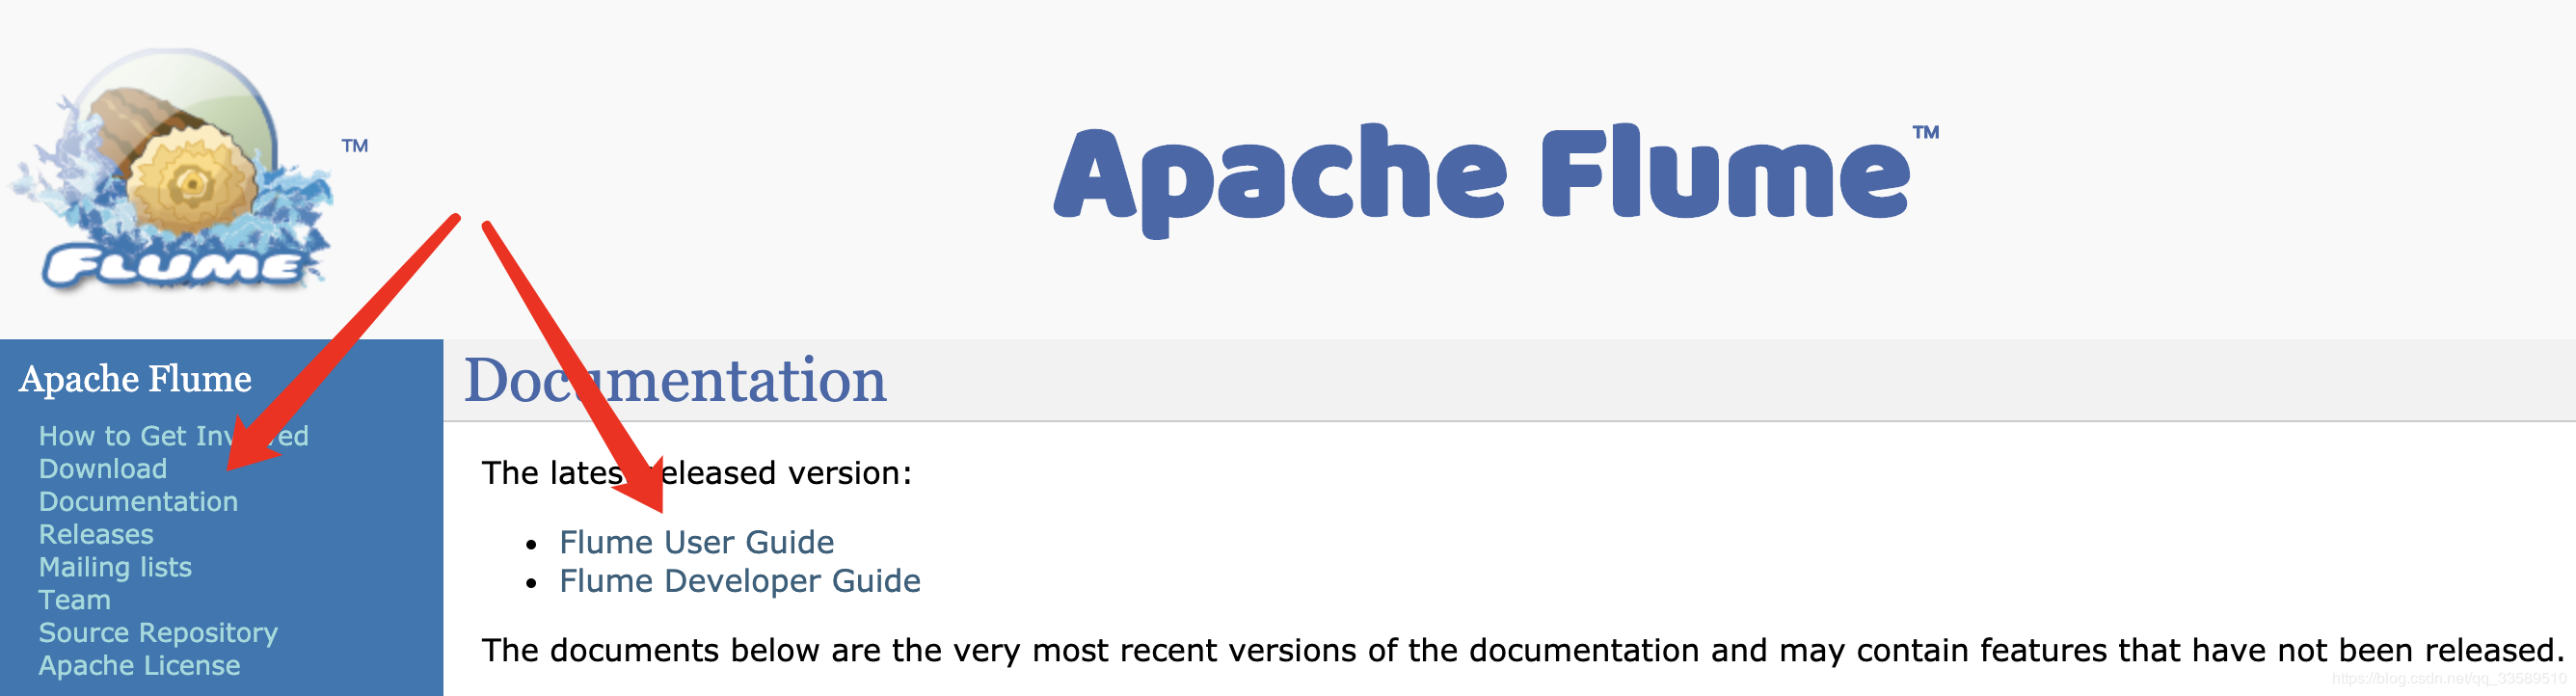
2.1 官网
- Flume是一种分布式,可靠且可用的服务,用于有效地收集,聚合和移动大量日志数据。
- 它具有基于流式数据流的简单灵活的架构。
- 它具有可靠的可靠性机制和许多故障转移和恢复机制,具有强大的容错性。
- 它使用简单的可扩展数据模型,允许在线分析应用程序。
2.2 设计目标
- 可靠性
当节点出现故障时,日志能够被传送到其他节点上而不会丢失。Flume提供了三种级别的可靠性保障,从强到弱依次分别为:end-to-end(收到数据agent首先将event写到磁盘上,当数据传送成功后,再删除;如果数据发送失败,可以重新发送。),Store on failure(这也是scribe采用的策略,当数据接收方crash时,将数据写到本地,待恢复后,继续发送),Best effort(数据发送到接收方后,不会进行确认)。
- 扩展性
Flume采用了三层架构,分别为agent,collector和storage,每一层均可以水平扩展。
其中,所有agent和collector由master统一管理,这使得系统容易监控和维护,且master允许有多个(使用ZooKeeper进行管理和负载均衡),这就避免了单点故障问题。
- 管理性
所有agent和colletor由master统一管理,这使得系统便于维护。多master情况,Flume利用ZooKeeper和gossip,保证动态配置数据的一致性。用户可以在master上查看各个数据源或者数据流执行情况,且可以对各个数据源配置和动态加载。Flume提供了web 和shell script command两种形式对数据流进行管理。
- 功能可扩展性
用户可以根据需要添加自己的agent,collector或者storage。此外,Flume自带了很多组件,包括各种agent(file, syslog等),collector和storage(file,HDFS等)。
2.3 主流竞品对比
其他的还有比如:
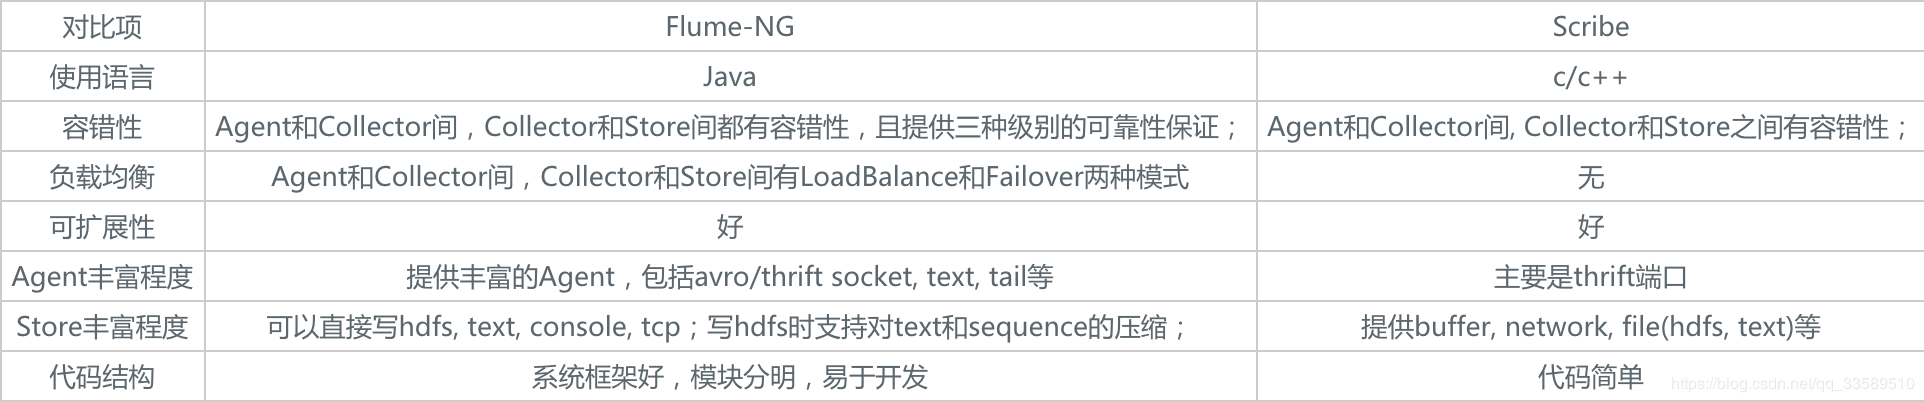
- Logstash: ELK(ElasticsSearch, Logstash, Kibana)
- Chukwa: Yahoo/Apache, 使用Java语言开发, 负载均衡不是很好, 已经不维护了。
- Fluentd: 和Flume类似, Ruby开发。
2.4 发展史
- Cloudera公司提出0.9.2,叫Flume-OG
- 2011年Flume-728编号,重要里程碑(Flume-NG),贡献给Apache社区
- 2012年7月 1.0版本
- 2015年5月 1.6版本
- ~ 1.9版本
3 核心架构及其组件
3.1 core架构

3.2 核心的组件
顺便来看看官方文档
3.2.1 Source - 收集
指定数据源(Avro, Thrift, Spooling, Kafka, Exec)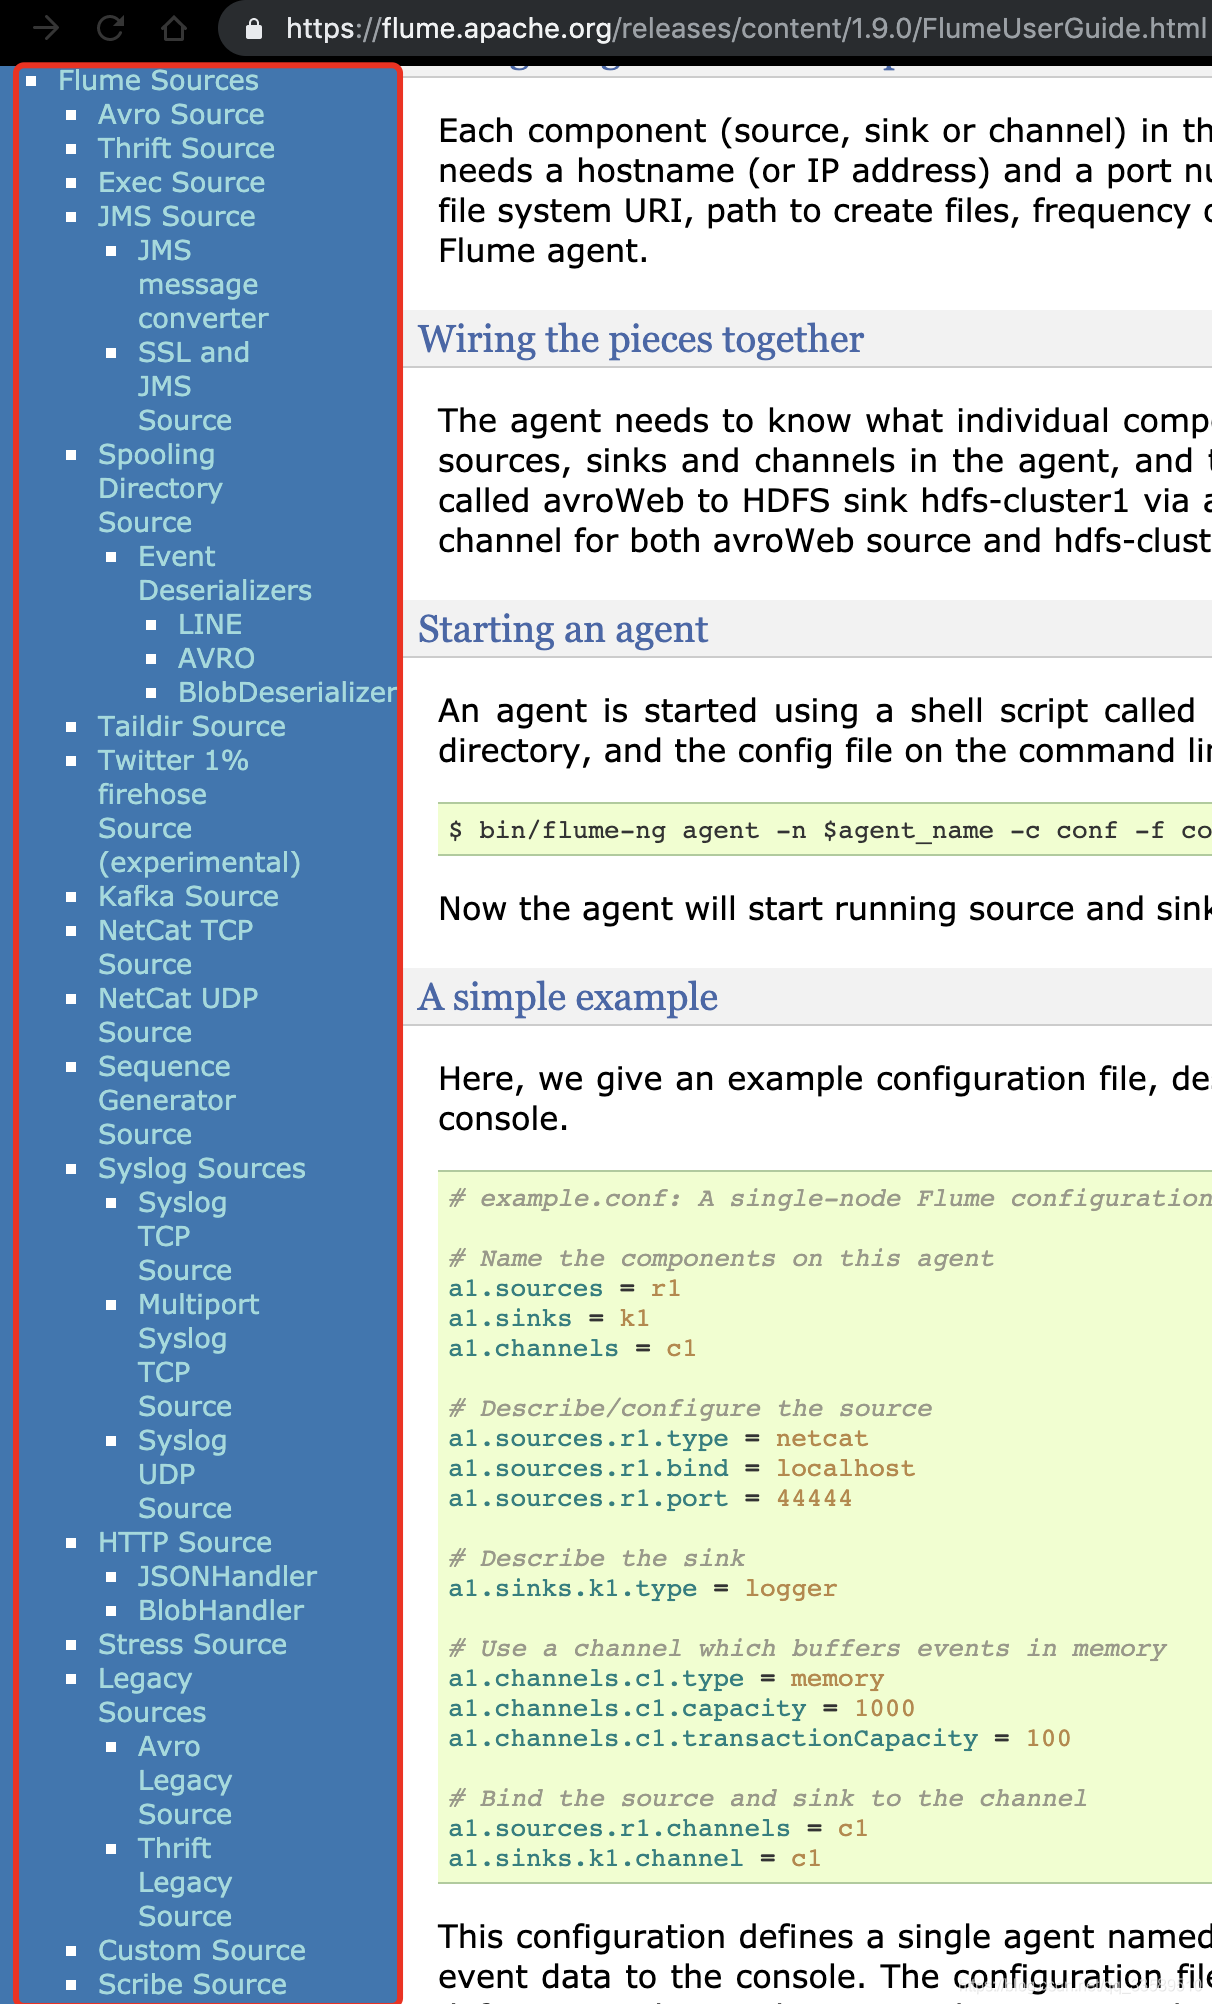
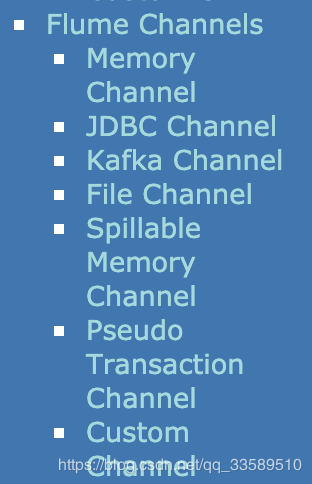
3.2.2 Channel - 聚集
把数据暂存(Memory, File, Kafka等用的比较多)
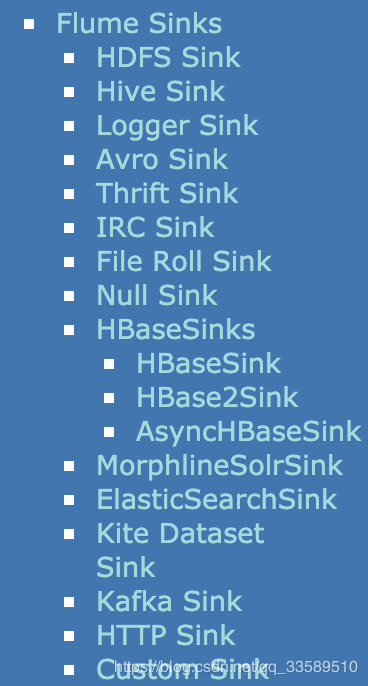
3.2.3 Sink - 输出
把数据写至某处(HDFS, Hive, Logger, Avro, Thrift, File, ES, HBase, Kafka等)
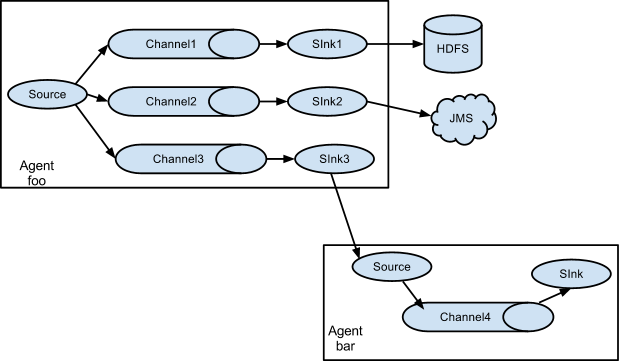
multi-agent flow
为了跨多个代理或跳数据流,先前代理的接收器和当前跳的源需要是avro类型,接收器指向源的主机名(或IP地址)和端口。

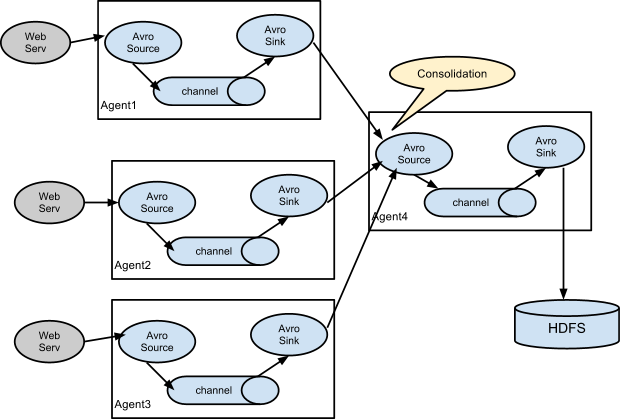
Consolidation合并
日志收集中非常常见的情况是大量日志生成客户端将数据发送到连接到存储子系统的少数消费者代理。 例如,从数百个Web服务器收集的日志发送给写入HDFS集群的十几个代理。
这可以通过使用avro接收器配置多个第一层代理在Flume中实现,所有这些代理都指向单个代理的avro源(同样,您可以在这种情况下使用thrift源/接收器/客户端)。 第二层代理上的此源将接收的事件合并到单个信道中,该信道由信宿器消耗到其最终目的地。
Multiplexing the flow
Flume支持将事件流多路复用到一个或多个目的地。 这是通过定义可以复制或选择性地将事件路由到一个或多个信道的流复用器来实现的。
上面的例子显示了来自代理“foo”的源代码将流程扩展到三个不同的通道。 扇出可以复制或多路复用。 在复制流的情况下,每个事件被发送到所有三个通道。 对于多路复用情况,当事件的属性与预配置的值匹配时,事件将被传递到可用通道的子集。 例如,如果一个名为“txnType”的事件属性设置为“customer”,那么它应该转到channel1和channel3,如果它是“vendor”,那么它应该转到channel2,否则转到channel3。 可以在代理的配置文件中设置映射。
4 环境配置与部署
4.1 系统需求
- 系统
macOS 10.14.14
- Java运行时环境
Java 1.8或更高版本
- 内存源
通道或接收器使用的配置的足够内存
- 磁盘空间
通道或接收器使用的配置的足够磁盘空间
- 目录权限
代理使用的目录的读/写权限
4.2 下载与安装

4.3 配置
- 查看安装路径

- 系统配置文件
export FLUME_VERSION=1.9.0
export FLUME_HOME=/usr/local/Cellar/flume/1.9.0/libexec
export FLUME_CONF_DIR=$FLUME_HOME/conf
export PATH=$FLUME_HOME/bin:$PATH- flume配置文件
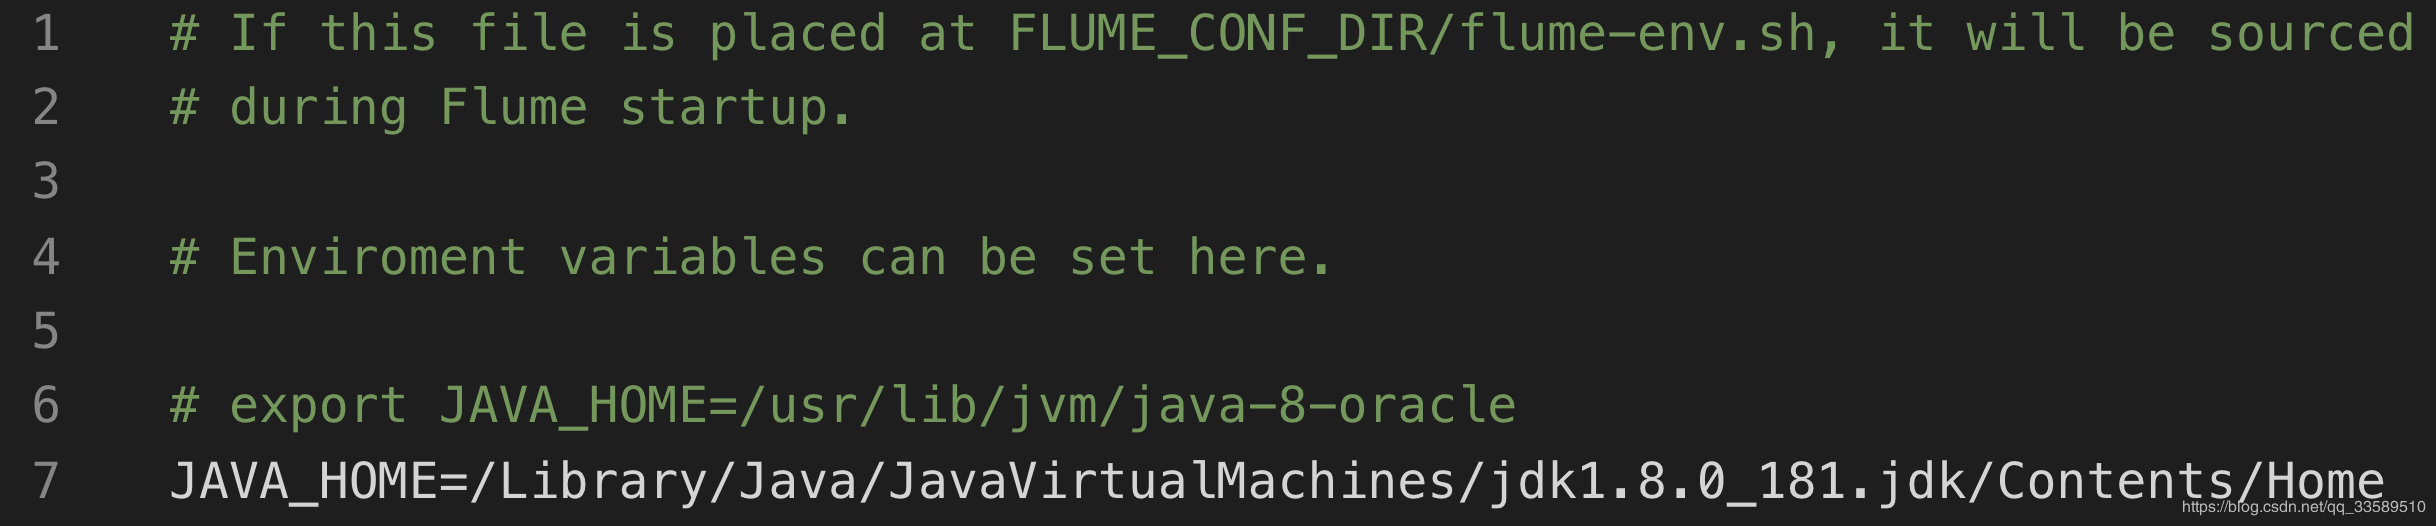
配置JAVA_HOME
- 验证
bin下的命令执行文件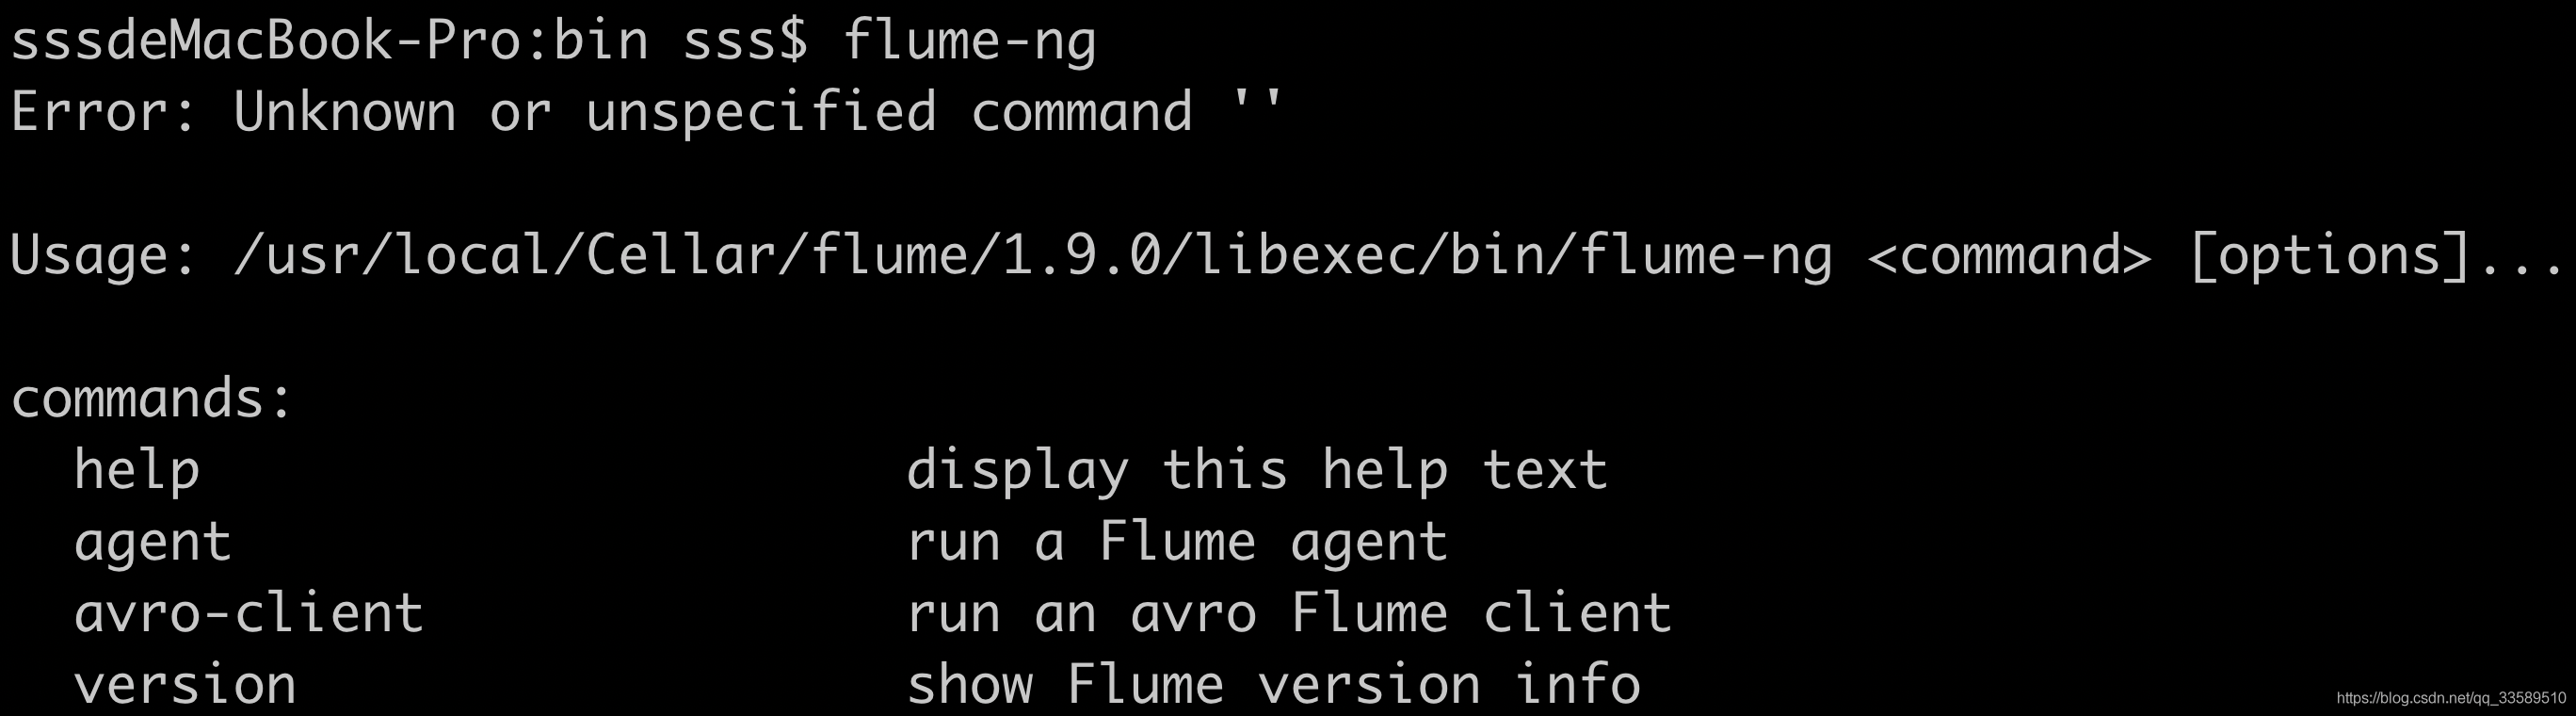
安装成功
5 实战
使用Flume的核心就在于配置文件
- 配置Source
- 配置Channel
- 配置Sink
- 组织在一起
5.1 场景1 - 从指定网络端口收集数据输出到控制台
看看官网的第一个案例
# example.conf: A single-node Flume configuration

# Name the components on this agent
a1.sources = r1
a1.sinks = k1
a1.channels = c1

# Describe/configure the source
a1.sources.r1.type = netcat
a1.sources.r1.bind = localhost
a1.sources.r1.port = 44444

# Describe the sink
a1.sinks.k1.type = logger

# Use a channel which buffers events in memory
a1.channels.c1.type = memory
a1.channels.c1.capacity = 1000
a1.channels.c1.transactionCapacity = 100

# Bind the source and sink to the channel
a1.sources.r1.channels = c1
a1.sinks.k1.channel = c1
a1:agent名称
r1:Source名称
k1:Sink名称
c1:Channel名称
看看其中的
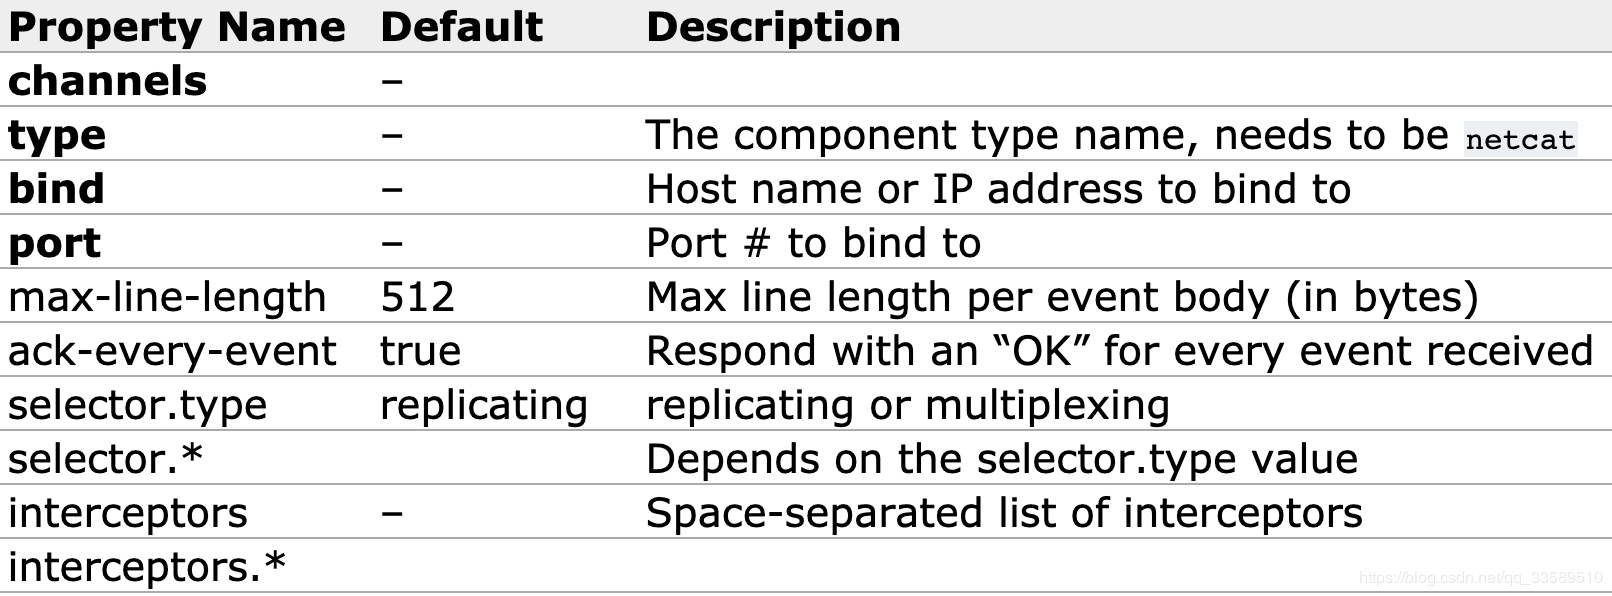
Sources : netcat
类似于netcat的源,它侦听给定端口并将每行文本转换为事件。 像nc -k -l [host] [port]这样的行为。 换句话说,它打开一个指定的端口并侦听数据。 期望是提供的数据是换行符分隔的文本。 每行文本都转换为Flume事件,并通过连接的通道发送。
必需属性以粗体显示。
Sinks:logger
在INFO级别记录事件。 通常用于测试/调试目的。 必需属性以粗体显示。 此接收器是唯一的例外,它不需要在“记录原始数据”部分中说明的额外配置。

channel:memor
事件存储在具有可配置最大大小的内存中队列中。 它非常适用于需要更高吞吐量的流量,并且在代理发生故障时准备丢失分阶段数据。 必需属性以粗体显示。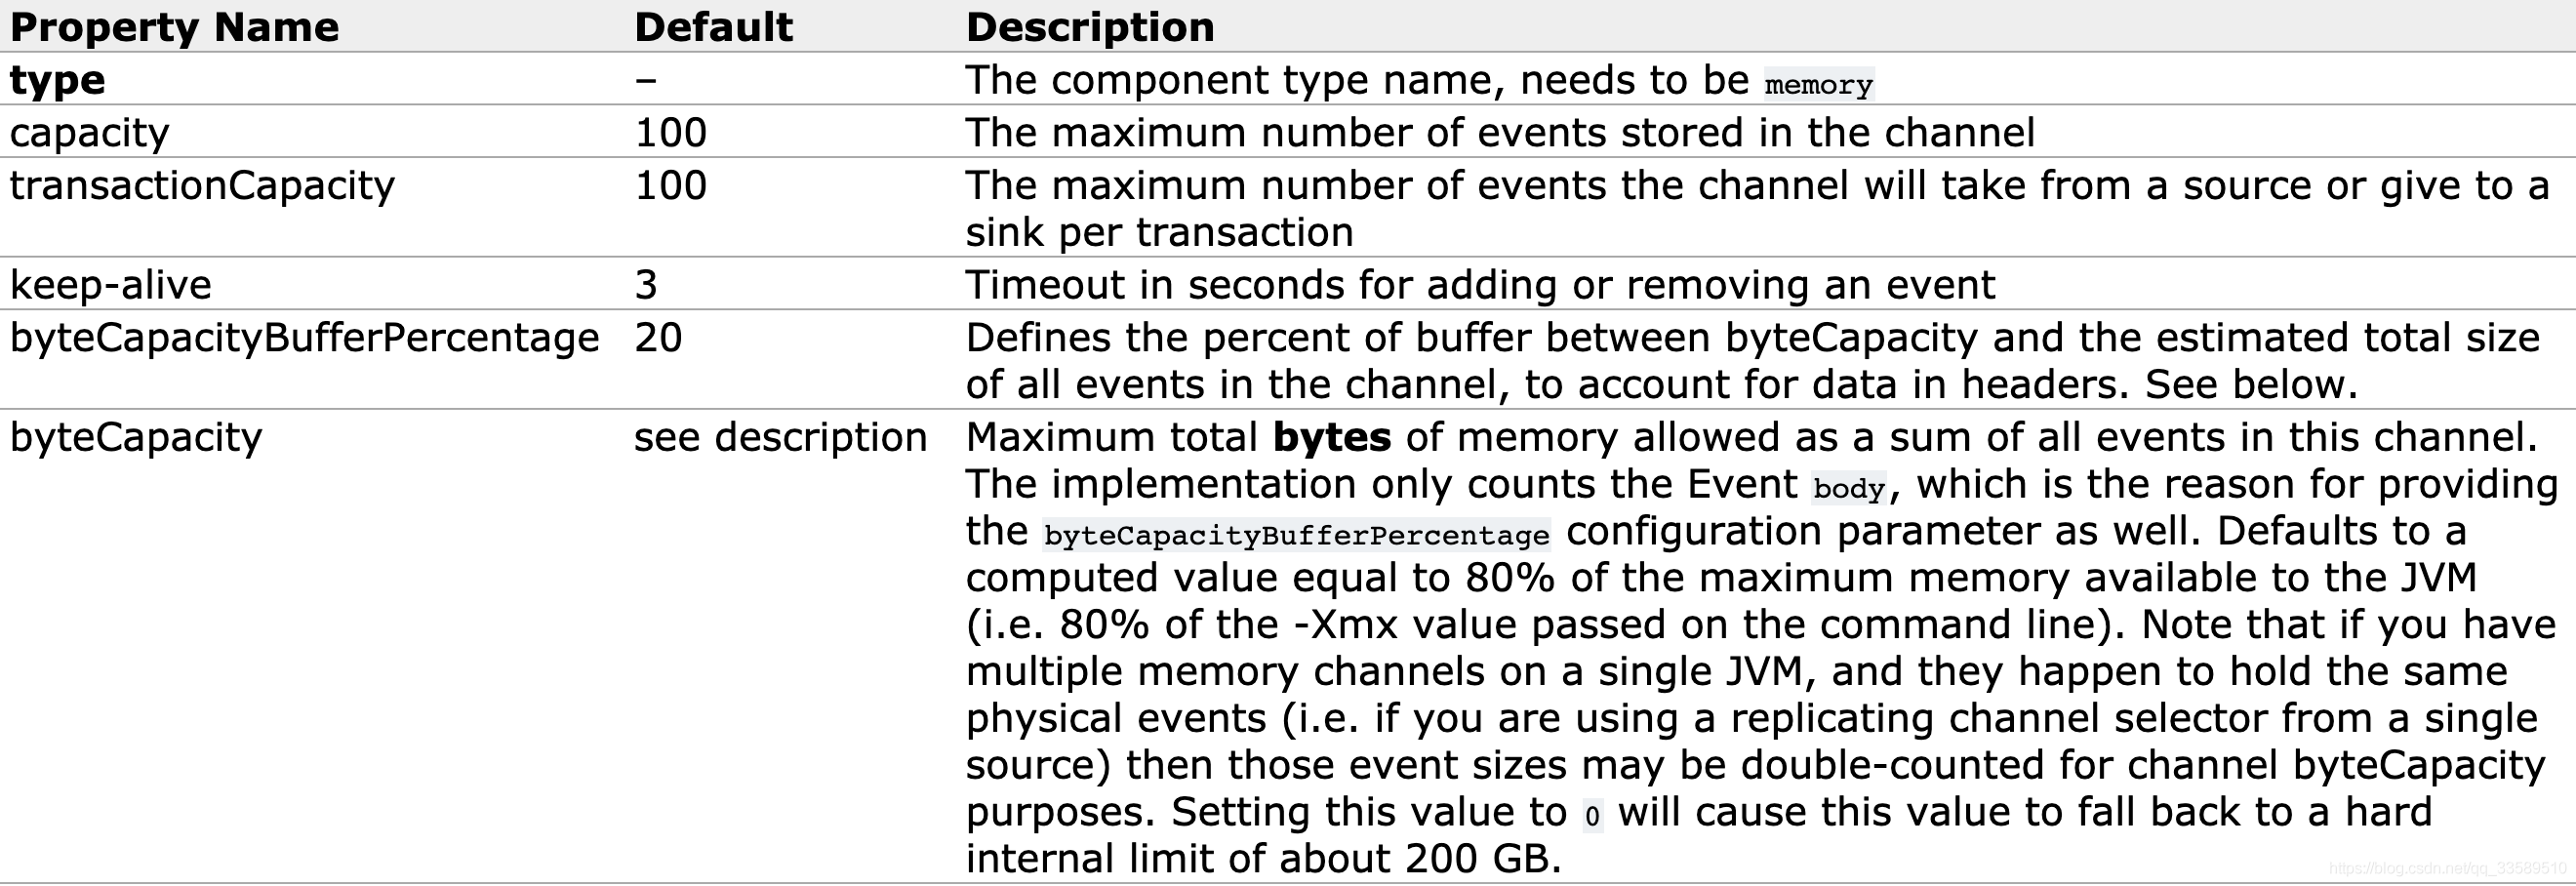
实战
新建example.conf配置
在conf目录下
启动一个agent
使用名为flume-ng的shell脚本启动代理程序,该脚本位于Flume发行版的bin目录中。 您需要在命令行上指定代理名称,config目录和配置文件:
bin/flume-ng agent -n $agent_name -c conf -f conf/flume-conf.properties.template- 回顾命令参数的意义
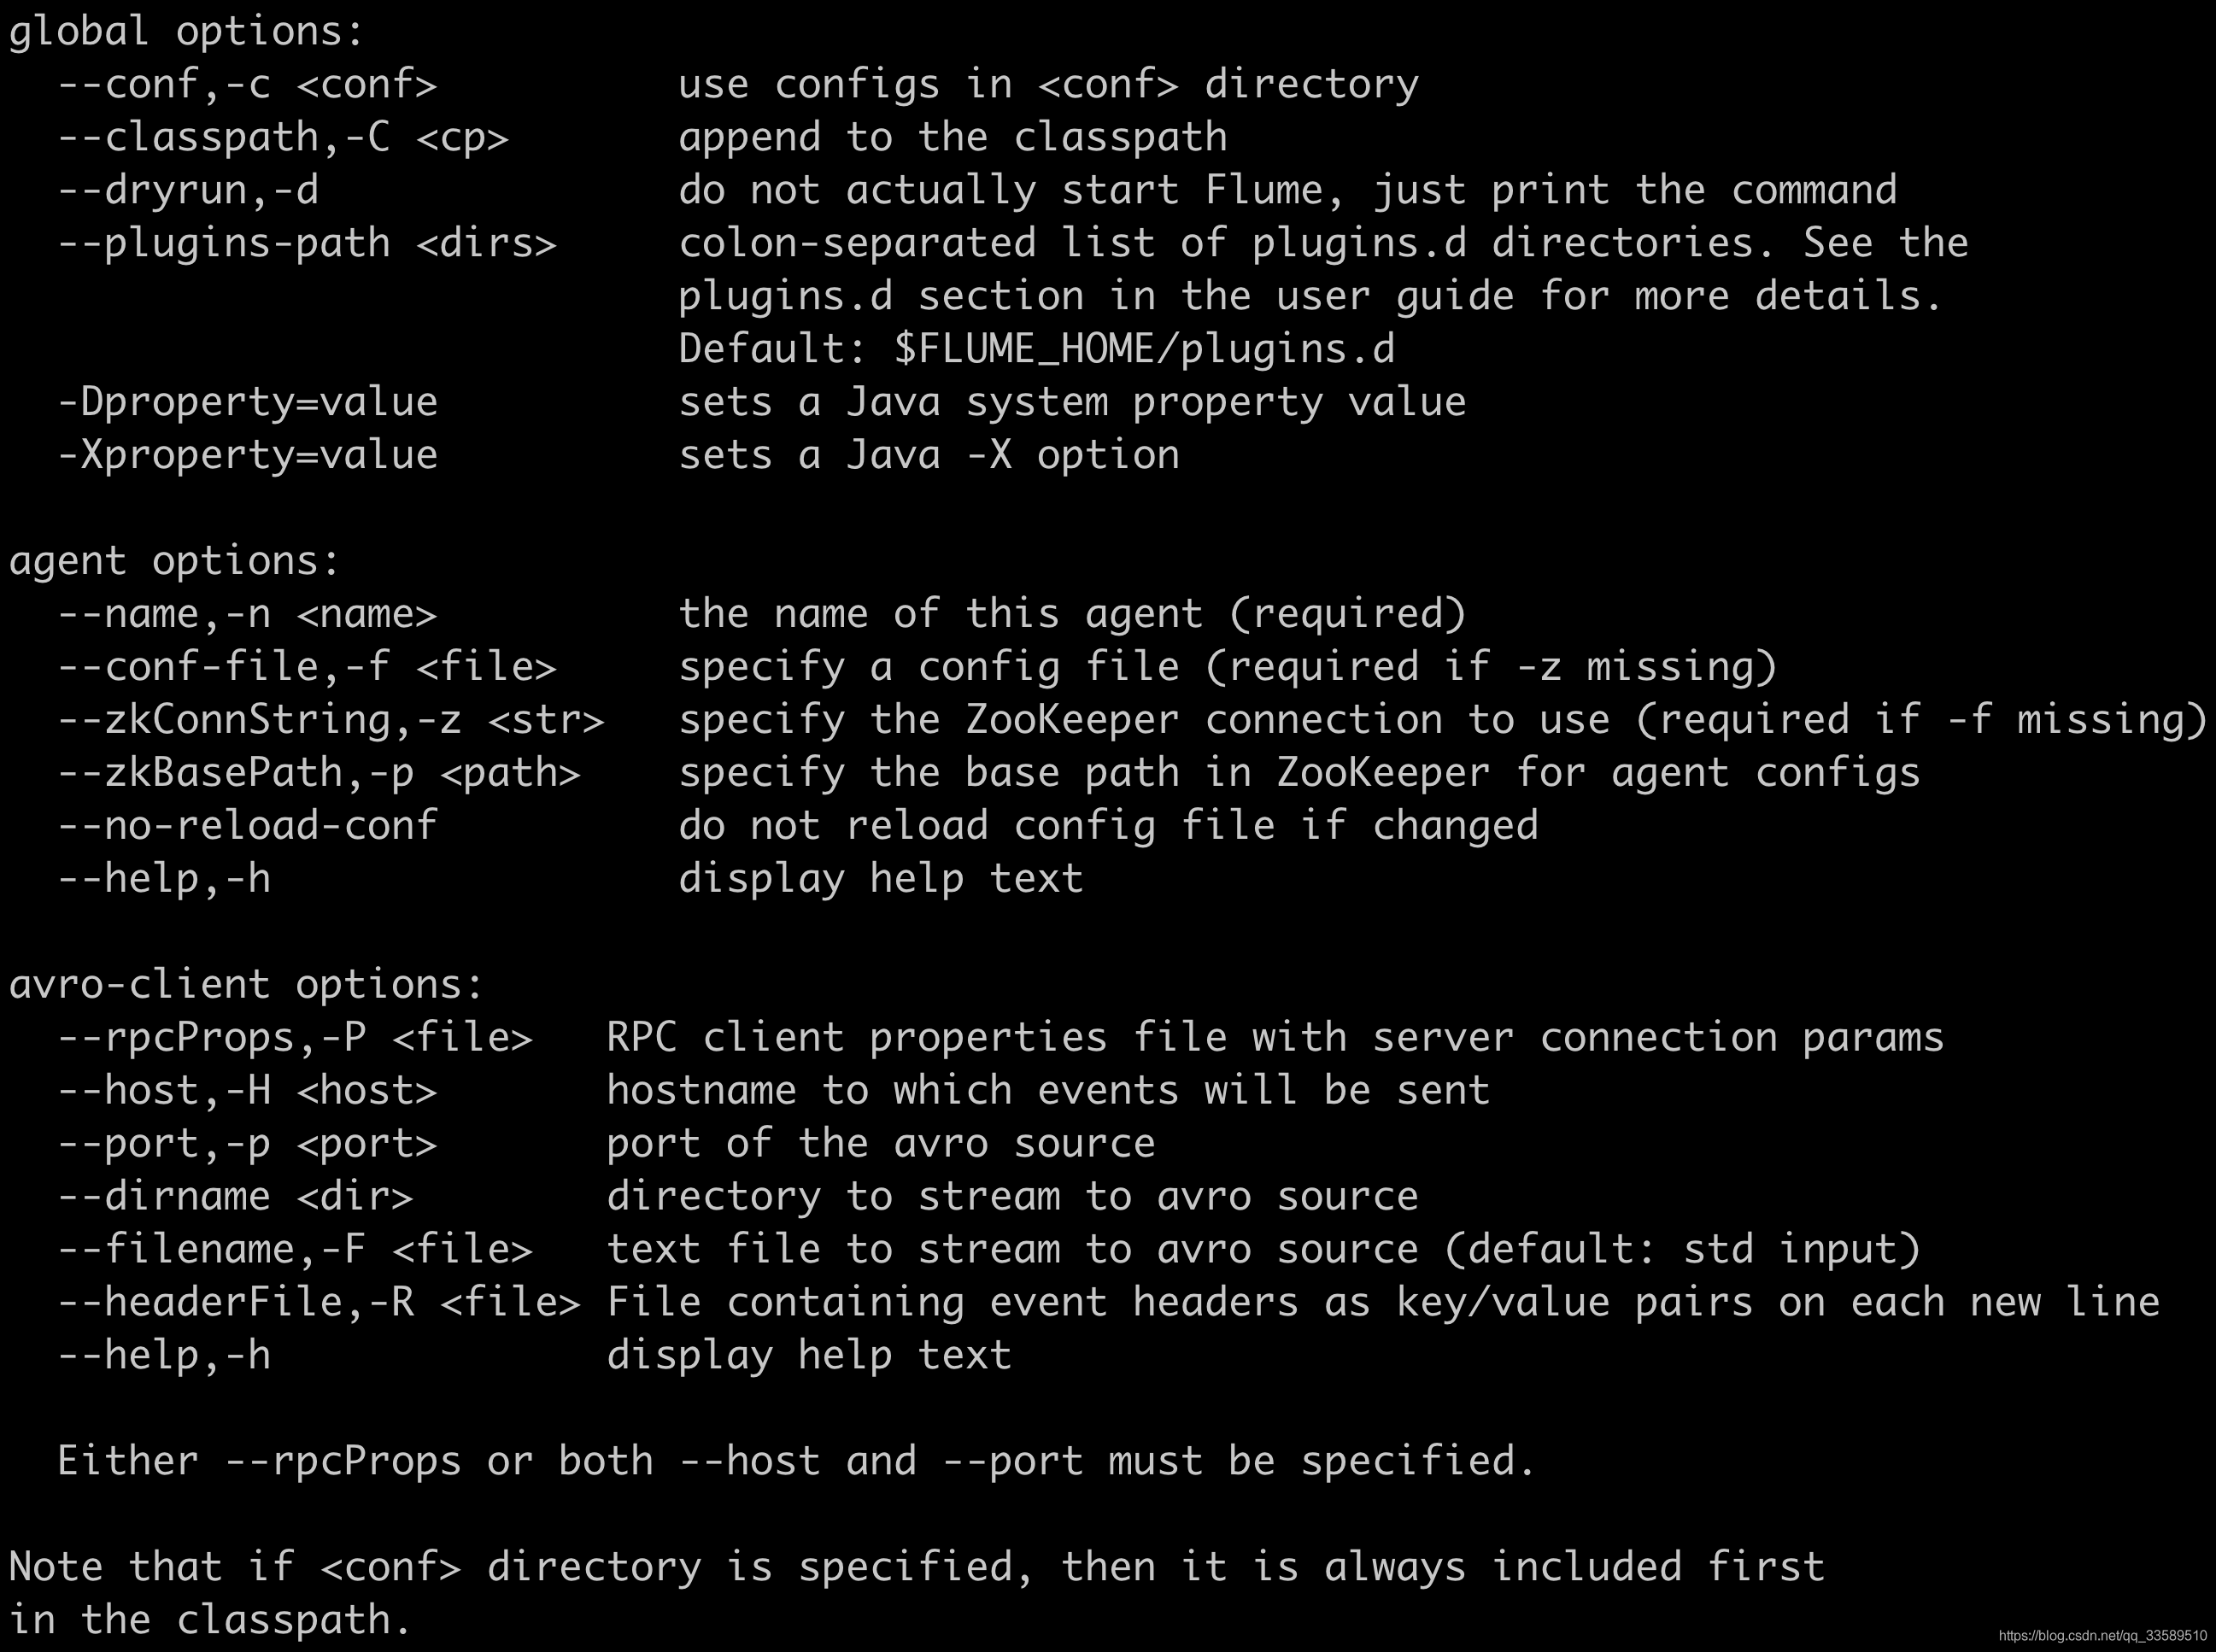
bin/flume-ng agent \
--name a1 \
--conf $FLUME_HOME/conf \
--conf-file $FLUME_HOME/conf/example.conf \
-Dflume.root.logger=INFO,console
现在,代理将开始运行在给定属性文件中配置的源和接收器。
使用telnet进行测试验证
- 注意

telnet 127.0.0.1 44444- 发送了两条数据
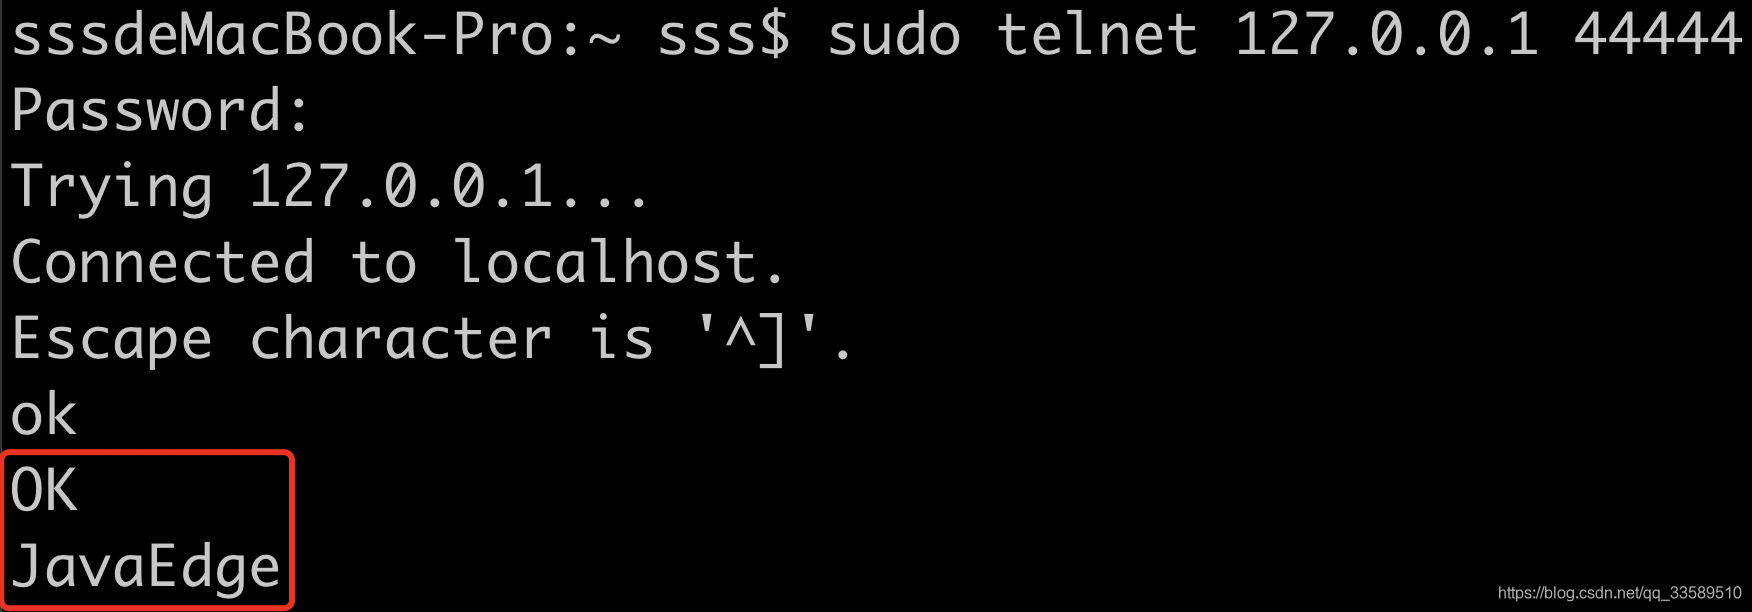
- 这边接收到了数据
让我们详细分析下上图中的数据信息

2019-06-12 17:52:39,711 (SinkRunner-PollingRunner-DefaultSinkProcessor)
[INFO - org.apache.flume.sink.LoggerSink.process(LoggerSink.java:95)]
Event: { headers:{} body: 4A 61 76 61 45 64 67 65 0D                      JavaEdge. }
其中的Event是Fluem数据传输的基本单元
Event = 可选的header + byte array
5.2 场景2 - 监控一个文件实时采集新增的数据输出到控制台
Exec Source
Exec源在启动时运行给定的Unix命令,并期望该进程在标准输出上连续生成数据(stderr被简单地丢弃,除非属性logStdErr设置为true)。 如果进程因任何原因退出,则源也会退出并且不会生成其他数据。 这意味着诸如cat [named pipe]或tail -F [file]之类的配置将产生所需的结果,而日期可能不会 - 前两个命令产生数据流,而后者产生单个事件并退出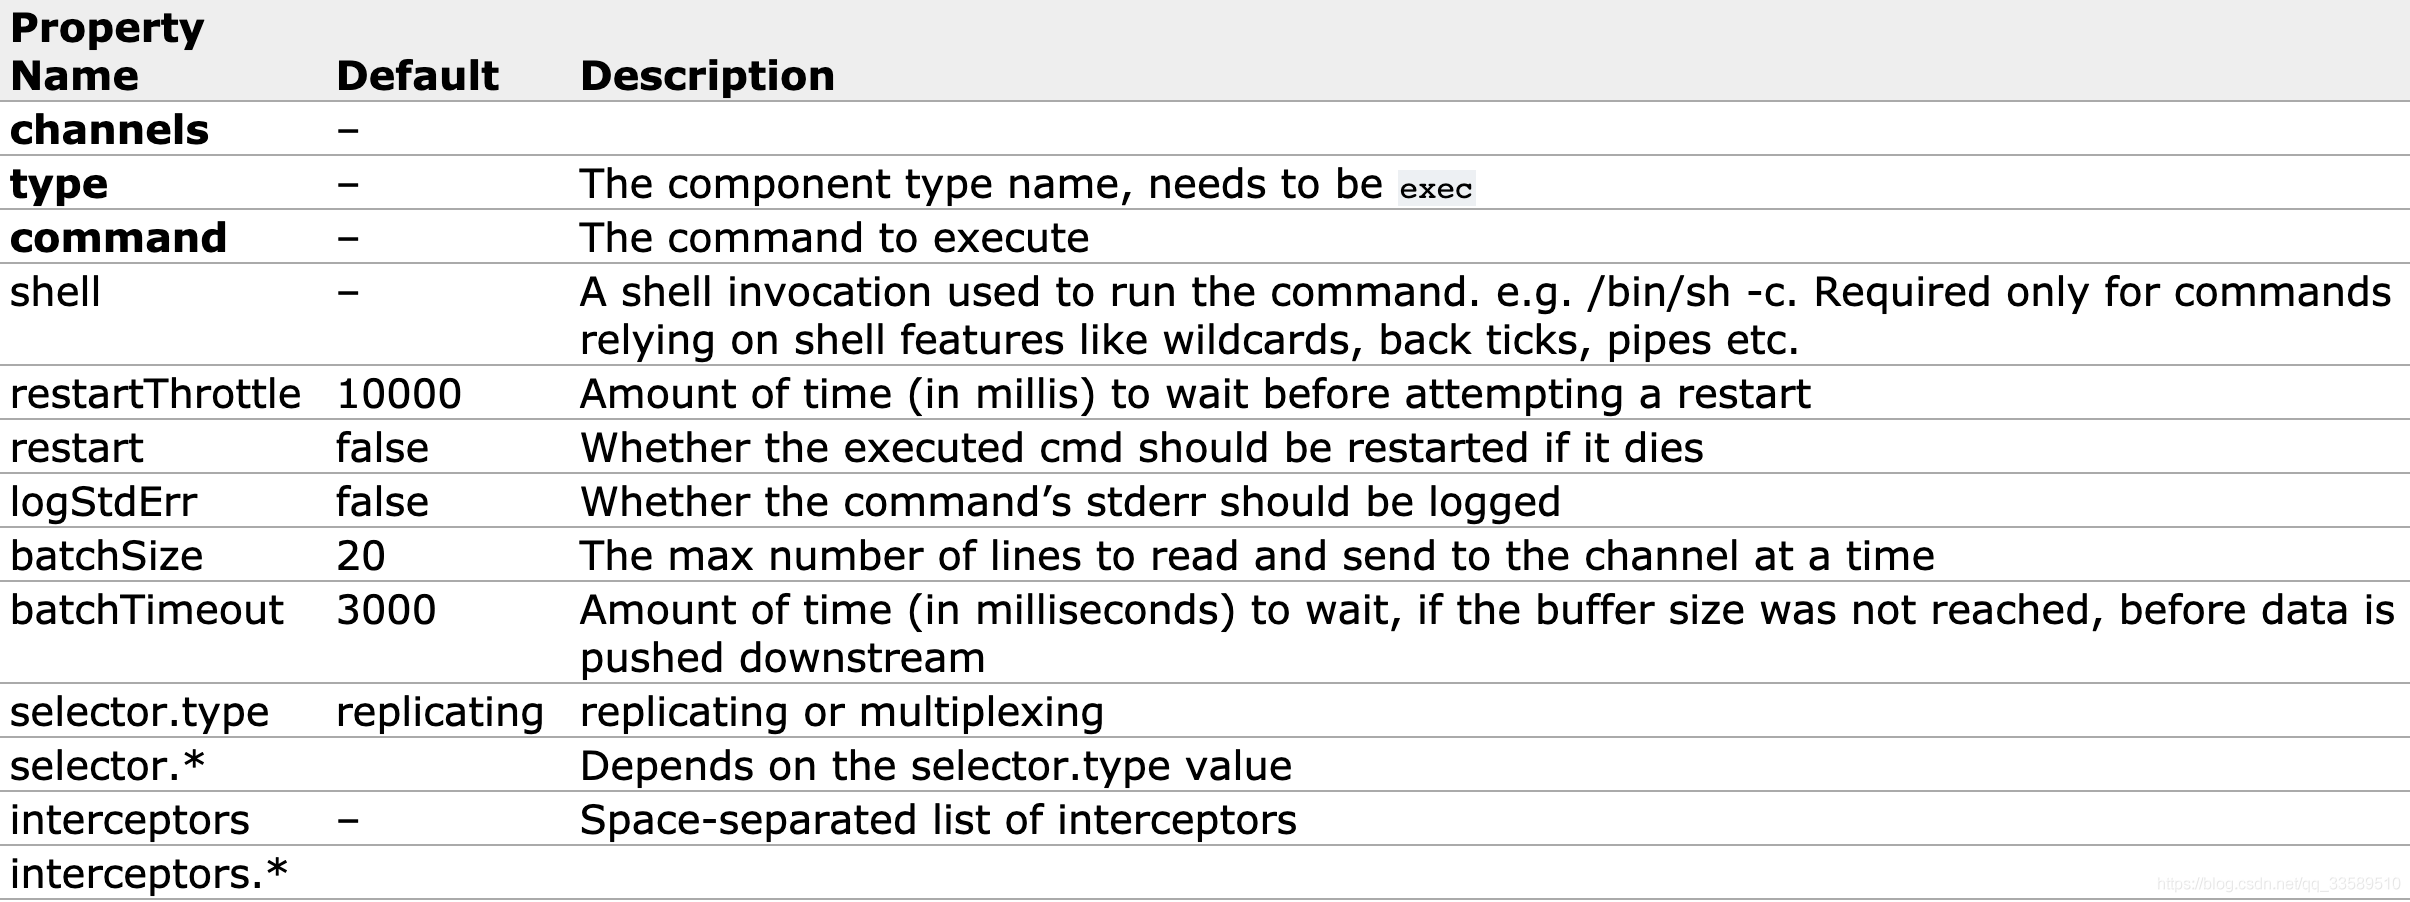
Agent 选型
exec source + memory channel + logger sink
配置文件
# example.conf: A single-node Flume configuration

# Name the components on this agent
a1.sources = r1
a1.sinks = k1
a1.channels = c1

# Describe/configure the source
a1.sources.r1.type = exec
a1.sources.r1.command = tail -F /Volumes/doc/data/data.log
a1.sources.r1.shell = /bin/sh -c

# Describe the sink
a1.sinks.k1.type = logger

# Use a channel which buffers events in memory
a1.channels.c1.type = memory
a1.channels.c1.capacity = 1000
a1.channels.c1.transactionCapacity = 100

# Bind the source and sink to the channel
a1.sources.r1.channels = c1
a1.sinks.k1.channel = c1
在conf下新建配置文件如下: 
- data.log文件内容

- 成功接收

5.3 应用场景3 - 将A服务器上的日志实时采集到B服务器
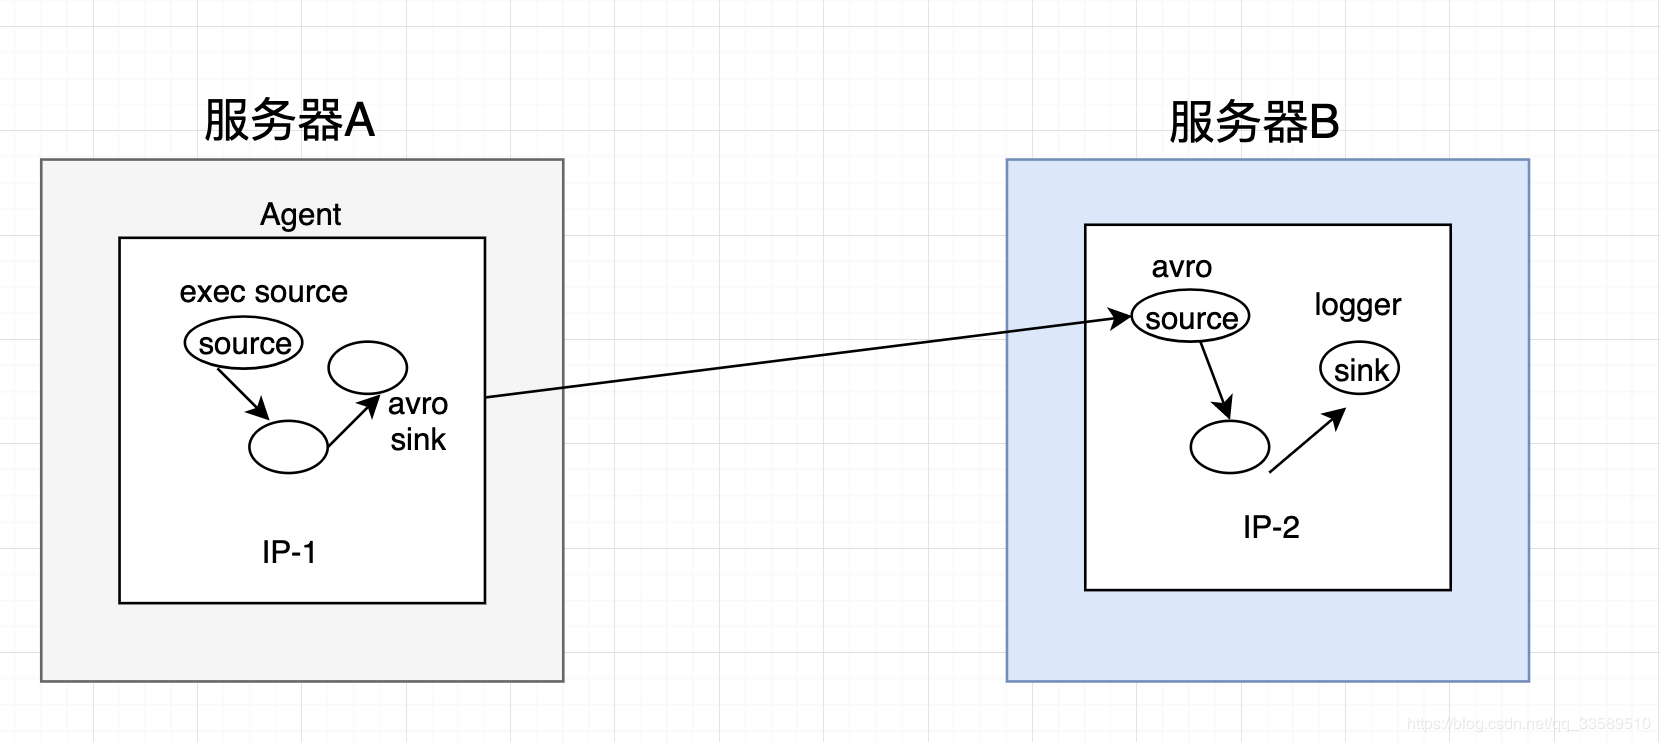
技术选型
exec s + memory c + avro s
avro s + memory c + loger s
配置文件
exec-memory-avro.conf
# Name the components on this agent
exec-memory-avro.sources = exec-source
exec-memory-avro.sinks = avro-sink
exec-memory-avro.channels = memory-channel

# Describe/configure the source
exec-memory-avro.sources.exec-source.type = exec
exec-memory-avro.sources.exec-source.command = tail -F /Volumes/doc/data/data.log
exec-memory-avro.sources.exec-source.shell = /bin/sh -c

# Describe the sink
exec-memory-avro.sinks.avro-sink.type = avro
exec-memory-avro.sinks.avro-sink.hostname = localhost
exec-memory-avro.sinks.avro-sink.port = 44444

# Use a channel which buffers events in memory
exec-memory-avro.channels.memory-channel.type = memory
exec-memory-avro.channels.memory-channel.capacity = 1000
exec-memory-avro.channels.memory-channel.transactionCapacity = 100

# Bind the source and sink to the channel
exec-memory-avro.sources.exec-source.channels = memory-channel
exec-memory-avro.sinks.avro-sink.channel = memory-channel
# Name the components on this agent
exec-memory-avro.sources = exec-source
exec-memory-avro.sinks = avro-sink
exec-memory-avro.channels = memory-channel
# Describe/configure the source
exec-memory-avro.sources.exec-source.type = exec
exec-memory-avro.sources.exec-source.command = tail -F /Volumes/doc/data/data.log
exec-memory-avro.sources.exec-source.shell = /bin/sh -c
# Describe the sink
exec-memory-avro.sinks.avro-sink.type = avro
exec-memory-avro.sinks.avro-sink.hostname = localhost
exec-memory-avro.sinks.avro-sink.port = 44444
# Use a channel which buffers events in memory
exec-memory-avro.channels.memory-channel.type = memory
exec-memory-avro.channels.memory-channel.capacity = 1000
exec-memory-avro.channels.memory-channel.transactionCapacity = 100
# Bind the source and sink to the channel
exec-memory-avro.sources.exec-source.channels = memory-channel
exec-memory-avro.sinks.avro-sink.channel = memory-channel
