❝【GiantPandaCV导语】大家好,今天为大家介绍一下如何部署一个人脸106关键点模型到MsnhNet上,涉及到Caffe和Pytorch,MsnhNet模型转换,融合BN简化网络和如何编写MsnhNet预测代码等等。❞
1. 前言
之前,MsnhNet主要支持了将Pytorch模型转换为MsnhNet框架可以运行的模型文件(*.msnhnet和*.bin),并且我们在之前的Pytorch转Msnhnet模型思路分享文章中分享了这个转换的思路。
最近尝试部署一个开源的人脸106点Caffe模型(https://github.com/dog-qiuqiu/MobileNet-Yolo/tree/master/yoloface50k-landmark106)到MsnhNet中,所以这篇文章就记录了我是如何将这个Caffe模型转换到MsnhNet并进行部署的。
2. 通用的转换思路
由于我们已经在Pytroch2Msnhnet这个过程上花费了比较大的精力,所以最直接的办法就是直接将Caffe模型转为Pytorch模型,然后调用已有的Pytorch2Msnhnet工具完成转换,这样是比较快捷省事的。
我参考https://github.com/UltronAI/pytorch-caffe这个工程里面的caffe2pytorch工具新增了一些上面提到的yoloface50k-landmark106关键点模型要用到的OP,如PReLU,nn.BatchNorm1D以及只有2个维度的Scale层等,例如将Scale层重写为:
`class Scale(nn.Module):
def __init__(self, channels):
super(Scale, self).__init__()
self.weight = Parameter(torch.Tensor(channels))
self.bias = Parameter(torch.Tensor(channels))
self.channels = channels
# Python 有一个内置的函数叫 repr,它能把一个对象用字符串的形式表达出来以便辨认,这就是“字符串表示形式”
def __repr__(self):
return 'Scale(channels = %d)' % self.channels
def forward(self, x):
# landmark网络最后的全连接层后面接了Scale,所以需要考虑Scale层输入为2维的情况
if x.dim() == 2:
nB = x.size(0)
nC = x.size(1)
x = x * self.weight.view(1, nC).expand(nB, nC) + \
self.bias.view(1, nC).expand(nB, nC)
else:
nB = x.size(0)
nC = x.size(1)
nH = x.size(2)
nW = x.size(3)
x = x * self.weight.view(1, nC, 1, 1).expand(nB, nC, nH, nW) + \
self.bias.view(1, nC, 1, 1).expand(nB, nC, nH, nW)
return x
`
可以看到这个Caffe里面的Scale层Pytorch是不原生支持的,这是Caffe特有的层,所以这里写一个Scale类继承nn.Module来拼出一个Scale层。除了Scale层还有其它的很多层是这种做法,例如Eletwise层可以这样来拼:
`class Eltwise(nn.Module):
def __init__(self, operation='+'):
super(Eltwise, self).__init__()
self.operation = operation
def __repr__(self):
return 'Eltwise %s' % self.operation
def forward(self, *inputs):
if self.operation == '+' or self.operation == 'SUM':
x = inputs[0]
for i in range(1,len(inputs)):
x = x + inputs[i]
elif self.operation == '*' or self.operation == 'MUL':
x = inputs[0]
for i in range(1,len(inputs)):
x = x * inputs[i]
elif self.operation == '/' or self.operation == 'DIV':
x = inputs[0]
for i in range(1,len(inputs)):
x = x / inputs[i]
elif self.operation == 'MAX':
x = inputs[0]
for i in range(1,len(inputs)):
x =torch.max(x, inputs[i])
else:
print('forward Eltwise, unknown operator')
return x
`
介绍了如何在Pytorch中拼凑出Caffe的特有层之后,我们就可以对Caffe模型进行解析,然后利用解析后的层关键信息完成Caffe模型到Pytorch模型的转换了。解析Caffe模型的代码实现在https://github.com/msnh2012/Msnhnet/blob/master/tools/caffe2Msnhnet/prototxt.py文件,我们截出一个核心部分说明一下,更多细节读者可以亲自查看。
我们以一个卷积层为例,来理解一下这个Caffe模型中的prototxt解析函数:
`layer {
name: "conv1_conv2d"
type: "Convolution"
bottom: "data"
top: "conv1_conv2d"
convolution_param {
num_output: 8
bias_term: false
group: 1
stride: 2
pad_h: 1
pad_w: 1
kernel_h: 3
kernel_w: 3
}
}
`
解析prototxt文件的代码实现如下,结合上面卷积层的prototxt表示和下面代码的注释应该很好理解:
`def parse_prototxt(protofile):
# caffe的每个layer以{}包起来
def line_type(line):
if line.find(':') >= 0:
return 0
elif line.find('{') >= 0:
return 1
return -1
def parse_block(fp):
# 使用OrderedDict会根据放入元素的先后顺序进行排序,所以输出的值是排好序的
block = OrderedDict()
line = fp.readline().strip()
while line != '}':
ltype = line_type(line)
if ltype == 0: # key: value
#print line
line = line.split('#')[0]
key, value = line.split(':')
key = key.strip()
value = value.strip().strip('"')
if key in block:
if type(block[key]) == list:
block[key].append(value)
else:
block[key] = [block[key], value]
else:
block[key] = value
elif ltype == 1: # 获取块名,以卷积层为例返回[layer, convolution_param]
key = line.split('{')[0].strip()
# 递归
sub_block = parse_block(fp)
block[key] = sub_block
line = fp.readline().strip()
# 忽略注释
line = line.split('#')[0]
return block
fp = open(protofile, 'r')
props = OrderedDict()
layers = []
line = fp.readline()
counter = 0
while line:
line = line.strip().split('#')[0]
if line == '':
line = fp.readline()
continue
ltype = line_type(line)
if ltype == 0: # key: value
key, value = line.split(':')
key = key.strip()
value = value.strip().strip('"')
if key in props:
if type(props[key]) == list:
props[key].append(value)
else:
props[key] = [props[key], value]
else:
props[key] = value
elif ltype == 1: # 获取块名,以卷积层为例返回[layer, convolution_param]
key = line.split('{')[0].strip()
if key == 'layer':
layer = parse_block(fp)
layers.append(layer)
else:
props[key] = parse_block(fp)
line = fp.readline()
if len(layers) > 0:
net_info = OrderedDict()
net_info['props'] = props
net_info['layers'] = layers
return net_info
else:
return props
`
然后解析CaffeModel比较简单,直接调用caffe提供的接口即可,代码实现如下:
`def parse_caffemodel(caffemodel):
model = caffe_pb2.NetParameter()
print ('Loading caffemodel: '), caffemodel
with open(caffemodel, 'rb') as fp:
model.ParseFromString(fp.read())
return model
`
解析完Caffe模型之后,我们就拿到了所有Layer的参数信息和权重,我们只需要将其对应放到Pytorch实现的Layer就可以了,这部分的代码实现就是https://github.com/msnh2012/Msnhnet/blob/master/tools/caffe2Msnhnet/caffenet.py#L332这里的CaffeNet类这里就不再过多解释了,因为这仅仅是一个构件Pytorch模型并加载权重的过程,相信熟悉Pytorch的同学不难看懂和写出这部分代码。执行完这个过程之后我们就可以获得Caffe模型对应的Pytorch模型了。
3. 精简网络
为了让Pytorch模型转出来的MsnhNet模型推理更快,我们可以考虑在Caffe转到Pytorch模型时就精简一些网络层,比如常规的Convolution+BN+Scale可以融合为一个层。我们发现这里还存在一个FC+BN+Scale的结构,我们也可以一并融合了。这里可以再简单回顾一下融合的原理。
3.1 融合BN原理介绍
「我们知道卷积层的计算可以表示为:」
「然后BN层的计算可以表示为:」
「我们把二者组合一下,公式如下:」
然后令
「那么,合并BN层后的卷积层的权重和偏置可以表示为:」
这个公式同样可以用于反卷积,全连接和BN+Scale的组合情况。
3.2 融合BN
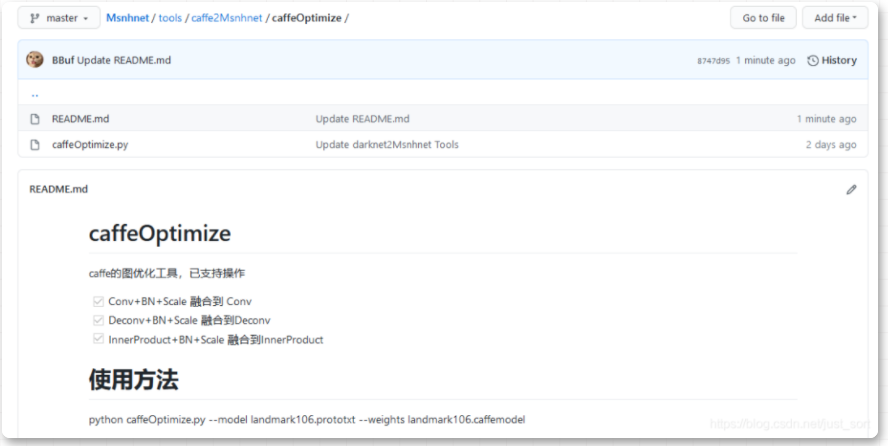
基于上面的理论,我们可以在转Caffe模型之前就把BN融合掉,这样我们在MsnhNet上推理更快(另外一个需要融合的原因是目前MsnhNet的图优化工具还在开发中,暂时不支持带BN+Scale层的融合)。Caffe模型融合的代码我放在https://github.com/msnh2012/Msnhnet/blob/master/tools/caffe2Msnhnet/caffeOptimize/caffeOptimize.py这里了,简要介绍如下:
Caffe BN融合工具
4. MsnhNet推理
精简网络之后我们就可以重新将没有BN的Caffe模型转到Pytorch再转到MsnhNet了,这部分的示例如下:
`# -*- coding: utf-8
from pytorch2caffe import plot_graph, pytorch2caffe
import sys
import cv2
import caffe
import numpy as np
import os
from caffenet import *
import argparse
import torch
from PytorchToMsnhnet import *
parser = argparse.ArgumentParser(description='Convert Caffe model to MsnhNet model.',
formatter_class=argparse.ArgumentDefaultsHelpFormatter)
parser.add_argument('--model', type=str, default=None)
parser.add_argument('--weights', type=str, default=None)
parser.add_argument('--height', type=int, default=None)
parser.add_argument('--width', type=int, default=None)
parser.add_argument('--channels', type=int, default=None)
args = parser.parse_args()
model_def = args.model
model_weights = args.weights
name = model_weights.split('/')[-1].split('.')[0]
width = args.width
height = args.height
channels = args.channels
net = CaffeNet(model_def, width=width, height=height, channels=channels)
net.load_weights(model_weights)
net.to('cpu')
net.eval()
input=torch.ones([1,channels,height,width])
model_name = name + ".msnhnet"
model_bin = name + ".msnhbin"
trans(net, input,model_name,model_bin)
`
获得了MsnhNet的模型文件之后,我们就可以使用MsnhNet进行推理了,推理部分的代码在https://github.com/msnh2012/Msnhnet/blob/master/examples/landmark106/landmark106.cpp。
我们来看看效果,随便拿一张人脸图片来测试一下:
原图
结果图
landmark的结果还是比较正确的,另外我们对比了Caffe/Pytorch/MsnhNet的每层特征值,Float32情况下相似度均为100%,证明我们的转换过程是正确的。
我们在「X86 CPU」 i7 10700F上测一下速度(float32推理),结果如下:
速度还是挺快的,由于本框架目前在x86没有太多优化,所以这个速度后面会进一步优化的。感兴趣的读者也可以测试在其它平台上这个模型的速度。
5. 转换工具支持的OP和用法
5.1 介绍
Caffe2msnhnet工具首先将你的Caffe模型转换为Pytorch模型,然后调用Pytorch2msnhnet工具将Caffe模型转为*.msnhnet和*.bin。
5.2 依赖
- Pycaffe
- Pytorch
5.3 计算图优化
- 在调用
caffe2msnhnet.py之前建议使用caffeOPtimize文件夹中的caffeOptimize.py对原始的Caffe模型进行图优化,目前已支持的操作有: - Conv+BN+Scale 融合到 Conv
- Deconv+BN+Scale 融合到Deconv
- InnerProduct+BN+Scale 融合到InnerProduct
5.4 Caffe2Pytorch支持的OP
- Convolution 转为
nn.Conv2d - Deconvolution 转为
nn.ConvTranspose2d - BatchNorm 转为
nn.BatchNorm2d或者nn.BatchNorm1d - Scale 转为
乘/加 - ReLU 转为
nn.ReLU - LeakyReLU 转为
nn.LeakyReLU - PReLU 转为
nn.PReLU - Max Pooling 转为
nn.MaxPool2d - AVE Pooling 转为
nn.AvgPool2d - Eltwise 转为
加/减/乘/除/torch.max - InnerProduct 转为
nn.Linear - Normalize 转为
pow/sum/sqrt/加/乘/除拼接 - Permute 转为
torch.permute - Flatten 转为
torch.view - Reshape 转为
numpy.reshape/torch.from_numpy拼接 - Slice 转为
torch.index_select - Concat 转为
torch.cat - Crop 转为
torch.arange/torch.resize_拼接 - Softmax 转为
torch.nn.function.softmax
5.5 Pytorch2Msnhnet支持的OP
- conv2d
- max\_pool2d
- avg\_pool2d
- adaptive\_avg\_pool2d
- linear
- flatten
- dropout
- batch\_norm
- interpolate(nearest, bilinear)
- cat
- elu
- selu
- relu
- relu6
- leaky\_relu
- tanh
- softmax
- sigmoid
- softplus
- abs
- acos
- asin
- atan
- cos
- cosh
- sin
- sinh
- tan
- exp
- log
- log10
- mean
- permute
- view
- contiguous
- sqrt
- pow
- sum
- pad
- +|-|x|/|+=|-=|x=|/=|
5.6 使用方法举例
python caffe2msnhnet --model landmark106.prototxt --weights landmark106.caffemodel --height 112 --width 112 --channels 3,执行完之后会在当前目录下生成lanmark106.msnhnet和landmark106.bin文件。
6. 总结
至此,我们完成了yoloface50k-landmark106在MsnhNet上的模型转换和部署测试,如果对本框架感兴趣可以尝试部署自己的一个模型试试看,如果转换工具有问题请在github提出issue或者直接联系我们。点击阅读原文可以快速关注MsnhNet,这是我们业余开发的一个轻量级推理框架,如果对模型部署和算法优化感兴趣的读者可以看看,我们也会在GiantPandaCV公众号分享我们的框架开发和算子优化相关的经历。
7. 参考
推荐阅读


