1.前言
最近,极术社区发起了基于全志R329芯片的AI开发板免费申请活动,个人第一时间自己加入了申请者行列。非常幸运的是自己通过了第一阶段的模型的仿真,并成功收到的R329开发板;接下来,我将介绍如何开发板上运行之前仿真的模型,其实极术社区已经陆陆续续地发布了不少同学在R329上的一些评测文章,我也有不少借鉴,这里只是作一下个人的总结,如有一些不详或遗漏之处,还望大家指教。
2.实验所需材料
- R329开发板
- SD卡 + SD卡读卡器
- Type C的USB线
- 一台Windows电脑
- 一台Linux电脑
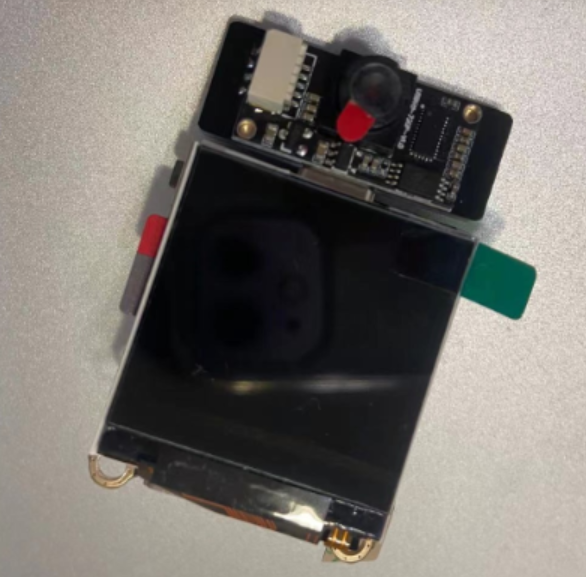
3. 开发板外观
总而言之,R329开发板“麻雀虽小,但五脏俱全”。
4.编译环境准备
sudo apt-get update
sudo apt-get install docker.io
sudo docker pull tdleiyao/ubuntu-sipeed_r329_env:bionic
sudo docker run -v /home/fzhou/WorkSpace/AI/jishequ:/tf/aipu  -it tdleiyao/ubuntu-sipeed_r329_env:bionic /bin/bash
5.SDK下载与编译
git clone https://github.com/sipeed/R329-Tina-jishu (国外)
git clone https://hub.fastgit.org/sipeed/R329-Tina-jishu.git (国内)
cd R329-Tina-jishu
git submodule update --init --recursive
source build/envsetup.sh
lunch r329_evb5-tina
## 编译
make -j16
## 打包镜像
pack
成功编译打包后,会有如下的打印:
......
----------image is for nand/emmc----------
----------image is at----------

/tf/aipu/R329-Tina-jishu-SDK/out/r329-evb5/tina_r329-evb5_uart0.img

pack finish
如果编译过程中的遇到一些问题,请参考如下链接:
6. 镜像烧录
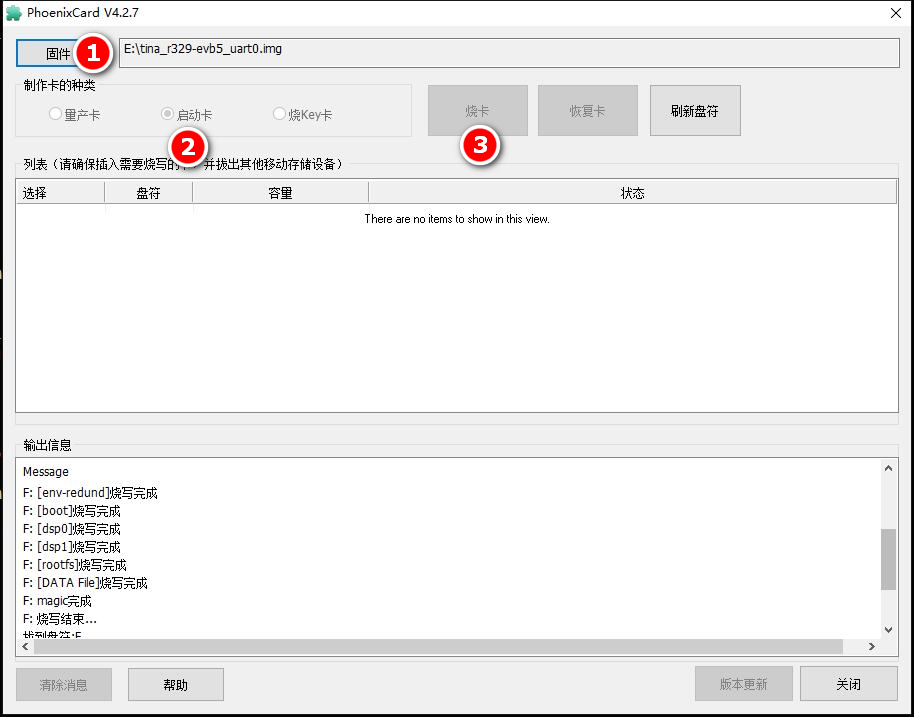
按照上图所示的顺序,选择编译前面生成的镜像,选择启动卡选项,最后点周烧卡。烧卡成功后,将卡插入开发板,然后插入Type C 线,就会上电,串口会有类似如下打印:
[    4.149364] sunxi-ehci 4101000.ehci0-controller: SW USB2.0 'Enhanced' Host Controller (EHCI) Driver
[    4.159553] sunxi-ehci 4101000.ehci0-controller: new USB bus registered, assigned bus number 2
[    4.169813] sunxi-ehci 4101000.ehci0-controller: irq 249, io mem 0xffffff80080873fc
[    4.194451] sunxi-ehci 4101000.ehci0-controller: USB 0.0 started, EHCI 1.00
[    4.202357] sunxi-ehci 4101000.ehci0-controller: ehci_irq: highspeed device connect
[    4.202487] usb usb2: New USB device found, idVendor=1d6b, idProduct=0002
[    4.202495] usb usb2: New USB device strings: Mfr=3, Product=2, SerialNumber=1
[    4.202501] usb usb2: Product: SW USB2.0 'Enhanced' Host Controller (EHCI) Driver
[    4.202507] usb usb2: Manufacturer: Linux 4.9.191 ehci_hcd
[    4.202512] usb usb2: SerialNumber: sunxi-ehci
[    4.246976] hub 2-0:1.0: USB hub found
[    4.251253] hub 2-0:1.0: 1 port detected
[    4.256086] [ohci0-controller]: sunxi_usb_enable_ohci
[    4.261777] [sunxi-ohci0]: probe, pdev->name: 4101000.ohci0-controller, sunxi_ohci: 0xffffff8008aec118
[    4.272259] 4101000.ohci0-controller supply drvvbus not found, using dummy regulator
[    4.281102] sunxi-ohci 4101000.ohci0-controller: SW USB2.0 'Open' Host Controller (OHCI) Driver
[    4.290907] sunxi-ohci 4101000.ohci0-controller: new USB bus registered, assigned bus number 3
[    4.300654] sunxi-ohci 4101000.ohci0-controller: irq 250, io mem 0xffffff80088d8000
[    4.370494] usb usb3: New USB device found, idVendor=1d6b, idProduct=0001
[    4.378136] usb usb3: New USB device strings: Mfr=3, Product=2, SerialNumber=1
[    4.386268] usb usb3: Product: SW USB2.0 'Open' Host Controller (OHCI) Driver
[    4.394287] usb usb3: Manufacturer: Linux 4.9.191 ohci_hcd
[    4.400455] usb usb3: SerialNumber: sunxi-ohci
[    4.406550] hub 3-0:1.0: USB hub found
[    4.410816] hub 3-0:1.0: 1 port detected
[    4.582455] usb 2-1: new high-speed USB device number 2 using sunxi-ehci
[    4.763624] usb 2-1: New USB device found, idVendor=0c45, idProduct=6366
[    4.771196] usb 2-1: New USB device strings: Mfr=2, Product=1, SerialNumber=3
[    4.779220] usb 2-1: Product: USB 2.0 Camera
[    4.784027] usb 2-1: Manufacturer: Sonix Technology Co., Ltd.
[    4.790493] usb 2-1: SerialNumber: SN0001
[    4.797193] uvcvideo: Found UVC 1.00 device USB 2.0 Camera (0c45:6366)
[    4.813763] input: USB 2.0 Camera as /devices/platform/soc/4101000.ehci0-controller/usb2/2-1/2-1:1.0/input/input3
[    8.201203] block: extroot: cannot find device UDISK
[    8.213757] procd: - early -
[    8.217134] procd: - watchdog -
[    8.246899] random: procd: uninitialized urandom read (4 bytes read)
[    8.357177] procd: - watchdog -
[    8.361063] random: jshn: uninitialized urandom read (4 bytes read)
[    8.361099] procd: - ubus -
[    8.361701] procd (1): /proc/1166/oom_adj is deprecated, please use /proc/1166/oom_score_adj instead.
[    8.396800] random: ubusd: uninitialized urandom read (4 bytes read)
[    8.412227] procd: - init -
Please press Enter to activate this console.


BusyBox v1.27.2 () built-in shell (ash)

 _   .-')      ('-.            ) (`-.
( '.( OO )_   ( OO ).-.         ( OO ).
 ,--.   ,--.) / . --. /  ,-.-')(_/.  \_)-.
 |   `.'   |  | \-.  \   |  |OO)\  `.'  /
 |         |.-'-'  |  |  |  |  \ \     /\
 |  |'.'|  | \| |_.'  |  |  |(_/  \   \ |
 |  |   |  |  |  .-.  | ,|  |_.' .'    \_)
 |  |   |  |  |  | |  |(_|  |   /  .'.  \
 `--'   `--'  `--' `--'  `--'  '--'   '--'
   __   _
  / /  (_)__  __ ____ __ ------------------------
 / /__/ / _ \/ // /\ \ /  sipeed.com (Neptune)
/____/_/_//_/\_,_//_\_\  ------------------------

root@(none):/# - 注意:在win10上如何使用PhoenixCardv4.2.6烧录失败的话,建议下载PhoenixCardv4.2.7.7z进行烧录。
7. 测试内置模型
首先insmod aipu.ko
root@TinaLinux:~/maix_sense# insmod aipu.ko
[  736.170406] aipu: loading out-of-tree module taints kernel.
[  736.178513] armchina aipu: AIPU KMD probe start...
[  736.183913] armchina aipu: KMD version: release 3.0.13
[  736.189705] armchina aipu: no interrupts-reg specified
[  736.195841] armchina aipu: AIPU is not behind an IOMMU
[  736.201647] armchina aipu: AIPU DRAM mem type is [CMA default]
[  736.228956] armchina aipu: init DRAM region done: pa [0x4a200000, 0x4c7fffff]
[  736.237025] armchina aipu: AIPU core #0 detected: zhouyi-v1-0600
[  736.244184] armchina aipu: AIPU Initial Status: 0x70000
[  736.250174] armchina aipu: ########## AIPU CORE 0: ZHOUYI V1 ##########
[  736.257623] armchina aipu: # ISA Version Register: 0x0
[  736.263400] armchina aipu: # TPC Feature Register: 0x10101
[  736.269568] armchina aipu: # SPU Feature Register: 0x0
[  736.275343] armchina aipu: # HWA Feature Register: 0x10111
[  736.281508] armchina aipu: # Revision ID Register: 0x0
[  736.287283] armchina aipu: # Memory Hierarchy Feature Register: 0x170
[  736.294524] armchina aipu: # Instruction RAM Feature Register:  0x0
[  736.301569] armchina aipu: # TEC Local SRAM Feature Register:   0x312
[  736.308808] armchina aipu: # Global SRAM Feature Register:      0x10
[  736.315955] armchina aipu: # Instruction Cache Feature Register:0x233
[  736.323193] armchina aipu: # Data Cache Feature Register:       0x70030
[  736.330627] armchina aipu: # L2 Cache Feature Register:         0x0
[  736.337672] armchina aipu: ############################################
[  736.345109] armchina aipu: initialize AIPU core #0 done
然后执行./run.sh -c mbnetv2
root@TinaLinux:~/maix_sense# ./run.sh -c mbnetv2
[TEST RUN INFO] Run benchmark test with benchmark mbnetv2
[TEST INFO] AIPU load graph successfully.
[  740.265784] armchina aipu: [Job 65536 of Thread 1745] trigger job running done
[TEST INFO] Job #65536 Test Result Check PASS! (1/1)
[TEST INFO] job cleaned.
[TEST RUN INFO] memory section dump files saved under: ./output/mbnetv2-pass-1970-01-01-08-12-19
8. 测试自己的模型
root@TinaLinux:/mnt/UDISK/maix_sense# ./run.sh  -c nasnet_mobile
[TEST RUN INFO] Run benchmark test with benchmark nasnet_mobile
[TEST INFO] AIPU load graph successfully.
[  462.702057] armchina aipu: [Job 65536 of Thread 1905] trigger job running done
[TEST INFO] Job #65536 Test Result Check PASS! (1/1)
[TEST INFO] job cleaned.
[TEST RUN INFO] memory section dump files saved under: ./output/nasnet_mobile-pass-2021-06-01-09-34-02
9. 视觉模型实时运行
从网盘下载以下三个文件:
- zhouyi_cam.zip是本项目的工程源码,使用cmake构建
- rootfs.tar.gz 是构建zhouyi_cam所需要的系统目录,构建脚本会自行在该目录寻找库文件
- toolchain.tar.gz 是构建所需的工具链
编译zhouyi_cam
mkdir build && cd build
cmake .. && make -j16
将生成zhouyi_cam拷贝至SD卡的最后一个分区,(在这之前需要将SD区的最后一个分区格式化成NTFS格式)。
运行zhouyi_cam+nasnet模型
mount -o loop /dev/mmcblk0p8  /mnt/UDISK/
cd /mnt/UDISK/maix_sense
insmod aipu.ko
export LD_LIBRARY_PATH=./benchmark_test:/lib:/usr/lib:./lib/:$LD_LIBRARY_PATH
./zhouyi_cam models/nasnet_mobile/aipu.bin 1
相对来说这个模型的准确率还行,就是帧率太低3~5fps.
10.参考
1.https://aijishu.com/a/1060000...
2.https://aijishu.com/a/1060000...
3.https://aijishu.com/a/1060000...
4.https://aijishu.com/a/1060000...


