Julio Suarez2021年11月8日
在本博客中,我们将探讨一个数据收集、处理和分析用例,该用例使用基于Arm的设备上的Splunk Universal Forwarder跨越边缘到云。
边缘设备通常包括各种紧凑形状的传感器,用于生成数据。这些数据用于做出实时决策。一旦做出实时决策,数据集不会被丢弃,而是被保留、聚合,并用于研究历史模式和进一步构建新的预测模型。为了处理这些海量数据,我们需要所有位置的智能计算基础设施——边缘和云。边缘需要能效,而云需要性价比。在这两种情况下,Arm的方案都是一种自然的配合。现在让我们深入了解细节。
对于这个边缘到云的用例,云端由运行在AWS EC2实例中的Splunk Enterprise组成。此实例用于索引和可视化从边缘传入的数据。用例的边缘部分在基于Arm架构的NVIDIA Jetson Xavier NX平台上运行Splunk Universal Forwarder。Jetson设备有一组传感器,用于对其所在环境的条件进行采样。然后,它使用Splunk Universal Forwarder将传感器数据发送到云中的Splunk Enterprise。
关于Splunk
Splunk帮助世界各地的组织将数据转化为行动。Splunk技术旨在以任何规模对数据进行调查、监控、分析和处理。
对于这个用例,我们将使用Splunk Enterprise和Splunk Universal Forwarder产品。
Splunk Enterprise是一种软件产品,它使您能够搜索、分析和可视化从IT基础架构或业务组件收集的数据。Splunk Enterprise从网站、应用程序、传感器、设备等接收数据。定义数据源后,Splunk Enterprise会为数据流编制索引,并将其解析为一系列可以查看和搜索的单个事件。
Splunk universal转发器从数据源或其他转发器收集数据,并将其发送到转发器或Splunk部署。使用通用转发器,您可以将数据发送到Splunk Enterprise、Splunk Light或Splunk Cloud。它还取代了Splunk Enterprise light forwarder。通用转发器作为单独的安装包提供。
用例描述
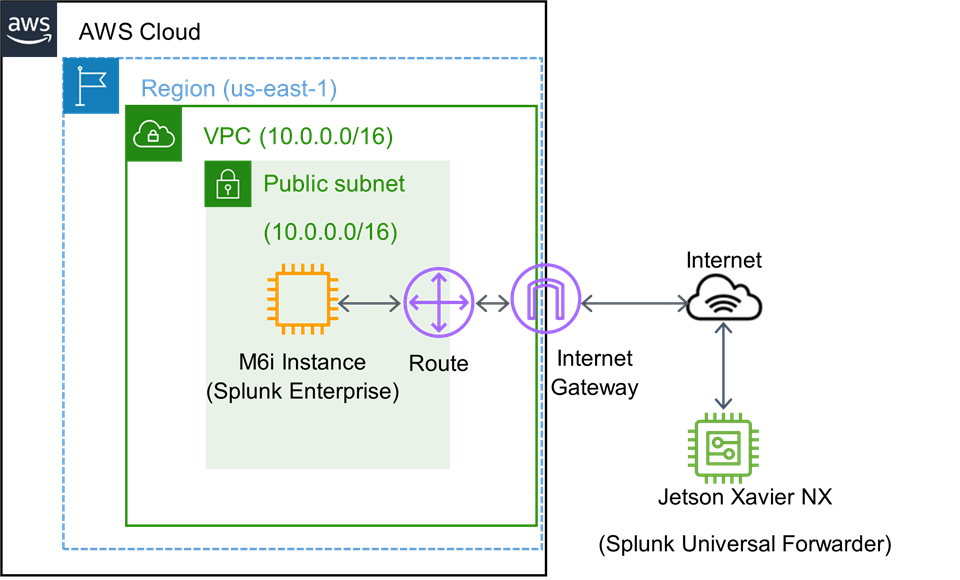
下面是用例设置的顶层视图:
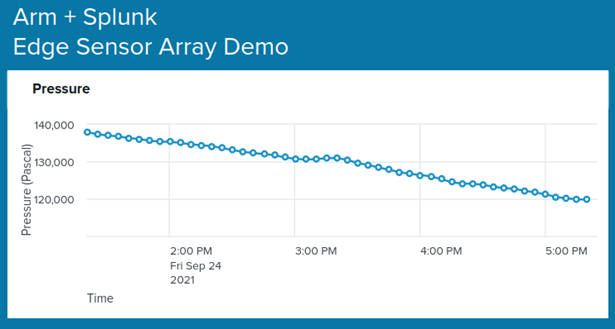
在左边,我们有这个用例的AWS云托管部分。它由一个VPC和一个子网组成,托管在us-east-1区域。在子网中,我们部署了一个运行Ubuntu的M6i实例,该Ubuntu安装了Splunk Enterprise。实例通过将实例连接到公共Internet的Internet网关和路由表连接到公共Internet。在右边,我们有这个用例中以边缘为主体的部分。这包括互联网和Jetson Xavier NX。Jetson板上装有传感器,用于采集温度、湿度、压力、VOC气体和光照强度。Jetson船上还安装了Splunk通用转发器。转发器被配置为读取传感器数据的样本,并将其发送到云中的Splunk企业实例进行索引。一旦Splunk Enterprise为数据编制了索引,我们就可以搜索并可视化传感器数据。以下是仪表板的局部图像,显示了边缘设备生成的压力数据。
用例部署辅助资料
部署此用例所需的所有文件都托管在github(https://github.com/ARM-softwa...)上。在repo中,有各种README.md文件进一步解释了如何部署演示,包括要运行的命令。我们鼓励在尝试部署之前花时间阅读这些文件。在下一节中,我们将repo的根称为$repo_root
用例部署细节
部署演示所需的工具是Terraform(https://www.terraform.io/intro/index.html)和Ansible(https://www.ansible.com/)。Terraform用于部署云端基础设施(EC2实例、网关、VPC等)。Ansible用于在云中安装Splunk Enterprise,并在边缘安装Splunk Universal Forwarder。edge设备不必是Jetson平台,它可以是任何基于Arm的设备。我们在Jetson板上使用的传感器记录在repo的自述文件中。然而,部署演示并不需要这些传感器。可以创建基于Python的模拟数据生成器,以消除获取传感器的需求。这种模拟数据方法也记录在repo中。
如上所述,云端组件与terraform配置文件一起自动部署(请参阅$REPO_ROOT/enterprise/terraform)。tf文件可用于更改AMI、实例类型、区域和可用性区域等内容。如果更改了AMI,请注意此演示仅使用Ubuntu图像进行了测试。要设置的最重要变量是aws_密钥和入口IP。aws_key是用于访问实例(通过SSH)的RSA/EdDSA密钥对的名称。ingress_ips是允许访问实例的IP地址列表。设置此变量允许访问UI、边缘设备和云之间的数据转发,以及下拉边缘设备配置更新。security_groups.tf文件是应用此IP地址列表的位置。此变量的默认值为空。这意味着用户必须明确列出允许访问Splunk Enterprise安装的IP地址。如果未指定任何内容,则会发生错误。要使用的IP首选列表是边缘设备的公共IP地址,以及用于运行terraform和ansible的笔记本电脑的公共IP地址。有关如何设置这些变量的说明见自述文件。
######################################################################
# Variables related to general setup of the infrastructure
######################################################################
variable "aws_region" {
  description = "The AWS region we want to deploy on."
  type = string
  default = "us-east-1"
}

###################################
# Variable related to instance deployment
###################################
variable "enterprise_instance_ami" {
  description = "The AMI to use for enterprise_instance_type"
  type = string
  default = "ami-09e67e426f25ce0d7"
}

variable "enterprise_instance_type" {
  description = "The EC2 instance type to use for splunk enterprise"
  type = string
  default = "m6i.large"
}

variable "instance_az" {
  description = "Availability Zone we want for splunk"
  type = string
  default = "us-east-1a"
}

variable "ingress_ips" {
  description = "A list of IP address we will allow to connect to the splunk instance(s), 0.0.0.0/0 is all ips. all ips is ok for debug, but don't use it for demos"
  type = list(string)
  default =  [""]
}

variable "aws_key" {
  description = "The AWS public key to push into the instances for SSH/SCP."
  type = string
  default = ""
}
Splunk Enterprise的安装和配置是使用$REPO_ROOT/Enterprise/ansible目录下包含的ansible文件完成的。有两件事需要注意。第一个是Splunk企业安装程序文件的名称及其位置。repo中不包括安装程序。必须从Splunk网站下载到$REPO_ROOT/enterprise/installers中。如果安装程序目录不存在,则必须创建该目录。第二项是需要创建TLS证书并将其放置在$REPO_ROOT/enterprise/server_certs目录中。READMEs和Splunk文档解释了如何做到这一点。最后,当我们运行ansible playbook时,会要求我们设置管理员密码。请记住此密码,因为登录Splunk Web需要此密码。更多详细信息请参见自述文件。
---
- name: Install & Setup Splunk
  vars:
    ent_user: "ubuntu"
    remote_home: "/home/{{ ent_user }}"
    splunk_ent_path: "/opt/splunk"
    splunk_ent_local: "{{ splunk_ent_path }}/etc/system/local/"
    splunk_ent_certs: "{{ splunk_ent_path }}/etc/auth/mycerts/"
    splunk_ent_app: "{{ splunk_ent_path }}/etc/apps"
    splunk_ent_deployment_apps: "{{ splunk_ent_path }}/etc/deployment-apps/"
    splunk_deb: "splunk-8.2.1-ddff1c41e5cf-linux-2.6-amd64.deb"

  vars_prompt:
    - name: admin_password
      prompt: Enter Splunk Enterprise Admin Password
      private: yes
      confirm: yes

  hosts: all
  remote_user: ubuntu
  become: true
  become_method: sudo

  tasks:
    - name: Copy splunk installer and various config files
      copy:
        src: "{{ item.src }}"
        dest: "{{ item.dest }}"
      with_items:
        - { src: "../installers/{{ splunk_deb }}", dest: "{{ remote_home }}" }
        - { src: ../server_certs/, dest: "{{ splunk_ent_certs }}" }
        - { src: ../splunk_config/web.conf, dest: "{{ splunk_ent_local }}" }
        - { src: ../splunk_user/user-seed.conf, dest: "{{ splunk_ent_local }}" }
        - { src: ../splunk_inputs/inputs.conf, dest: "{{ splunk_ent_local }}" }
        - { src: ../splunk_apps/edge_sensor_demo, dest: "{{ splunk_ent_app }}" }
        - { src: ../splunk_deployment_apps/edge_array_output, dest: "{{ splunk_ent_deployment_apps }}" }
        - { src: ../splunk_deployment_apps/edge_array_input, dest: "{{ splunk_ent_deployment_apps }}" }

    - name: Install the splunk package
      apt: "deb={{ remote_home }}/{{ splunk_deb }}"

    - name: Seed the password into the user-seed.conf file on the Splunk Enterprise host
      replace:
        path: "{{ splunk_ent_local }}/user-seed.conf"
        regexp: '<PW>'
        replace: "{{ admin_password }}"

    - name: Add splunk enterprise IP to conf files
      replace:
        path: "{{ item.path }}"
        regexp: 'splunk_ent_ip'
        replace: "{{ lookup('file', './host')  }}"
      with_items:
        - { path: "{{ splunk_ent_deployment_apps }}/edge_array_output/default/outputs.conf" }

    - name: Start Splunk Enterprise
      command: "/opt/splunk/bin/splunk --accept-license restart splunkd"
使用$REPO_ROOT/fwd/ansible目录下包含的ansible文件在边缘设备上安装和配置Splunk Universal Forwarder。在这本指南中,我们必须注意三件事。第一个是安装程序文件及其位置。repo中不包括安装程序。必须从Splunk网站下载到$REPO_ROOT/fwd/installers中。如果安装程序目录不存在,则必须创建该目录。第二个是需要在$REPO_ROOT/fwd/ansible/hosts目录中创建一个ansible清单文件。此文件必须包含边缘设备的IP地址。最后要注意的是,TLS证书必须复制到$REPO_ROOT/enterprise/indexer_certs目录中。更多详细信息请参见自述文件。
---
- name: Install & Setup Splunk forwarder
  vars:
    splunk_fwd_path: /opt/splunkforwarder
    splunk_fwd_local: "{{ splunk_fwd_path }}/etc/system/local/"
    splunk_fwd_certs: "{{ splunk_fwd_path }}/etc/auth/mycerts"
    splunk_tgz: "splunkforwarder-8.2.1-ddff1c41e5cf-Linux-armv8.tgz"
    python_scripts_path: "/home/{{ fwd_user }}"

  vars_prompt:
    - name: fwd_password
      prompt: Enter Splunk Forwarder Admin Password
      private: yes
      confirm: yes
    - name: fwd_user
      prompt: Enter Splunk Forwarder User
      private: no

  hosts: all
  remote_user: "{{ fwd_user }}"
  become: true
  become_method: sudo

  tasks:
    - name: Stop the Splunk Forwarder if it's running
      command: "/opt/splunkforwarder/bin/splunk stop --accept-license"
      ignore_errors: yes

    - name: Delete splunk forwarder if it exists
      file:
        path: "{{ splunk_fwd_path }}"
        state: absent

    - name: Copy and install the forwarder & sensor interface scripts
      unarchive:
        src: "../installers/{{ splunk_tgz }}"
        dest: /opt

    - name: Copy splunk forwader configs & certs. Also copying sensor interface scripts.
      copy:
        src: "{{ item.src }}"
        dest: "{{ item.dest }}"
      with_items:
        - { src: ../local/, dest: "{{ splunk_fwd_local }}" }
        - { src: ../indexer_certs/, dest: "{{ splunk_fwd_certs }}" }
        - { src: ../../python, dest: "{{ python_scripts_path }}" }

    - name: Make python sensor script executable
      file:
        path: "{{ python_scripts_path }}/python/read_sensors.py"
        mode: 'u+x,g+x,o+x'

    - name: Add splunk enterprise IP to conf files
      replace:
        path: "{{ item.path }}"
        regexp: 'splunk_ent_ip'
        replace: "{{ lookup('file', './splunk_ent_ip')  }}"
      with_items:
          #        - { path: "{{ splunk_fwd_local }}outputs.conf" }
        - { path: "{{ splunk_fwd_local }}deploymentclient.conf" }

    - name: Seed the password into the user-seed.conf file on the Splunk Enterprise host
      replace:
        path: "{{ splunk_fwd_local }}/user-seed.conf"
        regexp: '<PW>'
        replace: "{{ fwd_password }}"

    - name: Start Splunk Forwarder
      command: "/opt/splunkforwarder/bin/splunk start --accept-license"
此时,一切都已启动并运行,我们可以连接并登录到Splunk Web。
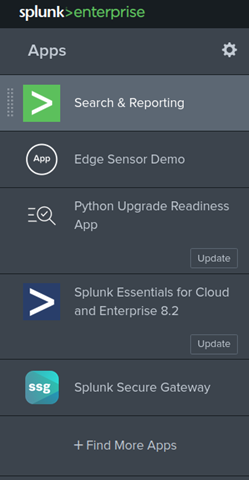
我们从默认的Splunk Web UI中看到的一个区别是添加了Edge Sensor演示应用程序。它显示在屏幕的左上角。在打开仪表板查看实时传感器数据之前,必须先设置一个服务器类。这使边缘设备了解它必须下拉的配置。边缘设备下载此配置后,将开始向索引器转发数据。服务器类设置记录在Splunk Enterprise文档中。必须添加到服务器类的应用程序是edge_array_输入和edge_array_输出。边缘设备的客户端名称为EdgeArray-00。这在单击服务器类创建设置菜单时很明显。创建服务器类并由边缘设备下载配置时。转发器管理屏幕应显示边缘设备已下载两个文件。更多详细信息请参见自述文件。
此时,我们可以返回到Splunk Web主屏幕,单击Edge Sensor演示应用程序,然后单击Edge Sensor Array仪表板。这将显示各种显示活动边缘传感器读数的图表。一切就绪并运行后,我们鼓励用户浏览Splunk Enterprise和Universal Forward中的配置文件。我们还鼓励用户探索Splunk Enterprise和Splunk Universal Forwarder文档。最后,我们鼓励用户尝试在基于Arm的edge设备上使用自己的用例部署Splunk Universal Forwarder。
总之,我们描述并提供了(在github上)辅助资料,演示如何将Splunk Universal Forwarder部署到基于Arm的设备上。并将其配置为在AWS EC2实例上与Splunk Enterprise通信。然后,Splunk universal forwarder可以从边缘的多个传感器收集数据,并将其发送给Splunk Enterprise。Splunk Enterprise可用于搜索、分析和可视化在边缘收集的数据。
有关在Arm Neoverse平台上运行的软件工作负载的任何查询,请随时联系sw-ecosystem@arm.com.


