X3芯片概述
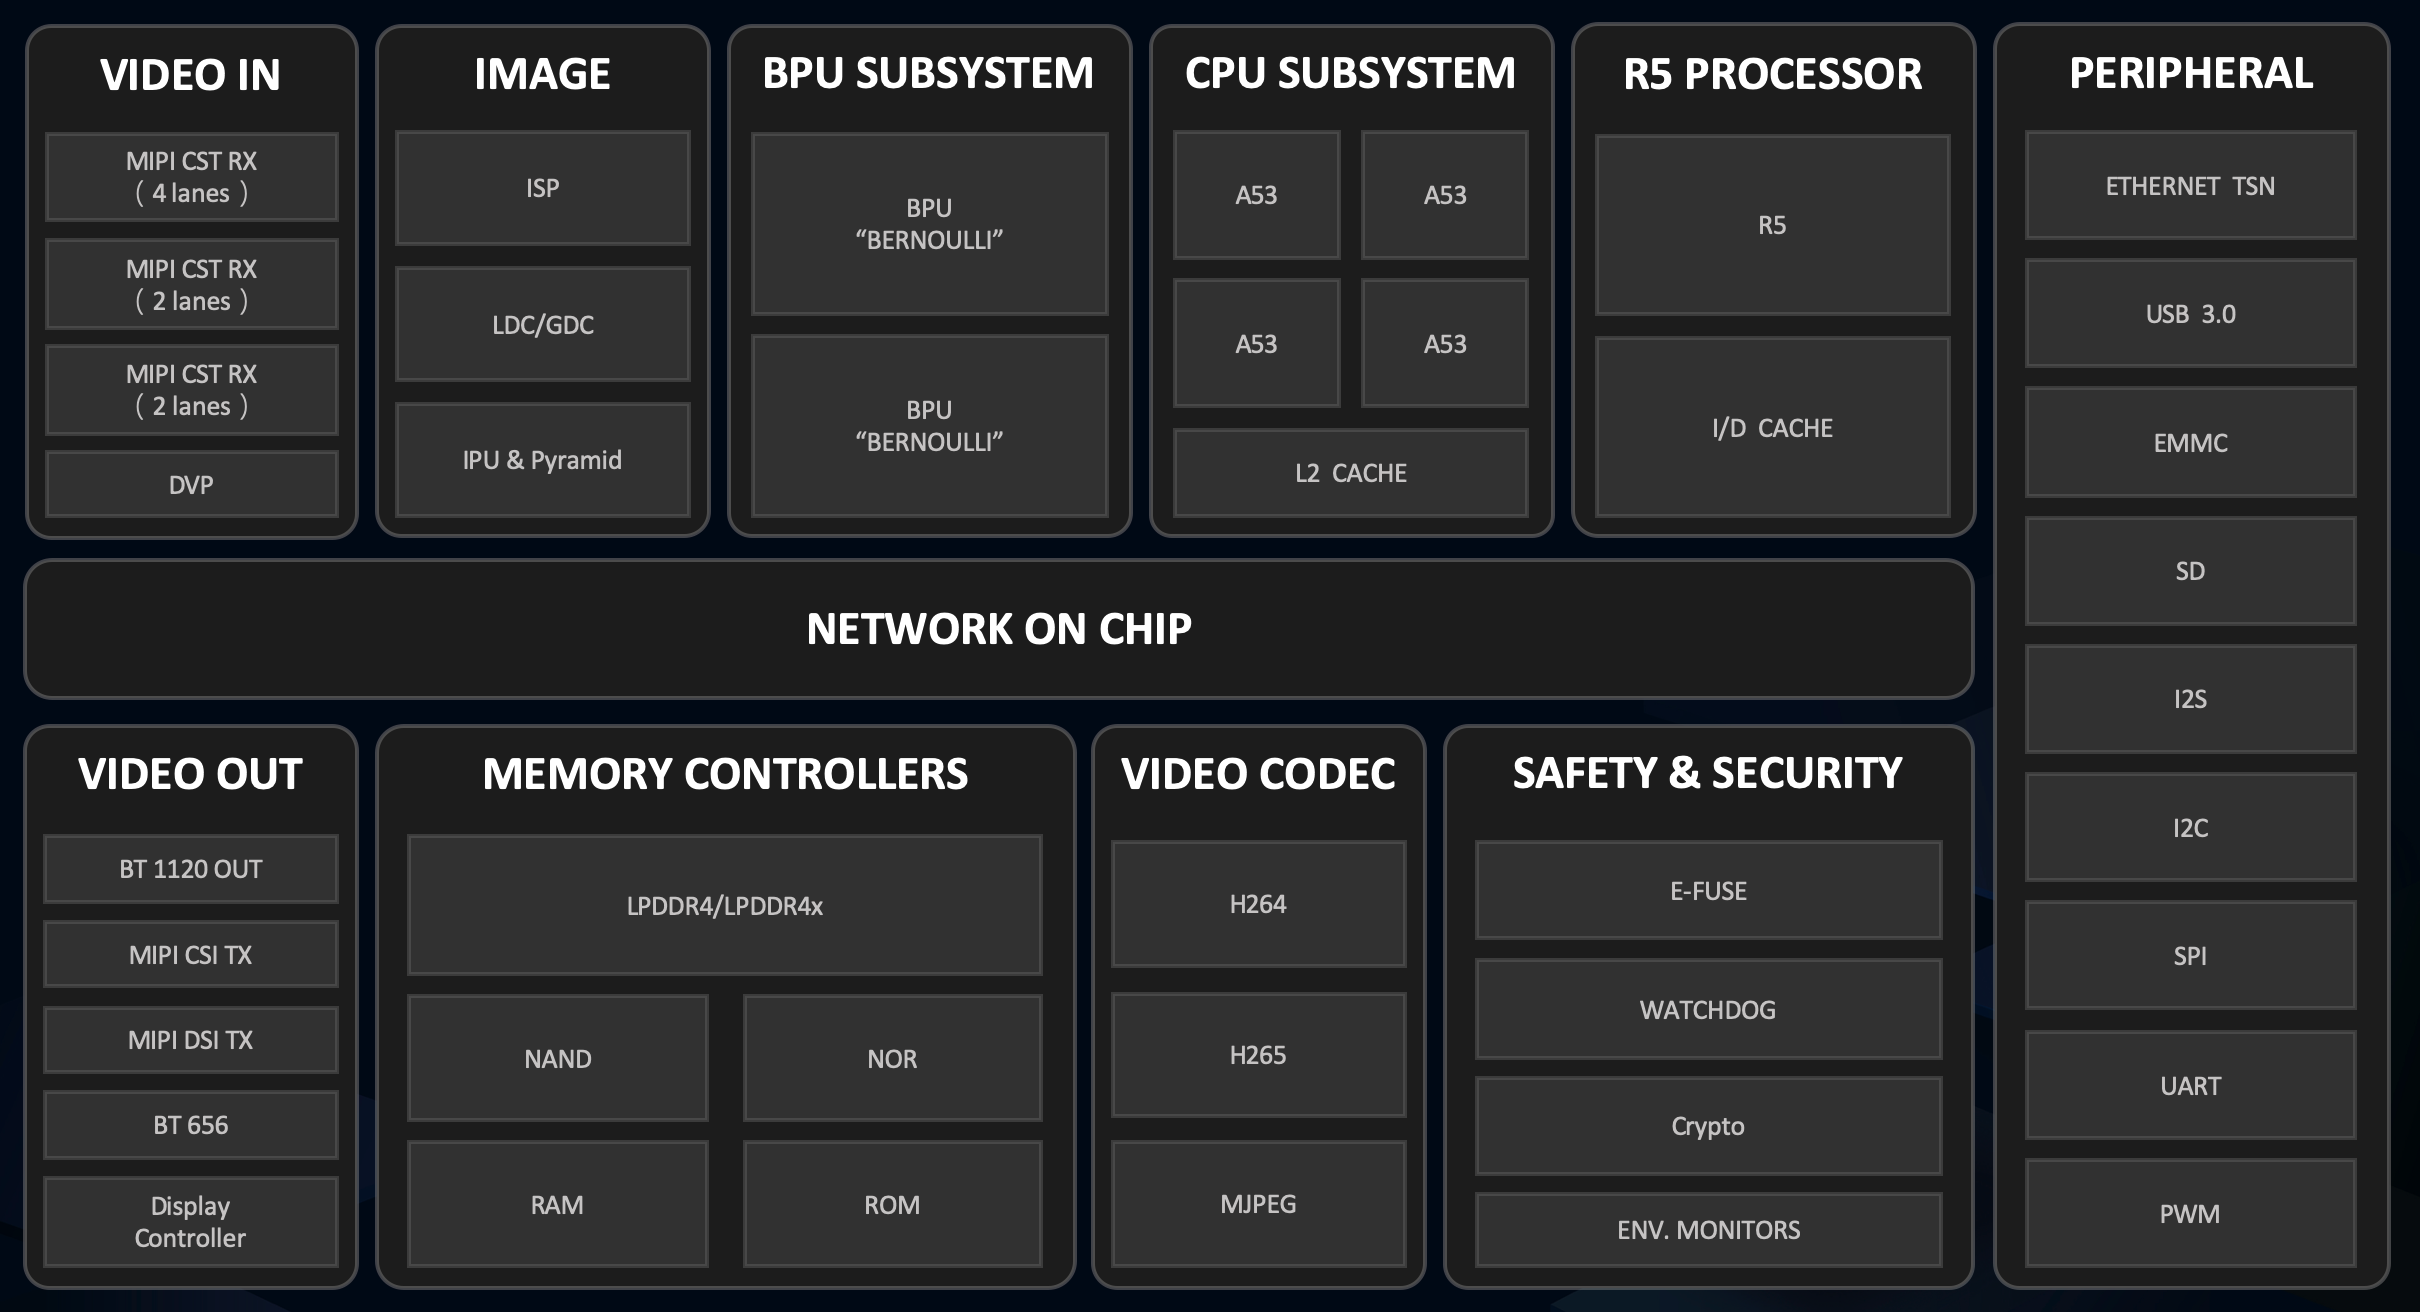
BPU是地平线自研的AI加速核,在设计过程中具体结合了AIoT/Auto的场景需求,从算法、计算架构、编译器三个方面进行了软硬协同优化,使得在功耗不变前提下提高数倍的AI计算性能。
X3和J3芯片各内置了两个伯努利2.0的BPU核,它极大提升了对先进CNN网络的支持,同时大大降低了DDR带宽占用率,可提供实时像素级视频分割和结构化视频分析等能力。
详细的内容请参考地平线芯片开发手册
1.图片分类任务
这里主要对样例中提供的程序进行测试
首先是系统中提供的图片分类任务样例
cd /app/ai_inference/01_basic_sample/
sudo python3 ./test_mobilenetv1.py
在test_mobilenetv1.py中对斑马的图片进行了分类,得到的结果如下,通过查看标签编号340: 'zebra'实现了对图片的准确分类。
========== Classification result ==========
cls id: 340 Confidence: 0.991851
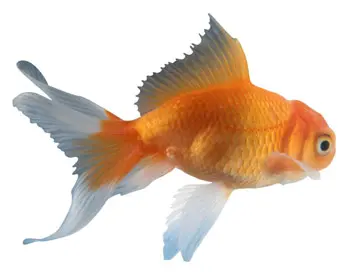
为了简单测试下分类算法的结果。使用其他图片进行测试,发现在特征明显时图片分类准确度较高,如对背景干净,特征清晰的金鱼达到了0.999884的置信度,1: 'goldfish, Carassius auratus',也存在图片分类错误的情况存在,如对于玉米进行检测时998: 'ear, spike, capitulum'。
========== Classification result ==========
cls id: 1 Confidence: 0.999884
========== Classification result ==========
cls id: 998 Confidence: 0.7537212.fcos目标检测快速验证
使用目标检测样例
cd /app/ai_inference/02_usb_camera_sample/
python3 usb_camera_fcos.py
在初探中已经对其进行简单展示,这里将代码进行简单分析,主要包括以下5个部分
其中加载模型 和模型正演为地平线封装的模型方法,from hobot_dnn import pyeasy_dnn as dnn
hdmi显示时地平线封装的vio方法,from hobot_vio import libsrcampy as srcampy
加载的模型是通过地平线工具链编译的bin模型fcos_512x512_nv12.bin,在运行中会对输入和输出的tensor进行打印,可以看出输入的是512x512的图像信息,输入为15个tensor,其中输出包括了检测框坐标、类别、置信度得分等。
tensor type: NV12_SEPARATE
data type: uint8
layout: NCHW
shape: (1, 3, 512, 512)
15
tensor type: float32
data type: float32
layout: NHWC
shape: (1, 64, 64, 80)
tensor type: float32
data type: float32
layout: NHWC
shape: (1, 32, 32, 80)
tensor type: float32
data type: float32
layout: NHWC
shape: (1, 16, 16, 80)
tensor type: float32
data type: float32
layout: NHWC
shape: (1, 8, 8, 80)
tensor type: float32
data type: float32
layout: NHWC
shape: (1, 4, 4, 80)
tensor type: float32
data type: float32
layout: NHWC
shape: (1, 64, 64, 4)
tensor type: float32
data type: float32
layout: NHWC
shape: (1, 32, 32, 4)
tensor type: float32
data type: float32
layout: NHWC
shape: (1, 16, 16, 4)
tensor type: float32
data type: float32
layout: NHWC
shape: (1, 8, 8, 4)
tensor type: float32
data type: float32
layout: NHWC
shape: (1, 4, 4, 4)
tensor type: float32
data type: float32
layout: NHWC
shape: (1, 64, 64, 1)
tensor type: float32
data type: float32
layout: NHWC
shape: (1, 32, 32, 1)
tensor type: float32
data type: float32
layout: NHWC
shape: (1, 16, 16, 1)
tensor type: float32
data type: float32
layout: NHWC
shape: (1, 8, 8, 1)
tensor type: float32
data type: float32
layout: NHWC
shape: (1, 4, 4, 1)
3.改用YOLOv5进行目标检测
更换YOLOv5模型进行目标检测,由于工具链中提供了编译后的YOLOv5模型,这里可以对其直接使用,工具链相关资料在AI工具链资料包其中
horizon_xj3_open_explorer_v1.11.4_20220413\ddk\samples\ai_toolchain\model_zoo\runtime\yolov5直接在usb_camera_fcos.py中进行模型的替换
models = dnn.load('../models/yolov5_672x672_nv12.bin')对输入输出进行打印,可以看到输入是一个 (1, 3, 672, 672)的tensor,而输出为3层的tensor,输出的不同代表着需要对模型后处理进行重写。
tensor type: NV12_SEPARATE
data type: uint8
layout: NCHW
shape: (1, 3, 672, 672)
3
tensor type: float32
data type: float32
layout: NHWC
shape: (1, 84, 84, 255)
tensor type: float32
data type: float32
layout: NHWC
shape: (1, 42, 42, 255)
tensor type: float32
data type: float32
layout: NHWC
shape: (1, 21, 21, 255)
在这里我找到之前地平线对YOLOv5的后处理的相关代码和说明,这个位于\horizon_xj3_open_explorer_v1.11.4_20220413\ddk\samples\ai_toolchain\horizon_model_convert_sample\04_detection\03_yolov5\mapper
1.4 对于 YOLOv5 模型,我们在模型结构上的修改点主要在于几个输出节点处。由于目前的浮点转换工具链暂时不支持 5 维的 Reshape,所以我们在 prototxt中进行了删除,并将其移至后处理中执行。同时我们还添加了一个 transpose 算子,使该节点将以 NHWC 进行输出。这是因为在地平线芯片中, BPU 硬件本身以 NHWC 的layout 运行,这样修改后可以让 BPU 直接输出结果,而不在量化模型中引入额外的transpose。 详情请见文档中benchmark部分的图文介绍。
根据说明可以看到YOLOv5应该属于异构量化,部分网络在后处理中执行,这也就代表需要更多的处理时间。在对于样例中给出的fcos的代码,我们主要在后处理处做出相应的调整,并将类别展示做出更换,其中主要代码也是参考了地平线中给出的YOLOv5的公开代码,做了部分的修改。
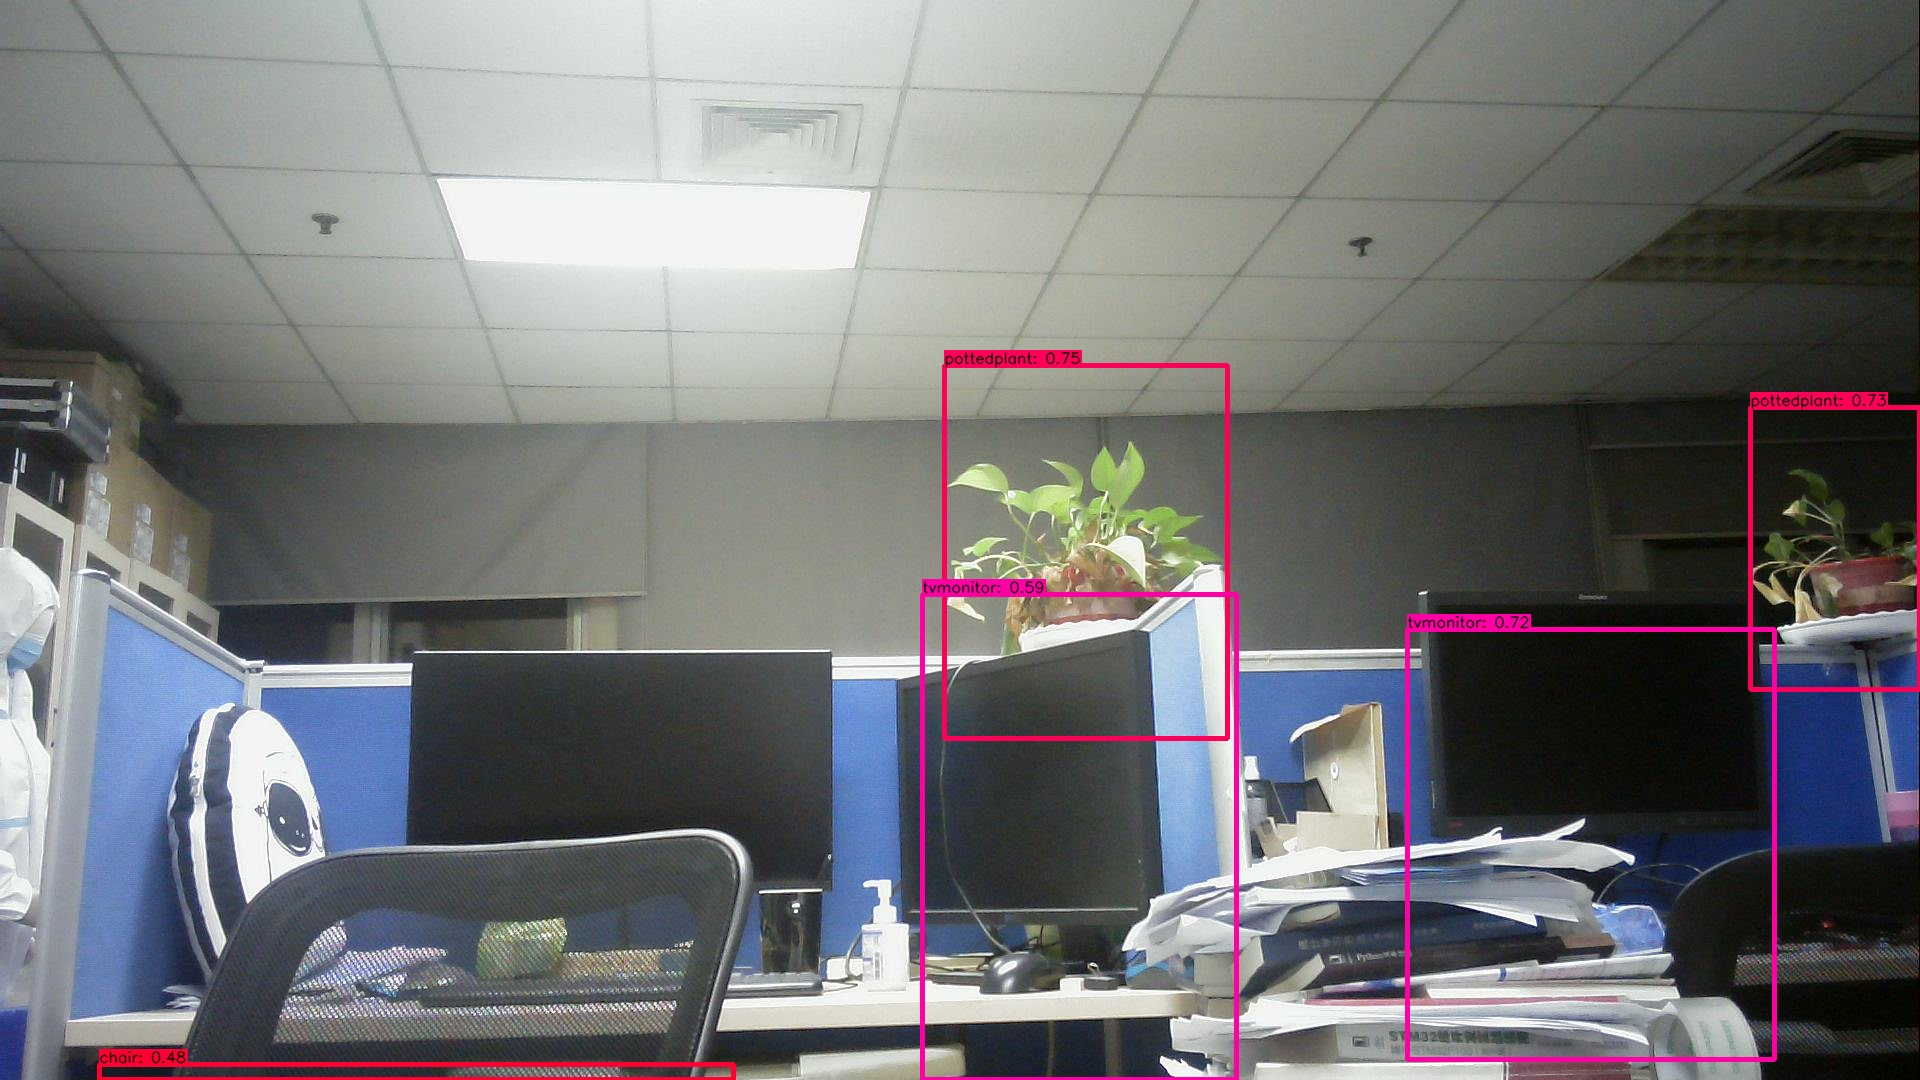
检测结果:
运行指令
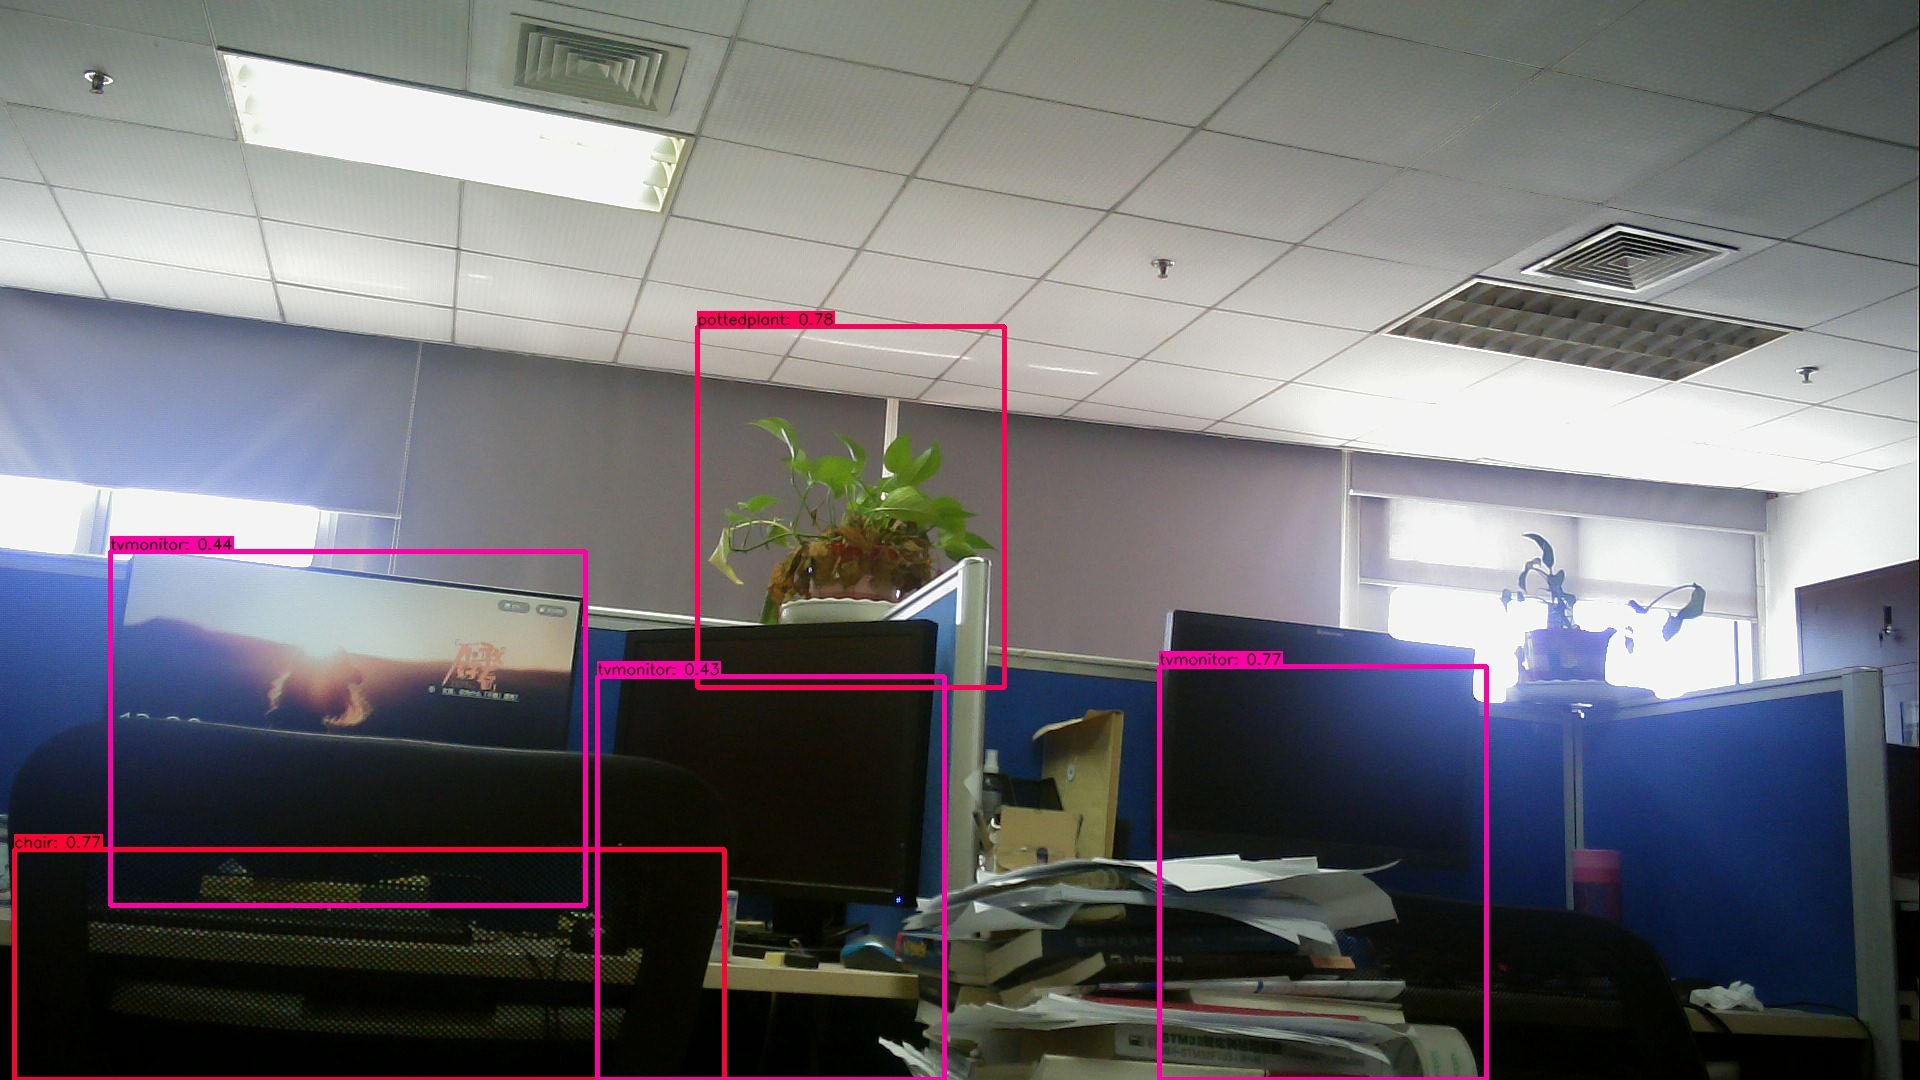
python3 usb_camera_yolov5.py将检测结果输出,可以看到对环境中的大部分物品做出了及时的检测,置信度也很高。
对时间进行统计,检测的时间根据实际环境中的复杂度变化而变化,经过实际测试发现在0.5s~0.8s之间,检测结果较快。主要对cv_time(获取图像并缩放到模型的输入尺寸)、forward_time(模型的正向推演)、postprocess_time(后处理)时间进行了统计,其中模型量化后的时间主要是Forward_time,可以看到需要的时间较短,表明模型的量化有效的减少了检测时间。占用的时间主要集中在后处理和显示,还有优化的空间。
time: 0.8004379272460938
cv_time         =  0.15749073028564453
Forward_time    =  0.06625533103942871
postprocess_time=  0.38094043731689453
chair is in the picture with confidence:0.8259
pottedplant is in the picture with confidence:0.7951
tvmonitor is in the picture with confidence:0.7798
tvmonitor is in the picture with confidence:0.4708
tvmonitor is in the picture with confidence:0.4420
time: 0.8241267204284668
cv_time         =  0.1624467372894287
Forward_time    =  0.06629300117492676
postprocess_time=  0.3649098873138428
chair is in the picture with confidence:0.6791
pottedplant is in the picture with confidence:0.7784
tvmonitor is in the picture with confidence:0.7809
tvmonitor is in the picture with confidence:0.5400
4.使用工具链量化模型
查看工具链介绍主要有以下两种方式:
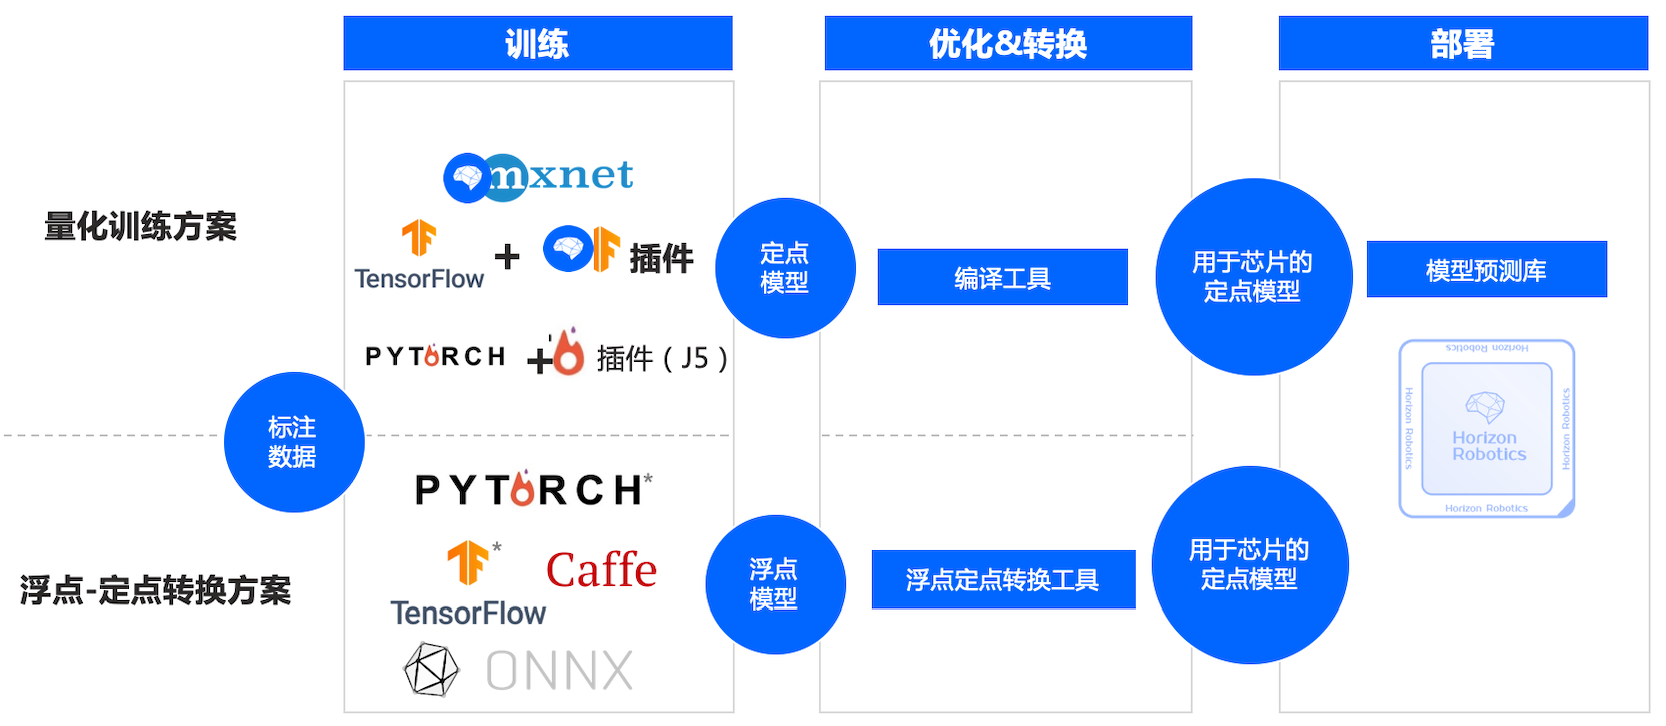
这里使用浮点转定点工具链,这种方法适用于最多的模型,详细介绍可以去查看数据链的视频。使用wegt下在docker文件,安装docker读取镜像
docker image ls
docker run -it hub.hobot.cc/aitools/ai_toolchain_centos_7_xj3:v2.1.7 /bin/bash
这里发现其中有YOLOv5s的相关内容,使用该模型进行快速部署
cd /open_explorer/horizon_xj3_open_explorer_v2.1.7_20220520/ddk/samples/ai_toolchain/horizon_model_convert_sample/04_detection/03_yolov5s/mapper
bash 01_check.sh
bash 02_preprocess.sh
bash 03_build.sh   #此步骤需要耗费一定时间
在model_output中输出了yolov5s_672x672_nv12.bin ,由于输出模型一致,直接在板子代码中修改运行,得到了与YOLO相似的效果。
**原作者:Tobark
原链接:原文详见地平线开发者社区(点击此处一键直达,详细文档及代码详见此处)**

