本文内容,主要来自官方文档的整合翻译与理解,涉及到的文档是《Blitz Course to TensorIR》,对TensorIR的实现与优化这部分介绍的Schedule是TensorIR的(这部分内容来自mlc.ai),Schedule Primitive这部分介绍的Schedule是Tensor Expression的,二者在Schedule上有一定共性。
因为涉及到的官方文档中的概念与例程比较简单,但是理解部分难免出错,还望指出。非常感谢!
下面我们会先介绍TensorIR以及相关的Schedule,再介绍TE的Schedule。TensorIR是Apache TVM为深度学习领域设计的专用语言,其有两个目的:
- 对模型中的各种算子逻辑进行变换和优化的同时,适配各种硬件后端;
- 可以自动将算子中计算逻辑的程序 tensorized 并优化。
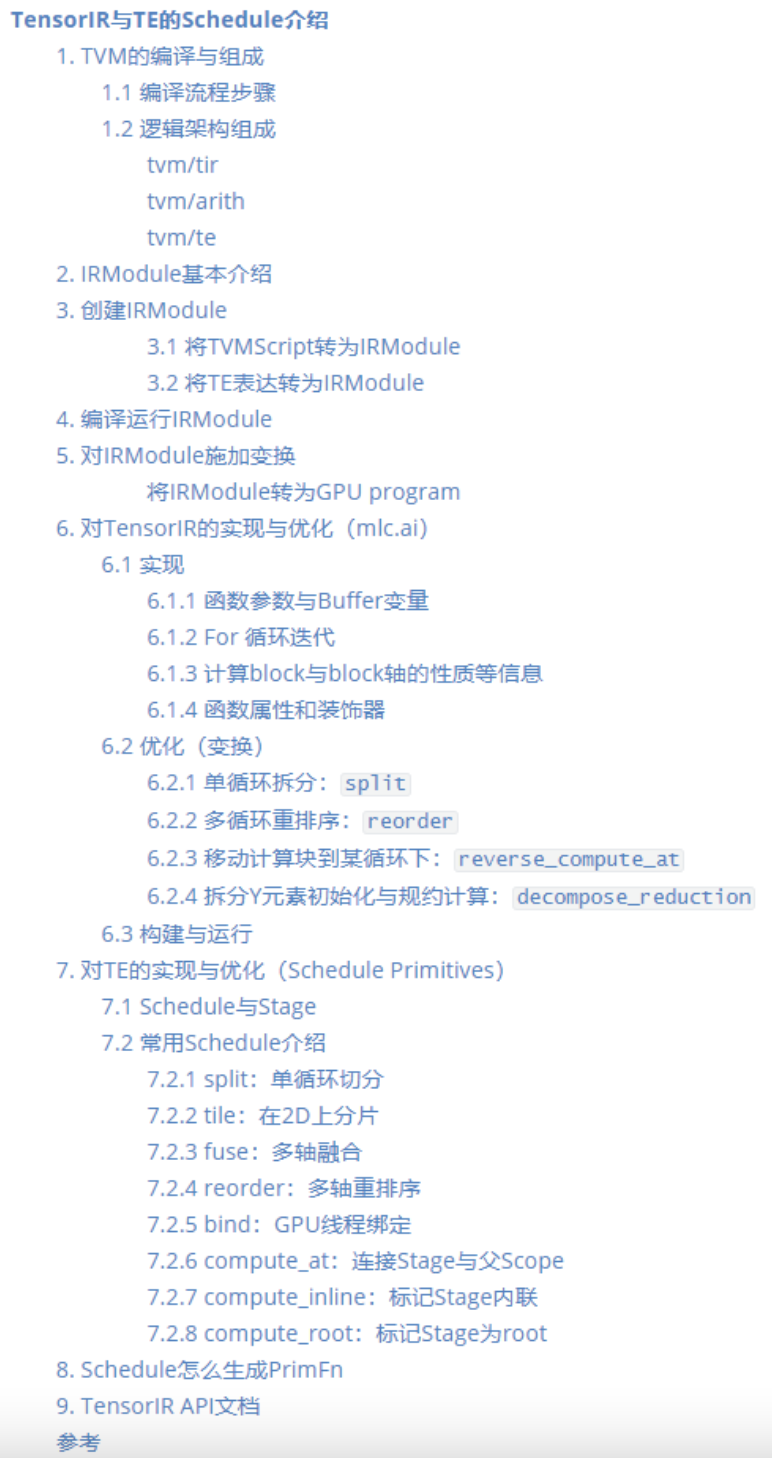
本文目录结构大体如下,实际略有出入。
图1 文章目录
在讲解TensorIR之前,我们会先介绍一下TVM的编译步骤与组成模块:一来是看看承载TensorIR的IRModule,因其多种形式,这其中的编译步骤对其形式的影响是如何流转的,再就是组成模块部分与其他模块的转换关系。为后续TensorIR的理解,进行铺垫。
1. TVM的编译与组成
1.1 编译流程步骤
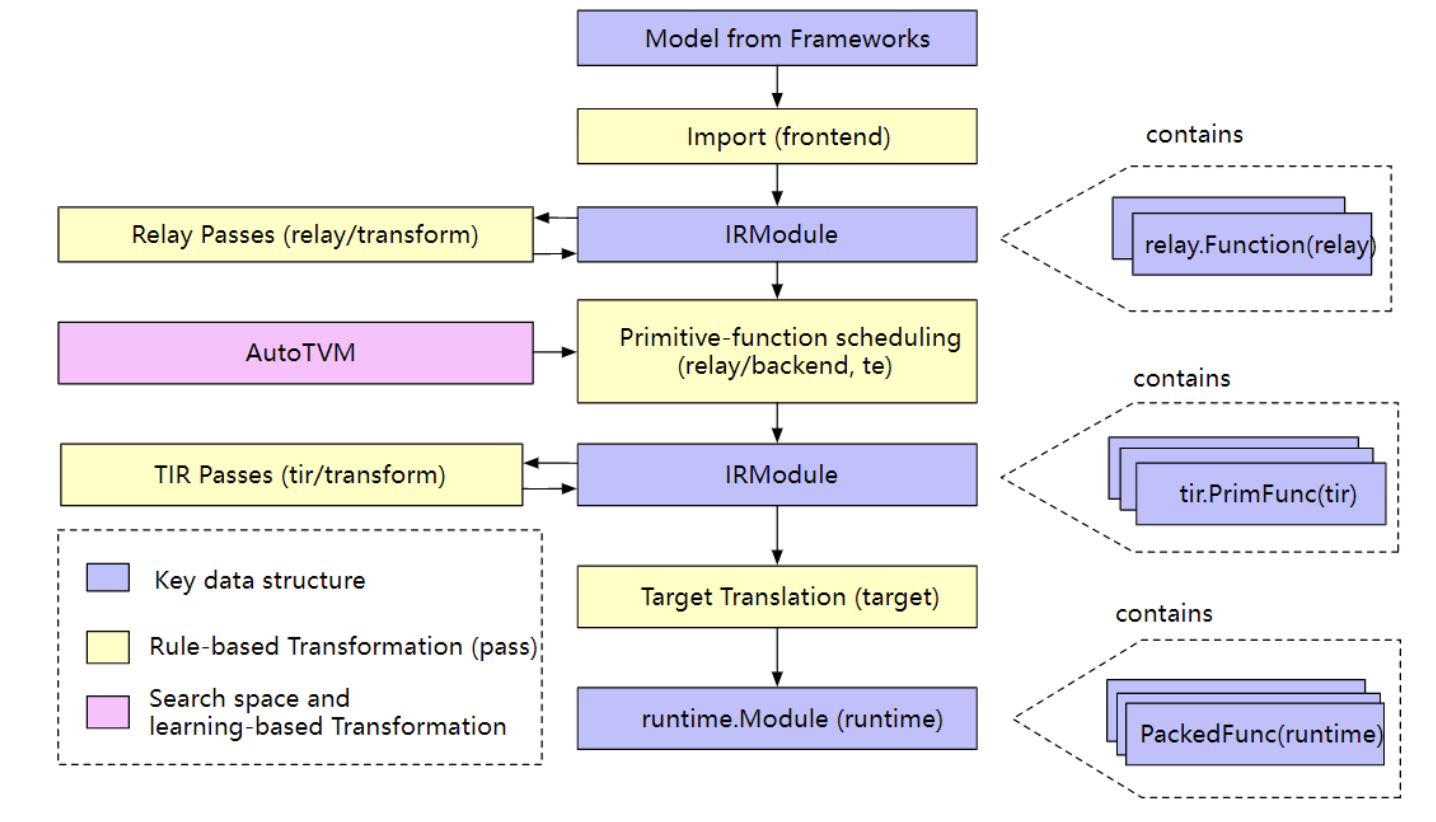
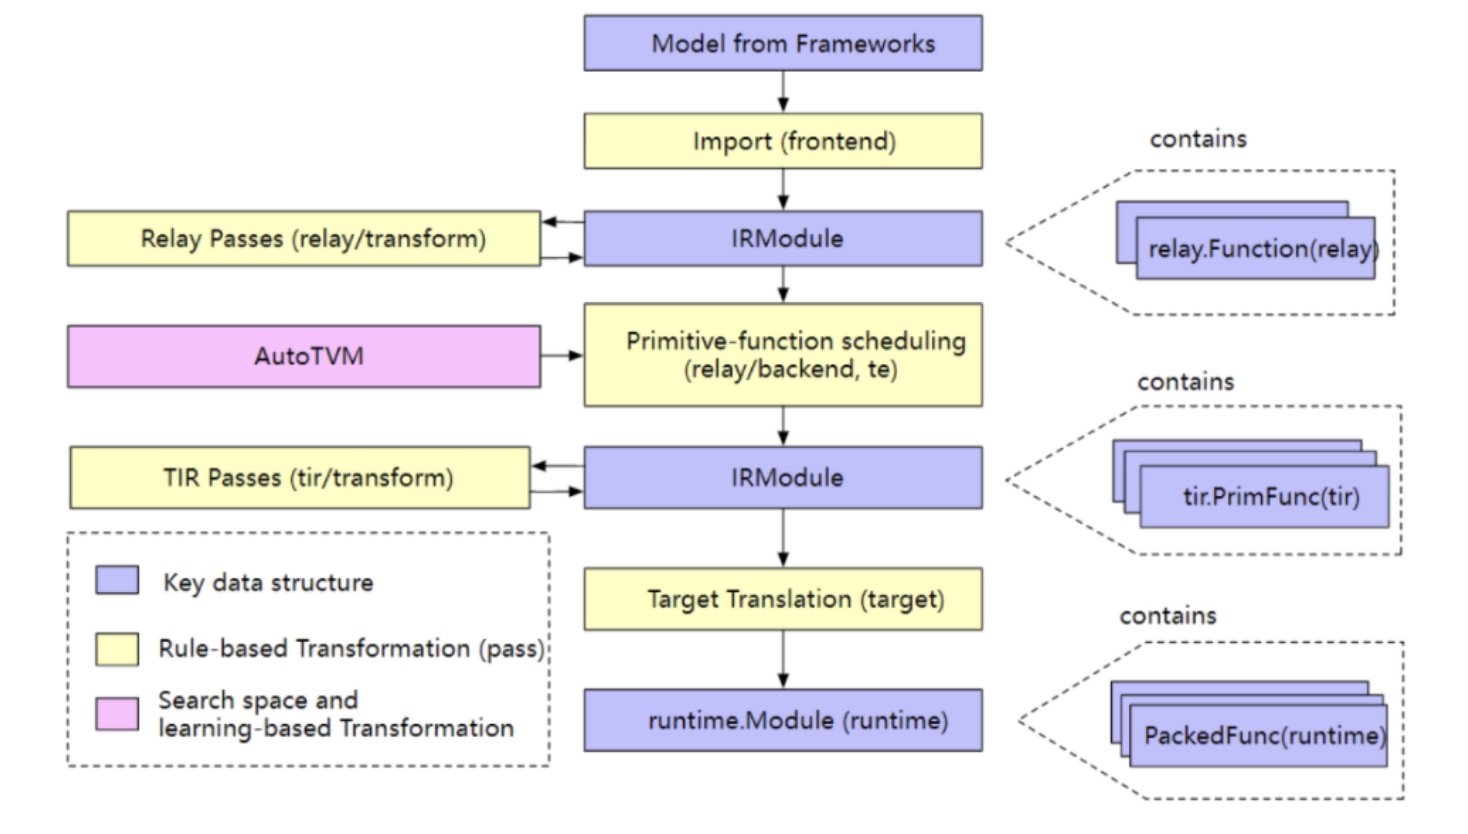
高层级编译流程的几个关键步骤:
- 导入:前端将模型导入,导入后的模型在TVM内部表示为一个IRModule,其包含模型中一系列的函数;
- 变换:编译器会对IRModule在功能上进行等效或近似变换。目的当然都是为了部署目标设备上的性能最优,很多变换都是基于集合设备的特点的,比方量化等;
- 目标翻译:编译器通过翻译器即代码生成(codegen),将IRModule翻译为目标设备上可执行的格式。目标设备翻译的结果会打包进
runtime.Module,该runtime.Module可以在目标设备上导出·、加载以及运行; - 运行执行:用户加载
runtime.Module并在支持的运行时环境执行编译好的函数。
图2 编译步骤:IR Module经过两次变换:第一次是relay.Function(relay)的形式,第二次是 tir.PrimFunc(tir)的形式,最终会被代码生成为目标机器上的可执行模块,即 runtime.Module(runtime)
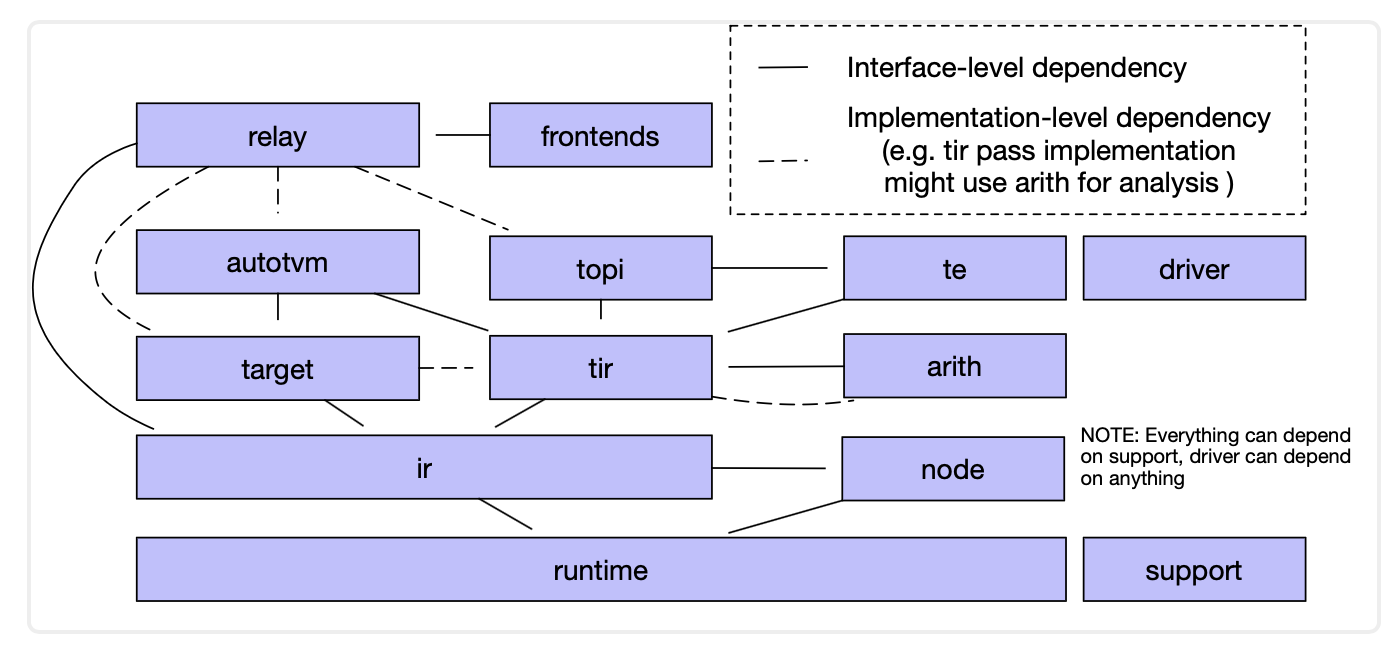
1.2 逻辑架构组成
图3 逻辑架构组成:从上到下有Relay、TE、TIR,作为IRModule的中心数据结构,其内部与其他模块的交互作用如上图
逻辑组成上,这里重点介绍下面几个与本文介绍的TensorIR强相关的部分。
tvm/tir
TIR包含了低层级程序表示,通过使用 tir::PrimFunc来表示可以被TIR passes处理的函数。除了IR数据结构,tir模块也定义了一系列的bluitin instrinsic和相关属性(属性通过公共Op registry),tir passes位于 tir/transform。
tvm/arith
这部分与TIR关系紧密,因为低层级代码生成的一个关键问题是对算术计算的属性:包含正负、变量约束,以及表述迭代空间的整数集合。arith模块提供了对其进行代码分析的工具集,一个TIR pass可以使用这些工具来化简优化代码。
tvm/te
te是 tensor expression的缩写,te是一个领域专用语言模块,通过该专用语言用户可以构建 tir::PrimFunc变体,需要注意,tensor expression并不是自包含函数(这里的self-contained function,可以理解为:不需要其他的函数了,自成一体,或者说是一个函数就是一个端到端的model)。TE是IR的一个片段,可以与现有的IRModule构造在一起,比方有调用关系这种。
te/schedule提供了一系列的调度primtives,以帮助函数的生成,在未来,将会给 tir::PrimFunc实现更多的scheduling组件。更多相关内容可以参考:
- InferBound Pass:InferBound的主要任务是创建边界映射,该映射为程序中的每个IterVar指定一个Range。然后将这些边界传递给ScheduleOps,在那里它们用于设置For循环的范围(参见MakeLoopNest),以及设置已分配缓冲区的大小(BuildRealize)等;
- Hybrid Frontend Developer Guide:Hybrid Frontend Language是一种混合前端,允许用户编写一些尚未得到TVM官方支持的习语的初步版本。
2. IRModule基本介绍
一个IRModule是TVM的中心数据结构,其包含了深度学习程序,是IR变换和模型构建的基本组成。一个IRModule把混了一些列functions的集合,目前支持的两种主要的function形式分别为:
relay::Function:一种高层级函数式的程序表达。一个relay.Function通常对应着一个端到到的模型。你可以将其视为一个额外支持的计算图,这种额外性体现在这个计算图存在控制流、递归或者复杂数据结构。tir::PrimFunc:一个低层级程序表达,该表达中包含了嵌套循环、多维度的load/store、线程、向量或张量指令。往往是模型中的某个(做了融合后的)算子/层的程序。
虽然是两种变体,但是在经过编译阶段,一个 relay::Function会进一步下沉(lower)为多个 tir::PrimFunc的低层级函数,以及一个包含调用这些低层级函数的调用(calls)。
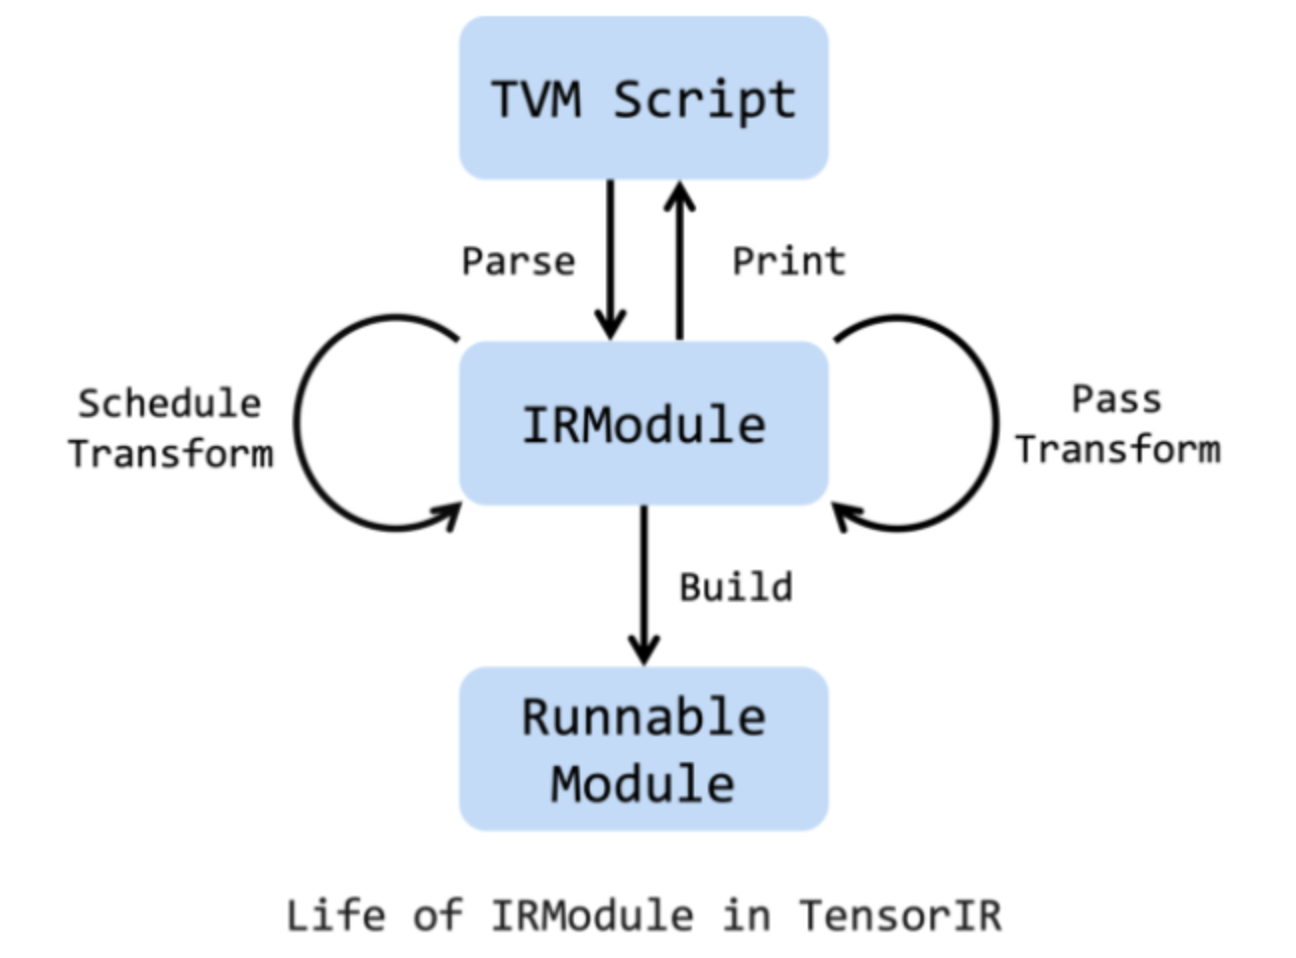
图4 IR Module生命周期
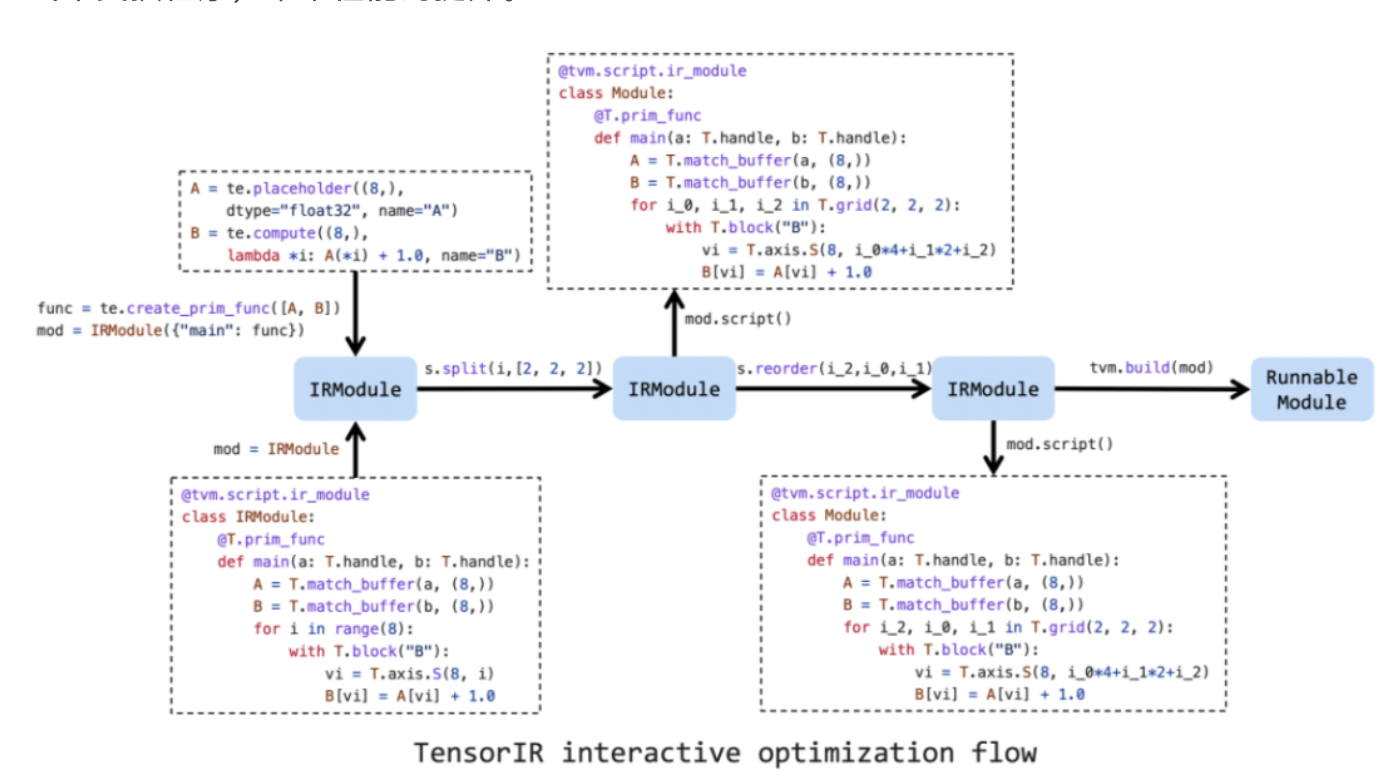
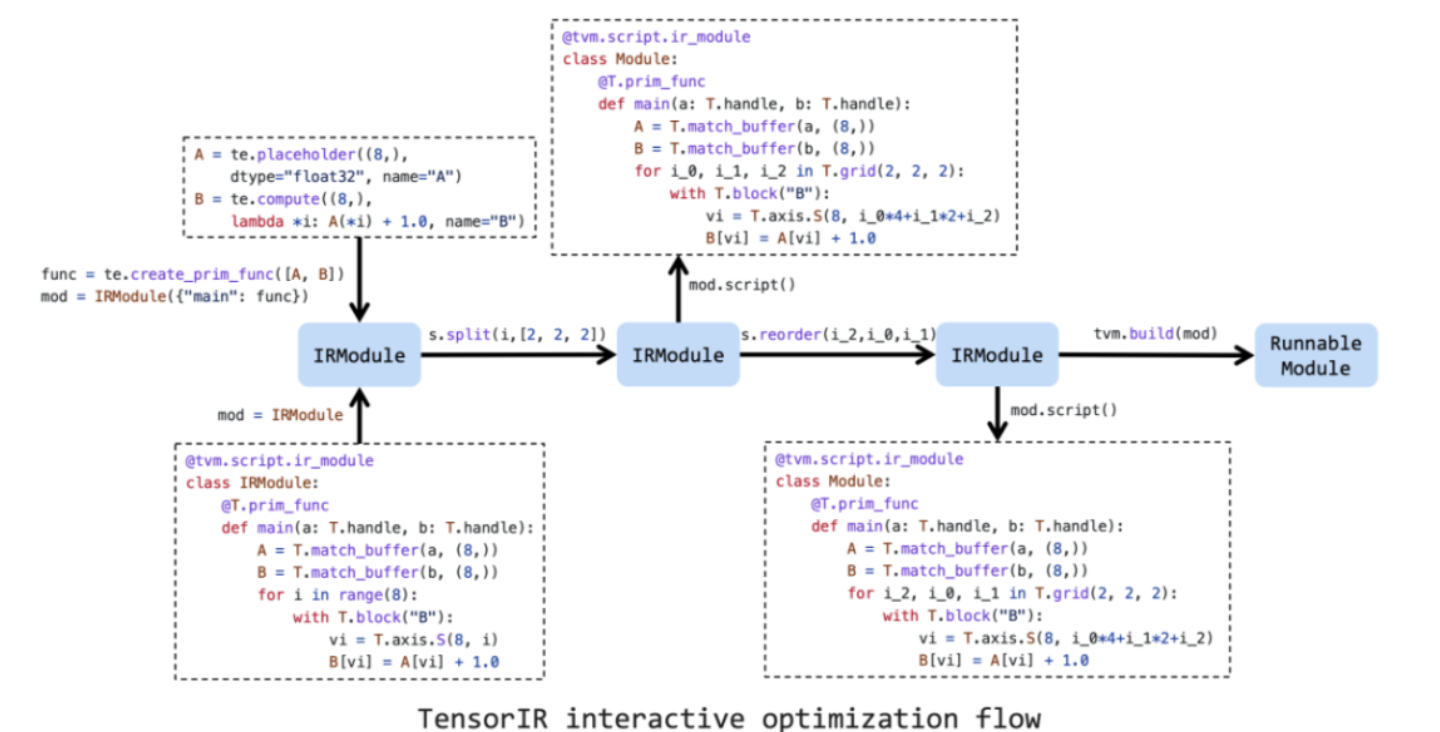
上图是IRModule的生命周期,其由TVMScript创建。TensorIR schedule primtives和passes是对IRModule变换的两个主要途径,即对IRModule施加一系列的transormation是可行的。同时,为了方便Debug,可以在任何阶段将IRModule打印为TVMScript。
在变换(Pass Transformation)和优化(Schedule Transformation)完成,之后就可以对其进行Build,即构建为可以运行的Module,即可以被目标设备部署的Runnable Module。
基于TensorIR的和IRModule的设计理念,我们可构建一种新的编程方式:
- 写一种基于Python-AST语法的名为TVMScript的程序;
- 通过Python就可以变换和优化程序;
- 交互式地观察性能,因为结合Python命令式,也更容易。
3. 创建IRModule
IRModule可以通过编写TVMScript来创建,这是TVM IR的一种可循环的语法。
3.1 将TVMScript转为IRModule
与使用Tensor表达式创建计算表达式不同,TensorIR允许用户通过TVMScript(一种嵌入在python AST中的语言)进行编程。新方法使编写复杂程序、进一步调度和优化程序成为可能。下面是矢量加法的一个简单示例。
@tvm.script.ir_moduleclass MyModule: @T.prim_func def main(a: T.handle, b: T.handle): # We exchange data between function by handles, which are similar to pointer. T.func_attr({"global_symbol": "main", "tir.noalias": True}) # Create buffer from handles. A = T.match_buffer(a, (8,), dtype="float32") B = T.match_buffer(b, (8,), dtype="float32") for i in range(8): # A block is an abstraction for computation. with T.block("B"): # Define a spatial block iterator and bind it to value i. vi = T.axis.spatial(8, i) B[vi] = A[vi] + 1.0ir_module = MyModuleprint(type(ir_module))print(ir_module.script())# 下面是打印的结果"""<class 'tvm.ir.module.IRModule'># from tvm.script import tir as T@tvm.script.ir_moduleclass Module: @T.prim_func def main(A: T.Buffer[8, "float32"], B: T.Buffer[8, "float32"]): # function attr dict T.func_attr({"tir.noalias": True, "global_symbol": "main"}) # body # with T.block("root") for i in T.serial(8): with T.block("B"): vi = T.axis.spatial(8, i) T.reads(A[vi]) T.writes(B[vi]) B[vi] = A[vi] + T.float32(1)"""3.2 将TE表达转为IRModule
使用Tensor Expression领域专用语言也可以写简单的算子实现,并将其转为IRModule。
from tvm import teA = te.placeholder((8,), dtype="float32", name="A")B = te.compute((8,), lambda *i: A(*i) + 1.0, name="B")func = te.create_prim_func([A, B])ir_module_from_te = IRModule({"main": func})print(ir_module_from_te.script())# 下面是打印结果"""# from tvm.script import tir as T@tvm.script.ir_moduleclass Module: @T.prim_func def main(A: T.Buffer[8, "float32"], B: T.Buffer[8, "float32"]): # function attr dict T.func_attr({"global_symbol": "main", "tir.noalias": True}) # body # with T.block("root") for i0 in T.serial(8): with T.block("B"): v_i0 = T.axis.spatial(8, i0) T.reads(A[v_i0]) T.writes(B[v_i0]) B[v_i0] = A[v_i0] + T.float32(1)"""4. 编译运行IRModule
通过指定目标后端,可以将IRModule构建为可执行module。
mod = tvm.build(ir_module, target="llvm") # The module for CPU backends.print(type(mod))# <class 'tvm.driver.build_module.OperatorModule'>准备好输入月输出的数组,就可以运行:
a = tvm.nd.array(np.arange(8).astype("float32"))b = tvm.nd.array(np.zeros((8,)).astype("float32"))mod(a, b)print(a)print(b)# [0. 1. 2. 3. 4. 5. 6. 7.]# [1. 2. 3. 4. 5. 6. 7. 8.]5. 对IRModule施加变换
IRModule是程序优化过程的核心数据结构,可以被前文提到的Schedule所转换。一个Schedule包含多个primtive方法,可以交互式地来变换program。每个Primitive通过某种方式来变换程序,带来性能的提升。
图5 TensorIR交互式优化流程
上图是优化Tensor Program的工作流程。首先,需要创建一个初始的Schedule,该Schedule作用于一个TVMScript或者Tensor Expression。之后,通过一系列的schedule primitives来提升性能。最终将其下沉并将IRModule构建为一个可执行模块,即Runnable Module。
下面我们从一个简单的Schedule开始:
sch = tvm.tir.Schedule(ir_module)print(type(sch))# <class 'tvm.tir.schedule.schedule.Schedule'>将该循环拆为三层嵌套循环并打印结果。
# Get block by its nameblock_b = sch.get_block("B")# Get loops surrounding the block(i,) = sch.get_loops(block_b)# Tile the loop nesting.i_0, i_1, i_2 = sch.split(i, factors=[2, 2, 2])print(sch.mod.script())# 输出结果如下"""# from tvm.script import tir as T@tvm.script.ir_moduleclass Module: @T.prim_func def main(A: T.Buffer[8, "float32"], B: T.Buffer[8, "float32"]): # function attr dict T.func_attr({"tir.noalias": True, "global_symbol": "main"}) # body # with T.block("root") for i_0, i_1, i_2 in T.grid(2, 2, 2): with T.block("B"): vi = T.axis.spatial(8, i_0 * 4 + i_1 * 2 + i_2) T.reads(A[vi]) T.writes(B[vi]) B[vi] = A[vi] + T.float32(1)"""也可以将循环重新排列,比方将循环 i_2移动到i\_1外面:
sch.reorder(i_0, i_2, i_1)print(sch.mod.script())# 打印结果如下# from tvm.script import tir as T@tvm.script.ir_moduleclass Module: @T.prim_func def main(A: T.Buffer[8, "float32"], B: T.Buffer[8, "float32"]): # function attr dict T.func_attr({"tir.noalias": True, "global_symbol": "main"}) # body # with T.block("root") for i_0, i_2, i_1 in T.grid(2, 2, 2): with T.block("B"): vi = T.axis.spatial(8, i_0 * 4 + i_1 * 2 + i_2) T.reads(A[vi]) T.writes(B[vi]) B[vi] = A[vi] + T.float32(1)将IRModule转为GPU program
如果想部署到GPU上,那么绑定线程是必须的,通过primitives可以通过如下的变换方式绑定线程:
sch.bind(i_0, "blockIdx.x")sch.bind(i_2, "threadIdx.x")print(sch.mod.script())"""# from tvm.script import tir as T@tvm.script.ir_moduleclass Module: @T.prim_func def main(A: T.Buffer[8, "float32"], B: T.Buffer[8, "float32"]): # function attr dict T.func_attr({"tir.noalias": True, "global_symbol": "main"}) # body # with T.block("root") for i_0 in T.thread_binding(2, thread="blockIdx.x"): for i_2 in T.thread_binding(2, thread="threadIdx.x"): for i_1 in T.serial(2): with T.block("B"): vi = T.axis.spatial(8, i_0 * 4 + i_1 * 2 + i_2) T.reads(A[vi]) T.writes(B[vi]) B[vi] = A[vi] + T.float32(1)"""绑定线程后,可以构建 tvm.build为CUDA后端,并执行结果:
ctx = tvm.cuda(0)cuda_mod = tvm.build(sch.mod, target="cuda")cuda_a = tvm.nd.array(np.arange(8).astype("float32"), ctx)cuda_b = tvm.nd.array(np.zeros((8,)).astype("float32"), ctx)cuda_mod(cuda_a, cuda_b)print(cuda_a)print(cuda_b)"""[0. 1. 2. 3. 4. 5. 6. 7.][1. 2. 3. 4. 5. 6. 7. 8.]6. 对TensorIR的实现与优化(mlc.ai)
下面内容来自MLC.ai。将会对TensorIR的方法展开介绍,并在此过程中结合一个实例。
正如前文所说,IRModule源自TVM Scripts,该Python包导入的方式为:
from tvm.script import tir as T
使用张量抽象程序的目的是硬件加速,如多线程、特殊硬件指令的使用和内存访问等。下面我们从一个实际的例子展开,该例子有两个过程:
- 过程一:对二维矩阵A和二维矩阵B做矩阵乘法,并将计算结果存入矩阵Y中;
- 过程二:对矩阵Y做ReLU计算。
这里的例子可以看成是一个算子,任何算子都有两部分:实现与优化。下面内容先讲计算逻辑实现涉及的TensorIR概念,之后我们会讲Schedule即为在目标平台上的性能更优,所做的加速变换优化。
6.1 实现
先看下图右边,虽然使用了Numpy,但是我们称之为低级 Numpy 因为这个过程为了尽可能表示清楚,没有直接使用 Numpy 计算矩阵乘法的接口,而是通过下标索引标量值来计算。
图6 TensorIR(左)与低级Numpy(右)的代码
而上图左边是与之等价的 TensorIR实现,其表述看起来很复杂,下面我们逐步看一下其:函数参数与Buffer变量、For循环迭代、计算block与block轴的性质等信息、函数属性和装饰器。
6.1.1 函数参数与Buffer变量
从TensorIR的函数参数,就与 NumPy 函数定义方式不同。Numpy是 np.ndarray类型,而TensorIR是 T.Buffer且带有维度和类型信息。
# TensorIRdef mm_relu(A: T.Buffer[(128, 128), "float32"], B: T.Buffer[(128, 128), "float32"], C: T.Buffer[(128, 128), "float32"]): ...# numpydef lnumpy_mm_relu(A: np.ndarray, B: np.ndarray, C: np.ndarray): ...这里 A、B 和 C 采用名为 T.Buffer 的类型,其形状参数为 (128,128),数据类型为 float32。这些附加信息有助于可能的机器学习编译过程以生成专门针对形状和数据类型的代码。
同样,TensorIR 在中间结果分配中也使用了缓冲区类型。
# TensorIRY = T.alloc_buffer((128, 128), dtype="float32")# numpyY = np.empty((128, 128), dtype="float32")6.1.2 For 循环迭代
循环迭代也有直接对应关系。T.grid 是 TensorIR 中的语法糖,供我们书写多个嵌套的迭代器。
# TensorIRfor i, j, k in T.grid(128, 128, 128): # numpyfor i in range(128): for j in range(128): for k in range(128):6.1.3 计算block与block轴的性质等信息
主要区别之一来自计算语句。TensorIR 包含一个名为 T.block 的额外结构。
# TensorIRwith T.block("Y"): vi = T.axis.spatial(128, i) vj = T.axis.spatial(128, j) vk = T.axis.reduce(128, k) with T.init(): Y[vi, vj] = T.float32(0) Y[vi, vj] = Y[vi, vj] + A[vi, vk] * B[vk, vj]# coressponding numpy codevi, vj, vk = i, j, kif vk == 0: Y[vi, vj] = 0Y[vi, vj] = Y[vi, vj] + A[vi, vk] * B[vk, vj]块 是 TensorIR 中的基本计算单位,但其比普通 NumPy 代码更多的信息。一个块包含一组块轴( vi、vj、vk)和围绕它们定义的计算。
vi = T.axis.spatial(128, i)vj = T.axis.spatial(128, j)vk = T.axis.reduce(128, k)上面三行声明了关于块轴的关键性质,语法如下。
[block_axis] = T.axis.[axis_type]([axis_range], [mapped_value])
这三行包含以下信息:
- 定义了
vi、vj、vk应被绑定到的位置(在本例中为i、j和k); - 声明了
vi、vj、vk的原始范围(T.axis.spatial(128, i)中的128); - 声明了块轴的属性(
spatial,reduce),其标记了轴与正在执行的计算之间的关系。 - Spatial:Spatial即空间的意思,就边界关系而言,
vi = T.axis.spatial(128, i)有效地蕴含了vi = i。[axis_range]值提供了[block_axis]的预期范围。例如,vi = T.axis.spatial(128, i)中的128表明vi值域应该在range(0, 128)。 - Reduce:下图总结了块(迭代)轴和块
Y的读写关系。块Y正在对Buffer变量Y进行(规约)更新,将其标记为写入,因为我们不需要来自另一个块的Buffer变量Y的值。
图7 块Y的block axis属性:block Y读取 A[vi,vk]和 B[vk,vj],其中用到 vi、vj、vk,输出是 Y[vi,vj]**
块 Y 通过读取来自 A[vi,vk] 和 B[vk,vj] 的值来计算结果 Y[vi,vj],并对所有可能的 vk 执行求和。在上图示例中,如果 vi、 vj 固定为 (0,1),并对 vkinrange(0,128) 执行块 Y,可以计算出 C[0,1],相当于矩阵乘法得到一个 C[0,1]。
对固定的 vi 和 vj,计算块在 Y 的空间位置 ( Y[vi,vj]) 处生成一个点值,该点值独立于 Y 中的其他位置(具有不同的 vi, vj 值的位置)。我们可以称 vi、 vj 为空间轴,因为空间轴直接对应于块写入的Buffer变量空间区域的开始。涉及归约的轴( vk)被命名为归约轴。
综上,我们再次回顾这部分代码,可以看到下面有两个块,block Y与block C,block内部具有相关轴,以及围绕轴而进行的计算。但是其实不难发现,如block Y外部定义了 i、j、k的范围是128,问题是为何内部又会定义索引值128,重复定义128值?
@tvm.script.ir_moduleclass MyModule: @T.prim_func def mm_relu(A: T.Buffer[(128, 128), "float32"], B: T.Buffer[(128, 128), "float32"], C: T.Buffer[(128, 128), "float32"]): T.func_attr({"global_symbol": "mm_relu", "tir.noalias": True}) Y = T.alloc_buffer((128, 128), dtype="float32") for i, j, k in T.grid(128, 128, 128): with T.block("Y"): vi = T.axis.spatial(128, i) vj = T.axis.spatial(128, j) vk = T.axis.reduce(128, k) with T.init(): Y[vi, vj] = T.float32(0) Y[vi, vj] = Y[vi, vj] + A[vi, vk] * B[vk, vj] for i, j in T.grid(128, 128): with T.block("C"): vi = T.axis.spatial(128, i) vj = T.axis.spatial(128, j) C[vi, vj] = T.max(Y[vi, vj], T.float32(0))这种额外附加的块信息是使块轴独立于外部循环嵌套 i, j, k,有两个原因:
- 帮助我们验证用于执行计算的外部循环的正确性。当外部定义的
i范围是[0, 128)即for i in range(127)不包含127,而内部却包含,那么此时代码块会报错,因为我们外部循环i值到127,而block则绑定的循环包含128,就不对了; - 有助于机器学习编译。两种轴:在空间轴上做并行化,在规约轴上进行并行化都需要特定的策略,而这些策略需要这些值,即这些块的额外附加的信息帮助编译。
块轴的语法糖。外部循环只需要一行代码就创建了三层嵌套循环:fori,j,kinT.grid(128,128,128)。其实块轴也支持类似的操作,这就是块轴的语法糖了。使用 T.axis.remap 在一行中声明所有块轴,如等效于原本三行,现在只需要一行:
# SSR means the properties of each axes are "spatial", "spatial", "reduce"vi, vj, vk = T.axis.remap("SSR", [i, j, k])# equal code belowvi = T.axis.spatial(range_of_i, i)vj = T.axis.spatial(range_of_j, j)vk = T.axis.reduce(range_of_k, k)因而原本的TensorIR的写法也可以更简化:
@tvm.script.ir_moduleclass MyModuleWithAxisRemapSugar: @T.prim_func def mm_relu(A: T.Buffer[(128, 128), "float32"], B: T.Buffer[(128, 128), "float32"], C: T.Buffer[(128, 128), "float32"]): T.func_attr({"global_symbol": "mm_relu", "tir.noalias": True}) Y = T.alloc_buffer((128, 128), dtype="float32") for i, j, k in T.grid(128, 128, 128): with T.block("Y"): vi, vj, vk = T.axis.remap("SSR", [i, j, k]) with T.init(): Y[vi, vj] = T.float32(0) Y[vi, vj] = Y[vi, vj] + A[vi, vk] * B[vk, vj] for i, j in T.grid(128, 128): with T.block("C"): vi, vj = T.axis.remap("SS", [i, j]) C[vi, vj] = T.max(Y[vi, vj], T.float32(0))6.1.4 函数属性和装饰器
函数属性信息包含关于函数的额外信息。
T.func_attr({"global_symbol": "mm_relu", "tir.noalias": True})global_symbol:对应函数名,也是被装饰器@T.prim_func修饰的函数的名字;tir.noalias:一个属性,表示所有的Buffer参数内部区域不重叠。相当于OpenCL对__global参数修饰的restrict,这些概念对TensorIR的整体理解不影响,不要有思想负担。
图8 编译流程步骤(再次贴出)
上面TensorIR表示中还有两个装饰器 @tvm.script.ir_module 和 @T.prim_func ,这两个装饰器用于表示对应部分的类型。@tvm.script.ir_module :表示 MyModule 是一个 IRModule。IRModule 是在机器学习编译中保存张量函数集合的容器对象:
type(MyModule) # 容器type(MyModule["mm_relu"]) # 容器内是PrimFunc# 输出如下tvm.ir.module.IRModuletvm.tir.function.PrimFunc这时候,你想想前文一开始对编译流程步骤的图,是对应的,再把该图片贴出来(见上图),TIR Passes与IRModule交互,且这个IRModule里包含了 tir.PrimFunc(tir)。
前文我们提到IRModule内的PrimFunc(张量函数)只有一个,下面是有两个PrimFunc的IRMoudle例子:
@tvm.script.ir_moduleclass MyModuleWithTwoFunctions: @T.prim_func def mm(A: T.Buffer[(128, 128), "float32"], B: T.Buffer[(128, 128), "float32"], Y: T.Buffer[(128, 128), "float32"]): T.func_attr({"global_symbol": "mm", "tir.noalias": True}) for i, j, k in T.grid(128, 128, 128): with T.block("Y"): vi, vj, vk = T.axis.remap("SSR", [i, j, k]) with T.init(): Y[vi, vj] = T.float32(0) Y[vi, vj] = Y[vi, vj] + A[vi, vk] * B[vk, vj] @T.prim_func def relu(A: T.Buffer[(128, 128), "float32"], B: T.Buffer[(128, 128), "float32"]): T.func_attr({"global_symbol": "relu", "tir.noalias": True}) for i, j in T.grid(128, 128): with T.block("B"): vi, vj = T.axis.remap("SS", [i, j]) B[vi, vj] = T.max(A[vi, vj], T.float32(0))以上就是TensorIR中单纯从算子的实现而言的主要元素。
6.2 优化(变换)
下面将介绍另一部分,也是机器学习编译工作流的重要步骤——元张量函数的变换,英文表达式Transform,或者说是优化。变换过程中,考虑的问题是性能。比方,我们将矩阵乘法在对矩阵C的列方向的循环,从128拆分为32与4两个循环:
def lnumpy_mm_relu_v2(A: np.ndarray, B: np.ndarray, C: np.ndarray): Y = np.empty((128, 128), dtype="float32") for i in range(128): for j0 in range(32): for k in range(128): for j1 in range(4): j = j0 * 4 + j1 if k == 0: Y[i, j] = 0 Y[i, j] = Y[i, j] + A[i, k] * B[k, j] for i in range(128): for j in range(128): C[i, j] = max(Y[i, j], 0)c_np = np.empty((128, 128), dtype=dtype)lnumpy_mm_relu_v2(a_np, b_np, c_np)np.testing.assert_allclose(c_mm_relu, c_np, rtol=1e-5)因为引入这种变换,TensorIR必须重写为一个新的函数来表示这种变换,有两点变化:
- 用两个循环
j0和j1替换了j循环; i、j、k迭代顺序中j循环的变化:从i、j、k变为i、j0、k、j1。虽然j拆成两个子循环,但是k循环在两个子循环中间。
这种从性能出发,破坏TensorIR原始实现的计算逻辑,并不友好。因此,我们将实现和优化分开,为了便于优化性能,TensorIR引入名为Schedule的辅助结构,下面是通过Schedule辅助结构实现上面一样的改变的代码,通过Schedule同样实现上面两点变换。
6.2.1 单循环拆分: split
首先是没有做任何变换只描述计算语义的原始TensorIR:
import IPythonIPython.display.Code(MyModule.script(), language="python")@tvm.script.ir_moduleclass Module: @T.prim_func def mm_relu(A: T.Buffer[(128, 128), "float32"], B: T.Buffer[(128, 128), "float32"], C: T.Buffer[(128, 128), "float32"]) -> None: # function attr dict T.func_attr({"global_symbol": "mm_relu", "tir.noalias": True}) # body # with T.block("root") Y = T.alloc_buffer([128, 128], dtype="float32") for i, j, k in T.grid(128, 128, 128): with T.block("Y"): vi, vj, vk = T.axis.remap("SSR", [i, j, k]) T.reads(A[vi, vk], B[vk, vj]) T.writes(Y[vi, vj]) with T.init(): Y[vi, vj] = T.float32(0) Y[vi, vj] = Y[vi, vj] + A[vi, vk] * B[vk, vj] for i, j in T.grid(128, 128): with T.block("C"): vi, vj = T.axis.remap("SS", [i, j]) T.reads(Y[vi, vj]) T.writes(C[vi, vj]) C[vi, vj] = T.max(Y[vi, vj], T.float32(0))在上面的TensorIR代码中,多出了
T.reads、T.writes两个方法,在官方文档对tvm.tir.Block的接口文档中,写道:
- reads (List[BufferRegion]) – The read buffer regions of the block.
- writes (List[BufferRegion]) – The write buffer regions of the block.
二者分别是对Buffer变量的block的某个区域,进行读或者写。但是并没提到是从内存读到哪里,可能的目的是如GPU片上的内存。
下面是即将开始的代码变换,以基于给定的IRModule,在我们这里是 MyModule创建一个schedule:
sch = tvm.tir.Schedule(MyModule)block_Y = sch.get_block("Y", func_name="mm_relu")i, j, k = sch.get_loops(block_Y)并获取对应Primfunction mm_relu里block Y,并获取相应的循环引用,下面将开始对其中的循环 j分成两个循环,其中切分后的两个循环的内循环的长度为4,外部为32。
j0, j1 = sch.split(j, factors=[None, 4])对Schedule的操作(即代码优化)是串行的,一步接着一步,存在顺序的。如果上面这个对 j循环的切分操作执行了两次,第二次会报错因为不存在 j循环,如果错了就得从Schedule创建的位置,重新开始。
下面可以看看切分后存储在 sch.mod 中的变换结果的TensorIR的样子:
IPython.display.Code(sch.mod.script(), language="python")# 输出如下@tvm.script.ir_moduleclass Module: @T.prim_func def mm_relu(A: T.Buffer[(128, 128), "float32"], B: T.Buffer[(128, 128), "float32"], C: T.Buffer[(128, 128), "float32"]) -> None: # function attr dict T.func_attr({"global_symbol": "mm_relu", "tir.noalias": True}) # body # with T.block("root") Y = T.alloc_buffer([128, 128], dtype="float32") for i, j_0, j_1, k in T.grid(128, 32, 4, 128): with T.block("Y"): vi = T.axis.spatial(128, i) vj = T.axis.spatial(128, j_0 * 4 + j_1) vk = T.axis.reduce(128, k) T.reads(A[vi, vk], B[vk, vj]) T.writes(Y[vi, vj]) with T.init(): Y[vi, vj] = T.float32(0) Y[vi, vj] = Y[vi, vj] + A[vi, vk] * B[vk, vj] for i, j in T.grid(128, 128): with T.block("C"): vi, vj = T.axis.remap("SS", [i, j]) T.reads(Y[vi, vj]) T.writes(C[vi, vj]) C[vi, vj] = T.max(Y[vi, vj], T.float32(0))6.2.2 多循环重排序: reorder
但与咱们开头手写的TensorIR还有地方不同:j循环切分后的两个循环,内循环是4循坏是32,但是手写的版本这两个子循环中间是循环k。
sch.reorder(j0, k, j1)IPython.display.Code(sch.mod.script(), language="python")# 输出如下@tvm.script.ir_moduleclass Module: @T.prim_func def mm_relu(A: T.Buffer[(128, 128), "float32"], B: T.Buffer[(128, 128), "float32"], C: T.Buffer[(128, 128), "float32"]) -> None: # function attr dict T.func_attr({"global_symbol": "mm_relu", "tir.noalias": True}) # body # with T.block("root") Y = T.alloc_buffer([128, 128], dtype="float32") for i, j_0, k, j_1 in T.grid(128, 32, 128, 4): with T.block("Y"): vi = T.axis.spatial(128, i) vj = T.axis.spatial(128, j_0 * 4 + j_1) vk = T.axis.reduce(128, k) T.reads(A[vi, vk], B[vk, vj]) T.writes(Y[vi, vj]) with T.init(): Y[vi, vj] = T.float32(0) Y[vi, vj] = Y[vi, vj] + A[vi, vk] * B[vk, vj] for i, j in T.grid(128, 128): with T.block("C"): vi, vj = T.axis.remap("SS", [i, j]) T.reads(Y[vi, vj]) T.writes(C[vi, vj]) C[vi, vj] = T.max(Y[vi, vj], T.float32(0))此时,生成的TensorIR经过Schedule的两个操作,就和开始手写的TensorIR基本一样了。
6.2.3 移动计算块到某循环下: reverse_compute_at
其实本质上是在矩阵乘法后,直接做ReLU的计算,减少了一次访问。通过名为 reverse_compute_at的原语,将计算块C移动到块Y的内循环 j0里:
block_C = sch.get_block("C", "mm_relu")sch.reverse_compute_at(block_C, j0)IPython.display.Code(sch.mod.script(), language="python")# 输出@tvm.script.ir_moduleclass Module: @T.prim_func def mm_relu(A: T.Buffer[(128, 128), "float32"], B: T.Buffer[(128, 128), "float32"], C: T.Buffer[(128, 128), "float32"]) -> None: # function attr dict T.func_attr({"global_symbol": "mm_relu", "tir.noalias": True}) # body # with T.block("root") Y = T.alloc_buffer([128, 128], dtype="float32") for i, j_0 in T.grid(128, 32): for k, j_1 in T.grid(128, 4): with T.block("Y"): vi = T.axis.spatial(128, i) vj = T.axis.spatial(128, j_0 * 4 + j_1) vk = T.axis.reduce(128, k) T.reads(A[vi, vk], B[vk, vj]) T.writes(Y[vi, vj]) with T.init(): Y[vi, vj] = T.float32(0) Y[vi, vj] = Y[vi, vj] + A[vi, vk] * B[vk, vj] for ax0 in T.serial(4): with T.block("C"): vi = T.axis.spatial(128, i) vj = T.axis.spatial(128, j_0 * 4 + ax0) T.reads(Y[vi, vj]) T.writes(C[vi, vj]) C[vi, vj] = T.max(Y[vi, vj], T.float32(0))注意看,block C移动到里循环 j_0的下面,block C是消费者块,而block Y是生产者块,block C内的计算会使用block Y的结果作为输入。reverse_compute_at后,两个block都位于 j_0循环下,因为 j_0循环也在 i循环下,那么必然两个block也都在 i循环下。
文档对
reverse_compute_at也有说明,该方法将指定的计算块移动到指定的循环下,并生成该计算块的新循环。这里有两个概念:消费者块和生产者块,生产块是会生成计算的结果,消费块会基于生产块的结果进行新的计算,因为这两个计算块有前后关系,所以在循环上,可以进行循环的复用。目前看到的例子,
reverse_compute_at方法都会将消费者块里的部分循环剔除,因为被剔除的部分循环与生产者块的部分循环一样,消费者块可以复用生产者块的循环,从而将消费者块移动到生产者块的循环内,并重新生成各自块内的循环。根据文档对
reverse_compute_at的说明,使用要求:
- block和loop需要位于同一个scope内,且loop不能是block的祖先;
- scope block是串联的属性;
- 指定的block所在的作用域必须满足紧凑数据流的条件,就是说例如作用域内的所有block或者子block必须是complete block或reduction block。
- 这里提到的block's subtree,是否是说block可以嵌套?block可以嵌套,但我们只能在同一Scope内的block应用schedule;
- complete block以及reduction block是什么?见https://github.com/apache/tvm...,这里代码注释提到:
- complete block的定义是:① 所有block内的var是数据并行;② 该块是输出的唯一写入者,管理输出buffer的读取过程;③ 块读取和写入的buffer之间没有重叠;
- reduction block的定义是:① 块有"init"语句;② 所有块的绑定都是准仿射表达式;③ 所有块变量都是数据并行块变量或reduction块变量;④ 该块是输出的唯一写入者,管理输出buffer的读取过程;⑤ reduction块变量不用来索引输出buffer。
- block的所有生产者都必须要在给定的循环下。这里的所有生产者要怎么理解?根据数据依赖,我们有生产者块(写buffer操作),以及消费者块(读buffer操作)。那么所有生产者块,也就是所有写buffer操作的块。
6.2.4 拆分Y元素初始化与规约计算: decompose_reduction
在上述循环变换之后,可以将 Y 元素的初始化( Y[vi,vj]=T.float32(0))与归约更新( Y[vi,vj]=Y[vi,vj]+A[vi,vk]*B[vk,vj])分开,通过 decompose_reduction 原语来做到这一点。(注意:这是 TVM 在以后编译时隐式做的,所以这一步的主要目的是让它显式,看看最终效果)。
sch.decompose_reduction(block_Y, k)IPython.display.Code(sch.mod.script(), language="python")最终变换后的代码,类似如下低级 NumPy 代码:
def lnumpy_mm_relu_v3(A: np.ndarray, B: np.ndarray, C: np.ndarray): Y = np.empty((128, 128), dtype="float32") for i in range(128): for j0 in range(32): # Y_init for j1 in range(4): j = j0 * 4 + j1 Y[i, j] = 0 # Y_update for k in range(128): for j1 in range(4): j = j0 * 4 + j1 Y[i, j] = Y[i, j] + A[i, k] * B[k, j] # C for j1 in range(4): j = j0 * 4 + j1 C[i, j] = max(Y[i, j], 0)c_np = np.empty((128, 128), dtype=dtype)lnumpy_mm_relu_v3(a_np, b_np, c_np)np.testing.assert_allclose(c_mm_relu, c_np, rtol=1e-5)以上,就是使用Schedule辅助工具来优化代码的过程。在此过程中,优化变换充分利用了轴信息。
6.3 构建与运行
后续就可以查看最终TVMScript的变换结果,也可以通过IRModule来运行该程序。不过首先需要将IRModule转换为runtime.Module,后者包含可运行函数的几何,通过给定部署目标平台的信息 target,可部署到如GPU或者CPU平台,也可以是Android手机等。下面以CPU平台为例,并传入输入和输出用到的三个TVM NDArray。
rt_lib = tvm.build(MyModule, target="llvm")a_nd = tvm.nd.array(a_np)b_nd = tvm.nd.array(b_np)c_nd = tvm.nd.empty((128, 128), dtype="float32")type(c_nd)# 输出tvm.runtime.ndarray.NDArray7. 对TE的实现与优化(Schedule Primitives)
前面我们以实际列子,介绍了计算逻辑为矩阵乘法后做ReLU的TensorIR的实现与优化,这个例子中涉及到的TensorIR Schedule主要有:split、reorder、reverse_compute_at、decompose_reduction。
因为Relay、Tensor Expression、TensorIR三者都可以构建计算逻辑,其中Tensor Expression和TensorIR都具有实现与优化分离的特点,而优化都是指Schedule接口的使用,Schedule就是一组对程序进行的计算变换。
注:本节所提到的Schedule都是基于Tensor Expression。我们下面会走读官方文档《Schedule Primitives in TVM》。
7.1 Schedule与Stage
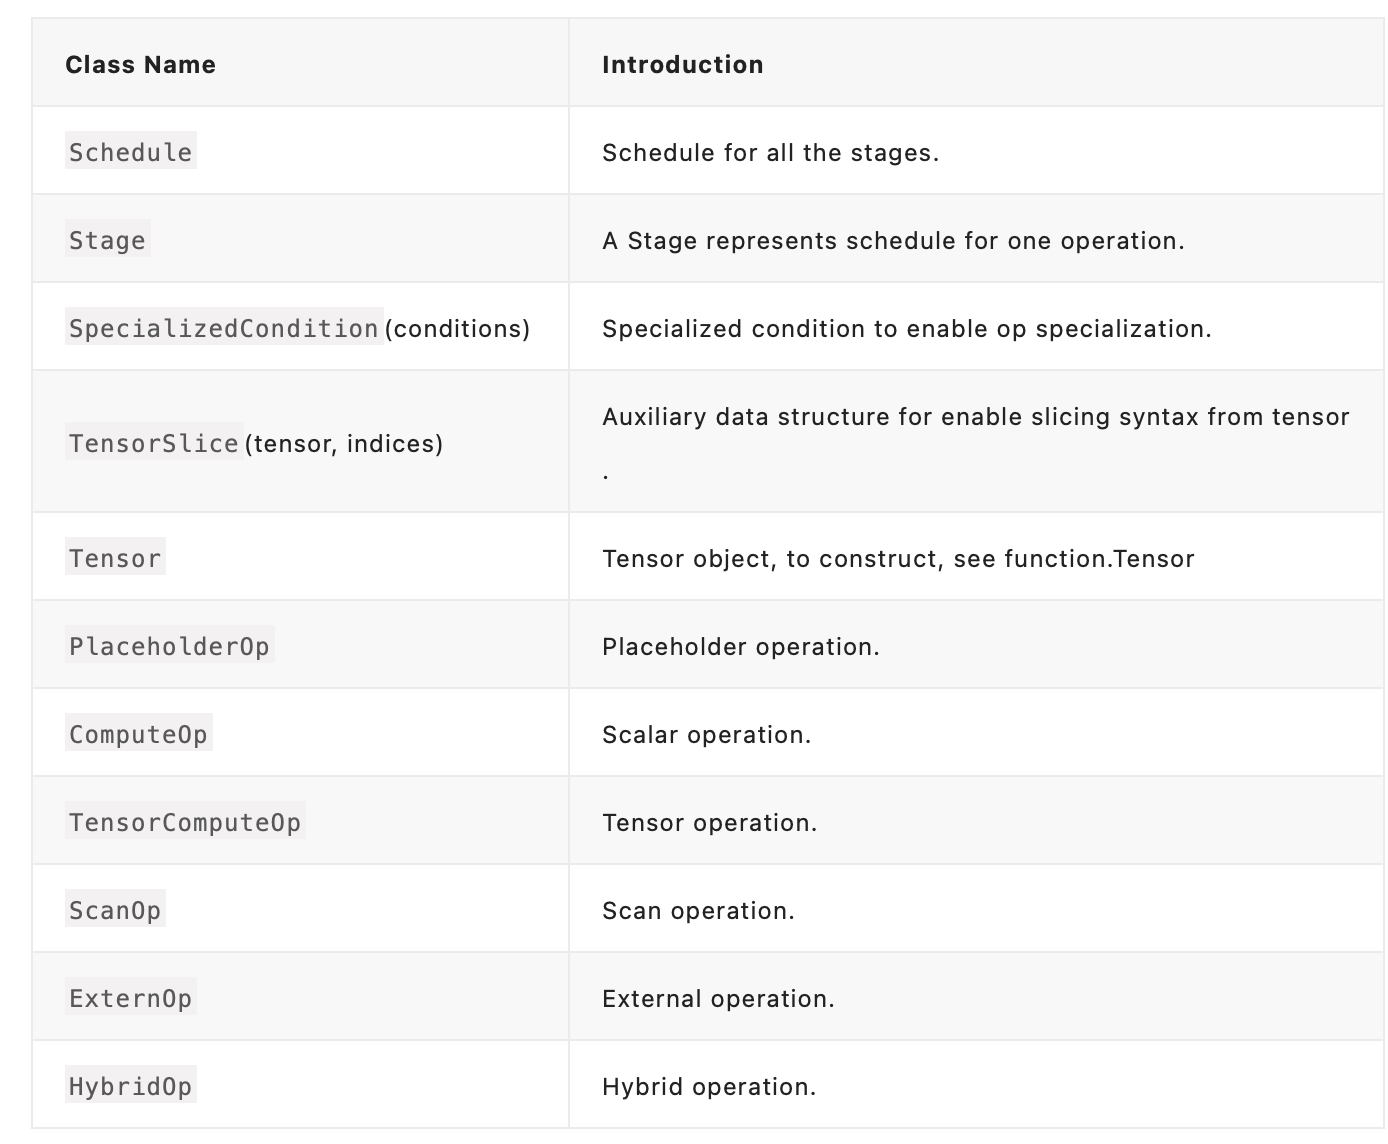
在开始前,我们先来介绍几个概念,其实是TE相关的类。与TE相关的类有如下:
我们主要关注优化过程涉及到的两个:Schedule与Stage。其中,Schedule可以是一组变换op,通常来说,计算遵循行优先且以串行方式计算张量。
from __future__ import absolute_import, print_functionimport tvmfrom tvm import teimport numpy as np# declare some variables for use latern = te.var("n")m = te.var("m")# declare a matrix element-wise multiplyA = te.placeholder((m, n), name="A")B = te.placeholder((m, n), name="B")C = te.compute((m, n), lambda i, j: A[i, j] * B[i, j], name="C")s = te.create_schedule([C.op])# lower will transform the computation from definition to the real# callable function. With argument `simple_mode=True`, it will# return you a readable C like statement, we use it here to print the# schedule result.print(tvm.lower(s, [A, B, C], simple_mode=True))"""@main = primfn(A_1: handle, B_1: handle, C_1: handle) -> () attr = {"from_legacy_te_schedule": True, "global_symbol": "main", "tir.noalias": True} buffers = {A: Buffer(A_2: Pointer(float32), float32, [m: int32, n: int32], [stride: int32, stride_1: int32], type="auto"), B: Buffer(B_2: Pointer(float32), float32, [m, n], [stride_2: int32, stride_3: int32], type="auto"), C: Buffer(C_2: Pointer(float32), float32, [m, n], [stride_4: int32, stride_5: int32], type="auto")} buffer_map = {A_1: A, B_1: B, C_1: C} { for (i: int32, 0, m) { for (j: int32, 0, n) { C_3: Buffer(C_2, float32, [(stride_4*m)], [], type="auto")[((i*stride_4) + (j*stride_5))] = (A_3: Buffer(A_2, float32, [(stride*m)], [], type="auto")[((i*stride) + (j*stride_1))]*B_3: Buffer(B_2, float32, [(stride_2*m)], [], type="auto")[((i*stride_2) + (j*stride_3))]) } }}"""一个Schedule由多个Stage组成,一个Stage表示一个schedule operation。通过各种各样的schedule operation,来优化每个Stage。下面,将以上面这个逐元素乘法为例,介绍几个主要Schedule,有些可能前文中有提及,这里如果再次提到,也可以对比来看。
7.2 常用Schedule介绍
Tensor Expression与TensorIR的Schedule具有相似性,下面以Tensor Expression来介绍主要的Schedule接口:tile、 fuse、 reorder、 bind、 compute_at、 compute_inline、 compute_root。
7.2.1 split:单循环切分
split通过 factor参数将一个轴切分为两个轴,内轴与外轴,内轴的长度为 factor。
A = te.placeholder((m,), name="A")B = te.compute((m,), lambda i: A[i] * 2, name="B")s = te.create_schedule(B.op)xo, xi = s[B].split(B.op.axis[0], factor=32)print(tvm.lower(s, [A, B], simple_mode=True))"""@main = primfn(A_1: handle, B_1: handle) -> () attr = {"from_legacy_te_schedule": True, "global_symbol": "main", "tir.noalias": True} buffers = {A: Buffer(A_2: Pointer(float32), float32, [m: int32], [stride: int32], type="auto"), B: Buffer(B_2: Pointer(float32), float32, [m], [stride_1: int32], type="auto")} buffer_map = {A_1: A, B_1: B} { for (i.outer: int32, 0, floordiv((m + 31), 32)) { for (i.inner: int32, 0, 32) { if @tir.likely((((i.outer*32) + i.inner) < m), dtype=bool) { let cse_var_1: int32 = ((i.outer*32) + i.inner) B_3: Buffer(B_2, float32, [(stride_1*m)], [], type="auto")[(cse_var_1*stride_1)] = (A_3: Buffer(A_2, float32, [(stride*m)], [], type="auto")[(cse_var_1*stride)]*2f32) } }"""split也可以通过 nparts参数,该值与 factor相反,表示要切分的段数,即切出来的两个轴的外轴的长度。
A = te.placeholder((m,), name="A")B = te.compute((m,), lambda i: A[i], name="B")s = te.create_schedule(B.op)bx, tx = s[B].split(B.op.axis[0], nparts=32)print(tvm.lower(s, [A, B], simple_mode=True))"""@main = primfn(A_1: handle, B_1: handle) -> () attr = {"from_legacy_te_schedule": True, "global_symbol": "main", "tir.noalias": True} buffers = {A: Buffer(A_2: Pointer(float32), float32, [m: int32], [stride: int32], type="auto"), B: Buffer(B_2: Pointer(float32), float32, [m], [stride_1: int32], type="auto")} buffer_map = {A_1: A, B_1: B} { for (i.outer: int32, 0, 32) { for (i.inner: int32, 0, floordiv((m + 31), 32)) { if @tir.likely(((i.inner + (i.outer*floordiv((m + 31), 32))) < m), dtype=bool) { B_3: Buffer(B_2, float32, [(stride_1*m)], [], type="auto")[((i.inner + (i.outer*floordiv((m + 31), 32)))*stride_1)] = A_3: Buffer(A_2, float32, [(stride*m)], [], type="auto")[((i.inner + (i.outer*floordiv((m + 31), 32)))*stride)] } } }"""通过对二者参数 factor与 nparts产生的PrimFunc的区别可以看出:
- 当使用
factor参数:内层循环上界为指定的factor值,即内层循环区间会被确定,即[0, factor-1],接下来是确定外层循环的范围,因为内层固定为factor,外层循必然要对上界做对齐,对齐方式是floordiv((m+factor-1), factor),其中m是内外循环原本的循环上界,这个上界至少是1,比方m < factor的情况; - 当使用
nparts参数:刚刚好与上面这种情况相反。外层循环区间固定为[0, nparts-1],而内层循环为[0, floordiv((m+nparts-1), nparts) - 1],外层循环给定且固定,比方并行线程数,而内层则需要考虑上限。当任务量m=3,并行线程为4,则外循环nparts=4,则内循环(3+4-1)/4=1,总共可以做4,4>3,超出的PrimFun里if判断筛掉了if @tir.likely(((i.inner + (i.outer*floordiv((m + 31), 32))) < m), dtype=bool);当任务量m=6,并行线程为4,则外循环nparts=4,则内循环(6+4-1)/4=2,总共可以做8,8>6,超出的访问会被if判断筛掉。
split(parent, factor=None, nparts=None
Split the stage either by factor providing outer scope, or both
- Parameters
- parent (IterVar) – The parent iter var.
- factor (Expr, optional) – The splitting factor.
- nparts (Expr, optional) – The number of outer parts.
- Returns
- outer (IterVar) – The outer variable of iteration.
- inner (IterVar) – The inner variable of iteration.
7.2.2 tile:在2D上分片
tile实现在两个轴上作计算。
A = te.placeholder((m, n), name="A")B = te.compute((m, n), lambda i, j: A[i, j], name="B")s = te.create_schedule(B.op)xo, yo, xi, yi = s[B].tile(B.op.axis[0], B.op.axis[1], x_factor=10, y_factor=5)print(tvm.lower(s, [A, B], simple_mode=True))"""@main = primfn(A_1: handle, B_1: handle) -> () attr = {"from_legacy_te_schedule": True, "global_symbol": "main", "tir.noalias": True} buffers = {A: Buffer(A_2: Pointer(float32), float32, [m: int32, n: int32], [stride: int32, stride_1: int32], type="auto"), B: Buffer(B_2: Pointer(float32), float32, [m, n], [stride_2: int32, stride_3: int32], type="auto")} buffer_map = {A_1: A, B_1: B} { for (i.outer: int32, 0, floordiv((m + 9), 10)) { for (j.outer: int32, 0, floordiv((n + 4), 5)) { for (i.inner: int32, 0, 10) { if @tir.likely((((i.outer*10) + i.inner) < m), dtype=bool) { for (j.inner: int32, 0, 5) { if @tir.likely((((j.outer*5) + j.inner) < n), dtype=bool) { let cse_var_2: int32 = ((j.outer*5) + j.inner) let cse_var_1: int32 = ((i.outer*10) + i.inner) B_3: Buffer(B_2, float32, [(stride_2*m)], [], type="auto")[((cse_var_1*stride_2) + (cse_var_2*stride_3))] = A_3: Buffer(A_2, float32, [(stride*m)], [], type="auto")[((cse_var_1*stride) + (cse_var_2*stride_1))] } } } } } }}"""上面代码通过指定 x_factor和 y_factor将两个嵌套的循环,再次切分为2组内外循环,内循环(y)的factor为5,外循环(x)的factor为10,在实际生成的PrimFunc中,原本2个循环变为4个循环,其中,两组循环的外循环在最外层,需要通过 floorDiv重新考虑循环上界且最小为1。
tile(x_parent, y_parent, x_factor, y_factor
Perform tiling on two dimensions
The final loop order from outmost to inner most are [xouter, youter, xinner, yinner]
- Parameters
- x_parent (IterVar) – The original x dimension
- y_parent (IterVar) – The original y dimension
- x_factor (Expr) – The stride factor on x axis
- y_factor (Expr) – The stride factor on y axis
- Returns
- x_outer (IterVar) – Outer axis of x dimension
- y_outer (IterVar) – Outer axis of y dimension
- x_inner (IterVar) – Inner axis of x dimension
- pyinner (IterVar) – Inner axis of y dimension
7.2.3 fuse:多轴融合
fuse可以合并计算中的两个连续轴。
A = te.placeholder((m, n), name="A")B = te.compute((m, n), lambda i, j: A[i, j], name="B")s = te.create_schedule(B.op)# tile to four axes first: (i.outer, j.outer, i.inner, j.inner)xo, yo, xi, yi = s[B].tile(B.op.axis[0], B.op.axis[1], x_factor=10, y_factor=5)# then fuse (i.inner, j.inner) into one axis: (i.inner.j.inner.fused)fused = s[B].fuse(xi, yi)print(tvm.lower(s, [A, B], simple_mode=True))"""@main = primfn(A_1: handle, B_1: handle) -> () attr = {"from_legacy_te_schedule": True, "global_symbol": "main", "tir.noalias": True} buffers = {A: Buffer(A_2: Pointer(float32), float32, [m: int32, n: int32], [stride: int32, stride_1: int32], type="auto"), B: Buffer(B_2: Pointer(float32), float32, [m, n], [stride_2: int32, stride_3: int32], type="auto")} buffer_map = {A_1: A, B_1: B} { for (i.outer: int32, 0, floordiv((m + 9), 10)) { for (j.outer: int32, 0, floordiv((n + 4), 5)) { for (i.inner.j.inner.fused: int32, 0, 50) { if @tir.likely((((i.outer*10) + floordiv(i.inner.j.inner.fused, 5)) < m), dtype=bool) { if @tir.likely((((j.outer*5) + floormod(i.inner.j.inner.fused, 5)) < n), dtype=bool) { let cse_var_2: int32 = ((j.outer*5) + floormod(i.inner.j.inner.fused, 5)) let cse_var_1: int32 = ((i.outer*10) + floordiv(i.inner.j.inner.fused, 5)) B_3: Buffer(B_2, float32, [(stride_2*m)], [], type="auto")[((cse_var_1*stride_2) + (cse_var_2*stride_3))] = A_3: Buffer(A_2, float32, [(stride*m)], [], type="auto")[((cse_var_1*stride) + (cse_var_2*stride_1))] } } } } }}"""上述代码的计算逻辑是二维的A映射到二维的B。优化部分先将二维通过 tile切为四个循环,之后融合四层循环的最内两层,融合后为三层循环:xo、 yo、 fused。
因为 tile时候采用的是 x_factor和 y_factor参数且分别为10和5,即四层循环最内层两个,那么融合后的 fused循环上界为50。
fuse(*args)
Fuse multiple consecutive iteration variables into a single iteration variable.
fused = fuse(…fuse(fuse(args[0], args[1]), args[2]),…, args[-1]) The order is from outer to inner.
Parameters
- args (list of IterVars) – Itervars that proceeds each other
Returns
- fused – The fused variable of iteration.
- Return type:IterVar
7.2.4 reorder:多轴重排序
根据指定顺序重排序循环的轴。
A = te.placeholder((m, n), name="A")B = te.compute((m, n), lambda i, j: A[i, j], name="B")s = te.create_schedule(B.op)# tile to four axes first: (i.outer, j.outer, i.inner, j.inner)xo, yo, xi, yi = s[B].tile(B.op.axis[0], B.op.axis[1], x_factor=10, y_factor=5)# then reorder the axes: (i.inner, j.outer, i.outer, j.inner)s[B].reorder(xi, yo, xo, yi)print(tvm.lower(s, [A, B], simple_mode=True))"""@main = primfn(A_1: handle, B_1: handle) -> () attr = {"from_legacy_te_schedule": True, "global_symbol": "main", "tir.noalias": True} buffers = {A: Buffer(A_2: Pointer(float32), float32, [m: int32, n: int32], [stride: int32, stride_1: int32], type="auto"), B: Buffer(B_2: Pointer(float32), float32, [m, n], [stride_2: int32, stride_3: int32], type="auto")} buffer_map = {A_1: A, B_1: B} { for (i.inner: int32, 0, 10) { for (j.outer: int32, 0, floordiv((n + 4), 5)) { for (i.outer: int32, 0, floordiv((m + 9), 10)) { if @tir.likely((((i.outer*10) + i.inner) < m), dtype=bool) { for (j.inner: int32, 0, 5) { if @tir.likely((((j.outer*5) + j.inner) < n), dtype=bool) { let cse_var_2: int32 = ((j.outer*5) + j.inner) let cse_var_1: int32 = ((i.outer*10) + i.inner) B_3: Buffer(B_2, float32, [(stride_2*m)], [], type="auto")[((cse_var_1*stride_2) + (cse_var_2*stride_3))] = A_3: Buffer(A_2, float32, [(stride*m)], [], type="auto")[((cse_var_1*stride) + (cse_var_2*stride_1))] } } } } } }}"""排序前的顺序为 tile的轴顺序,即:xo、 yo、 xi、 yi。reorder的顺序为指定的参数:xi、 yo、 xo、 yi。
reorder(*args):reorder the arguments in the specified order.
Parameters:args (list of IterVar) – The order to be ordered
7.2.5 bind:GPU线程绑定
通常用于GPU编程,将指定轴绑定到指定的线程上。
A = te.placeholder((n,), name="A")B = te.compute(A.shape, lambda i: A[i] * 2, name="B")s = te.create_schedule(B.op)bx, tx = s[B].split(B.op.axis[0], factor=64)s[B].bind(bx, te.thread_axis("blockIdx.x"))s[B].bind(tx, te.thread_axis("threadIdx.x"))print(tvm.lower(s, [A, B], simple_mode=True))"""@main = primfn(A_1: handle, B_1: handle) -> () attr = {"from_legacy_te_schedule": True, "global_symbol": "main", "tir.noalias": True} buffers = {A: Buffer(A_2: Pointer(float32), float32, [n: int32], [stride: int32], type="auto"), B: Buffer(B_2: Pointer(float32), float32, [n], [stride_1: int32], type="auto")} buffer_map = {A_1: A, B_1: B} { attr [IterVar(blockIdx.x: int32, (nullptr), "ThreadIndex", "blockIdx.x")] "thread_extent" = floordiv((n + 63), 64); attr [IterVar(threadIdx.x: int32, (nullptr), "ThreadIndex", "threadIdx.x")] "thread_extent" = 64; if @tir.likely((((blockIdx.x*64) + threadIdx.x) < n), dtype=bool) { B_3: Buffer(B_2, float32, [(stride_1*n)], [], type="auto")[(((blockIdx.x*64) + threadIdx.x)*stride_1)] = (A_3: Buffer(A_2, float32, [(stride*n)], [], type="auto")[(((blockIdx.x*64) + threadIdx.x)*stride)]*2f32) }}"""如上代码,计算逻辑的语义是实现对1D矩阵A的每个元素乘以2,并存入结果矩阵B中。优化过程则先将其切分为内循环为64的两层嵌套循环:bx与 tx,将 bx绑定到GPU的Block索引 blockIdx.x上,将 tx绑定到block内的线程索引 threadIdx.x上。
bind(ivar, thread_ivar)
Bind ivar to thread index thread_ivar
- Parameters
- ivar (IterVar) – The iteration to be binded to thread.
- thread_ivar (IterVar) – The thread to be binded.
7.2.6 compute_at:连接Stage与父Scope
对于包含多个操作的实现,默认情况下我们使用 compute方法,每个操作的计算是分开的,如下:
A = te.placeholder((m,), name="A")B = te.compute((m,), lambda i: A[i] + 1, name="B")C = te.compute((m,), lambda i: B[i] * 2, name="C")s = te.create_schedule(C.op)print(tvm.lower(s, [A, B, C], simple_mode=True))"""@main = primfn(A_1: handle, B_1: handle, C_1: handle) -> () attr = {"from_legacy_te_schedule": True, "global_symbol": "main", "tir.noalias": True} buffers = {A: Buffer(A_2: Pointer(float32), float32, [m: int32], [stride: int32], type="auto"), B: Buffer(B_2: Pointer(float32), float32, [m], [stride_1: int32], type="auto"), C: Buffer(C_2: Pointer(float32), float32, [m], [stride_2: int32], type="auto")} buffer_map = {A_1: A, B_1: B, C_1: C} { for (i: int32, 0, m) { B_3: Buffer(B_2, float32, [(stride_1*m)], [], type="auto")[(i*stride_1)] = (A_3: Buffer(A_2, float32, [(stride*m)], [], type="auto")[(i*stride)] + 1f32) } for (i_1: int32, 0, m) { C_3: Buffer(C_2, float32, [(stride_2*m)], [], type="auto")[(i_1*stride_2)] = (B_3[(i_1*stride_1)]*2f32) }}"""观察上面代码,可以看到两个 compute对应是两个不相干的循环轴,分别计算对应的矩阵B和矩阵C的计算。
下面使用 compute_at这个schedule,将B的计算移动到C的矩阵的第一个轴 C.op.axis[0]里:
A = te.placeholder((m,), name="A")B = te.compute((m,), lambda i: A[i] + 1, name="B")C = te.compute((m,), lambda i: B[i] * 2, name="C")s = te.create_schedule(C.op)s[B].compute_at(s[C], C.op.axis[0])print(tvm.lower(s, [A, B, C], simple_mode=True))"""@main = primfn(A_1: handle, B_1: handle, C_1: handle) -> () attr = {"from_legacy_te_schedule": True, "global_symbol": "main", "tir.noalias": True} buffers = {A: Buffer(A_2: Pointer(float32), float32, [m: int32], [stride: int32], type="auto"), B: Buffer(B_2: Pointer(float32), float32, [m], [stride_1: int32], type="auto"), C: Buffer(C_2: Pointer(float32), float32, [m], [stride_2: int32], type="auto")} buffer_map = {A_1: A, B_1: B, C_1: C} { for (i: int32, 0, m) { B_3: Buffer(B_2, float32, [(stride_1*m)], [], type="auto")[(i*stride_1)] = (A_3: Buffer(A_2, float32, [(stride*m)], [], type="auto")[(i*stride)] + 1f32) C_3: Buffer(C_2, float32, [(stride_2*m)], [], type="auto")[(i*stride_2)] = (B_3[(i*stride_1)]*2f32) }}"""移动后,可以看到原本两层循环结合为1个,需要注意的是,使用 compute_at这个schedule需要指定B在C上算,以及轴参数,即分别是上面的参数 s[B].compute_at(s[C],C.op.axis[0])。
compute_at(parent, scope)
Attach the stage at parent’s scope
- Parameters
- parent (Stage) – The parent stage
- scope (IterVar) – The loop scope t be attached to.
7.2.7 compute_inline:标记Stage内联
compute_inline将标记一个Stage为inline即内部、内联,那么计算体将会扩展并插入到需Tensor的指定地址上。
A = te.placeholder((m,), name="A")B = te.compute((m,), lambda i: A[i] + 1, name="B")C = te.compute((m,), lambda i: B[i] * 2, name="C")s = te.create_schedule(C.op)s[B].compute_inline()print(tvm.lower(s, [A, B, C], simple_mode=True))"""@main = primfn(A_1: handle, B_1: handle, C_1: handle) -> () attr = {"from_legacy_te_schedule": True, "global_symbol": "main", "tir.noalias": True} buffers = {A: Buffer(A_2: Pointer(float32), float32, [m: int32], [stride: int32], type="auto"), B: Buffer(B_2: Pointer(float32), float32, [m], [stride_1: int32], type="auto"), C: Buffer(C_2: Pointer(float32), float32, [m], [stride_2: int32], type="auto")} buffer_map = {A_1: A, B_1: B, C_1: C} { for (i: int32, 0, m) { C_3: Buffer(C_2, float32, [(stride_2*m)], [], type="auto")[(i*stride_2)] = ((A_3: Buffer(A_2, float32, [(stride*m)], [], type="auto")[(i*stride)] + 1f32)*2f32) }}"""上面代码中,计算体是B,B结果是通过对输入A逐个元素加1得到的,但是B并非是最终的输出,而B是C的输入,即需要的Tensor,这个计算体会扩展并插入下一个步骤。结果代码显示的是两个过程( A[i]+1与 B[i]*2)合并内联到了一起。
compute_inline():Mark stage as inline
Parameters:parent (Stage) – The parent stage
7.2.8 compute_root:标记Stage为root
compute_root将一个stage的计算移动到root。
A = te.placeholder((m,), name="A")B = te.compute((m,), lambda i: A[i] + 1, name="B")C = te.compute((m,), lambda i: B[i] * 2, name="C")s = te.create_schedule(C.op)s[B].compute_at(s[C], C.op.axis[0])s[B].compute_root()print(tvm.lower(s, [A, B, C], simple_mode=True))"""@main = primfn(A_1: handle, B_1: handle, C_1: handle) -> () attr = {"from_legacy_te_schedule": True, "global_symbol": "main", "tir.noalias": True} buffers = {A: Buffer(A_2: Pointer(float32), float32, [m: int32], [stride: int32], type="auto"), B: Buffer(B_2: Pointer(float32), float32, [m], [stride_1: int32], type="auto"), C: Buffer(C_2: Pointer(float32), float32, [m], [stride_2: int32], type="auto")} buffer_map = {A_1: A, B_1: B, C_1: C} { for (i: int32, 0, m) { B_3: Buffer(B_2, float32, [(stride_1*m)], [], type="auto")[(i*stride_1)] = (A_3: Buffer(A_2, float32, [(stride*m)], [], type="auto")[(i*stride)] + 1f32) } for (i_1: int32, 0, m) { C_3: Buffer(C_2, float32, [(stride_2*m)], [], type="auto")[(i_1*stride_2)] = (B_3[(i_1*stride_1)]*2f32) }}"""上面代码的计算语义逻辑是串行计算 B[i]=A[i]+1与 C[i]=B[i]*2,而实现部分的Schedule先通过 compute_at,将两个原本独立的for循环进行计算体扩展,即结合B与C计算到一个循环内(见前面 compute_at的介绍),然后又通过 s[B].compute_root对B的计算拆分出来(到root)。
compute_root():Attach the stage at parent, and mark it as root
Parameters:parent (Stage) – The parent stage
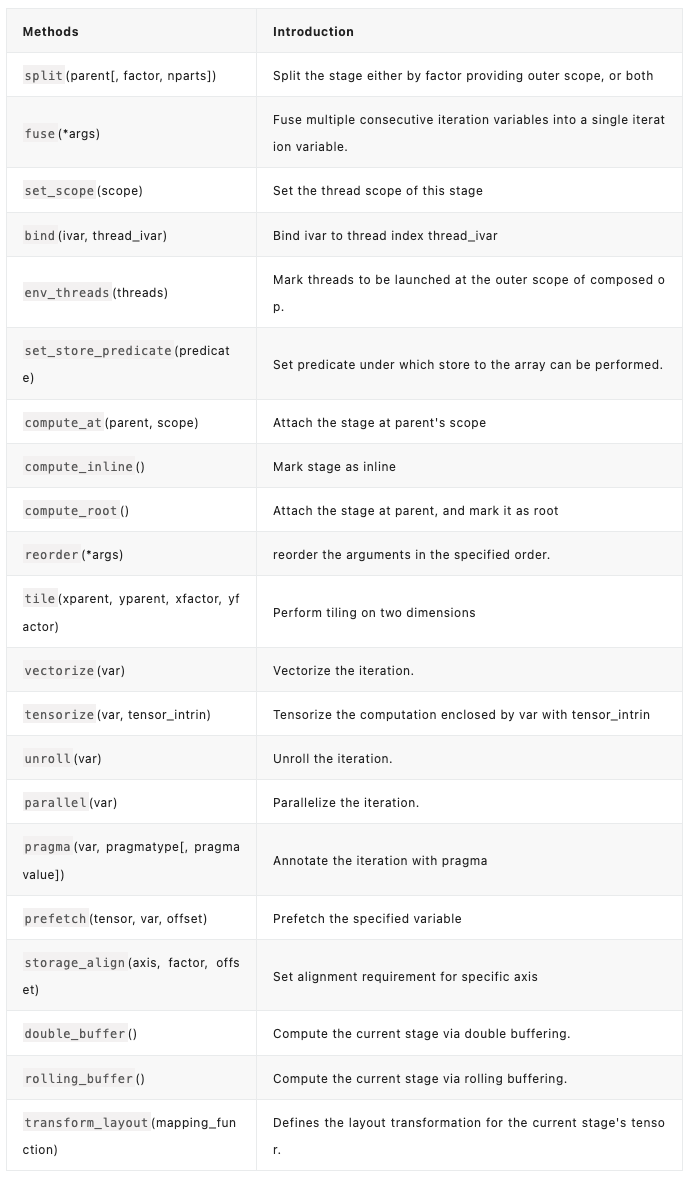
以上就是常用的TE的Stage,Stage前面讲过,表示一个schedule操作,除了上面讲的,完整的Stage( classtvm.te.Stage)方法如下表。
通过Schedule,让代码的优化实现更加简单灵活,更多关于TE的Schedule说明可以参考API文档:
tvm.te — tvm 0.11.dev0 documentation
整体上,我们要得到一个高性能的Kernel实现,需要下面四个步骤:
- 通过一系列操作描述计算语义;
- 尝试使用schdule源语来优化计算(初始版本);
- 编译并运行当前的版本,观察性能差异;
- 根据当前的性能结果,调整Schedule并重复进行3,直到性能符合预期。
8. Schedule怎么生成PrimFn
有个LowerSchedule,把tvm.Schedule转化为IRModule,其中LowerSchedule里调用各种注册的pass,不断把Stage转为AST。这里后续会单独写一篇。
本文对TensorIR进行总结,是从使用用户的角度而言,算子实现一般分为计算逻辑实现与优化,本文是侧重对TensorIR、TE在优化部分的基本操作介绍。
作者:开心的派大星
文章来源:NeuralTalk
推荐阅读
- YOLO系列改进 | YOLOF的小小改进升级之轻量化TE-YOLOF
- 【BBuf的CUDA笔记】六,总结 FasterTransformer Encoder 优化技巧
- 李飞飞高徒教你从0到1构建GPT,马斯克点赞
- 【BBuf的CUDA笔记】五,解读 PyTorch index_add 操作涉及的优化技术
- OpenCV图像拼接改进算法之完美拼接
- 液晶面板的表面缺陷及其检测方法
更多嵌入式AI干货请关注嵌入式AI专栏。欢迎添加极术小姐姐微信(id:aijishu20)加入技术交流群,请备注研究方向。

