【说在前面的话】
在前面的文章中,我们介绍了如何使用Arm-2D所提供的场景播放器(Scene Player)和场景模板(Scene)实现基于面板的图形界面设计范式。
当我们实际开始使用Arm-2D进行2D图像处理时,几乎所有的API都需要指定目标Region。特别是对于那些需要使用Arm-2D进行简单UI设计的用户来说,如何放置图形元素以及如何处理屏幕布局本质上都是一个Region计算的问题。
在与开源社区互动的过程中,我注意到很多朋友仍然在手动计算每个图形元素的起始坐标,设计出来的界面往往也缺乏根据屏幕分辨率的不同而做出一定程度自适应的能力。
为了让用户摆脱手动计算Region的困扰,Arm-2D参考了流行的GUI布局方法,并提供了一系列简单易用的辅助功能,以宏模板的形式呈现,称为布局助手。
本文将通过示例详细介绍Arm-2D布局助手的使用。
【一些重要的基本概念】
这里不妨假设您第一次接触Arm-2D,因此为了方便后续的讲解,我们需要首先介绍一些基本概念,例如区域(Region)、画布(Canvas)、容器(Container)等等。
什么是区域(Region)
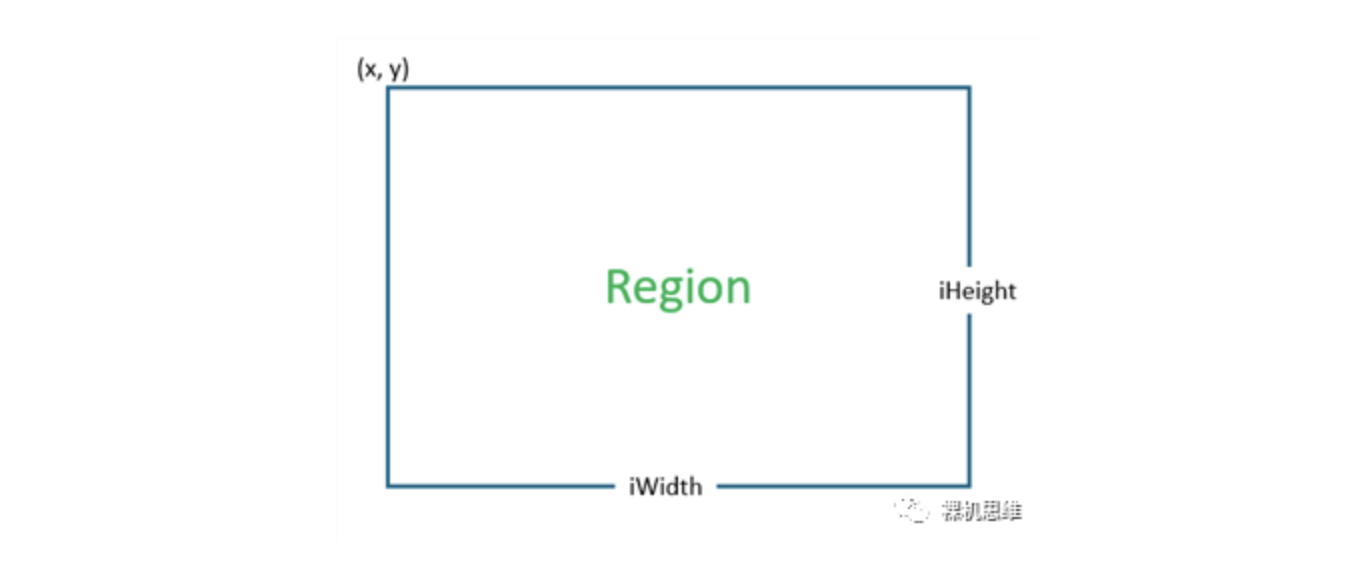
Region是一个由位置(Location,即左上角坐标)和大小(Size)信息描述的矩形区域。
typedef struct arm_2d_region_t {
    implement_ex(arm_2d_location_t, tLocation);
    implement_ex(arm_2d_size_t, tSize);
} arm_2d_region_t;上述代码展示了Region的结构体定义,其中包含了Location和Size的信息,如下图所示:
在这里,Region的坐标由位矩形左上角的顶点定义,它的数据结构如下:
typedef struct arm_2d_location_t {
    int16_t iX;
    int16_t iY;
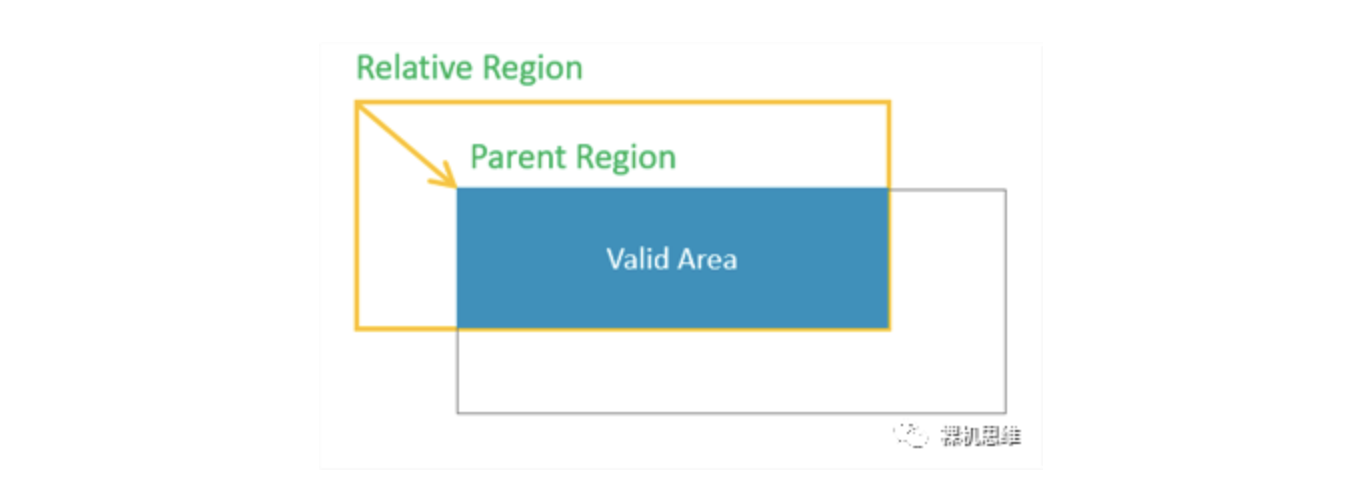
} arm_2d_location_t;与一般的笛卡尔坐标系不同,在图形学中,Y轴通常是沿相反方向镜像的,这意味着Y坐标越小,其值越大。在稍后介绍的“包围盒模型(Bounding Box Model)”中,我们会了解到Region的坐标可以是负数,表示当前Region相对于其父Region的起始点的位置。
如上图所示,当Region的x和y坐标都为负数时,实际上它有相当大一部分区域在父Region的外面(左上角)。当我们尝试获取当前Region与其父Region的交集时,会发现只有重叠的部分是有效的。
Region的尺寸信息由宽度(Width)和高度(Height)共同描述。数据结构定义如下:
typedef struct arm_2d_size_t {
    int16_t iWidth;
    int16_t iHeight;
} arm_2d_size_t;请注意:这里虽然使用了带符号的int16\_t类型来描述宽度和高度,但是负数是没有意义的,应该避免使用。
什么是包围盒模型(Bounding Box Model)
所谓的包围盒模型描述了Region之间的从属关系,通常用于描述容器和可视元素之间的关系。
在GUI堆栈中,包围盒模型通常涉及到更复杂的内容,例如:边框的宽度(Border Width)、容器边框内的边距(Margin)、容器内元素之间的间距(Padding)等等。但是Arm-2D并不关心这些细节,它的包围盒模型中只描述容器和其内部元素之间的简单关系。
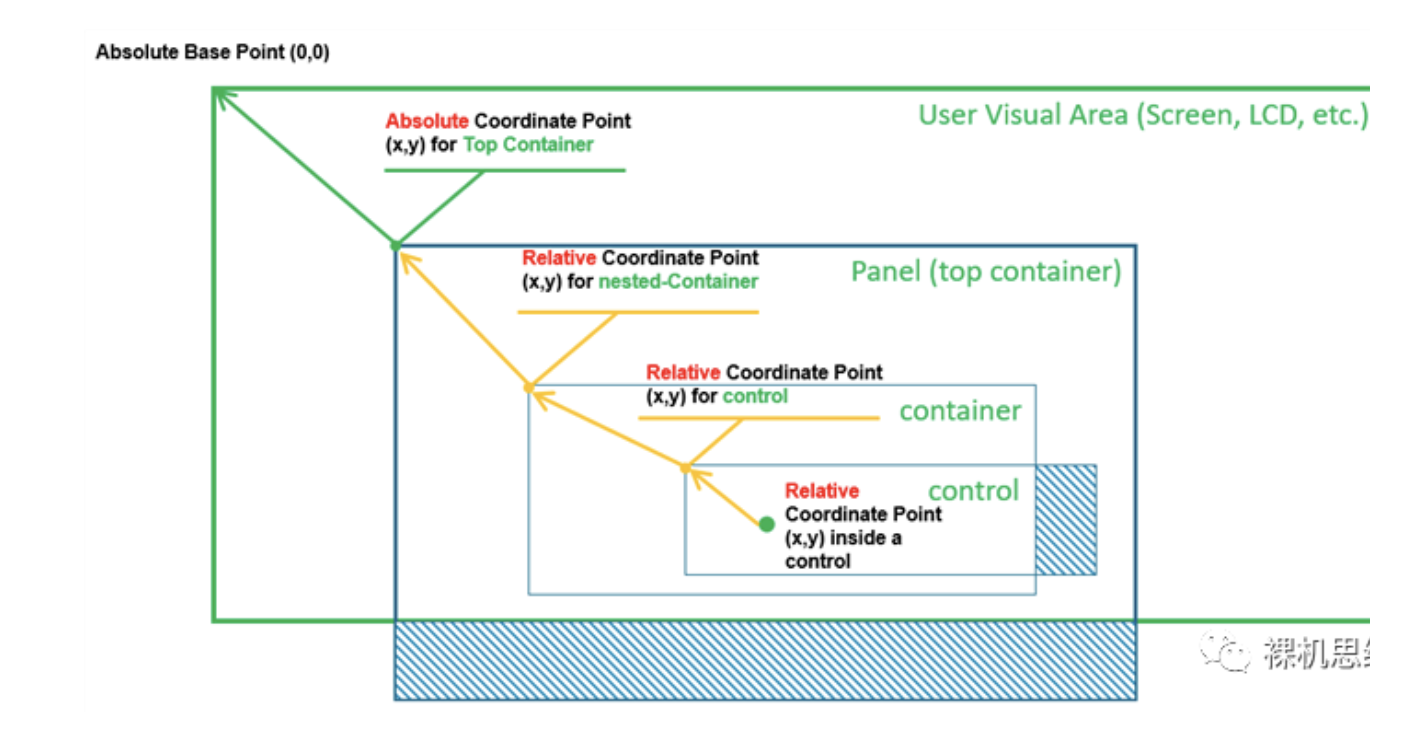
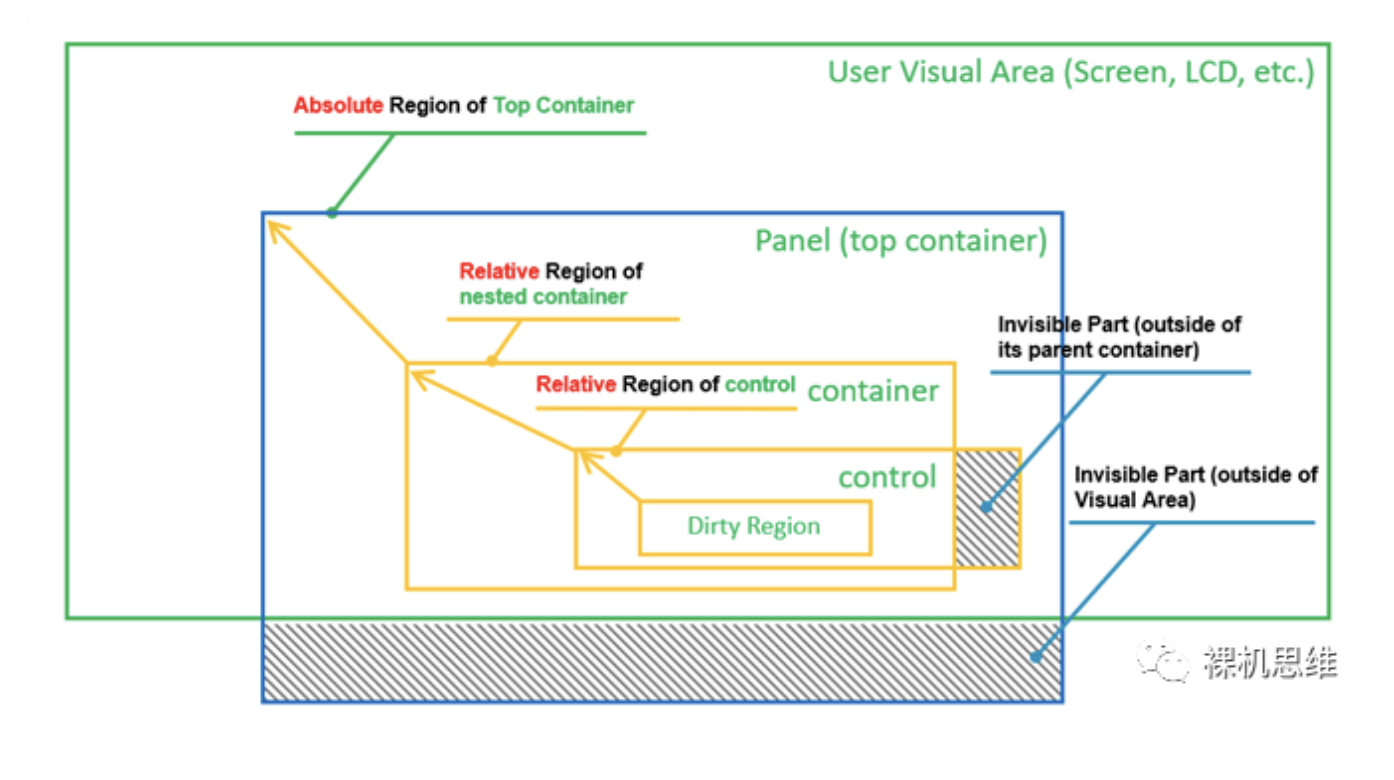
在Arm-2D中,我们将面板或窗口视为容器,面板和窗口的位置是它们在显示缓冲区中的坐标。我们称这种直接描述显示缓冲区(Display Buffer)内坐标的位置信息为绝对坐标。下图中,面板(顶层容器)的坐标就是绝对坐标。
容器内部图形元素所使用的坐标是相对于容器左上角来说的,我们将这种坐标称为相对坐标。除此之外,如果我们把容器本身也看成是一个图形元素,那么,容器嵌套就是自然而然的事情了。
如果一个Region具有绝对坐标,我们就称之为绝对Region;类似地,如果一个Region具有相对坐标,就称为相对Region。
当我们使用这些相对和绝对信息来进行布局时,Arm-2D可以帮助我们轻松地将那些实际上对用户不可见的区域裁减掉,从而提高2D处理的整体性能。
什么是画布(Canvas)
Canvas的本质是Region。要在Tile上绘制图像,我们需要首先使用arm\_2d\_canvas()创建一个canvas。其语法如下:
arm_2d_canvas(<目标Tile的地址>, <canvas名称>) {
/* canvas的作用域 */
}这里,我们需要向arm\_2d\_canvas()传递两个参数:即目标Tile的地址和canvas的名称。这样arm\_2d\_canvas()就会为我们提供的目标Tile创建一个我们指定名称的canvas。
注意:这里arm\_2d\_canvas()所生成的canvas不能在花括号外使用。
例如:
static
IMPL_PFB_ON_DRAW(__pfb_draw_scene0_handler)
{
    ARM_2D_UNUSED(ptTile); /* 目标屏幕 /
    ...
    arm_2d_canvas(ptTile, __top_canvas) {
    / 在此处放置绘制代码 */
    }

    arm_2d_op_wait_async(NULL);
    return arm_fsm_rt_cpl;
}上面的代码是一个典型的场景绘制函数,其中ptTile指向代表屏幕的目标Tile。为了在屏幕上绘图,我们需要为它创建一个canvas,即示例中的\_\_top\_canvas。
什么是容器(Container)
Region只是一个描述信息。如何解释Region的含义完全取决于我们所使用的API。同样,在使用Canvas进行布局时,通常会出现实际的图形元素超出Canvas范围的情况。此时,是否对超出的部分进行裁剪则取决于具体所使用的API。
如果我们明确希望将超出Canvas范围的部分裁剪掉,则需要引入容器(Container)的概念。Container的本质是一个子Tile,而任何超出子Tile矩形范围的部分都将被裁剪。通过宏 arm\_2d\_container() 我们可以轻松地创建容器,其具体语法如下:
arm_2d_container(<目标Tile的地址>, <新子Tile的名称>, <目标Region的地址>) {

}这里,我们需要向arm\_2d\_container()函数传递三个参数:即目标Tile的地址、新子Tile的名称以及目标Tile内Region的地址。这里,arm\_2d\_container()函数不仅会根据给定的目标Region为用户定义指定名称的子Tile,还会为其自动成相应的Canvas(以\_\_canvas为后缀)。例如:假设子Tile叫my\_container,则对应的的Canvas将被命名为my\_container\_canvas。
需要注意的是:
- 目标Region的地址可以为NULL。此时子Tile与目标Tile的大小相同。
- arm\_2d\_container()所生成的子Tile和Canvas不能在花括号外使用。
下面的代码是一段自控件模板的例子:
void control_template_show(user_control_template_t *ptThis,
                           const arm_2d_tile_t *ptTile,
                           const arm_2d_region_t *ptRegion,
                           bool bIsNewFrame)
{
    ...
    arm_2d_container(ptTile, __control, ptRegion) {
        /* 在此处放置绘制代码
         *    - &__control是目标Tile(请不要再使用ptTile了)
         *    - __control_canvas是Canvas
         */
    }
    arm_2d_op_wait_async(NULL);
}
在一般的GUI设计中,超出控件矩形区域的部分理所当然需要被裁剪——这就是为什么我们会在控件模板中默认创建一个容器的原因。
【如何进行对齐】
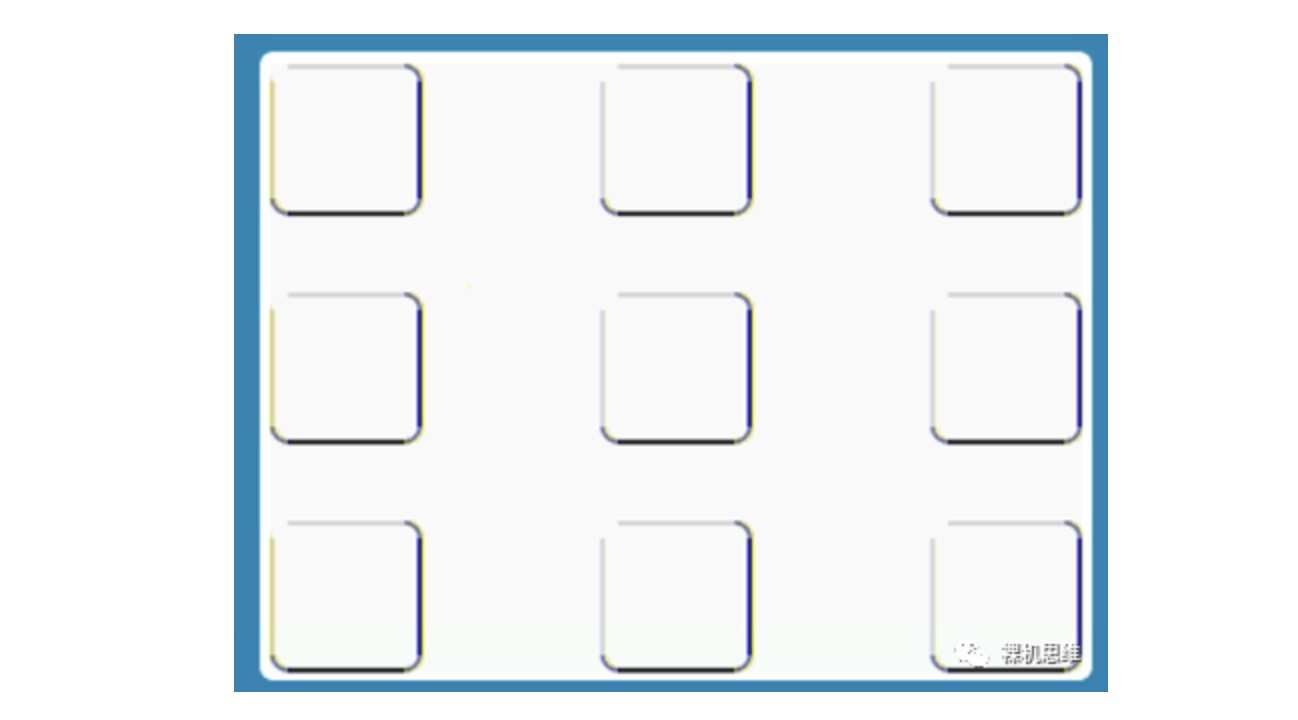
在界面设计中,对齐是最基本的布局方法。在一个给定的矩形区域内,常见的9种对齐方式如图所示:
Arm-2D为这9种对齐方式提供了风格统一的宏:
这些宏的语法如下:
- 语法1:
arm_2d_align_<alignment>(<目标区域:arm_2d_region_t对象>,
                         <目标区域的宽度:int16_t>,
                         <目标区域的高度:int16_t>)
{
    /* 您可以在大括号内定义的范围内使用名称为___region的区域 */
    ...
}
这里,我们需要向arm\_2d\_align\_xxxx()传递三个参数:即目标Region、目标Region的Width和Height。
注意:这里,我们要传递的是 arm\_2d\_region\_t 对象,而不是该对象的地址。
- 语法2:
arm_2d_align_xxxx(<目标区域:arm_2d_region_t对象>,
                         <目标区域的大小:arm_2d_size_t对象>)
{
     /* 您可以在大括号内定义的范围内使用名称为___region的区域 */
     ...
}
这里,我们需要向宏arm\_2d\_align\_xxxx传递两个参数,即目标Region对象和目标Region的大小(arm\_2d\_size\_t)。
注意:
- 这里我们所要传递的 Region 是 arm\_2d\_region\_t 类型的对象而不是它的地址;同样,
- 我们所要传递的Size是 arm\_2d\_size\_t 类型的对象而不是它的地址。
基于上述语法,前面图中的9种对齐方式其代码如下:
static
IMPL_PFB_ON_DRAW(__pfb_draw_scene0_handler)
{
    user_scene_0_t *ptThis = (user_scene_0_t *)pTarget;
    ARM_2D_UNUSED(ptTile);
    ARM_2D_UNUSED(bIsNewFrame);

    arm_2d_canvas(ptTile, __top_canvas) {

        arm_2d_fill_colour(ptTile, NULL, GLCD_COLOR_WHITE);

        arm_2d_align_top_left(__top_canvas, 60, 60 ) {

            draw_round_corner_border(   ptTile,
                                        &__top_left_region,
                                        GLCD_COLOR_BLACK,
                                        (arm_2d_border_opacity_t)
                                            {32, 32, 255-64, 255-64},
                                        (arm_2d_corner_opacity_t)
                                            {0, 128, 128, 128});
        }
        arm_2d_align_top_centre(__top_canvas, 60, 60 ) {

            draw_round_corner_border(   ptTile,
                                        &__top_centre_region,
                                        GLCD_COLOR_BLACK,
                                        (arm_2d_border_opacity_t)
                                            {32, 32, 255-64, 255-64},
                                        (arm_2d_corner_opacity_t)
                                            {0, 128, 128, 128});
        }
        arm_2d_align_top_right(__top_canvas, 60, 60 ) {

            draw_round_corner_border(   ptTile,
                                        &__top_right_region,
                                        GLCD_COLOR_BLACK,
                                        (arm_2d_border_opacity_t)
                                            {32, 32, 255-64, 255-64},
                                        (arm_2d_corner_opacity_t)
                                            {0, 128, 128, 128});
        }


        arm_2d_align_mid_left(__top_canvas, 60, 60 ) {

            draw_round_corner_border(   ptTile,
                                        &__mid_left_region,
                                        GLCD_COLOR_BLACK,
                                        (arm_2d_border_opacity_t)
                                            {32, 32, 255-64, 255-64},
                                        (arm_2d_corner_opacity_t)
                                            {0, 128, 128, 128});

        }
        arm_2d_align_centre(__top_canvas, 60, 60 ) {

            draw_round_corner_border(   ptTile,
                                        &__centre_region,
                                        GLCD_COLOR_BLACK,
                                        (arm_2d_border_opacity_t)
                                            {32, 32, 255-64, 255-64},
                                        (arm_2d_corner_opacity_t)
                                            {0, 128, 128, 128});

        }
        arm_2d_align_mid_right(__top_canvas, 60, 60 ) {

            draw_round_corner_border(   ptTile,
                                        &__mid_right_region,
                                        GLCD_COLOR_BLACK,
                                        (arm_2d_border_opacity_t)
                                            {32, 32, 255-64, 255-64},
                                        (arm_2d_corner_opacity_t)
                                            {0, 128, 128, 128});

        }

        arm_2d_align_bottom_left(__top_canvas, 60, 60 ) {

            draw_round_corner_border(   ptTile,
                                        &__bottom_left_region,
                                        GLCD_COLOR_BLACK,
                                        (arm_2d_border_opacity_t)
                                            {32, 32, 255-64, 255-64},
                                        (arm_2d_corner_opacity_t)
                                            {0, 128, 128, 128});

        }
        arm_2d_align_bottom_centre(__top_canvas, 60, 60 ) {

            draw_round_corner_border(   ptTile,
                                        &__bottom_centre_region,
                                        GLCD_COLOR_BLACK,
                                        (arm_2d_border_opacity_t)
                                            {32, 32, 255-64, 255-64},
                                        (arm_2d_corner_opacity_t)
                                            {0, 128, 128, 128});

        }
        arm_2d_align_bottom_right(__top_canvas, 60, 60 ) {

            draw_round_corner_border(   ptTile,
                                        &__bottom_right_region,
                                        GLCD_COLOR_BLACK,
                                        (arm_2d_border_opacity_t)
                                            {32, 32, 255-64, 255-64},
                                        (arm_2d_corner_opacity_t)
                                            {0, 128, 128, 128});

        }

    }
    arm_2d_op_wait_async(NULL);

    return arm_fsm_rt_cpl;
}
【如何进行流式布局】
在设计图形界面时,除了上面描述的对齐方式之外,我们通常还会遇到需要将一串图形元素按照某种规则在给定区域内顺次排列的情况,在Arm-2D中,这个过程通常被称为布局(Layout),其中常用的布局规则有两大类:
- 线性流式布局(Line Stream Layout):以线性方式(垂直或者水平)顺次布局
- 流式布局(Stream Layout):以行优先或者列优先的方式将元素在整个区域内平铺
在进行布局时,我们只需要列举所有的图形元素,指定每个元素的的大小、间距。在此过程中,由于用户无需手动计算每个元素的坐标,当屏幕分辨率发生变化时,界面也能自动的做出相应的调整,因而在实际的界面开发中大受欢迎。
线性流式布局(Line Stream Layout)
线性流式布局是一种常见的布局方法,它按顺序一个接一个地将元素放置在指定区域内。如果任何元素超出了给定区域,线性流式布局将不会换行/换列。
水平排列是线性流式布局的一种常见方式,其语法如下:
arm_2d_layout(<the target region: arm_2d_region_t>)
{
    /* Syntax 1 */
    __item_line_horizontal(<width>, <height>)
    {
        /* you can use __item_region in the scope defined by the curly braces */
        ...
    }

    /* Syntax 2 */
    __item_line_horizontal(<size of the element: arm_2d_size_t>)
    {
        /* you can use __item_region in the scope defined by the curly braces */
        ...
    }
    /* more of the __item_line_horizontal segments */
    ...

}这里,arm\_2d\_layout()以arm\_2d\_region\_t对象作为目标Region,并且\_\_item\_line\_horizontal()必须在arm\_2d\_layout()结构内使用。我们可以使用任意数量的\_\_item\_line\_horizontal()。
宏\_\_item\_line\_horizontal()有两个参数:即图形元素的Width和Height,或者,你也可以直接传递arm\_2d\_size\_t类型的对象作为元素的大小。
注意:
- 请将 arm\_2d\_region\_t 类型的对象而不是该对象的地址传递给 arm\_2d\_layout()。
- 在使用 arm\_2d\_size\_t 来描述大小信息时,请直接传递对象而不是它的指针给 \_\_item\_line\_horizontal()。
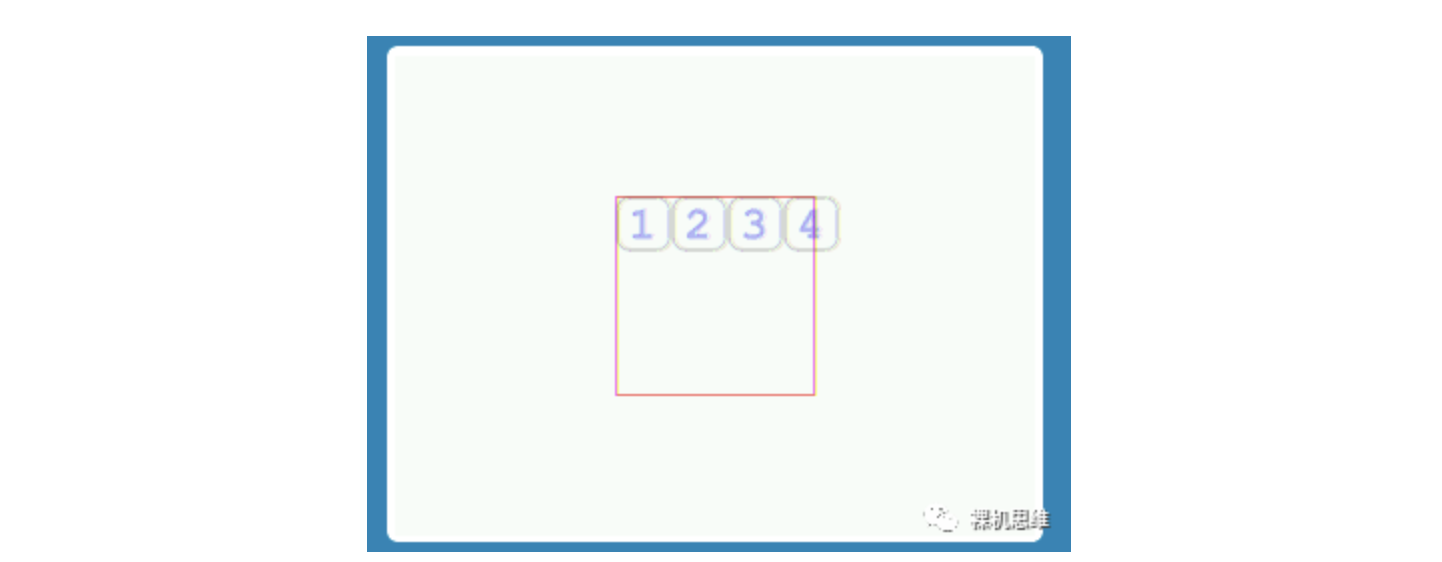
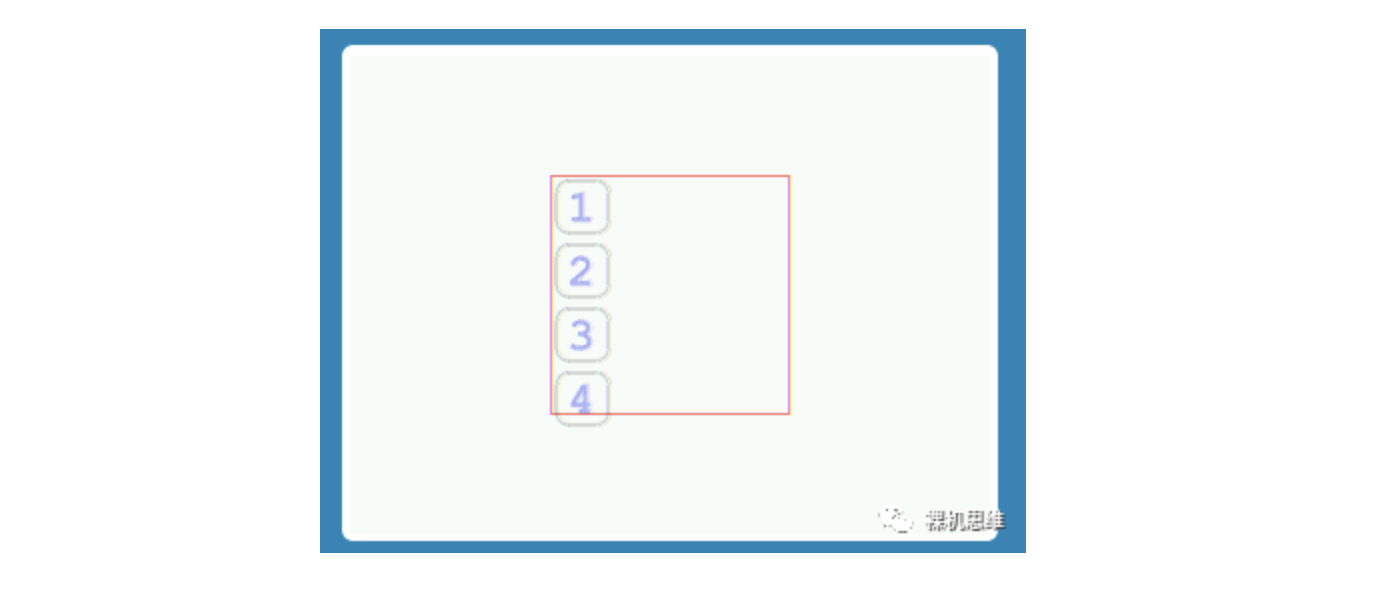
下图展示了线性流式布局的一个简单示例:将四个按钮顺次水平排列,按钮间无空隙。为了便于观察,我们通过源代码将目标区域用红色标记——这里,我们可以看到第四个按钮实际上超出了目标区域。
对应的源代码如下:
static void draw_buttom(const arm_2d_tile_t *ptTile,
                        arm_2d_region_t *ptRegion,
                        const char *pchString,
                        COLOUR_INT tColour,
                        uint8_t chOpacity)
{


    arm_2d_size_t tTextSize = ARM_2D_FONT_A4_DIGITS_ONLY
                                .use_as__arm_2d_user_font_t
                                    .use_as__arm_2d_font_t
                                        .tCharSize;
    tTextSize.iWidth *= strlen(pchString);

    arm_2d_container(ptTile, __button, ptRegion) {

        draw_round_corner_border(   &__button,
                                    &__button_canvas,
                                    GLCD_COLOR_BLACK,
                                    (arm_2d_border_opacity_t)
                                        {32, 32, 32, 32},
                                    (arm_2d_corner_opacity_t)
                                        {32, 32, 32, 32});

        arm_2d_align_centre(__button_canvas, tTextSize) {

            arm_lcd_text_set_target_framebuffer((arm_2d_tile_t *)&__button);
            arm_lcd_text_set_font((arm_2d_font_t *)&ARM_2D_FONT_A4_DIGITS_ONLY);
            arm_lcd_text_set_draw_region(&__centre_region);
            arm_lcd_text_set_colour(tColour, GLCD_COLOR_WHITE);
            arm_lcd_text_set_opacity(chOpacity);
            arm_lcd_printf("%s", pchString);
            arm_lcd_text_set_opacity(255);
        }
    }
}

static
IMPL_PFB_ON_DRAW(__pfb_draw_scene0_handler)
{

    arm_2d_canvas(ptTile, __top_canvas) {

        arm_2d_fill_colour(ptTile, NULL, GLCD_COLOR_WHITE);

        arm_2d_align_centre(__top_canvas, 100, 100 ) {

            /* 用红色标记目标区域 */
            arm_2d_helper_draw_box( ptTile,
                                    &__centre_region,
                                    1,
                                    GLCD_COLOR_RED,
                                    128);

            arm_2d_op_wait_async(NULL);

            arm_2d_layout(__centre_region) {
                __item_line_horizontal(28,28) {
                    draw_buttom(ptTile, &__item_region, "1", GLCD_COLOR_BLUE, 64);
                }
                __item_line_horizontal(28,28) {
                    draw_buttom(ptTile, &__item_region, "2", GLCD_COLOR_BLUE, 64);
                }
                __item_line_horizontal(28,28) {
                    draw_buttom(ptTile, &__item_region, "3", GLCD_COLOR_BLUE, 64);
                }
                __item_line_horizontal(28,28) {
                    draw_buttom(ptTile, &__item_region, "4", GLCD_COLOR_BLUE, 64);
                }
            }
        }
    }

    arm_2d_op_wait_async(NULL);

    return arm_fsm_rt_cpl;
}
如果我想把超出的部分裁减掉,如下图所示:
就应该创建一个 Container,更新后的代码如下:
static
IMPL_PFB_ON_DRAW(__pfb_draw_scene0_handler)
{

    arm_2d_canvas(ptTile, __top_canvas) {

        arm_2d_fill_colour(ptTile, NULL, GLCD_COLOR_WHITE);

        arm_2d_align_centre(__top_canvas, 100, 100 ) {

            /* 用红色标记目标区域 */
            arm_2d_helper_draw_box( ptTile,
                                    &__centre_region,
                                    1,
                                    GLCD_COLOR_RED,
                                    128);

            arm_2d_op_wait_async(NULL);

            arm_2d_container(ptTile, __panel, &__centre_region) {

                arm_2d_layout(__panel_canvas) {
                    __item_line_horizontal(28,28) {
                        draw_buttom(&__panel, &__item_region, "1", GLCD_COLOR_BLUE, 64);
                    }
                    __item_line_horizontal(28,28) {
                        draw_buttom(&__panel, &__item_region, "2", GLCD_COLOR_BLUE, 64);
                    }
                    __item_line_horizontal(28,28) {
                        draw_buttom(&__panel, &__item_region, "3", GLCD_COLOR_BLUE, 64);
                    }
                    __item_line_horizontal(28,28) {
                        draw_buttom(&__panel, &__item_region, "4", GLCD_COLOR_BLUE, 64);
                    }
                }
            }
        }
    }

    arm_2d_op_wait_async(NULL);

    return arm_fsm_rt_cpl;
}
除了基本的尺寸信息外,通过\_\_item\_line\_horizontal() 宏我们还可以指定当前元素与上下左右邻居之间的间隔,其语法如下:
arm_2d_layout(<the target region: arm_2d_region_t>) {
    /* Syntax 1 */
    __item_line_horizontal(<width>, <height>
                          [, <left>, <right>, <top>, <bottom>]) {
        /* you can use __item_region in the scope defined by the curly braces */
        ...
    }

    /* Syntax 2 */
    __item_line_horizontal(<size of the element: arm_2d_size_t>
                          [, <left>, <right>, <top>, <bottom>]) {
        /* you can use __item_region in the scope defined by the curly braces */
        ...
    }
    /* more of the __item_line_horizontal segments */
    ...

}需要特别注意的是:虽然这些间距信息(Padding)是可选的参数,但在使用时,四个位置必须同时指定,且顺序不能改变。
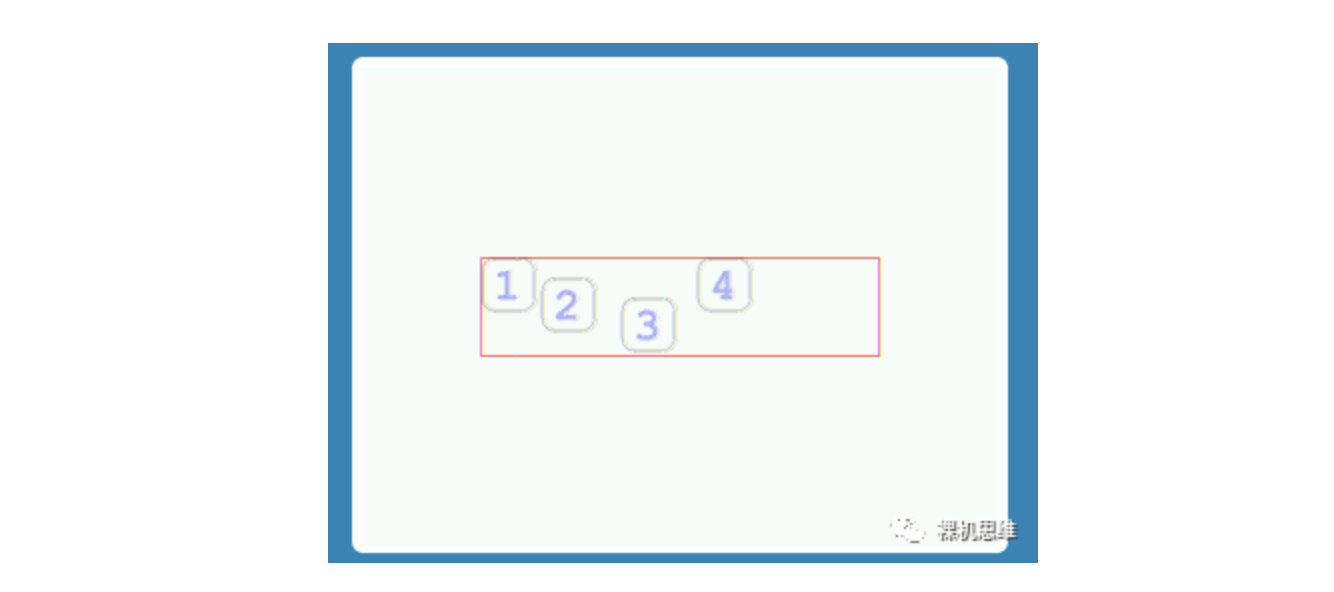
下图展示了4个按钮采用不同间距时的效果:
对应的代码如下:
static
IMPL_PFB_ON_DRAW(__pfb_draw_scene0_handler)
{

    arm_2d_canvas(ptTile, __top_canvas) {

        arm_2d_fill_colour(ptTile, NULL, GLCD_COLOR_WHITE);

        arm_2d_align_centre(__top_canvas, 200, 50 ) {

            arm_2d_helper_draw_box( ptTile,
                                    &__centre_region,
                                    1,
                                    GLCD_COLOR_RED,
                                    128);

            arm_2d_op_wait_async(NULL);

            arm_2d_container(ptTile, __panel, &__centre_region) {

                arm_2d_layout(__panel_canvas) {
                    __item_line_horizontal(28,28) {
                        draw_buttom(&__panel, &__item_region, "1", GLCD_COLOR_BLUE, 64);
                    }
                    __item_line_horizontal(28,28, 2, 2, 10, 10) {
                        draw_buttom(&__panel, &__item_region, "2", GLCD_COLOR_BLUE, 64);
                    }
                    __item_line_horizontal(28,28, 10, 10, 20, 20 ) {
                        draw_buttom(&__panel, &__item_region, "3", GLCD_COLOR_BLUE, 64);
                    }
                    __item_line_horizontal(28,28) {
                        draw_buttom(&__panel, &__item_region, "4", GLCD_COLOR_BLUE, 64);
                    }
                }
            }
        }
    }

    arm_2d_op_wait_async(NULL);

    return arm_fsm_rt_cpl;
}纵向的线性流式布局(Vertical Line Stream Layout)与横向的线性流式布局(Horizontal Line Stream Layout)类似,其语法如下:
arm_2d_layout(<the target region: arm_2d_region_t>) {
    /* Syntax 1 */
    __item_line_vertical(<width>, <height>
                        [, <left>, <right>, <top>, <bottom>]) {
        /* you can use __item_region in the scope defined by the curly braces */
        ...
    }

    /* Syntax 2 */
    __item_line_vertical(<size of the element: arm_2d_size_t>
                        [, <left>, <right>, <top>, <bottom>]) {
        /* you can use __item_region in the scope defined by the curly braces */
        ...
    }
    /* more of the __item_line_vertical segments */
    ...

}
下图展示了一个纵向线性流式布局的例子:
对应的代码如下:
static
IMPL_PFB_ON_DRAW(__pfb_draw_scene0_handler)
{

    arm_2d_canvas(ptTile, __top_canvas) {

        arm_2d_fill_colour(ptTile, NULL, GLCD_COLOR_WHITE);

        arm_2d_align_centre(__top_canvas, 120, 120 ) {


            arm_2d_helper_draw_box( ptTile,
                                    &__centre_region,
                                    1,
                                    GLCD_COLOR_RED,
                                    128);

            arm_2d_op_wait_async(NULL);


            arm_2d_layout(__centre_region) {
                __item_line_vertical(28, 28, 2, 2, 2, 2) {
                    draw_buttom(ptTile, &__item_region, "1", GLCD_COLOR_BLUE, 64);
                }
                __item_line_vertical(28, 28, 2, 2, 2, 2) {
                    draw_buttom(ptTile, &__item_region, "2", GLCD_COLOR_BLUE, 64);
                }
                __item_line_vertical(28, 28, 2, 2, 2, 2 ) {
                    draw_buttom(ptTile, &__item_region, "3", GLCD_COLOR_BLUE, 64);
                }
                __item_line_vertical(28, 28, 2, 2, 2, 2) {
                    draw_buttom(ptTile, &__item_region, "4", GLCD_COLOR_BLUE, 64);
                }
            }
        }
    }

    arm_2d_op_wait_async(NULL);

    return arm_fsm_rt_cpl;
}
流式布局(Stream Layout)
与现行流式布局类似,流式布局也很常用,只不过它可以将元素以行优先或者列优先的顺序排满指定的区域。
行优先的流式布局又叫横向流式布局,它的语法如下:
arm_2d_layout(<the target region: arm_2d_region_t>) {
    /* Syntax 1 */
    __item_horizontal(<width>, <height>
                     [, <left>, <right>, <top>, <bottom>]) {
        /* you can use __item_region in the scope defined by the curly braces */
        ...
    }

    /* Syntax 2 */
    __item_horizontal(<size of the element: arm_2d_size_t>
                     [, <left>, <right>, <top>, <bottom>]) {
        /* you can use __item_region in the scope defined by the curly braces */
        ...
    }
    /* more of the __item_horizontal segments */
    ...

}
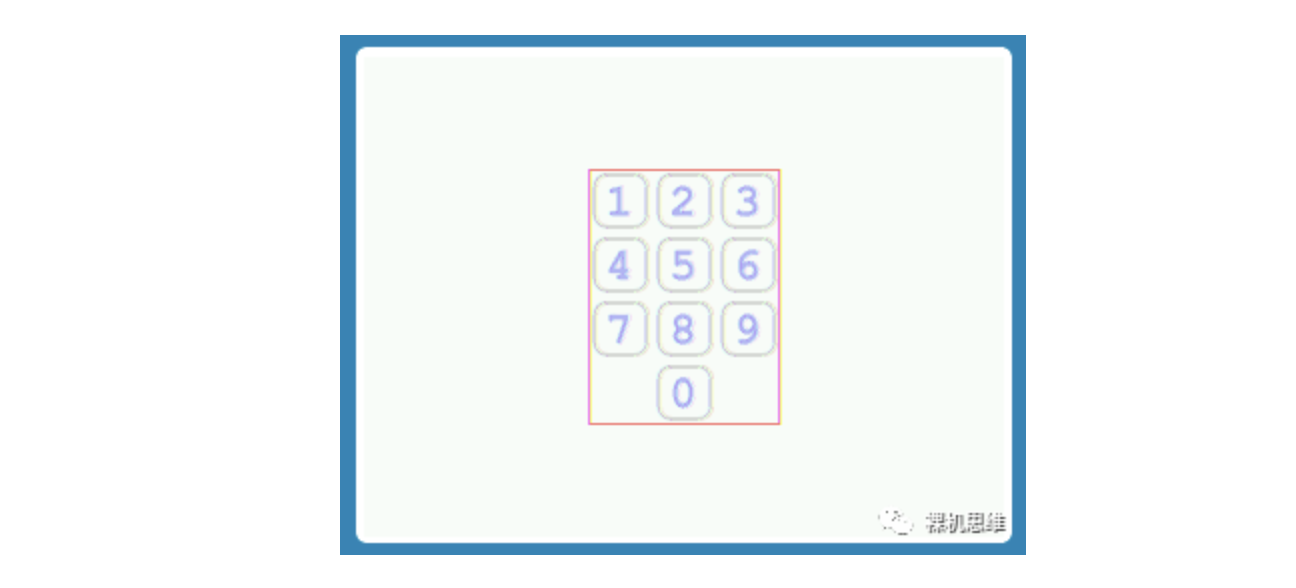
流式布局最常见的用途就是实现键盘,比如:
它对应的代码并不复杂:
static
IMPL_PFB_ON_DRAW(__pfb_draw_scene0_handler)
{

    arm_2d_canvas(ptTile, __top_canvas) {

        arm_2d_fill_colour(ptTile, NULL, GLCD_COLOR_WHITE);

        arm_2d_align_centre(__top_canvas, 96, 128 ) {


            arm_2d_helper_draw_box( ptTile,
                                    &__centre_region,
                                    1,
                                    GLCD_COLOR_RED,
                                    128);

            arm_2d_op_wait_async(NULL);

            arm_2d_layout(__centre_region) {
                __item_horizontal(28,28,2,2,2,2) {
                    draw_buttom(ptTile, &__item_region, "1", GLCD_COLOR_BLUE, 64);
                }
                __item_horizontal(28,28,2,2,2,2) {
                    draw_buttom(ptTile, &__item_region, "2", GLCD_COLOR_BLUE, 64);
                }
                __item_horizontal(28,28,2,2,2,2) {
                    draw_buttom(ptTile, &__item_region, "3", GLCD_COLOR_BLUE, 64);
                }
                __item_horizontal(28,28,2,2,2,2) {
                    draw_buttom(ptTile, &__item_region, "4", GLCD_COLOR_BLUE, 64);
                }
                __item_horizontal(28,28,2,2,2,2) {
                    draw_buttom(ptTile, &__item_region, "5", GLCD_COLOR_BLUE, 64);
                }
                __item_horizontal(28,28,2,2,2,2) {
                    draw_buttom(ptTile, &__item_region, "6", GLCD_COLOR_BLUE, 64);
                }
                __item_horizontal(28,28,2,2,2,2) {
                    draw_buttom(ptTile, &__item_region, "7", GLCD_COLOR_BLUE, 64);
                }
                __item_horizontal(28,28,2,2,2,2) {
                    draw_buttom(ptTile, &__item_region, "8", GLCD_COLOR_BLUE, 64);
                }
                __item_horizontal(28,28,2,2,2,2) {
                    draw_buttom(ptTile, &__item_region, "9", GLCD_COLOR_BLUE, 64);
                }
                __item_horizontal(28,28,34,34,2,2) {
                    draw_buttom(ptTile, &__item_region, "0", GLCD_COLOR_BLUE, 64);
                }
            }
        }
    }

    arm_2d_op_wait_async(NULL);

    return arm_fsm_rt_cpl;
}
值得注意的是:
- 大部分按钮之间的间距都是2,实际间距就是2+2=4;
- 为了实现最后一个按钮“0”居中的效果,它与左右的间隔都被设置为了按钮的宽度+2+2+2;
- 整个键盘的大小是 96*128;
纵向优先的流式布局与横向优先类似,其语法如下:
arm_2d_layout(<the target region: arm_2d_region_t>) {
    /* Syntax 1 */
    __item_vertical(<width>, <height>
                   [, <left>, <right>, <top>, <bottom>]) {
        /* you can use __item_region in the scope defined by the curly braces */
        ...
    }

    /* Syntax 2 */
    __item_vertical(<size of the element: arm_2d_size_t>
                   [, <left>, <right>, <top>, <bottom>]) {
        /* you can use __item_region in the scope defined by the curly braces */
        ...
    }
    /* more of the __item_vertical segments */
    ...

}
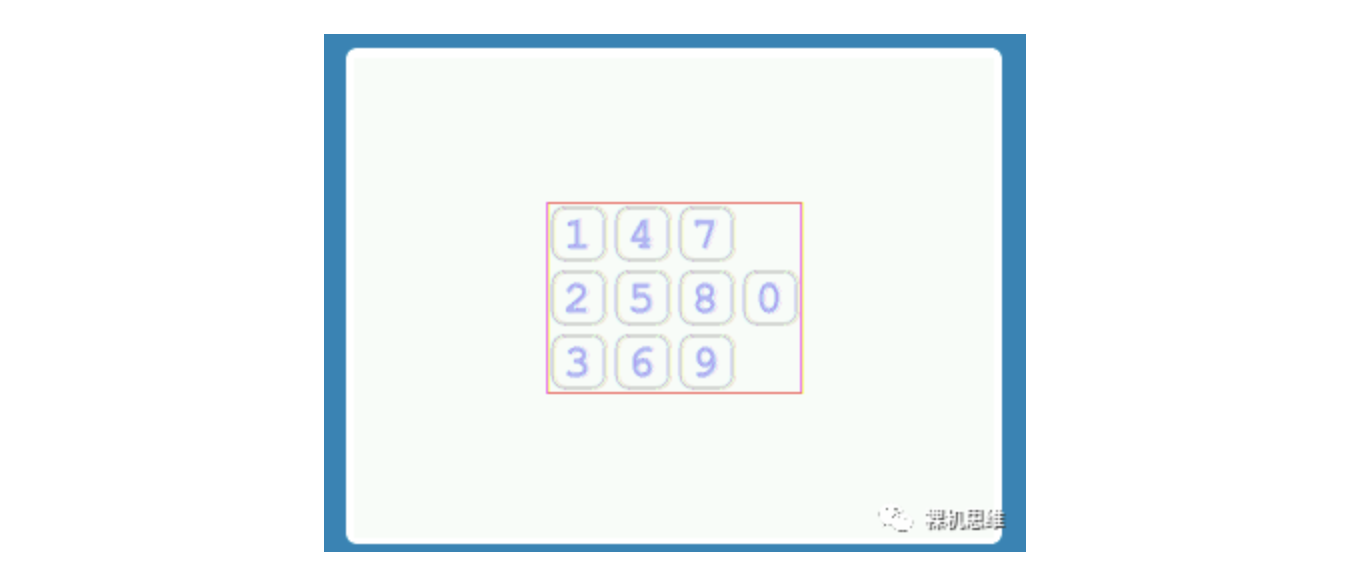
作为对比,我们可以将前面的数字键盘改个方向:
虽然看起来怪怪的,但它的确是纵向优先排布的。这里,我们将键盘的尺寸由原先的 96 * 128 调整为了 128 * 96,并将\_\_item\_horizontal()替换成了\_\_item\_vertical() 其它几乎保持不变,修改后的代码如下:
static
IMPL_PFB_ON_DRAW(__pfb_draw_scene0_handler)
{

    arm_2d_canvas(ptTile, __top_canvas) {

        arm_2d_fill_colour(ptTile, NULL, GLCD_COLOR_WHITE);

        arm_2d_align_centre(__top_canvas, 128, 96 ) {


            arm_2d_helper_draw_box( ptTile,
                                    &__centre_region,
                                    1,
                                    GLCD_COLOR_RED,
                                    128);

            arm_2d_op_wait_async(NULL);

            arm_2d_layout(__centre_region) {
                __item_vertical(28,28,2,2,2,2) {
                    draw_buttom(ptTile, &__item_region, "1", GLCD_COLOR_BLUE, 64);
                }
                __item_vertical(28,28,2,2,2,2) {
                    draw_buttom(ptTile, &__item_region, "2", GLCD_COLOR_BLUE, 64);
                }
                __item_vertical(28,28,2,2,2,2) {
                    draw_buttom(ptTile, &__item_region, "3", GLCD_COLOR_BLUE, 64);
                }
                __item_vertical(28,28,2,2,2,2) {
                    draw_buttom(ptTile, &__item_region, "4", GLCD_COLOR_BLUE, 64);
                }
                __item_vertical(28,28,2,2,2,2) {
                    draw_buttom(ptTile, &__item_region, "5", GLCD_COLOR_BLUE, 64);
                }
                __item_vertical(28,28,2,2,2,2) {
                    draw_buttom(ptTile, &__item_region, "6", GLCD_COLOR_BLUE, 64);
                }
                __item_vertical(28,28,2,2,2,2) {
                    draw_buttom(ptTile, &__item_region, "7", GLCD_COLOR_BLUE, 64);
                }
                __item_vertical(28,28,2,2,2,2) {
                    draw_buttom(ptTile, &__item_region, "8", GLCD_COLOR_BLUE, 64);
                }
                __item_vertical(28,28,2,2,2,2) {
                    draw_buttom(ptTile, &__item_region, "9", GLCD_COLOR_BLUE, 64);
                }
                __item_vertical(28,28,2,2,34,34) {
                    draw_buttom(ptTile, &__item_region, "0", GLCD_COLOR_BLUE, 64);
                }
            }
        }
    }

    arm_2d_op_wait_async(NULL);

    return arm_fsm_rt_cpl;
}
【说在后面的话】
Arm-2D不是GUI,只要你的系统资源充足,还是应该避免使用Arm-2D直接进行界面设计。但如果出现下面的情况:
- 芯片资源(Flash、SRAM等)捉襟见肘,或者留给图形界面的资源非常有限;
- 界面较为简单,可以通过基于面板的图形范式来构筑
- 交互较为简单(简单的触控或者完全基于实体按钮)
则推荐使用 Arm-2D 来进行界面设计,降低产品整体的成本,同时提最终用户的交互体验。
如果你不幸沦落到要使用Arm-2D来进行用户界面设计,也不要灰心,毕竟还有吸收了现代GUI设计器精华的 Layout Assistant 来简化我们的工作,将我们从繁重的坐标计算中解放出来,甚至还能在一定程度上实现对不同屏幕分辨率的自适应。
Layout Assistant 虽然主要是以宏来实现的,但我劝你把这些宏都当做是 Arm-2D图形设计脚本的专用关键字为妙——不要去深究它们是如何实现的——因为它们是来简化你的设计的,而不是来演示宏是怎样的一种奇技淫巧。
另外,Layout Assistant 也不是必须的,你如果不喜欢它,或者无法适应这种由宏所构建的“脚本语言风格”,完全可以丢掉它们。Arm-2D所有的API都不依赖 Layout Assistant——你完全可以自己计算Region——怎么舒服怎么来。
在这过程中,如果有什么疑问,欢迎在关注公众号【裸机思维】后发私信给我。
原文:裸机思维
作者:GorgonMeducer 傻孩子
专栏推荐文章
- 【喂到嘴边了的模块】不服?跑个分看看!——Coremark篇
- 【喂到嘴边了的模块】害怕追新?LVGL8发布稳定性更新(附部署教程)
- MDK下99%用户都不知道的万能printf方法
- 【独家】MDK开发树莓派Pico超进化——爷支持Flash下载了!
- 【独家】Pico-SDK v1.5.0 发布,Pico-Template光速更新
如果你喜欢我的思维,欢迎订阅裸机思维欢迎添加极术小姐姐微信(id:aijishu20)加入技术交流群,请备注研究方向。


