1 前言
前几期我们发布了基于EAIDK-310的传感器调试案例文章后,有开发者看了非常感兴趣,就自己动手,写了一个使用EAIDK-310的GPIO来点亮小灯泡的demo,经测试效果不错,所以将源代码投稿给我们发布。所以非常感谢那位开发者分享的案例,下面我们就展示下案例中具体的操作步骤、实验结果和源码。
关于EAIDK-310和GPIO相关控制命令介绍,这里我们就不再重复叙述了,感兴趣的小伙伴可以查看前序文章:
《基于EAIDK-310的传感器调试案例介绍(一)》
《基于EAIDK-310的传感器调试案例介绍(二)》
2 EAIDK-310管脚分布图
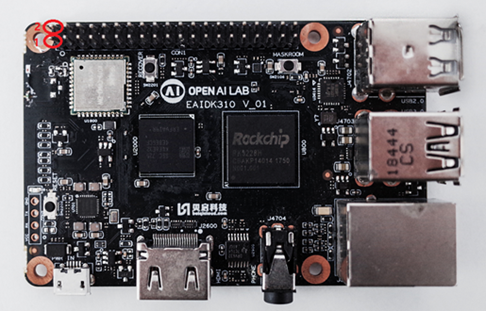
EAIDK-310的管脚分布如下图,Pin1和Pin2已经用红圈标出,其他管脚以此类推。
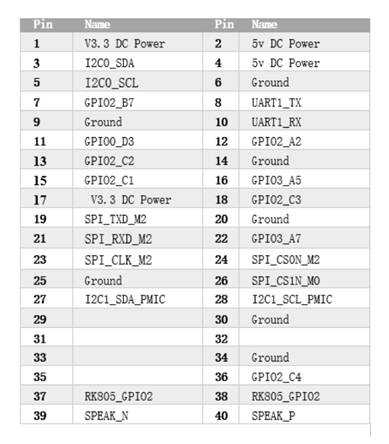
各个管脚定义如下图
从上表可以得出。PIN7, PIN11, PIN12, PIN13, PIN15, PIN16, PIN18, PIN22, PIN36为GPIO。
GPIO设置成输出模式时,高电平为3.3V,低电平为0V。
GPIO设置成输入模式时,高于1.8V为高电平,低于1.8V为低电平。
3 LED硬件连接
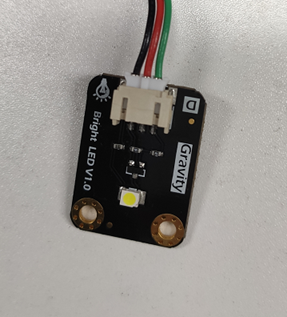
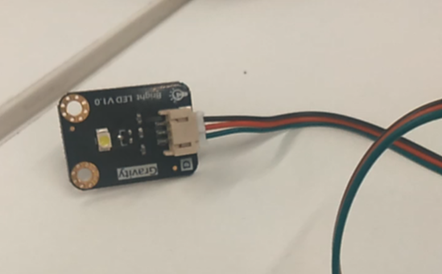
本案例使用的是DFROBOT的高亮LED模块,实物如图所示。
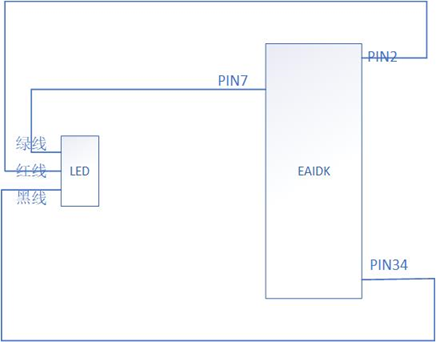
将LED的黑线接地,红线接VCC,绿线接GPIO2_B7。通过控制GPIO2_B7电位来观察LED是否发光。电路连线如下图。
根据EAIDK-310管脚分布图,PIN7为GPIO2_B7, PIN2为5V高电平,PIN34为地。
4 软件运行
4.1 编写代码
打开EAIDK-310的终端后,使用如下命令创建源代码文件
sudo touch led.c在led.c文件中,编辑源代码如下:
#include <stdio.h>
#include <stdlib.h>
#include <string.h>
#include <unistd.h>
#include<fcntl.h>
#include <signal.h>

#define OUT 79

typedef enum
{
    INVALI_DIRECTION,
    INPUT,
    OUTPUT,
} DIRECTION;

typedef enum
{
    INVALI_EDGE,
    NONE,
    RISING,
    FALLING,
    BOTH,
} EDGE;

int fd_int;
int stop_flag = 0;

int gpio_init(int gpio,DIRECTION direction,EDGE edge,char* value,int value_len)
{
    char cmd[1024] = {0};
    char file[64] = {0};
    FILE * fd_tmp;

    memset(cmd,0,sizeof(cmd));
    sprintf(cmd,"echo %d > /sys/class/gpio/export",gpio);
    system(cmd);

    if ( direction == INPUT )
    {
        memset(file,0,sizeof(file));
        sprintf(file,"/sys/class/gpio/gpio%d/direction",gpio);
        fd_tmp = fopen(file,"w");
        if (fd_tmp == NULL)
        {
            printf("open %s fail\n",file);
            return -1;
        }
        fprintf(fd_tmp,"in");
        fclose(fd_tmp);
    }
    else if ( direction == OUTPUT )
    {
        memset(file,0,sizeof(file));
        sprintf(file,"/sys/class/gpio/gpio%d/direction",gpio);
        fd_tmp = fopen(file,"w");
        if (fd_tmp == NULL)
        {
            printf("open %s fail\n",file);
            return -1;
        }
        fprintf(fd_tmp,"out");
        fclose(fd_tmp);
    }
    if ( edge == NONE )
    {
        memset(file,0,sizeof(file));
        sprintf(file,"/sys/class/gpio/gpio%d/edge",gpio);
        fd_tmp = fopen(file,"w");
        if (fd_tmp == NULL)
        {
            printf("open %s fail\n",file);
            return -1;
        }

        fprintf(fd_tmp,"none");
        fclose(fd_tmp);
    }
    else if ( edge == RISING )
    {
        memset(file,0,sizeof(file));
        sprintf(file,"/sys/class/gpio/gpio%d/edge",gpio);
        fd_tmp = fopen(file,"w");
        if (fd_tmp == NULL)
        {
            printf("open %s fail\n",file);
            return -1;
        }

        fprintf(fd_tmp,"rising");
        fclose(fd_tmp);
    }
    else if ( edge == FALLING )
    {
        memset(file,0,sizeof(file));
        sprintf(file,"/sys/class/gpio/gpio%d/edge",gpio);
        fd_tmp = fopen(file,"w");
        if (fd_tmp == NULL)
        {
            printf("open %s fail\n",file);
            return -1;
        }

        fprintf(fd_tmp,"falling");
        fclose(fd_tmp);
    }
    else if ( edge == BOTH )
    {
        memset(file,0,sizeof(file));
        sprintf(file,"/sys/class/gpio/gpio%d/edge",gpio);
        fd_tmp = fopen(file,"w");
        if (fd_tmp == NULL)
        {
            printf("open %s fail\n",file);
            return -1;
        }

        fprintf(fd_tmp,"both");
        fclose(fd_tmp);
    }
    if (value != NULL && value_len > 0)
    {
        memset(value,0,value_len);
        snprintf(value,value_len,"/sys/class/gpio/gpio%d/value",gpio);
    }
    return 0;
}
int set_voltage(FILE * fd,int value)
{
    if (fd != NULL)
    {
        if (value == 0 )
        {
            fprintf(fd,"0");
        }
        else
        {
            fprintf(fd,"1");
        }
        rewind(fd);
        return 0;
    }
    else
    {
        return -1;
    }
}
int get_voltage(int fd)
{
    char buffer[16];
    int len;

    if((len=read(fd,buffer,sizeof(buffer)))==-1)
    {
        perror("read failed!\n");
        return -1;
    }
    buffer[len]=0;
    return atoi(buffer);
}
void gpio_release(int gpio)
{
    char cmd[1024];
    memset(cmd,0,sizeof(cmd));
    sprintf(cmd,"echo %d > /sys/class/gpio/unexport",gpio);
    system(cmd);
}

void stop_demo (int param)
{
  stop_flag = 1;
}
int main()
{
    int voltage = 0;
    char cmd[1024];
    char value_file[64] = {0};
FILE * fd_file;
    signal (SIGINT, stop_demo);
    if(gpio_init(OUT,OUTPUT,INVALI_EDGE,value_file,sizeof(value_file))<0)
    {
        return -1;
    }
    fd_file = fopen(value_file,"w");
    if (fd_file == NULL)
    {
        printf("open %s fail\n",value_file);
        return -1;
    }

    while(stop_flag ==0)
    {
        if (voltage == 1)
        {
            voltage = 0;
        }
        else
        {
            voltage = 1;
        }
        set_voltage(fd_file,voltage);
        sleep(3);
    }
    fclose(fd_file);
    gpio_release(OUT);
    return 0;
}
4.2 编译代码
上述代码编辑完成后,可使用下面两种方式编译
1.直接执行下面编译命令:
[openailab@localhost ~]$ sudo gcc led.c -o led2.编写Makefile文件,内容如下:
all:
    gcc led.c -o led
clean:
    rm led
然后执行make命令编译:
[openailab@localhost ~]$ sudo make上述编译通过后,会在当前目录下生成绿色的可执行文件led
4.3 运行代码
执行如下命令来运行编译生成的可执行文件
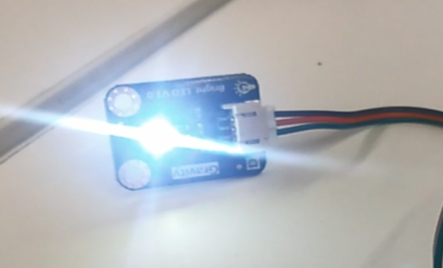
[openailab@localhost ~]$ sudo ./led到这里,我们就可以观察到led灯亮灭交替了, 效果如下
5 写在最后
通过开发者分享的这篇案例,在EAIDK-310上可以成功点亮LED灯了。
如果需要要了解更多关于EAIDK开发平台相关内容,欢迎加入EAIDK开发者大本营,QQ群:625546458。

