Koki Mitsunami 2021年4月6日
这篇博客文章是关于分享我们 在各种移动设备上使用NNAPI运行PyTorch Mobile的经验 。我希望这将为开发者提供 具有 怎样的感觉 ,这些 模型是通过移动设备执行 PyTorch 与NNAPI。
介绍
设备上机器学习(ML)为最终用户提供了低延迟、更好的能效、健壮的安全性和新的用例。目前,有几种方法可以在移动设备上运行推断,许多开发人员都想知道应该使用哪种方法。
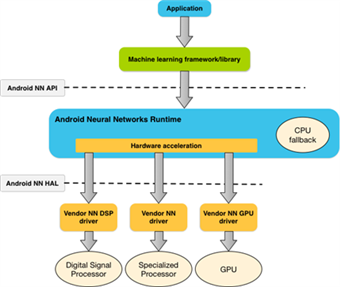
Android神经网络API(NNAPI)是由Google设计的,用于在Android移动设备上运行ML的计算密集型操作。它提供了一组api,可以从可用的硬件加速器(包括gpu、dsp和npu)中获益。在Arm,我们完全支持这一发展。它提供了瞄准Arm生态系统提供的各种加速器和IP的能力。例如,Arm Cortex-acpus和maligpus可以通过我们的推理机armnn获得。Arm NN将网络转换为内部Arm NN格式,然后在底层IP上高效地部署它们。
图 1。 来自 神经网络上的Android开发者博客的Android神经网络API的系统架构
NNAPI可以通过Android C API或更高级别的框架(如TensorFlow Lite)直接访问。最近,PyTorch Mobile发布了一个支持NNAPI的新原型特性,使开发人员能够在PyTorch框架中使用硬件加速推理。这将使PyTorch开发人员比以往更容易从显著的性能改进中获益。(同时宣布通过Vulkan在Android上支持GPU。此外,还添加了通过Lite解释器减少运行时二进制大小的功能。)
图 2。PyTorch Mobile支持Android NNAPI
(来自:https://medium.com/pytorch/pytorch-mobile-now-supports-android-nnapi-e2a2aeb74534)
PyTorch
PyTorch Mobile
PyTorch 是一个非常流行的ML框架,特别是在研究人员中,因为它支持的操作符范围广泛,并且易于编写。但不仅如此,他们还一直致力于弥合研究和生产之间的差距。为了实现从培训模型到在移动环境中部署模型的无缝过渡,他们引入了PyTorch Mobile。PyTorch Mobile提供了一个端到端的工作流程,简化了从研究到生产的环境,同时完全处于PyTorch生态系统中。
在移动设备上使用该模型之前的一个重要步骤是将依赖Python的模型转换为TorchScript格式。TrrScript是PyTrar模型的中间表示,它可以在高性能环境中运行,例如C++。TorchScript格式包括代码、参数、属性和调试信息。
带NNAPI的Pytork Mobile
PyTorch Mobile过去只在CPU上运行,但是现在使用NNAPI使得使用硬件加速变得更容易。为了运行支持NNAPI的PyTorch模型,需要将普通的TorchScript转换为与NNAPI兼容的TorchScript。然后,可以使用Pyr火炬移动java API或LIRBHORARC++ C++来加载和运行该模型。对于已经使用PyTorch Mobile的应用程序,不需要更改代码。开发人员只需用与NNAPI兼容的模型替换TorchScript模型。
MobileNetV2实验
模型转换
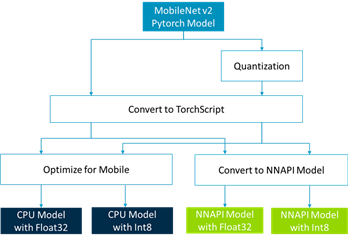
PyTorch提供了一个教程,用于将著名的分类模型MobileNetV2转换为使用Android NNAPI。我们遵循这个教程,并执行我们的实验模型。下图总结了创建普通TorchScript模型(CPU模型)和与NNAPI兼容的TorchScript模型(NNAPI模型)的流程。
图3. PyTorch Mobile转换流程
首先,我们需要准备一个依赖于Python的PyTorch模型。示例代码使用来自torchvision的MobileNetV2模型。然后我们生成一个非量化模型(Float32)和一个量化模型(Int8)来创建几种类型的模型。接下来,我们将这些模型转换为TorchScript格式。最后我们在流程中列出了四种模型。更多信息,请参阅本博客的附录。
基准测试
下一步是对这些模型进行基准测试。PyTorch还提供了一个基准脚本来度量模型的性能。通过使用此脚本,可以轻松地测量模型的执行速度。
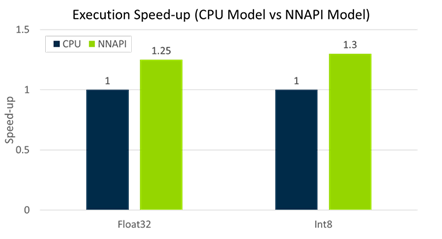
下图显示了NNAPI模型在一个移动设备上的速度提升。此结果是200次运行的平均时间。如您所见,使用NNAPI的Float32和Int8模型的运行速度比CPU模型快25-30%
图4.一台移动设备在不同模型中的MobileNetV2计算速度
Profiling
接下来,让我们看看运行NNAPI模型时移动设备中的硬件是如何工作的。Arm Streamline允许您查看设备内部的CPU和GPU活动。
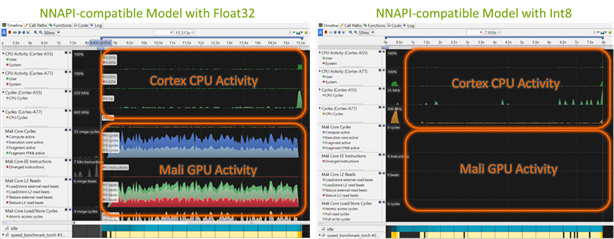
下面的屏幕截图显示了另一个移动设备上的CPU/GPU活动。左边的截图是运行带有Float32的NNAPI模型的截图,右边的截图是带有Int8的截图。您可以看到,GPU用于带有Float32的模型,而带有Int8的模型则使用多核CPU。使用NNAPI,ML框架(如PyTorch)可以查询移动设备中可用的硬件,并为每个操作选择性能最好的硬件。对于不受支持的操作,它可以从Google退回到默认的CPU实现。不同的移动设备对NNAPI的支持情况各不相同,但预计未来移动厂商会越来越多地支持NNAPI。
图5.通过NNAPI运行时,CPU / GPU活动的差异取决于模型的准确性
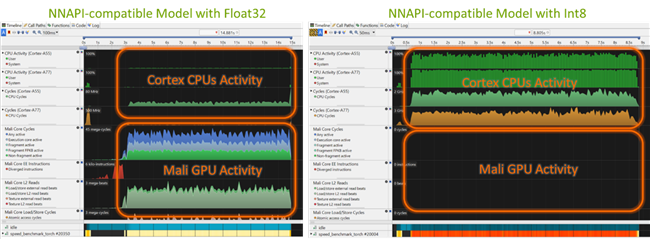
让我们看另一个例子。以下是在不同移动设备上运行的相同型号的示例。这里,带有Float32的模型和以前一样使用GPU,但是带有Int8的模型没有显示任何CPU或GPU活动。这表明,另一个硬件加速器是不可见的流线型。如您所见,通过使用NNAPI,相同的模型可以在不同的设备上工作。
图6.另一个移动设备上的不同NNAPI行为
见解
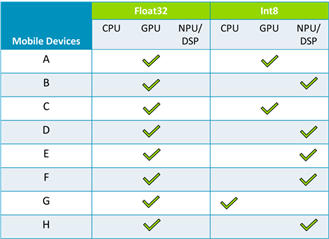
最后,我想分享一下我们在各种移动设备上运行这些模型所获得的见解。下表总结了在我们试验的移动设备上执行模型时选择的硬件(共8个)。这表明,GPU用于所有移动设备,以加速Float32模型。另一方面,使用的硬件取决于Int8机型的移动设备。严格来说,每个操作都会选择硬件,但所有操作都可以在列出的MobileNetV2硬件上执行。
表1。通过NNAPI选择的硬件
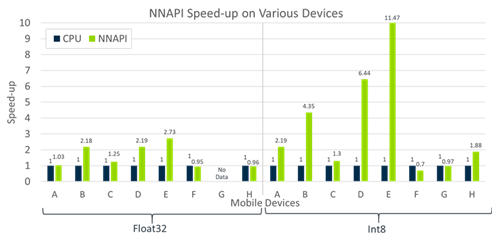
考虑到这一点,让我们看看下面的图表。此图显示了对于Float32和Int8,NNAPI模型可以快多少。速度的增加因设备而异。我们还可以看到,Int8往往有更高的速度增长,因为量化模型通常更有可能受益于硬件加速器。请注意,这些移动设备包括不同的代。这意味着他们的设备硬件和性能存在一些差异。,我想强调的是,这些移动设备中的许多都有底层Arm NN加速的模型。
图7。在各种移动设备上通过NNAPI加速
结论和下一步
在这篇博文中,我们看到了PyTorch如何支持NNAPI。此外,我们还看到了通过NNAPI使用的硬件是如何随移动设备而变化的。移动设备端和ML框架端对NNAPI的支持都将在未来取得进展。这将使开发人员能够运行模型,而不必考虑移动设备之间的差异。从开发人员的角度来看,这意味着一个单一的模型是所有需要发挥每个移动设备的全部潜力。它比以往任何时候都更容易将PyTorch模型部署到具有高性能的移动设备上。
另一方面,在框架或api之间转换ML模型并不总是那么容易。我们将跟踪开发,并继续与我们的合作伙伴合作,优化支持NNAPI和Arm NN的设备的性能。
我希望这能让您了解ML模型是如何与NNAPI一起工作的,您可以尝试一下这个特性!此外,您还可以在此处了解有关底层Arm NN的更多信息:https://developer.arm.com/ip-products/processors/machine-learning/arm-nn.
附录
在本附录中,将解释使用NNAPI支持准备PyTorch模型并对其进行基准测试的详细步骤。
PyTorch提供的教程目前与最新的trunk不兼容,并且教程中指定的版本(torch==1.8.0.dev20201106+cpu,torchvision==0.9.0.dev20201107+cpu)也无法从中获得https://download.pytorch.org/whl/nightly/cpu/torch_nightly.html。因此,您需要将PyTorch github repo恢复为下面指定的提交,并从源代码进行构建,直到正式发布。
代码1。PyTorch和torchvision的安装程序
# Setup virtual env and install dependencies

python3 -m venv .venv

source .venv/bin/activate

pip3 install numpy ninja pyyaml mkl mkl-include setuptools cmake cffi typing_extensions future six requests dataclasses

export USE_CUDA=0


# Install PyTorch

git clone https://github.com/pytorch/pytorch

cd pytorch

# revert to 201106 version

git reset --hard c19eb4ad73ebf16c7dc73229729ed95692472f6e

git submodule sync

git submodule update --init --recursive

python3 setup.py install


# Install torchvision

git clone https://github.com/pytorch/vision

# revert to 20201107 version

git reset --hard 052edcecef3eb0ae9fe9e4b256fa2a488f9f395b

python3 setup.py install
安装PyTorch后,可以通过运行模型准备脚本来生成模型。运行该脚本时,模型将在$HOME/mobilenetpi目录下创建。
代码2。用于模型准备的Python脚本
#!/usr/bin/env python

import sys

import os

import torch

import torch.utils.bundled_inputs

import torch.utils.mobile_optimizer

import torch.backends._nnapi.prepare

import torchvision.models.quantization.mobilenet

from pathlib import Path


# This script supports 3 modes of quantization:

# - "none": Fully floating-point model.

# - "core": Quantize the core of the model, but wrap it a

#    quantizer/dequantizer pair, so the interface uses floating point.

# - "full": Quantize the model, and use quantized tensors

#   for input and output.

#

# "none" maintains maximum accuracy

# "core" sacrifices some accuracy for performance,

# but maintains the same interface.

# "full" maximized performance (with the same accuracy as "core"),

# but requires the application to use quantized tensors.

#

# There is a fourth option, not supported by this script,

# where we include the quant/dequant steps as NNAPI operators.

def make_mobilenetv2_nnapi(output_dir_path, quantize_mode):

    quantize_core, quantize_iface = {

        "none": (False, False),

        "core": (True, False),

        "full": (True, True),

    }[quantize_mode]


    model = torchvision.models.quantization.mobilenet.mobilenet_v2(pretrained=True, quantize=quantize_core)

    model.eval()


    # Fuse BatchNorm operators in the floating point model.

    # (Quantized models already have this done.)

    # Remove dropout for this inference-only use case.

    if not quantize_core:

        model.fuse_model()

    assert type(model.classifier[0]) == torch.nn.Dropout

    model.classifier[0] = torch.nn.Identity()


    input_float = torch.zeros(1, 3, 224, 224)

    input_tensor = input_float


    # If we're doing a quantized model, we need to trace only the quantized core.

    # So capture the quantizer and dequantizer, use them to prepare the input,

    # and replace them with identity modules so we can trace without them.

    if quantize_core:

        quantizer = model.quant

        dequantizer = model.dequant

        model.quant = torch.nn.Identity()

        model.dequant = torch.nn.Identity()

        input_tensor = quantizer(input_float)


    # Many NNAPI backends prefer NHWC tensors, so convert our input to channels_last,

    # and set the "nnapi_nhwc" attribute for the converter.

    input_tensor = input_tensor.contiguous(memory_format=torch.channels_last)

    input_tensor.nnapi_nhwc = True


    # Trace the model.  NNAPI conversion only works with TorchScript models,

    # and traced models are more likely to convert successfully than scripted.

    with torch.no_grad():

        traced = torch.jit.trace(model, input_tensor)

    nnapi_model = torch.backends._nnapi.prepare.convert_model_to_nnapi(traced, input_tensor)


    # If we're not using a quantized interface, wrap a quant/dequant around the core.

    if quantize_core and not quantize_iface:

        nnapi_model = torch.nn.Sequential(quantizer, nnapi_model, dequantizer)

        model.quant = quantizer

        model.dequant = dequantizer

        # Switch back to float input for benchmarking.

        input_tensor = input_float.contiguous(memory_format=torch.channels_last)


    # Optimize the CPU model to make CPU-vs-NNAPI benchmarks fair.

    model = torch.utils.mobile_optimizer.optimize_for_mobile(torch.jit.script(model))


    # Bundle sample inputs with the models for easier benchmarking.

    # This step is optional.

    class BundleWrapper(torch.nn.Module):

        def __init__(self, mod):

            super().__init__()

            self.mod = mod

        def forward(self, arg):

            return self.mod(arg)

    nnapi_model = torch.jit.script(BundleWrapper(nnapi_model))

    torch.utils.bundled_inputs.augment_model_with_bundled_inputs(

        model, [(torch.utils.bundled_inputs.bundle_large_tensor(input_tensor),)])

    torch.utils.bundled_inputs.augment_model_with_bundled_inputs(

        nnapi_model, [(torch.utils.bundled_inputs.bundle_large_tensor(input_tensor),)])


    # Save both models.

    model.save(output_dir_path / ("mobilenetv2-quant_{}-cpu.pt".format(quantize_mode)))

    nnapi_model.save(output_dir_path / ("mobilenetv2-quant_{}-nnapi.pt".format(quantize_mode)))


if __name__ == "__main__":

    for quantize_mode in ["none", "core", "full"]:

        make_mobilenetv2_nnapi(Path(os.environ["HOME"]) / "mobilenetv2-nnapi", quantize_mode)
代码3。运行模型准备脚本
mkdir ~/mobilenetv2-nnapi
python3 prepare_model.py代码4.建立基准程序
mv <your-root-pytorch-dir>

rm -rf build_android

ANDROID_NDK=$NDK ANDROID_NATIVE_API_LEVEL=29 BUILD_PYTORCH_MOBILE=1 \
ANDROID_ABI=arm64-v8a ./scripts/build_android.sh -DBUILD_BINARY=ON
代码5。在移动设备上运行基准测试程序
adb connect <your-mobile-device>
adb push <pytorch-dir>/build_android/bin/speed_benchmark_torch \
/data/local/tmp
adb push $HOME/mobilenetv2-nnapi/mobilenetv2-quant_* /data/local/tmp
adb shell /data/local/tmp/speed_benchmark_torch --pthreadpool_size=1 \
--model=/data/local/tmp/mobilenetv2-quant_full-nnapi.pt \
--use_bundled_input=0 --warmup=5 --iter=200如果你收到下面这样的信息,你就成功了。当您运行脚本时,它测量并显示运行模型所需的执行时间以及每秒可以执行模型的次数。有关基准测试计划的更多信息,请参阅本页。
输出1。基准控制台输出示例
Starting benchmark.

Running warmup runs.

Main runs.

Main run finished. Microseconds per iter: 36012.7. Iters per second: 27.768
要更详细地分析移动设备的内部行为,可以使用Streamline。
代码6。Profile with Streamline
# Push gatord to a mobile device

adb push <armds-dir>/streamline/bin/arm64/gatord /data/local/tmp


# Run gatord with --app option for command line programs

adb shell /data/local/tmp/gatord \
 --app /data/local/tmp/speed_benchmark_torch --pthreadpool_size=1 \
 --model=/data/local/tmp/mobilenetv2-quant_full-nnapi.pt \
 --use_bundled_input=0 --warmup=5 --iter=200


# Launch Streamline and follow below:
# https://developer.arm.com/documentation/101813/0702/Application-profiling-on-an-Android-device/Profile-your-application

