https://www.electromaker.io/project/view/low-power-iot-intruder-detector-with-rpi4-pico
关于该项目
将Raspberry Pi Pico板与运动传感器一起使用,以唤醒Raspberry Pi 4并运行CV脚本,如果看到陌生人,它会提醒您。
该项目中使用的项目
硬件部件
软件应用程序和在线服务
手动工具和制造机
故事
项目:
Raspberry Pi Pico连接到运动传感器,该传感器在检测到运动时会打开Raspberry Pi 4。开启后,Raspberry Pi 4使用人脸识别算法来识别人脸并将检测到的人脸与Pi上存储的熟悉的人脸进行比较。然后,如果检测到陌生人,它将向IFTTT发出发布请求,以将通知发送到您的手机。然后,脚本将关闭Raspberry Pi,以节省能源。可通过cron作业启用此协调,该作业在启动时自动执行CV脚本。
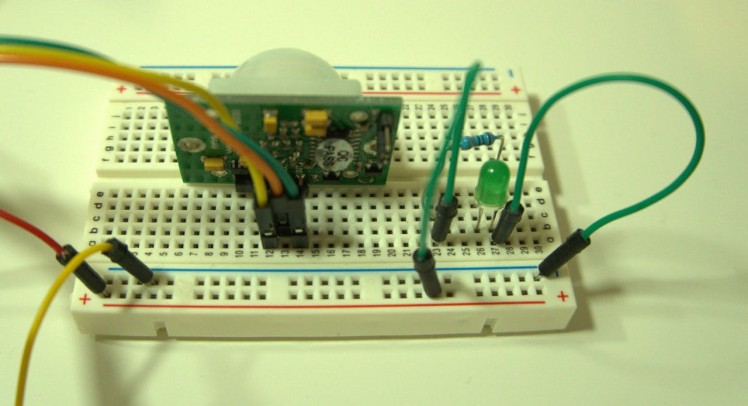
第1部分:接线传感器和LED
首先,您必须将一些引脚焊接到Pico板上以将电缆连接到它。确保使用正确的焊嘴尺寸和优质的助焊剂,以免造成上图所示的不良焊接工作。
连接传感器:
- GP1-LED的电源
- GND1-LED的接地
- GP4-传感器电源(VCC)
- GP5-传感器输出(OUT)
- GND2-传感器的接地引脚(GND)
from machine import Pin, Timerdef check_sensor(timer): global sensor if sensor.value() == 1: gp1.value(1) else: gp1.value(0)#GP4 - 5v outputgp4 = Pin(4,Pin.OUT)gp4.value(1)#GP1 - output for LEDgp1= Pin(1,Pin.OUT)#GP5 - input from sensorsensor = Pin(5,Pin.IN)tim = Timer()tim.init(freq=1.5, mode=Timer.PERIODIC, callback=check_sensor)此时,您应该在板上将脚本另存为“ main.py”,通过拔下板子并确保其如预期的那样运行来运行脚本(如果检测到运动,LED会亮起)。
在该项目的最后一部分,您将打开Raspberry Pi而不是LED。
第2部分: 计算机视觉,IFTTT和cron作业
首先,您需要将相机挂在Pi上,并弄清楚如何使其能够识别您的脸部(以便它可以分辨出框架中是否有陌生人)。最初,我考虑为此编写自己的ML模型,但最终决定改用人脸检测库,因为这会使我更快地进入工作项目。
1.)安装面部检测库的依赖项
sudo apt install build-essential cmake gfortran git wget curl graphicsmagick libgraphicsmagick1-dev libatlas-base-dev libavcodec-dev libavformat-dev libboost-all-dev libgtk2.0-dev libjpeg-dev liblapack-dev libswscale-dev pkg-config python3-dev python3-numpy python3-pip zip python3-picamera2)运行更新
sudo pip3 install --upgrade picamera[array]3)增加交换文件的大小,以便您可以构建dlib
sudo nano /etc/dphys-swapfile查找CONF_SWAPSIZE并将其值从100更改为1024。保存并退出,然后运行以下命令:
sudo /etc/init.d/dphys-swapfile restart4)构建并安装dlib
cdgit clone -b 'v19.6' --single-branch https://github.com/davisking/dlib.gitcd ./dlibsudo python3 setup.py install --compiler-flags "-mfpu=neon"运行大约需要40分钟(在RPi4上)
5)恢复交换大小
sudo nano /etc/dphys-swapfile查找CONF_SWAPSIZE并将其值从1024更改为100。保存并退出,然后运行以下命令:
sudo /etc/init.d/dphys-swapfile restart6)安装face_recognition与实例
sudo pip3 install face_recognition!那是完成的依赖关系。时间来一些更令人兴奋的事情。人脸识别代码:)
import face_recognitionimport picameraimport numpy as npimport timeimport requestsimport subprocessdef ping_cloud(): requests.post('https://maker.ifttt.com/trigger/unknown_person_detected/with/key/YOUR_API_KEY')#function for triggering the face recognitiondef find_face(): # Get a reference to the Raspberry Pi camera. # If this fails, make sure you have a camera connected to the RPi and that you # enabled your camera in raspi-config and rebooted first. camera = picamera.PiCamera() camera.resolution = (320, 240) camera.rotation = 180 output = np.empty((240, 320, 3), dtype=np.uint8) # Load a sample picture and learn how to recognize it. person_image = face_recognition.load_image_file("carlo_pic.jpg") person_face_encoding = face_recognition.face_encodings(person_image)[0] # Initialize some variables face_locations = [] face_encodings = [] while True: # Grab a single frame of video from the RPi camera as a numpy array camera.capture(output, format="rgb") # Find all the faces and face encodings in the current frame of video face_locations = face_recognition.face_locations(output) #print("Found {} faces in image.".format(len(face_locations))) face_encodings = face_recognition.face_encodings(output, face_locations) # Loop over each face found in the frame to see if it's someone we know. for face_encoding in face_encodings: # See if the face is a match for the known face(s) match = face_recognition.compare_faces([person_face_encoding], face_encoding) name = "<Unknown Person>" if match[0]: name = "Carlo" if name == "<Unknown Person>": ping_cloud() subprocess.call("sudo shutdown -h now",shell=True)#after warning the user shutdown time.sleep(60*5) #sleep for 5 minutes before sending another message to cloud breakwhile True: try: find_face() except: pass在这里,您传入图像中的人脸编码person_image(您应将您的人脸图片放入此脚本的本地文件夹中)。因此,如果您的图片是“ my_pic.jpg”,那么您应该具有:
person_image = face_recognition.load_image_file("my_pic.jpg")注意:瞄准小图像,以便该程序快速运行。
接下来,您需要设置我们的IFTTT挂钩,以便可以从RPi 4上运行的程序发送通知。完成此步骤后,您只需要在上面的代码中替换API密钥即可。
IFTTT
1)创建一个新的小程序
2)点击“添加”
3)选择Webhooks服务
4)点击“接收网络请求”
5)点击“创建触发器”
6)点击“添加”
7)点击“通知”
8)点击“从IFTTT应用发送通知”
注意:请确保您使用手机的IFTTT应用程序使用相同的帐户登录。
9)添加一条消息,然后单击“创建操作”
10)确保您的流程如下所示,然后单击“继续”
11)搜索Webhooks服务,然后单击“文档”
12)记下您的API密钥
完成此操作后,您现在应该在Raspberry Pi上运行的启动脚本中更改以下行,以获取上面看到的实际密钥。
requests.post('https://maker.ifttt.com/trigger/unknown_person_detected/with/key/YOUR_NEW_API_KEY')此时,您应该测试该程序,并确保一切正常。我建议先运行脚本,然后先将自己置于镜头前,并确保未触发通知。然后,将相机对准其他人(或智能手机上的照片)。您应该会在几秒钟内通过手机收到通知。
您是否曾经想过是否有一种方法可以根据一天中的时间或树莓派是否刚刚启动等条件自动在Raspberry Pi中执行程序?好吧,今天是您的幸运日。通过Cron作业,您可以在基于Linux的系统(例如Pi)中精确安排这些任务。
在Pi的终端上运行以下命令:
sudo crontab -e向下滚动到文件底部,然后放置以下命令:
@reboot cd /home/pi/Code && python3 /home/pi/Code/startup_script.py &这将使计算机视觉脚本在打开时在Pi上执行。
接下来,您需要做一些重新布线,以通过短暂短路Raspberry Pi上的引脚6来从Pico板上打开Pi。首先添加一个晶体管,该晶体管将充当开关,以便当我们从引脚1上的Pico板供电时,电流将从Raspberry Pi上的GPIO 5流向GPIO 6,从而暂时将其短路并打开Pi。
- Pico GP4-传感器电源(VCC)
- Pico GP5-传感器输出(OUT)
- Pico GND2-传感器的接地引脚(GND)
- Pico GP1-基座(晶体管)
- RPi4 GPIO5-发射极(晶体管)
- RPi4 GPIO6-收集器(晶体管)
注意:这仅适用于最新的Raspberry Pi OS。
我知道这可能不是打开和关闭Pi的最佳方法,因此我正在寻求实现更好的解决方案。如果有人对如何执行此操作有任何建议,请在下面留下评论,或在GitHub上提出问题。
要提出问题或查看该项目的最新版本,请查看其GitHub页面。依赖说明从这里开始。


