之前在Amlogic A311D上部署mobilefacenet翻车了,今天换周易AIPU试试。
准备模型
准备矫正集
- 将需要矫正的图片路径依次输入到label.txt
- 执行
python preprocess_dataset.py - preprocess_dataset.py中的参数需要和训练时保持一致
   input_height=112
   input_width=112
   input_channel = 3
   mean = [127.5, 127.5, 127.5]
   var = 128.
准备input.bin
- 准备之前可以仔细看下niuhui大佬的爬坑记录(nihui)
- 我从LFW数据集撸了3张测试图片,标记为a1,a2,b1,其中a1,a2为同类,b1为他类,以此作为最后区分度对比
b1
a1
a2 - 执行
python gen_inputbin.py,依次生成3个输入文件,分别为:input.bin,input_1.bin和input_2.bin
配置run.cfg
- 这里我碰到一个坑,此处model_domain只能有如下
- image_classification
image_detection
[Parser]
model_name = facenet
detection_postprocess =
model_domain = image_classification
如果写入自定义的值例如image_feature都会报错,并且错误信息很奇怪,不知道其他大佬有没有碰到。
[I] ==== auto-quantization ======
[E] Quantize model failed! 'NoneType' object has no attribute 'is_ready'
[I] Building ...
[I] [common_options.h: 276] BuildTool version: 4.0.175. Build for target Z1_0701 at frequency 800MHz
[I] [common_options.h: 297] using default profile events to profile AIFF

[E] [main.cpp  : 170] Cannot Open file:/tmp/AIPUBuilder_1627821631.5336628/facenet_int8.txt
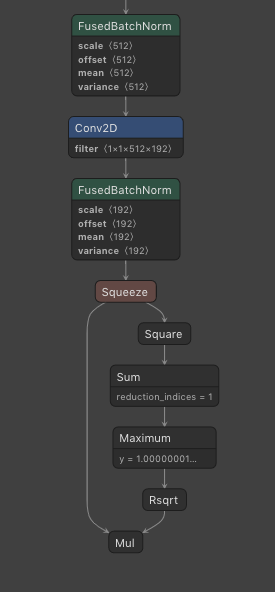
模型最后输出不能直接拿最后一个节点,不然会报错,需要提前到Squeeze节点,所以cfg中的output需要修改
[Parser]
input = img_inputs
input_shape = [1, 112, 112, 3]
output = MobileFaceNet/Logits/SpatialSqueeze
npu量化结果对比
- 我一共跑了3组结果分别为'/output_facenet.bin', '/output_facenet_1.bin', '/output_facenet_2.bin'
通过下面代码获取到int8的输出结果
 outputfile = current_dir + predict_file
 npyoutput = np.fromfile(outputfile, dtype=np.int8)
其中dtype需要和模型量化输出的类型保持一致,可以从如下路径
/tmp/AIPUBuilder_1627906624.410867/facenet_int8.txt中查看最后一层的输出情况layer_id=65 layer_name=MobileFaceNet/Logits/SpatialSqueeze layer_type=Reshape layer_bottom=[MobileFaceNet/Logits/LinearConv1x1/BatchNorm/FusedBatchNorm_0] layer_bottom_shape=[[1,1,1,192]] layer_bottom_type=[int8] layer_top=[MobileFaceNet/Logits/SpatialSqueeze_0] layer_top_shape=[[1,192]] layer_top_type=[int8] //输出类型 int8 shape=[1,192]最后输出的int8结果需要除以量化输出的scale才能复原到float结果,scale系数可以在量化输出时获取
layer_id: 65, layer_top:MobileFaceNet/Logits/SpatialSqueeze_0, output_scale:[6.513236] //量化系数人脸对比我采用的是余弦距离,所以事先需要做归一化
def feature_calc(data, size = 192):
 a = np.array(data).astype(np.float32)
 a = a.reshape((-1, size))
 a = a / np.linalg.norm(a, axis=1, keepdims=True)
 return a
最后使用np.dot将相似度显示
print(np.dot(predict_tensor[0], predict_tensor[0].T))
print(np.dot(predict_tensor[0], predict_tensor[1].T))
print(np.dot(predict_tensor[0], predict_tensor[2].T))
这把仿真的结果输出对比情况(其值越接近1,就越相似)。采用tensorflow输出的相似度结果为
a1 vs a1: [[1.]]
a1 vs a2: [[0.69566315]]
a1 vs b1: [[0.36696735]]
仿真输出结果为
root@corey-pc:/workspace/NV_DL/AIPU/simulator# python3 quant_predict.py
a1 vs a1: [[1.]]
a1 vs a2: [[0.7155405]]
a1 vs b1: [[0.4450221]]
看样子区分度已经不错了,并且和原始模型输出对比结果接近。
相关文件见(包括freeze pb模型)百度云盘分享.
链接: https://pan.baidu.com/s/1c2Zf... 密码: 4s23


