【GiantPandaCV导语】
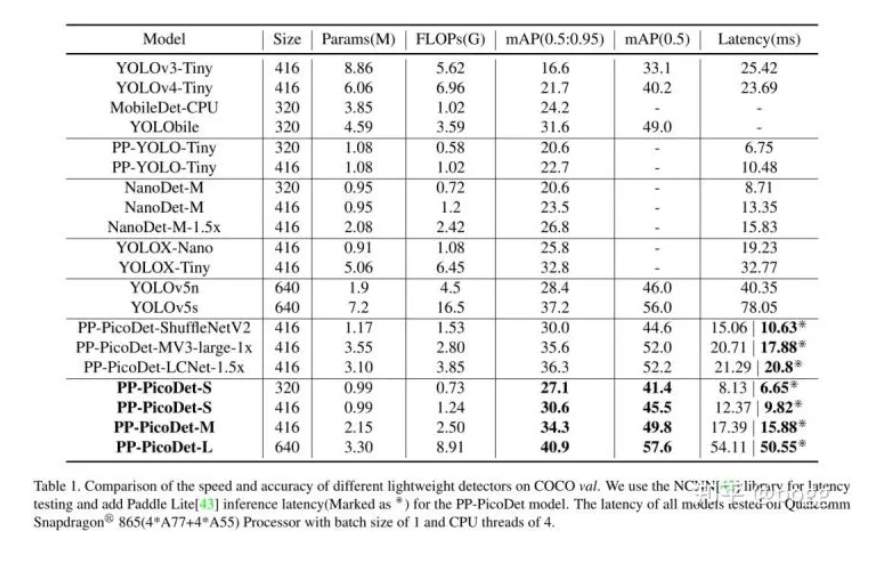
这篇博客仅对PicoDet的网络结构进行复现。PicoDet在一定程度上刷新了业界轻量级移动端模型的sota,这也是我比较感兴趣的地方。本文将PicoDet模型网络结构迁移到yolov5的平台,因为是anchor base的形式,在性能上与原生模型可能有一定的差异,以下是原生模型的性能指标。
一、PicoDet介绍
Picodet论文在11月放出,后面对模型结构进行了复现,但因为没有显卡,迟迟无法对复现后的模型进行效果检验(现在依旧没有显卡可以跑模型,遂放出代码),这个周末有空,把之前的代码翻出来整理一下,并讲述下复现的思路:
1.1 ESNet
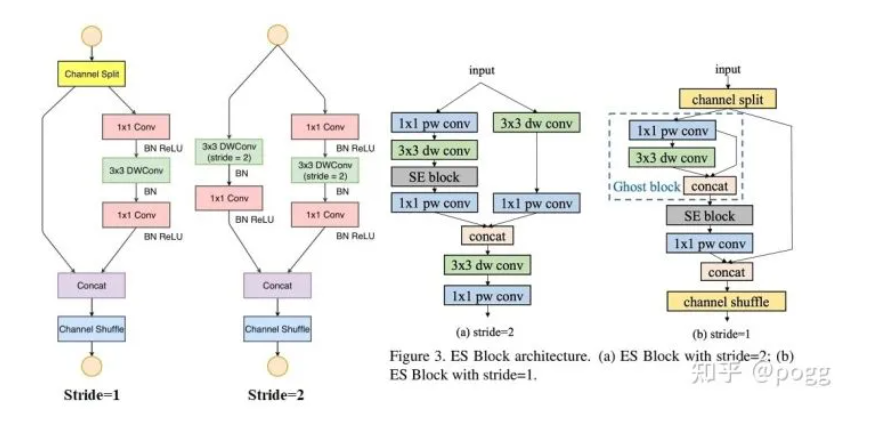
ESNet全称为Enhance ShuffleNet,是基于旷视的shufflenetv2演变而来(下图)
左为shuffle block,右为es_bottleneck
对于Stride=2,我们可以看到,ESNet和Shufflenetv2的差别是剔除了channel shuffle,增加了一个3x3的depthwise separable conv,除此之外,在其中一条branch中增加了se module;
对于Stride=1,应该是ESNet改动最大的地方,包含depthwise separable conv+point conv的branch变成了一个ghost conv+se module+point conv,这个需要稍加注意,channel稍微对不齐会导致concat和channel shuffle出错。
我们可以安装不同的branch和各种模块拆分出来进行讲解:
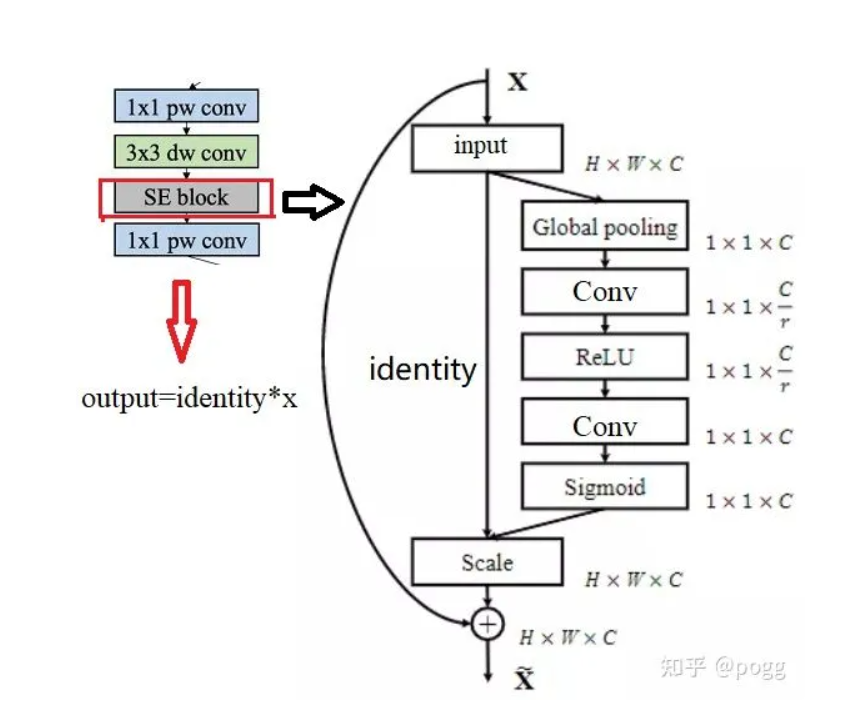
首先是注意力机制SE模块,可以参考mobile系列,激活函数选择hard_sigmoid:
复现代码:
class ES_SEModule(nn.Module):
    def __init__(self, channel, reduction=4):
        super().__init__()
        self.avg_pool = nn.AdaptiveAvgPool2d(1)
        self.conv1 = nn.Conv2d(
            in_channels=channel,
            out_channels=channel // reduction,
            kernel_size=1,
            stride=1,
            padding=0)
        self.relu = nn.ReLU()
        self.conv2 = nn.Conv2d(
            in_channels=channel // reduction,
            out_channels=channel,
            kernel_size=1,
            stride=1,
            padding=0)
        self.hardsigmoid = nn.Hardsigmoid()
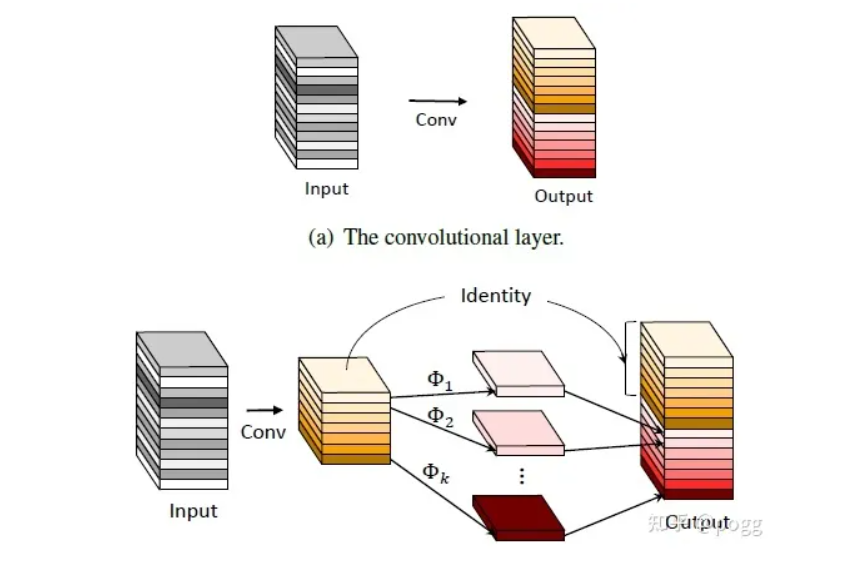
对于Ghost Block,相比于传统的卷积,GhostNet分两步走,首先GhostNet采用正常的卷积计算,得到channel较少的特征图,然后利用cheap operation得到更多的特征图,然后将不同的特征图concat到一起,组合成新的output.
代码:
class GhostConv(nn.Module):
    # 代码源于yolov5.common.py
    def __init__(self, c1, c2, k=3, s=1, g=1, act=True):  # ch_in, ch_out, kernel, stride, groups
        super().__init__()
        c_ = c2 // 2  # hidden channels
        self.cv1 = Conv(c1, c_, 1, s, None, g, act)
        self.cv2 = Conv(c_, c_, k, s, None, c_, act)

    def forward(self, x):
        y = self.cv1(x)
        return torch.cat((y, self.cv2(y)), dim=1)
对于stride=2,branch1是常见的depthwise separable conv:
另一边的branch2结构是point conv+se module+depthwise separable conv:
branch4结构是对concat后的branch1和branch2做深度可分离卷积操作:
将这些模块组合起来,构成stride=2的总分支:
def forward(self, x):
    x1 = torch.cat((self.branch1(x), self.branch2(x)), dim=1)
    out = self.branch4(x1)
branch3结构组合模块比较多,即ghost conv+identity+se module+point conv:
将这些模块组合起来,构成stride=1的总分支:
def forward(self, x):
    x1, x2 = x.chunk(2, dim=1)
    # 先进行channel split,打乱tensor
    x3 = torch.cat((x1, self.branch3(x2)), dim=1)
    # 进行branck3的操作
    out = channel_shuffle(x3, 2)
    # 将操作后的tensor重新组装起来
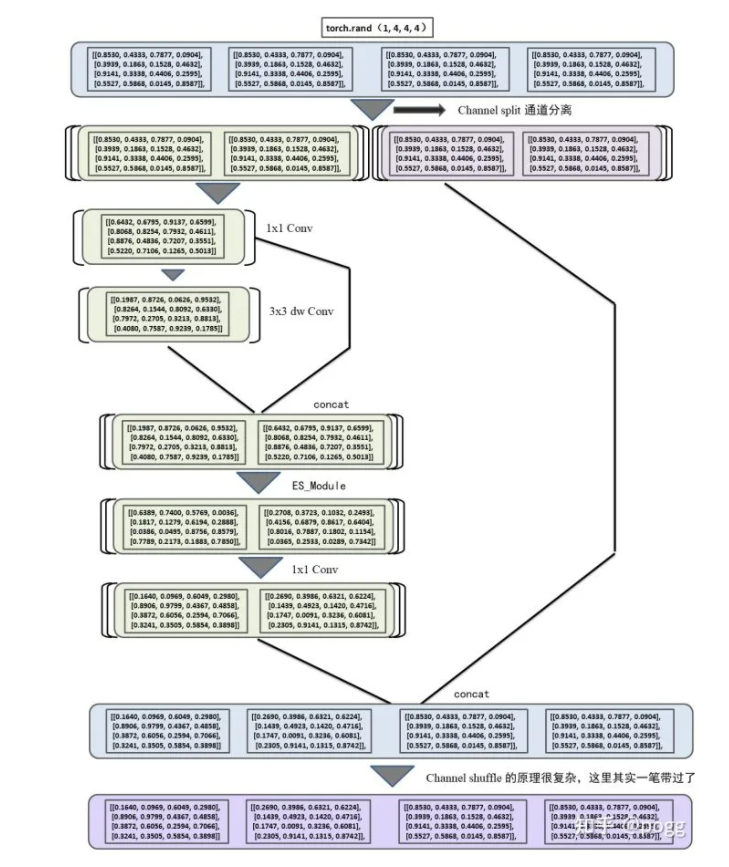
我们可以绘图分析下tensor的走向,以最复杂的Stride=1为例:
复现代码如下:
# build ES_Bottleneck
# -------------------------------------------------------------------------

class GhostConv(nn.Module):
    # Ghost Convolution https://github.com/huawei-noah/ghostnet
    def __init__(self, c1, c2, k=3, s=1, g=1, act=True):  # ch_in, ch_out, kernel, stride, groups
        super().__init__()
        c_ = c2 // 2  # hidden channels
        self.cv1 = Conv(c1, c_, 1, s, None, g, act)
        self.cv2 = Conv(c_, c_, k, s, None, c_, act)

    def forward(self, x):
        y = self.cv1(x)
        return torch.cat((y, self.cv2(y)), dim=1)

class ES_SEModule(nn.Module):
    def __init__(self, channel, reduction=4):
        super().__init__()
        self.avg_pool = nn.AdaptiveAvgPool2d(1)
        self.conv1 = nn.Conv2d(
            in_channels=channel,
            out_channels=channel // reduction,
            kernel_size=1,
            stride=1,
            padding=0)
        self.relu = nn.ReLU()
        self.conv2 = nn.Conv2d(
            in_channels=channel // reduction,
            out_channels=channel,
            kernel_size=1,
            stride=1,
            padding=0)
        self.hardsigmoid = nn.Hardsigmoid()

    def forward(self, x):
        identity = x
        x = self.avg_pool(x)
        x = self.conv1(x)
        x = self.relu(x)
        x = self.conv2(x)
        x = self.hardsigmoid(x)
        out = identity * x
        return out

class ES_Bottleneck(nn.Module):
    def __init__(self, inp, oup, stride):
        super(ES_Bottleneck, self).__init__()

        if not (1 <= stride <= 3):
            raise ValueError('illegal stride value')
        self.stride = stride

        branch_features = oup // 2
        # assert (self.stride != 1) or (inp == branch_features << 1)

        if self.stride > 1:
        # 第一条branch分支,用于stride=2的ES_Bottleneck
            self.branch1 = nn.Sequential(
                self.depthwise_conv(inp, inp, kernel_size=3, stride=self.stride, padding=1),
                nn.BatchNorm2d(inp),
                nn.Conv2d(inp, branch_features, kernel_size=1, stride=1, padding=0, bias=False),
                nn.BatchNorm2d(branch_features),
                nn.Hardswish(inplace=True),
            )

        self.branch2 = nn.Sequential(
        # 第一二条branch分支,用于stride=2的ES_Bottleneck
            nn.Conv2d(inp if (self.stride > 1) else branch_features,
                      branch_features, kernel_size=1, stride=1, padding=0, bias=False),
            nn.BatchNorm2d(branch_features),
            nn.ReLU(inplace=True),
            self.depthwise_conv(branch_features, branch_features, kernel_size=3, stride=self.stride, padding=1),
            nn.BatchNorm2d(branch_features),
            ES_SEModule(branch_features),
            nn.Conv2d(branch_features, branch_features, kernel_size=1, stride=1, padding=0, bias=False),
            nn.BatchNorm2d(branch_features),
            nn.Hardswish(inplace=True),
        )

        self.branch3 = nn.Sequential(
        # 第三条branch分支,用于stride=1的ES_Bottleneck
            GhostConv(branch_features, branch_features, 3, 1),
            ES_SEModule(branch_features),
            nn.Conv2d(branch_features, branch_features, kernel_size=1, stride=1, padding=0, bias=False),
            nn.BatchNorm2d(branch_features),
            nn.Hardswish(inplace=True),
        )

        self.branch4 = nn.Sequential(
        # 第四条branch分支,用于stride=2的ES_Bottleneck的最后一次深度可分离卷积
            self.depthwise_conv(oup, oup, kernel_size=3, stride=1, padding=1),
            nn.BatchNorm2d(oup),
            nn.Conv2d(oup, oup, kernel_size=1, stride=1, padding=0, bias=False),
            nn.BatchNorm2d(oup),
            nn.Hardswish(inplace=True),
        )

    @staticmethod
    def depthwise_conv(i, o, kernel_size=3, stride=1, padding=0, bias=False):
        return nn.Conv2d(i, o, kernel_size, stride, padding, bias=bias, groups=i)

    @staticmethod
    def conv1x1(i, o, kernel_size=1, stride=1, padding=0, bias=False):
        return nn.Conv2d(i, o, kernel_size, stride, padding, bias=bias)

    def forward(self, x):
        if self.stride == 1:
            x1, x2 = x.chunk(2, dim=1)
            x3 = torch.cat((x1, self.branch3(x2)), dim=1)
            out = channel_shuffle(x3, 2)
        elif self.stride == 2:
            x1 = torch.cat((self.branch1(x), self.branch2(x)), dim=1)
            out = self.branch4(x1)

        return out

# ES_Bottleneck end
# -------------------------------------------------------------------------
1.1 CSP - PAN
neck部分相对比较简单,主要op由depthwise separable conv + CSPNet + PANet组成
在这里插入图片描述
CSP - PAN的yaml构建:
#  CSP-PAN
head:
  [ [ -1, 1, Conv, [ 232, 1, 1 ] ], # 7
    [ [ -1, 6 ], 1, Concat, [ 1 ] ],  # cat backbone P4
    [ -1, 1, BottleneckCSP, [ 232, False ] ],  # 9 (P3/8-small)

    [ -1, 1, Conv, [ 116, 1, 1 ] ], # 10
    [ -1, 1, nn.Upsample, [ None, 2, 'nearest' ] ],
    [ [ -1, 4 ], 1, Concat, [ 1 ] ],  # cat backbone P4
    [ -1, 1, BottleneckCSP, [ 116, False ] ],  # 13

    [ -1, 1, Conv, [ 116, 1, 1 ] ], # 14
    [ -1, 1, nn.Upsample, [ None, 2, 'nearest' ] ],
    [ [ -1, 2 ], 1, Concat, [ 1 ] ],  # cat backbone P3
    [ -1, 1, BottleneckCSP, [ 116, False ] ],  # 17 (P3/8-small)

    [-1, 1, DWConvblock, [ 116, 5, 2 ]], # 18
    [ [ -1, 14 ], 1, Concat, [ 1 ] ],  # cat head P4
    [ -1, 1, BottleneckCSP, [ 116, False ] ],  # 20 (P4/16-medium)

    [ -1, 1, DWConvblock, [ 232, 5, 2 ] ],
    [ [ -1, 10 ], 1, Concat, [ 1 ] ],  # cat head P5
    [ -1, 1, BottleneckCSP, [ 232, False ] ],  # 23 (P5/32-large)

    [ [ -1, 7 ], 1, Concat, [ 1 ] ],  # cat head P6
    [ -1, 1, DWConvblock, [ 464, 5, 2 ] ],  # 26 (P5/32-large)

    [ [ 17, 20, 23, 25 ], 1, Detect, [ nc, anchors ] ],  # Detect(P3, P4, P5, P6)
  ]
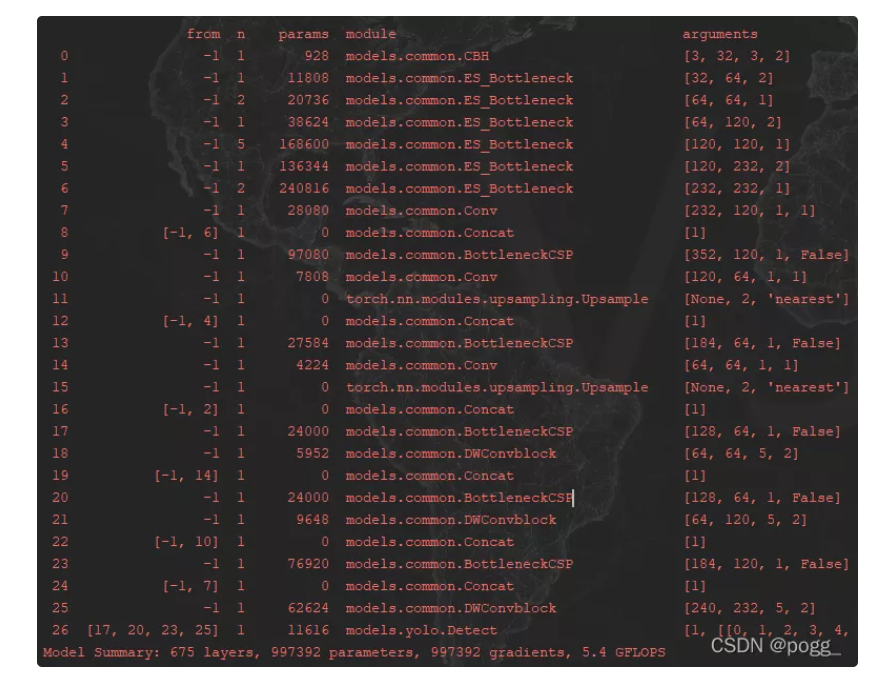
总的模型结构以及640x640下的param和Flops:
在这里插入图片描述
代码将更新于个人repo,欢迎大家star和白嫖!
https://github.com/ppogg/YOLOv5-Lite
原文链接:GiantPandaCV
作者:陈TEL
推荐阅读
更多嵌入式AI技术相关内容请关注嵌入式AI专栏。

