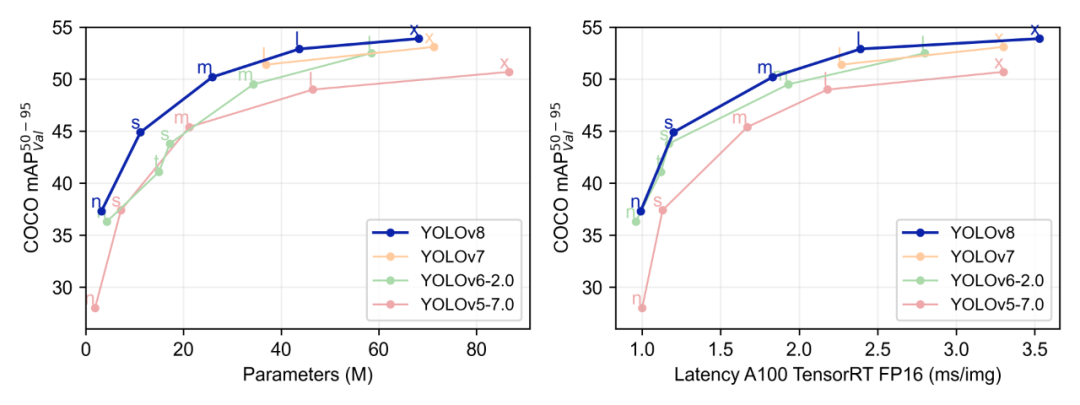
YOLO作为一种基于图像全局信息进行预测的目标检测系统,始终保持着极高的迭代更新率,从YOLOv5到YOLOv8,本次升级主要包括结构算法、命令行界面、Python API等。具体到YOLOv8,它可以在大型数据集上进行训练,并且能够在各种硬件平台上运行;YOLOv8还有一个关键特性是它的可扩展性,由于其被设计成一个框架,支持所有以前YOLO的版本,使得在不同版本之间切换和比较它们的性能变得容易。
本次内容《目标检测算法再升级!YOLOv8保姆级教程一键体验》,地平线开发者社区优秀开发者林松将会一步步引导大家在地平线旭日®X3派(下文简称旭日X3派)成功部署YOLOv8目标检测模型,并附上精度速度初探!相关问题欢迎大家注册加入地平线开发者社区交流讨论,配置文件及代码详见地平线开发者社区。
环境配置
本文所使用的脚本和代码目录结构和说明如下:
├── project                              # X3 工作目录
│   ├── calib_f32                          # 量化校准数据集
│   ├── coco128                            # 量化校准和待检测图片
│   ├── config.yaml                          # onnx 转 bin 模型配置
│   ├── modules.py -> ../ultralytics/ultralytics/nn/modules.py    # 软链接 YOLOv8 后处理文件
│   ├── onnxruntime-infer.py                    # pc 端读取 onnx 并检测
│   ├── requirements.txt                      # python 依赖包
│   ├── step1_export_onnx.py                    # YOLOv8 ONNX 导出
│   ├── step2_make_calib.py                      # 制作量化校准数据集
│   ├── step3_convert_bin.sh                    # onnx 转 bin 脚本
│   ├── step4_inference.py                      # X3 推理代码
│   ├── yolo-comparison-plots.png                  # YOLO 模型对比图
│   ├── yolov8n.onnx                        # 转换好的 onnx
│   ├── yolov8n.pt                          # YOLOv8 pytorch 权重
│   └── yolov8n_horizon.bin                      # 转换好的 bin 模型
├── ultralytics                            # YOLOv8 仓库
│   ├── CITATION.cff
│   ├── CONTRIBUTING.md
│   ├── LICENSE
│   ├── MANIFEST.in
│   ├── README.md
│   ├── README.zh-CN.md
│   ├── docker
│   ├── docs
│   ├── examples
│   ├── mkdocs.yml
│   ├── requirements.txt
│   ├── setup.cfg
│   ├── setup.py
│   ├── tests
│   └── ultralytics
YOLOv8 PyTorch环境配置
请在开发机中导出ONNX模型,安装PyTorch ONNX等依赖,再安装YOLOv8:
cd project
python3 -m pip install -r requirements.txt
cd ../ultralytics
python3 setup.py install
cd ../project
模型导出
修改YOLOv8后处理代码
将YOLOv8中ultralytics/ultralytics/nn/modules.py软链接到 project/modules.py,方便定位到修改的代码位置,其中中有两个trick:
# *************************************************************************************************************** #
# *************************************************************************************************************** #
# 原仓库的版本带后处理 注释掉!!!!
# def forward(self, x):
#     shape = x[0].shape  # BCHW
#     for i in range(self.nl):
#         x[i] = torch.cat((self.cv2[i](x[i]), self.cv3[i](x[i])), 1)
#     if self.training:
#         return x
#     elif self.dynamic or self.shape != shape:
#         self.anchors, self.strides = (x.transpose(0, 1) for x in make_anchors(x, self.stride, 0.5))
#         self.shape = shape
#
#     box, cls = torch.cat([xi.view(shape[0], self.no, -1) for xi in x], 2).split((self.reg_max * 4, self.nc), 1)
#     dbox = dist2bbox(self.dfl(box), self.anchors.unsqueeze(0), xywh=True, dim=1) * self.strides
#     y = torch.cat((dbox, cls.sigmoid()), 1)
#     return y if self.export else (y, x)

# *************************************************************************************************************** #
# *************************************************************************************************************** #
# X3 部署使用的版本!!!!
def forward(self, x):
    res = []
    for i in range(self.nl):
        bboxes = self.cv2[i](x[i]).permute(0, 2, 3, 1)
        scores = self.cv3[i](x[i]).permute(0, 2, 3, 1)
        res.append(bboxes)
        res.append(scores)
    # 返回 tuple 不会导出报错
    return tuple(res)
# *************************************************************************************************************** #
# *************************************************************************************************************** #
- 导出Transpose(permute)节点
bboxes = self.cv2[i](x[i]).permute(0, 2, 3, 1)
scores = self.cv3[i](x[i]).permute(0, 2, 3, 1)
由于旭日X3派支持的模型格式为NHWC,但是PyTorch训练的模型是NCHW,因此我们导出的ONNX模型在转换bin时会在网络头和尾插入Transpose结点,而这个 Transpose节点的顺序是[0, 3, 1, 2],可以发现与我们插入的[0, 2, 3, 1]节点正好可以抵消,相当与少了个Transpose节点,这样是可以提升模型推理速度,避免不必要的计算的。
- 将输出处理成 tuple
这步主要是为了让YOLOv8能够顺利导出不报错,如果使用list则会报tulpe的错误。
使用YOLOv8导出的ONNX
执行 step1_export_onnx.py,可以下载官方的权重并导出 ONNX。
# 导入 YOLOv8
from ultralytics import YOLO

# 载入预训练权重
model = YOLO("yolov8n.pt")

# 指定 opset=11 并且使用 onnx-sim 简化 ONNX
success = model.export(format="onnx", opset=11, simplify=True)
python3 step1_export_onnx.py注意:旭日X3派支持ONNX opset = 10/11,其他版本会无法通过模型工具链编译。
使用ONNXRuntime推理导出ONNX
为了避免导出的ONNX出错,最好使用ONNXRuntime来验证一下模型的正确性。
def letterbox(im, new_shape=(640, 640), color=114):
    # Resize and pad image while meeting stride-multiple constraints
    shape = im.shape[:2]  # current shape [height, width]
    if isinstance(new_shape, int):
        new_shape = (new_shape, new_shape)

    # Scale ratio (new / old)
    r = min(new_shape[0] / shape[0], new_shape[1] / shape[1])

    # Compute padding
    new_unpad = int(round(shape[1] * r)), int(round(shape[0] * r))
    dw, dh = new_shape[1] - new_unpad[0], new_shape[0] - new_unpad[1]  # wh padding

    dw /= 2  # divide padding into 2 sides
    dh /= 2

    if shape[::-1] != new_unpad:  # resize
        im = cv2.resize(im, new_unpad, interpolation=cv2.INTER_LINEAR)
    top, bottom = int(round(dh - 0.1)), int(round(dh + 0.1))
    left, right = int(round(dw - 0.1)), int(round(dw + 0.1))
    im = cv2.copyMakeBorder(im, top, bottom, left, right,
                            cv2.BORDER_CONSTANT,
                            value=(color, color, color))  # add border
    return im, 1 / r, (dw, dh)


def ratioresize(im, new_shape=(640, 640), color=114):
    shape = im.shape[:2]  # current shape [height, width]
    if isinstance(new_shape, int):
        new_shape = (new_shape, new_shape)
    new_h, new_w = new_shape
    padded_img = np.ones((new_h, new_w, 3), dtype=np.uint8) * color

    # Scale ratio (new / old)
    r = min(new_h / shape[0], new_w / shape[1])

    # Compute padding
    new_unpad = int(round(shape[1] * r)), int(round(shape[0] * r))

    if shape[::-1] != new_unpad:
        im = cv2.resize(im, new_unpad, interpolation=cv2.INTER_LINEAR)

    padded_img[: new_unpad[1], : new_unpad[0]] = im
    padded_img = np.ascontiguousarray(padded_img)
    return padded_img, 1 / r, (0, 0)
本文使用的两种图像缩放方法,letterbox是YOLOv8中训练时启用的方法,由于需要四周padding并且后处理要根据padding的数值还原,较为麻烦。使用 ratioresize方法,在保持图像的长宽比例的同时,使用右下角padding避免了后处理计算偏移量。
if __name__ == '__main__':

    images_path = Path('./coco128')
    model_path = Path('./yolov8n.onnx')

    score_thres = 0.4
    iou_thres = 0.65
    num_classes = 80
    try:
        session = onnxruntime.InferenceSession(str(model_path), providers=['CPUExecutionProvider'])
        model_h, model_w = session.get_inputs()[0].shape[2:]
    except Exception as e:
        print(f'Load model error.\n{e}')
        exit()
    else:
        try:
            # 预热10次推理
            for _ in range(10):
                session.run(None, {'images': np.random.randn(1, 3, model_h, model_w).astype(np.float32)})
        except Exception as e:
            print(f'Warm up model error.\n{e}')

    cv2.namedWindow("results", cv2.WINDOW_AUTOSIZE)
    for img_path in images_path.iterdir():
        image = cv2.imread(str(img_path))
        t0 = time.perf_counter()
        ## yolov8 training letterbox
        # resized, ratio, (dw, dh) = letterbox(image, (model_h, model_w))
        resized, ratio, (dw, dh) = ratioresize(image, (model_h, model_w))
        buffer = blob(resized)
        t1 = time.perf_counter()
        outputs = session.run(None, {'images': buffer})
        outputs = [o[0] for o in outputs]
        t2 = time.perf_counter()
        results = postprocess(
            outputs, score_thres, iou_thres,
            image.shape[0], image.shape[1], dh, dw, ratio, ratio,
            16, num_classes)
        results = nms(*results)
        t3 = time.perf_counter()
        for (x0, y0, x1, y1, score, label) in results:
            x0, y0, x1, y1 = map(int, [x0, y0, x1, y1])
            cls_id = int(label)
            cls = CLASSES[cls_id]
            color = COLORS[cls]
            cv2.rectangle(image, [x0, y0], [x1, y1], color, 1)
            cv2.putText(image,
                        f'{cls}:{score:.3f}', (x0, y0 - 2),
                        cv2.FONT_HERSHEY_SIMPLEX,
                        0.325, [0, 0, 225],
                        thickness=1)
        t4 = time.perf_counter()
        cv2.imshow('results', image)
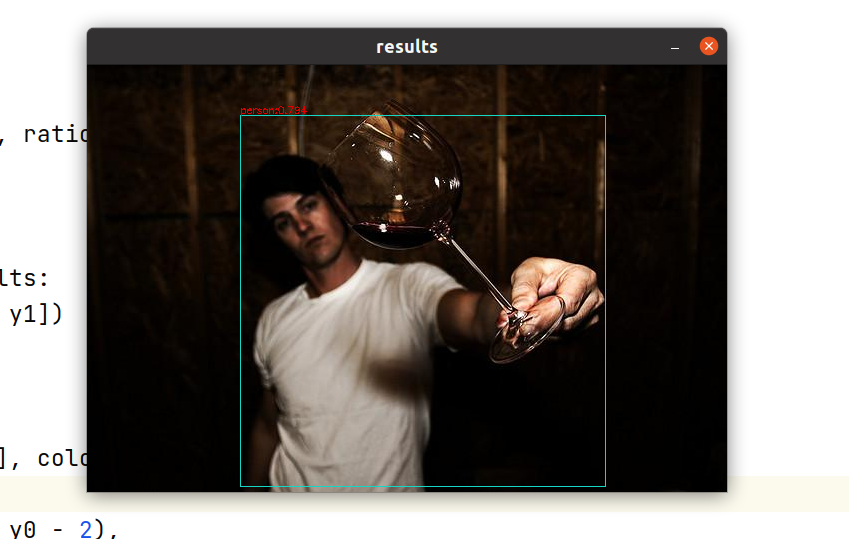
上述是推理主函数,为了保证模型打印的耗时稳定,前期启动了10次推理预热,建议端侧部署时一定记得预热一下。可以看到结果正确,后处理逻辑也是对的。
生成量化校准数据集
执行step2_make_calib.py,可以读取coco128目录下随机50张图片,制作校准数据集。
img = cv2.imread(str(i))
img = letterbox(img)[0]
img = blob(img[:, :, ::-1])  # bgr -> rgb
print(img.shape)
img.astype(np.float32).tofile(str(save / (i.stem + '.rgbchw')))
制作校准数据集主要是读图-> resize -> uint8转float -> numpy.tofile。在calib_f32目录下会生成50个rgbchw结尾的文件:
python3 step2_make_calib.py使用地平线提供的Docker编译bin模型
将docker_openexplorer_centos_7_xj3_v2.4.2.tar.gz下载到本地开发机,并使用以下命令开启docker:
cd ../
wget -c ftp://vrftp.horizon.ai/Open_Explorer_gcc_9.3.0/2.4.2/docker_openexplorer_centos_7_xj3_v2.4.2.tar.gz
docker load -i docker_openexplorer_centos_7_xj3_v2.4.2.tar.gz
docker run -it --name horizonX3 -v ${PWD}/project:/open_explorer/project openexplorer/ai_toolchain_centos_7_xj3:v2.4.2
docker exec -it horizonX3 /bin/bash
进入容器后,执行:
cd project
bash step3_convert_bin.sh
编译成功后会打印如下日志:
/model.22/cv3.2/cv3.2.2/Conv                        BPU  id(0)     HzSQuantizedConv           0.998216           67.505043
2023-01-31 21:17:24,261 INFO [Tue Jan 31 21:17:24 2023] End to Horizon NN Model Convert.
2023-01-31 21:17:24,315 INFO start convert to *.bin file....
2023-01-31 21:17:24,345 INFO ONNX model output num : 6
2023-01-31 21:17:24,346 INFO ############# model deps info #############
2023-01-31 21:17:24,346 INFO hb_mapper version   : 1.9.9
2023-01-31 21:17:24,346 INFO hbdk version        : 3.37.2
2023-01-31 21:17:24,346 INFO hbdk runtime version: 3.14.14
2023-01-31 21:17:24,346 INFO horizon_nn version  : 0.14.0
2023-01-31 21:17:24,346 INFO ############# model_parameters info #############
2023-01-31 21:17:24,346 INFO onnx_model          : /open_explorer/workspace/yolov8/yolov8n.onnx
2023-01-31 21:17:24,346 INFO BPU march           : bernoulli2
2023-01-31 21:17:24,346 INFO layer_out_dump      : False
2023-01-31 21:17:24,346 INFO log_level           : DEBUG
2023-01-31 21:17:24,346 INFO working dir         : /open_explorer/workspace/yolov8/model_output
2023-01-31 21:17:24,346 INFO output_model_file_prefix: yolov8n_horizon
2023-01-31 21:17:24,347 INFO ############# input_parameters info #############
2023-01-31 21:17:24,347 INFO ------------------------------------------
2023-01-31 21:17:24,347 INFO ---------input info : images ---------
2023-01-31 21:17:24,347 INFO input_name          : images
2023-01-31 21:17:24,347 INFO input_type_rt       : nv12
2023-01-31 21:17:24,347 INFO input_space&range   : regular
2023-01-31 21:17:24,347 INFO input_layout_rt     : NHWC
2023-01-31 21:17:24,347 INFO input_type_train    : rgb
2023-01-31 21:17:24,347 INFO input_layout_train  : NCHW
2023-01-31 21:17:24,347 INFO norm_type           : data_scale
2023-01-31 21:17:24,347 INFO input_shape         : 1x3x640x640
2023-01-31 21:17:24,347 INFO input_batch         : 1
2023-01-31 21:17:24,347 INFO scale_value         : 0.003921568627451,
2023-01-31 21:17:24,347 INFO cal_data_dir        : /open_explorer/calib_f32
2023-01-31 21:17:24,347 INFO ---------input info : images end -------
2023-01-31 21:17:24,347 INFO ------------------------------------------
2023-01-31 21:17:24,347 INFO ############# calibration_parameters info #############
2023-01-31 21:17:24,348 INFO preprocess_on       : False
2023-01-31 21:17:24,348 INFO calibration_type:   : max
2023-01-31 21:17:24,348 INFO cal_data_type       : float32
2023-01-31 21:17:24,348 INFO max_percentile      : 0.99999
2023-01-31 21:17:24,348 INFO per_channel         : True
2023-01-31 21:17:24,348 INFO ############# compiler_parameters info #############
2023-01-31 21:17:24,348 INFO hbdk_pass_through_params: --core-num 2 --fast --O3
2023-01-31 21:17:24,348 INFO input-source        : {'images': 'pyramid', '_default_value': 'ddr'}
2023-01-31 21:17:24,354 INFO Convert to runtime bin file sucessfully!
2023-01-31 21:17:24,354 INFO End Model Convert
/model.22/cv3.2/cv3.2.2/Conv                        BPU  id(0)     HzSQuantizedConv           0.998216           67.505043
上文的0.998216表示量化后的模型最后一层输出的余弦相似度,越接近1代表模型精度保持的越高(PS.model_output/yolov8n_horizon.bin是转换完的bin模型)。
推理测试
上板测试
将project文件夹打包上传到旭日X3派中,可以使用ssh或者U盘复制到旭日X3派工作目录中。假设保存到入/home/sunrise/project,推理前处理需要将输入转换到 nv12:
def bgr2nv12_opencv(image):
    height, width = image.shape[:2]
    area = height * width
    yuv420p = cv2.cvtColor(image, cv2.COLOR_BGR2YUV_I420).reshape((area * 3 // 2,))
    y = yuv420p[:area]
    uv_planar = yuv420p[area:].reshape((2, area // 4))
    uv_packed = uv_planar.transpose((1, 0)).reshape((area // 2,))

    nv12 = np.zeros_like(yuv420p)
    nv12[:area] = y
    nv12[area:] = uv_packed
    return nv12
使用终端执行:
cd /home/sunrise/project
sudo python3 -m pip install opencv-python # 安装 X3 推理依赖
mv model_output/yolov8n_horizon.bin ./
sudo python3 step4_inference.py
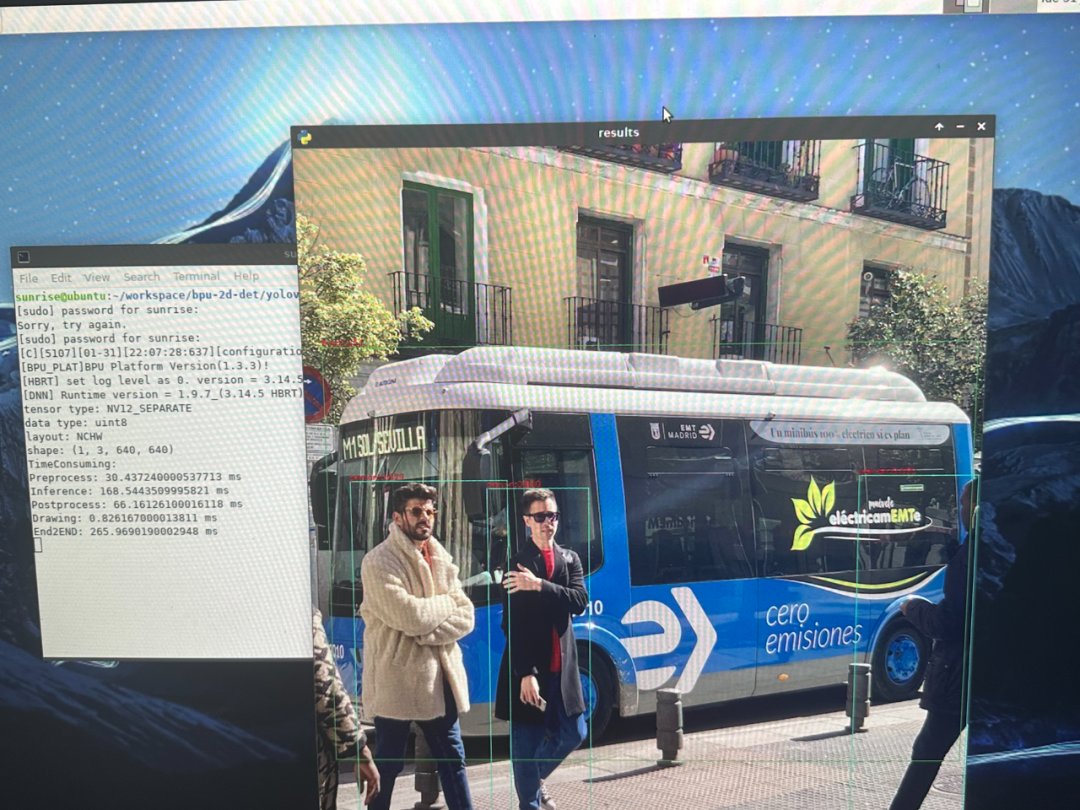
会看到图片检测并绘制的结果,还会打印推理的耗时情况:
得出结果:
前处理:30.4ms
推理:168.5ms
后处理:66ms
画图:0.8ms
全程耗时:265.9ms
本文转自地平线开发者社区
原作者:tripleMu
原链接:https://developer.horizon.ai:...


