从FPGA说起的深度学习(五)
这是新的系列教程,在本教程中,我们将介绍使用 FPGA 实现深度学习的技术,深度学习是近年来人工智能领域的热门话题。
在本教程中,旨在加深对深度学习和 FPGA 的理解。
- 用 C/C++ 编写深度学习推理代码
- 高级综合 (HLS) 将 C/C++ 代码转换为硬件描述语言
- FPGA 运行验证
到上一篇为止,我们已经完成了卷积层、全连接层、池化层、激活函数ReLU的所有C的编程实现。在本文中,我们将结合这些层来创建一个完整的推理函数。
模型实现
下面是在第 2 篇文章中创建的推理模型的图表。
首先输入一张1x28x28的图片,然后两次通过Conv2d -> ReLU -> MaxPool2d提取特征,最后转为linear,> ReLU -> Linear为10阶向量值。
用C写的时候,只需按如下依次逐层处理即可。
` void conv2d(const float* x, const float* weight, const float* bias, int32_t width, int32_t height,
             int32_t in_channels, int32_t out_channels, int32_t ksize, float* y) {
   for (int32_t och = 0; och < out_channels; ++och) {
     for (int32_t h = 0; h < height; ++h) {
       for (int32_t w = 0; w < width; ++w) {
         float sum = 0.f;

         for (int32_t ich = 0; ich < in_channels; ++ich) {
           for (int32_t kh = 0; kh < ksize; ++kh) {
             for (int32_t kw = 0; kw < ksize; ++kw) {
               int32_t ph = h + kh - ksize/2;
               int32_t pw = w + kw - ksize/2;

               // zero padding
               if (ph < 0 || ph >= height || pw < 0 || pw >= width) {
                 continue;
               }

               int64_t pix_idx = (ich * height + ph) * width + pw;
               int64_t weight_idx = ((och * in_channels + ich) * ksize + kh) * ksize + kw;

               sum += x[pix_idx] * weight[weight_idx];
             }
           }
         }

         // add bias
         sum += bias[och];

         y[(och * height + h) * width + w] = sum;
       }
     }
   }
 }

`
函数内部的缓冲区 (x1-x8) 用于连接各层之间的特征数据。
在HLS中,在哪里定义这个buffer很重要,如果像这次一样把它放在函数中,就可以指定使用FPGA中的RAM(或寄存器)。另一方面,如果将此缓冲区作为函数的参数提供,则可以将数据连接到外部 DRAM。这个区域需要根据应用来设计,但是这次内部SRAM已经够用了,所以定义在函数内部。
如果像以前一样编写接口规范,将如下所示:
输入
- x: 输入图像。shape=(1, 28, 28)
- weight0:第一个卷积层的权重。shape=(4, 1, 3, 3)
- bias0:第一个卷积层的偏差。shape=(4)
- weight1:第二个卷积层的权重。shape=(8, 4, 3, 3)
- bias1:第二个卷积层的偏差。shape=(8)
- weight2:第一个全连接层的权重。shape=(32, 8 * 7 * 7)
- bias2:第一个全连接层的偏差。shape=(32)
- weight3:第二个全连接层的权重。shape=(10, 32)
- bias3:第二个全连接层的偏差。shape=(10)
输出
- y:输出向量。shape=(10)
界面设置
在目前创建的函数中,我们还没有具体定义创建电路的接口。未指定接口时,HLS 会为简单 SRAM 生成一个接口。
该接口不能用于访问DRAM等访问时间不确定的接口,不方便在真机上操作。为此,我们告诉HLS使用一种称为AMBA AXI4接口协议(以下简称AXI)的协议,该协议主要用于Xilinx FPGA上IP之间的接口。
简单介绍一下AXI,AXI是ARM公司提供的一种接口标准。
Xilinx IP主要使用以下三种协议。
- AXI4:高速内存访问协议(主要用途:访问DRAM、PCIe等)
- AXI4-Lite:AXI4的一个子集,一种用于低速内存访问的协议(主要用途:IP寄存器控制)
- AXI4-Stream:仅用于单向数据传输的协议,无地址(主要用途:流数据处理)
这次我们将使用 AXI4 访问输入/输出数据,使用 AXI4-Lite 控制 IP。
具有接口定义的推理函数如下所示:
`void inference_top(const float x[kMaxSize],
                   const float weight0[kMaxSize], const float bias0[kMaxSize],
                   const float weight1[kMaxSize], const float bias1[kMaxSize],
                   const float weight2[kMaxSize], const float bias2[kMaxSize],
                   const float weight3[kMaxSize], const float bias3[kMaxSize],
                   float y[kMaxSize]) {
#pragma HLS interface m_axi port=x offset=slave bundle=gmem0
#pragma HLS interface m_axi port=weight0 offset=slave bundle=gmem1
#pragma HLS interface m_axi port=weight1 offset=slave bundle=gmem2
#pragma HLS interface m_axi port=weight2 offset=slave bundle=gmem3
#pragma HLS interface m_axi port=weight3 offset=slave bundle=gmem4
#pragma HLS interface m_axi port=bias0 offset=slave bundle=gmem5
#pragma HLS interface m_axi port=bias1 offset=slave bundle=gmem6
#pragma HLS interface m_axi port=bias2 offset=slave bundle=gmem7
#pragma HLS interface m_axi port=bias3 offset=slave bundle=gmem8
#pragma HLS interface m_axi port=y offset=slave bundle=gmem9
#pragma HLS interface s_axilite port=x bundle=control
#pragma HLS interface s_axilite port=weight0 bundle=control
#pragma HLS interface s_axilite port=weight1 bundle=control
#pragma HLS interface s_axilite port=weight2 bundle=control
#pragma HLS interface s_axilite port=weight3 bundle=control
#pragma HLS interface s_axilite port=bias0 bundle=control
#pragma HLS interface s_axilite port=bias1 bundle=control
#pragma HLS interface s_axilite port=bias2 bundle=control
#pragma HLS interface s_axilite port=bias3 bundle=control
#pragma HLS interface s_axilite port=y bundle=control
#pragma HLS interface s_axilite port=return bundle=control
   dnnk::inference(x,
                  weight0, bias0,
                  weight1, bias1,
                  weight2, bias2,
                  weight3, bias3,
                  y);
}
`
dnnk::inference函数就是前面提到的推理函数,这个函数将dnnk::inference“包起来”了。
和上一篇文章一样,top函数的接口是一个数组,而不是一个指针。在仿真 HLS 时,此符号对于指定仿真器保留的内存缓冲区的大小是必需的,但它并不是很重要。
第 30-50 行 #pragma HLS interfaceport=<参数名称>bundle=<要分配的接口名称> 使用语法为每个函数参数指定接口协议,使用的协议有两个,m_axi和s_axilite,其中m_/s_部分表示请求是发送还是接收(AXI术语中的master/slave),后面的部分就是前面提到的协议部分增加。
在此函数中,每个数据端口都成为 AXI4 主端口并主动从 DRAM (L30-39) 中获取数据。此时主机CPU等访问的存储器地址可以通过AXI4-Lite从端口(L40-49)进行设置。
最后,用于开始处理的控制寄存器和用于检查处理完成的状态寄存器port=return链接到 AXI4-Lite 从端口 (L50)。
综合/结果确认
界面
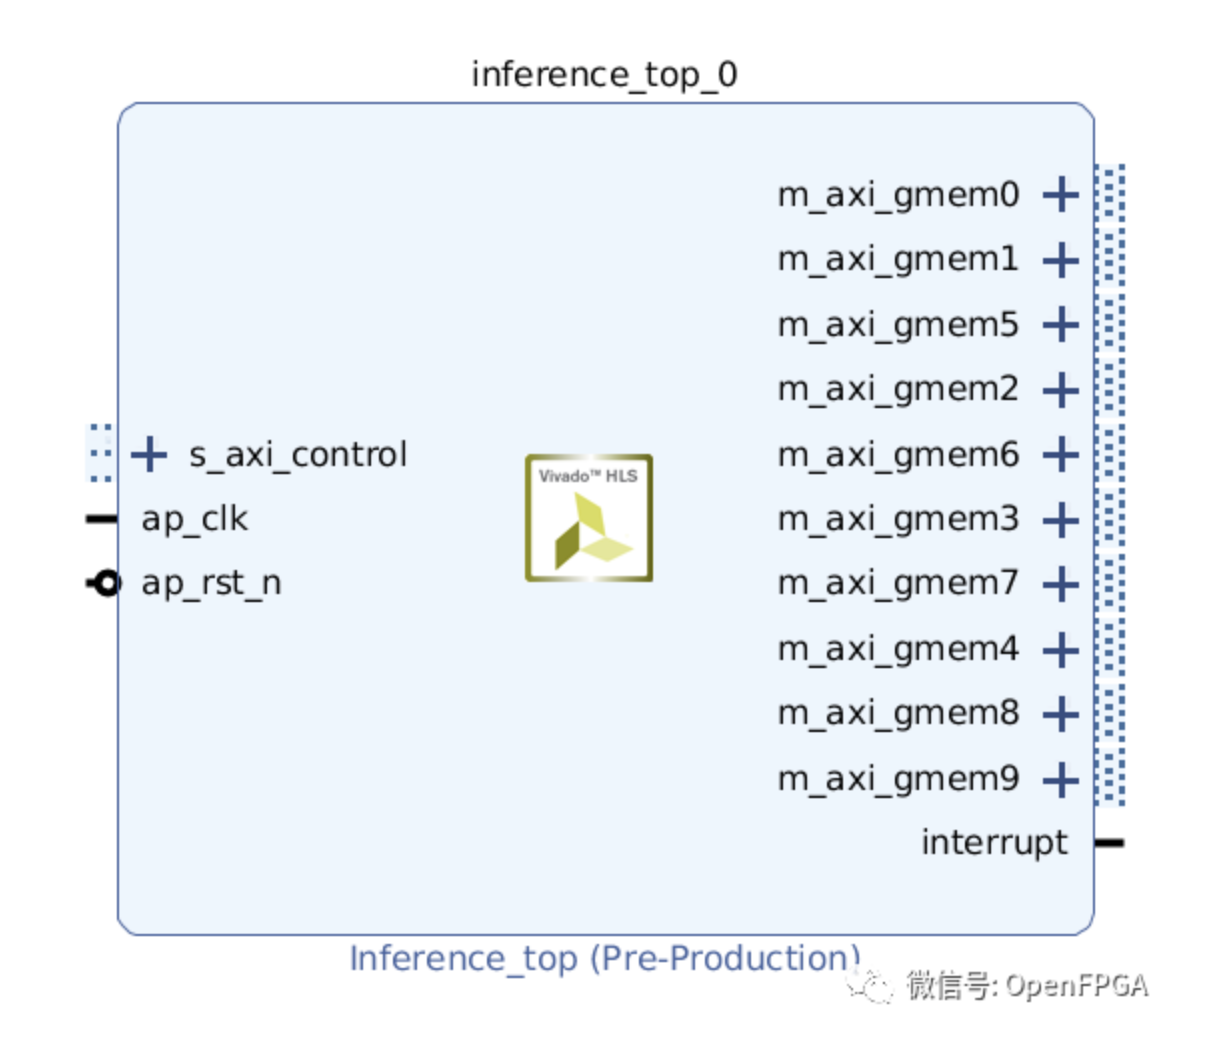
将这个电路作为IP输出,放到Vivado的IP Integrator中,如下图。每个端口的名称对应于上面的interface pragma bundle位置。
熟悉 Vivado 开发的都知道,剩下要做的就是适当地连接端口,将能够创建能够进行推理处理的 FPGA 图像。
综合
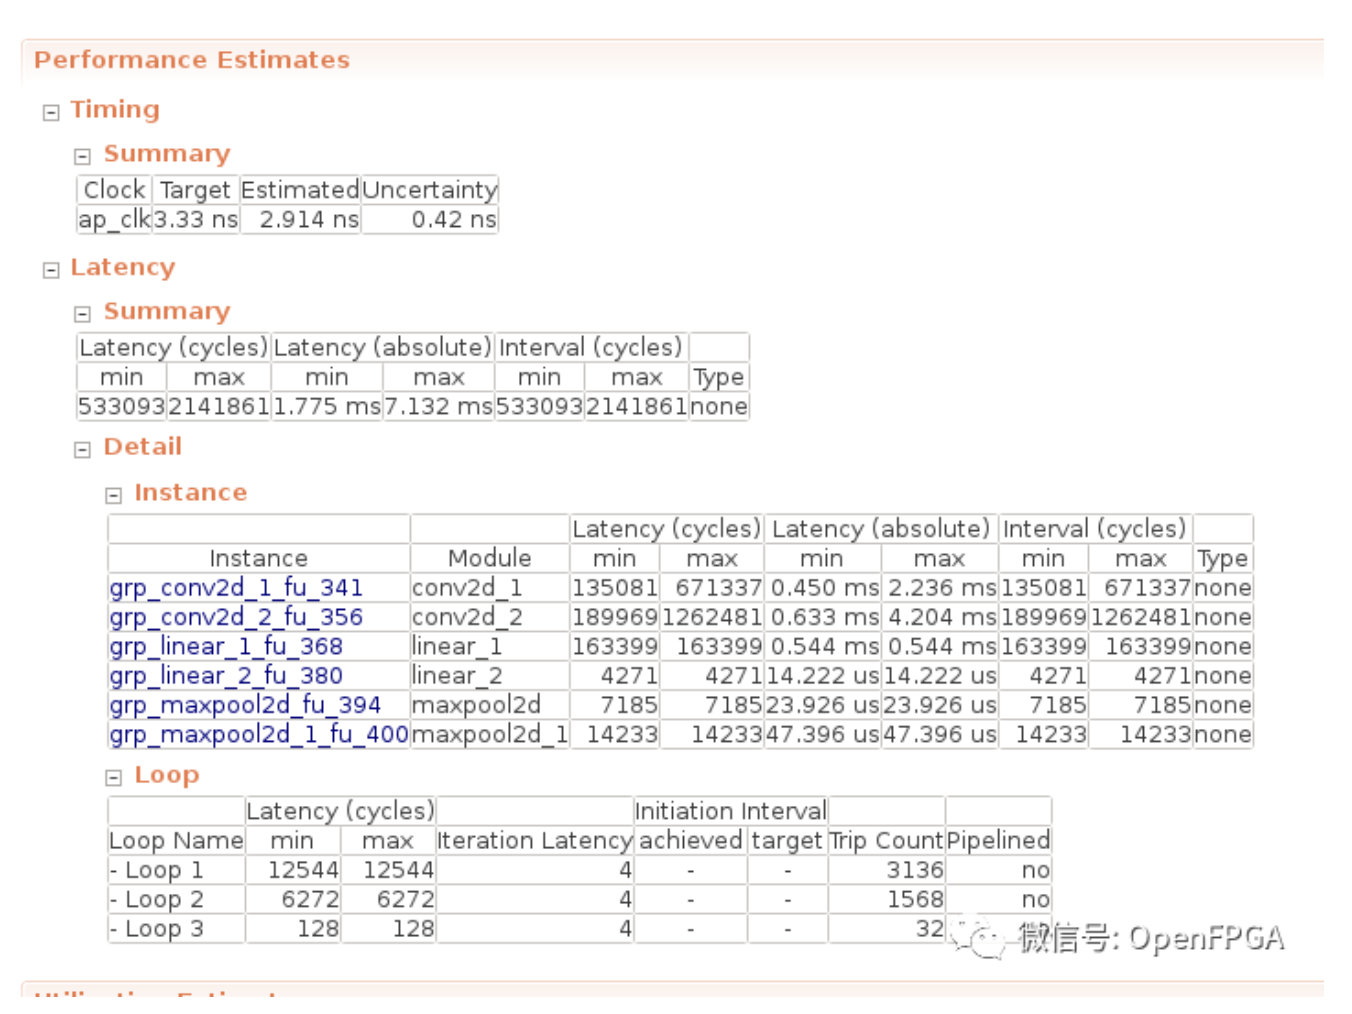
综合时的表现如下:执行时间最短 1.775 ms,最长 7.132 ms。
在这里,我想知道为什么输入图像大小是固定的,但执行时间不固定,这是因为第三篇文章中创建的卷积函数continue包括补零处理。
由于这个补零过程只在屏幕边缘进行,实际执行时间几乎是最大时间7.132 ms。
   for (int32_t kw = 0; kw < ksize; ++kw) {
     int32_t ph = h + kh - ksize/2;
     int32_t pw = w + kw - ksize/2;

     // zero padding
     if (ph < 0 || ph >= height || pw < 0 || pw >= width) {
       continue;
     }

     int64_t pix_idx = (ich * height + ph) * width + pw;
     int64_t weight_idx = ((och * in_channels + ich) * ksize + kh) * ksize + kw;

     sum += x[pix_idx] * weight[weight_idx];
   }
在这里为了可读性,用continue中止,但是在FPGA上,与在这里中断循环的处理相比,使用已经安装的乘法加法器进行0加法运算的成本更少。
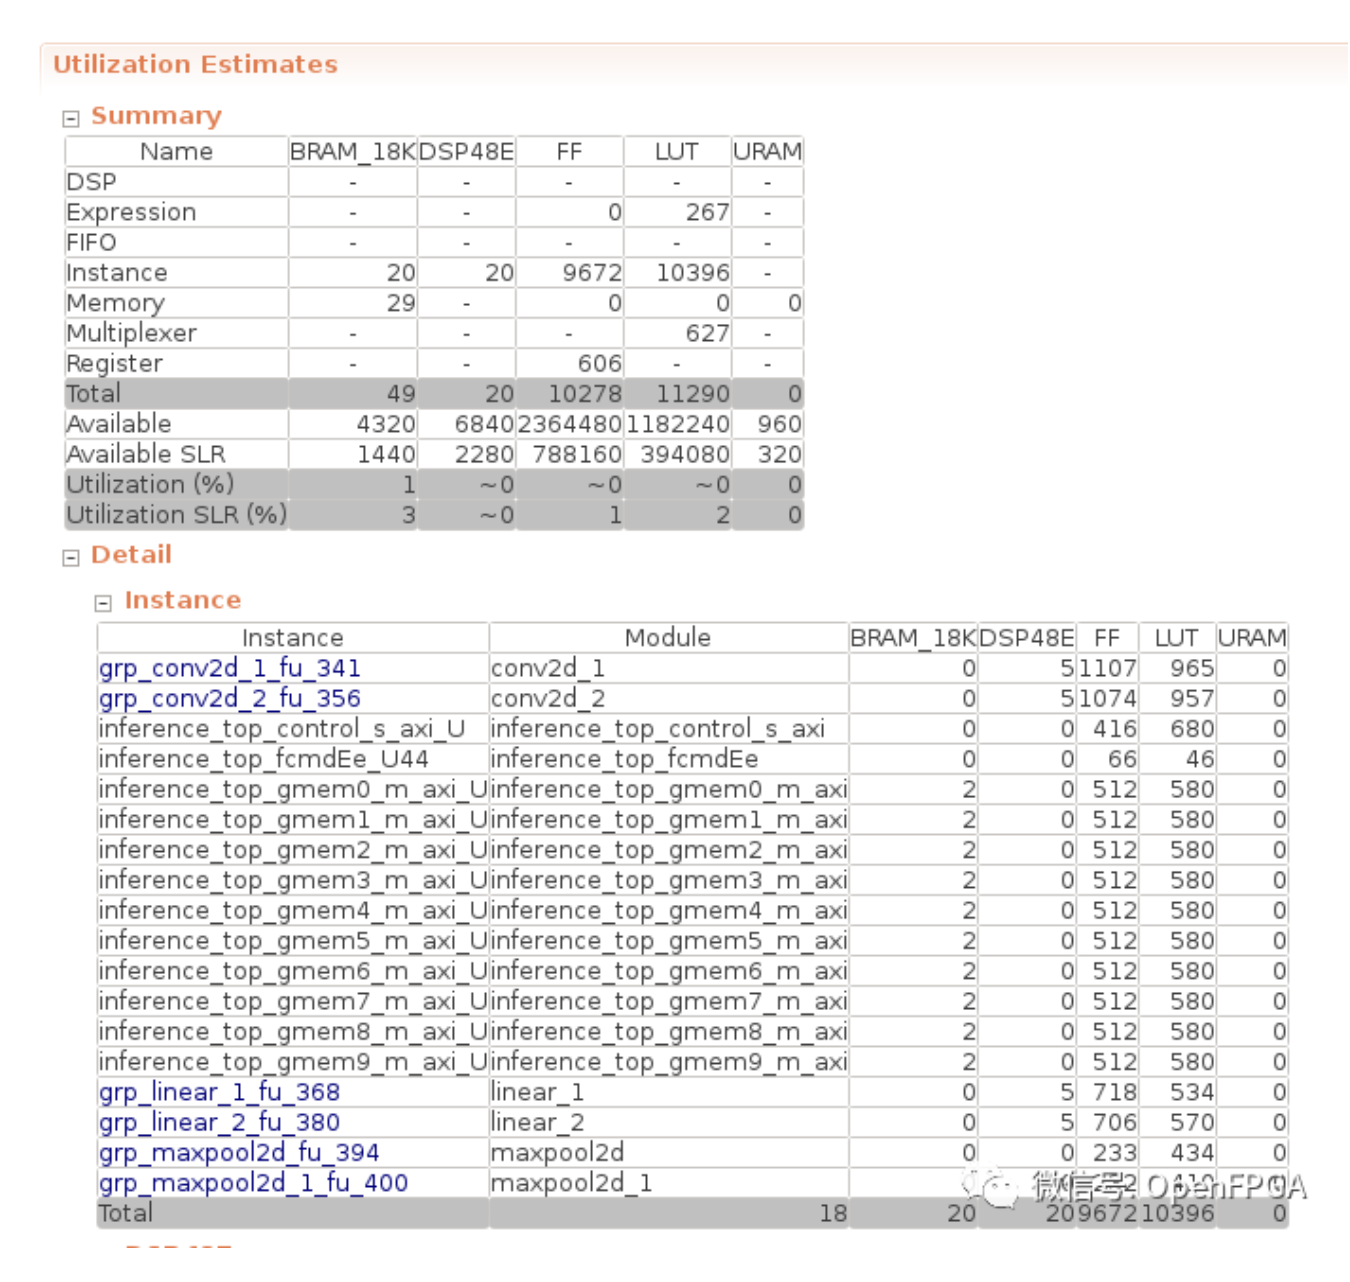
资源使用
FPGA的资源利用率如下所示:总体使用量是微不足道的,因为没有增加并行化和流水线等资源的加速。
总结
在本文中,从第 3 篇文章开始创建的整个推理函数终于完成了。在下一篇文章中,可能是优化可能是先FPGA实现。
原文:OpenFPGA
作者:碎碎思
相关文章推荐
更多FPGA干货请关注FPGA的逻辑技术专栏。欢迎添加极术小姐姐微信(id:aijishu20)加入技术交流群,请备注研究方向。


