实战是快速提升能力的最优途径。
想在你的【爱芯派】上实现更多元的场景实战体验吗?
前言
嘿!欢迎回来,来看看我们这次带来了什么有趣的新内容?
从传统的单目标跟踪算法到多目标跟踪实现的是新的质变,而今天我们带来的新内容是用 YOLOv8 与目标跟踪算法双结合,实现多目标的行人跟踪并部署在 爱芯派 上进行实战体验。
- 以下为多目标跟踪的实拍效果
https://www.bilibili.com/vide...
文章补充说明
仓库:GitHub - prophet-mu/elderly_fell_detect
本文基于 prophet-mu 原文 进行整理以及补充发布。本篇文章以下文为前提基础来编写:
YOLOv8 目标检测:训练自定义数据集并部署到爱芯派(一)
YOLOv8 目标检测:训练自定义数据集并部署到爱芯派(二)
多种方式实现你的目标跟踪
什么是 MOT(多目标跟踪)
多目标跟踪(Multiple Object Tracking or Multiple Target Tracking, MOT or MTT)是一种常见的计算机视觉任务,任务要求检测到连续视频帧中的目标,并为每一个目标分配 track id,这个 id 在视频序列中具有唯一性。多目标跟踪在自动驾驶、智能监控、行为识别等方向应用广泛,是计算机视觉领域的一项关键技术。
多目标跟踪的主要挑战有以下几点:
- 目标检测的准确性和鲁棒性:目标检测是多目标跟踪的基础,如果检测结果不准确或不稳定,会导致跟踪结果的误差累积。目标检测需要面对遮挡、变形、运动模糊、拥挤场景、快速运动、光照变化、尺度变化等问题。
- 目标关联的复杂性和效率:目标关联是多目标跟踪的核心,需要在前后两帧之间建立目标的对应关系,以便维持目标的 ID 不变。目标关联需要考虑目标的外观特征和运动特征,以及相似目标间的相互干扰。目标关联也需要在有限的时间内完成,以满足实时性的要求。
- 目标重识别的可靠性和鲁棒性:目标重识别是多目标跟踪的补充,用于处理目标在视频中出现和消失的情况,例如进入或离开视野,或者被长时间遮挡。目标重识别需要提取目标的稳定和区分度高的特征,以便在不同的时间和空间下重新识别同一个目标。
本文着重在于实操与应用,更多理论请关注:深度学习板块
能做什么
多目标跟踪(MOT)有许多应用场景,例如交通流分析、人类行为预测和姿势估计、自动驾驶辅助、智能视频监控等;MOT 也有许多数据集和评价指标,例如 MOTChallenge、KITTI、CLEAR MOT、ID scores 等。
多目标跟踪(MOT)的相关工作可以分为以下几个方面:
- 单目标跟踪(SOT),也称为视觉目标跟踪(VOT),旨在当只有目标的初始状态(在视频帧中)可用时,估计未知的视觉目标轨迹。单目标跟踪(SOT)通常采用卡尔曼滤波、相关滤波、深度神经网络等技术来学习目标的外观和运动特征。
- 重识别(Re-ID),旨在从不同的图像集合中验证目标身份,通常是从不同的角度、照明和姿势在不同的摄像机中。重识别(Re-ID)通常采用全局特征学习、局部特征学习、辅助特征学习等技术来提取区分性的目标表示。
- 嵌入方法,旨在学习每个目标或每对目标之间的特征表示,以便进行相似度计算和数据关联。嵌入方法可以分为补丁级嵌入、单帧嵌入、跨帧联合嵌入、相关嵌入、顺序嵌入、小轨迹嵌入和跨轨迹关系嵌入等类别。
要做什么
用 YOLOv8 来跟传统跟踪算法结合以此实现多目标行人跟踪,本篇内容会与关键点文章进行联动:MMPose:在爱芯派上玩转你的关键点检测
第一步:先使用目标检测 YOLOv8 把人体检测出来,
第二步:将检测出来的人体所在区域的图像扣出来后,传入跟踪算法中进行轨迹的预测和丢失目标的重识别。
所以我们需通过 YOLOv8 算法训练一个行人检测模型,在文章中我们会介绍两种跟踪算法(采用传统算法实现)分别是经典的 SORT 算法与近年流行的 ByteTrack 算法。
先了解相关的概念后续再进行详细介绍。
流程导读(该怎么做)
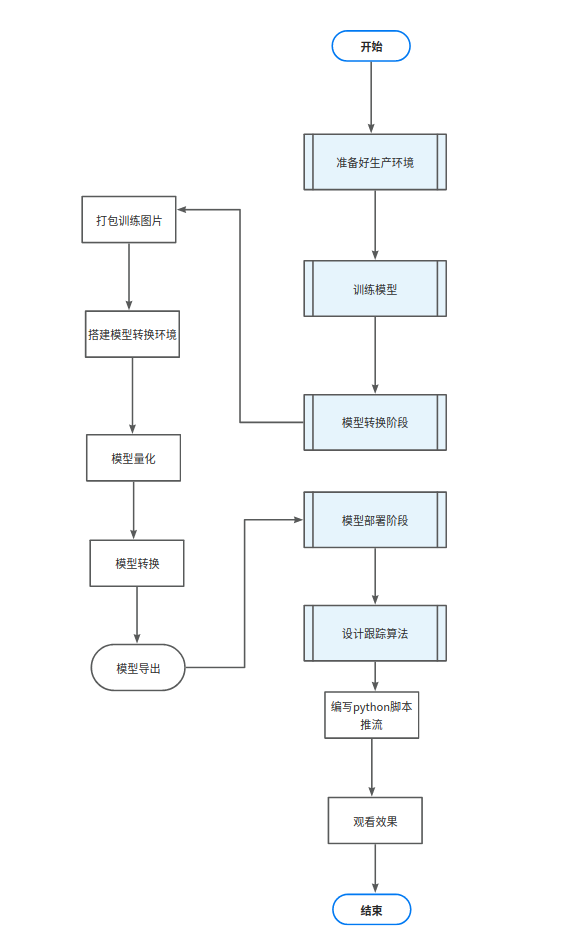
流程图
我们将通过四大块衍生出多小块的步骤来实现我们的目标!
步骤概括
- 模型训练:我们需通过 YOLOv8 算法训练行人检测的模型。
- 模型评估:训练模型后我们需要对其进行评估,以确保其性能符合预期。
- 模型部署:最后我们将模型部署到生产环境中以便实际应用。
环境
- 系统 ubuntu20.04
- nvidia 独立显卡 GPU(可选)
- 良好的网络(重要)
- Python:3.8.10
工具
- vscode(开发工具)
- Git
- Docker
准备工作
开始训练模型前我们需要进行一些准备工作,分别是相关的基础知识以及配置环境,请未学习的小伙伴们前往相关章节学习再接着往下看,本篇文章里不再浪费笔墨阐述如何搭建环境。
学习资料参考:
YOLOv8 目标检测:训练自定义数据集并部署到爱芯派(一)
YOLOv8 目标检测:训练自定义数据集并部署到爱芯派(二)
多种方式实现你的目标跟踪
训练行人检测模型
完成相关的配置环境后我们开启训练模型的第一步:获取行人检测数据集。
获取数据集
- 下载开源数据集
因为数据集的特殊性,我们可以在网上直接下载开源的数据集。
1. 行人检测数据集汇总(持续更新)
2. Kaggle: Your Machine Learning and Data Science Community
3. Hugging Face - The Al community building the future.
示例使用的数据集:WiderPerson: A Diverse Dataset for Dense Pedestrian Detection in the Wild
why?:
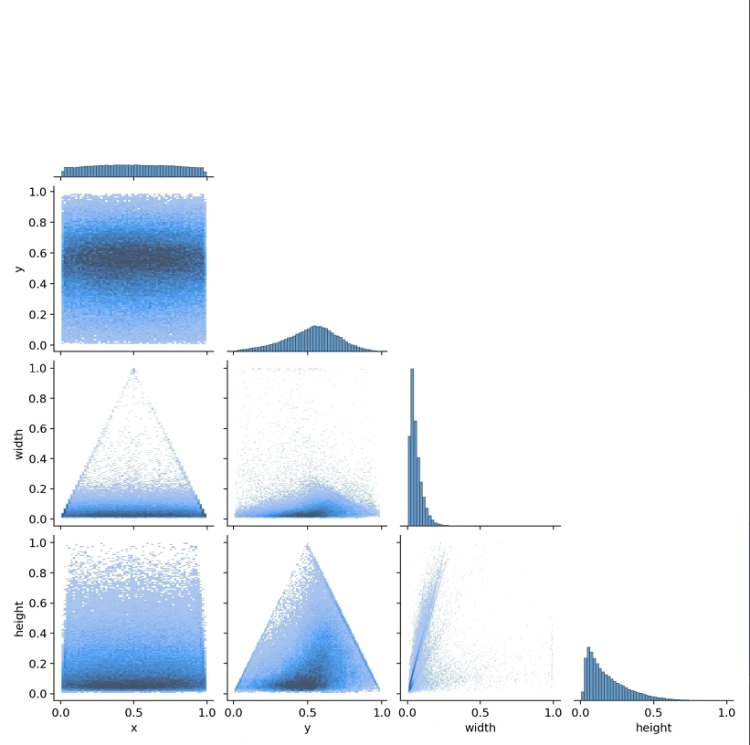
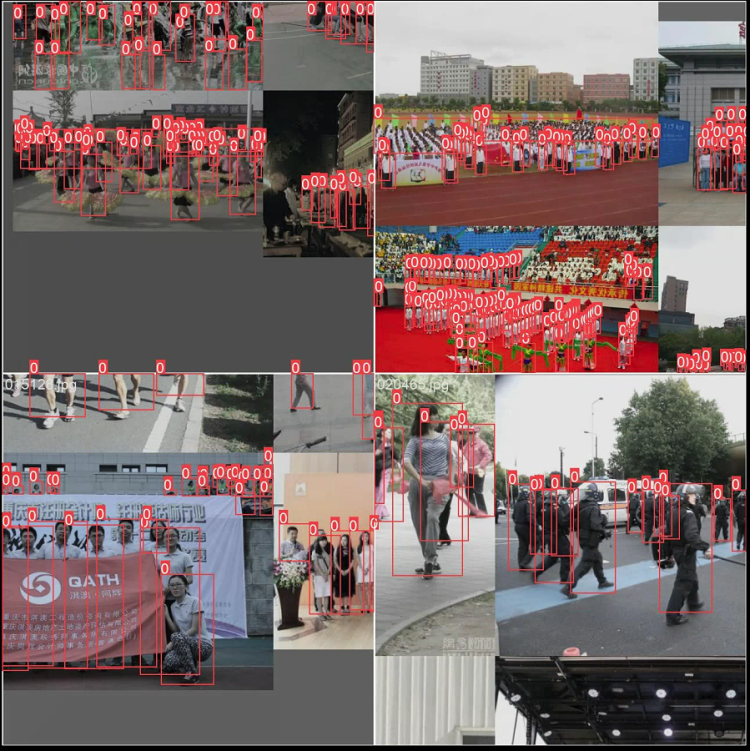
经过网上开源数据集训练出来的模型,由于数据分布都是小目标和密集目标的场景,但是我们的场景并没有这么复杂和密集,很多靠近摄像头的人体由于过大,数据集中的样本太少反而无法正常识别,增加自己做的数据集的部分是为了更符合自己的场景和环境。
对数据做进一步的处理增加更多符合自己场景的数据,帮助模型针对我们的任务做进一步的拟合,这就是数据层面上的微调。
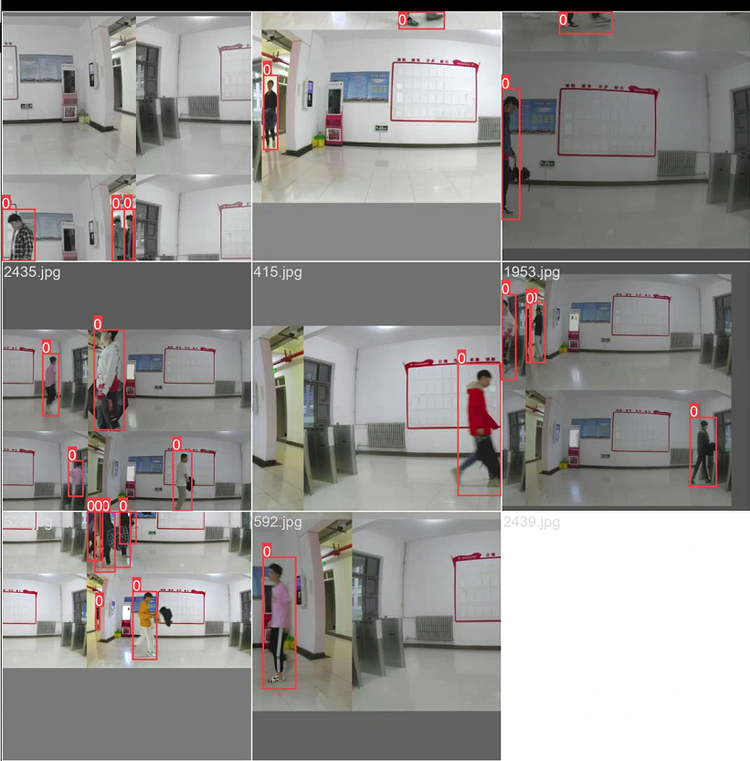
我们可以看到下文图片标签非常密集和细小,网上开源的数据集并多为密集场景的行人识别,而我们的应用场景是非密集、较简单的室内多目标跟踪。
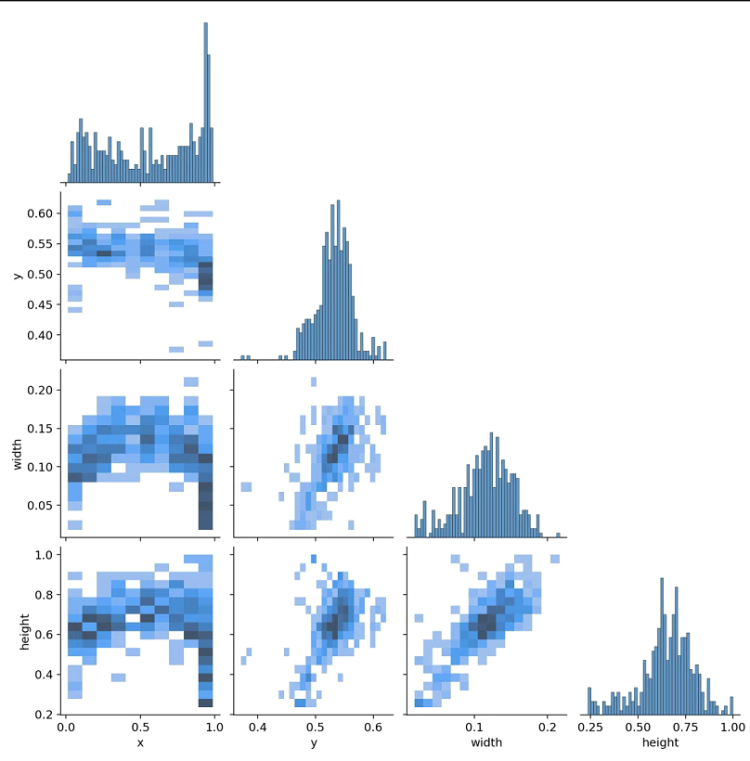
所以要平衡一下数据集的分布,在增加了室内的大目标后数据分布变成下图。
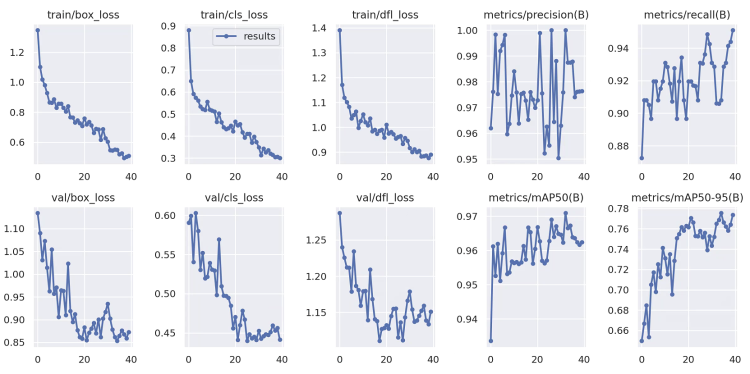
进行增加数据集后还可以通过增加 epoch(迭代轮次)的方式增加模型的精度,我们可以看到下图随着 epoch 的增加模型逐渐收敛,而 loss 在下降就还有优化空间。
而剩下的超参数比如 batch,lr(学习率)这样的东西 batch 可以调大一些,这个可根据显存来调整(太大会爆显存)而学习率就不用动了,有类似余弦退火算法来帮助你根据 epoch 的增加而减小学习率,不需要你去处理。
前面也对相关内容提过一嘴:模型预测效果不好
- 自行拍摄数据集
第一步:寻找合适地点架设爱芯派,运行 /home/bin 目录下的 sample_vin_ivps_joint_vo_h265 开始录制,录制好后的文件会保存在 /home/bin/ 目录下方。
第二步:将录制好的视频文件拷贝出来准备进行预处理,使用 split.py 将其分割成图片,修改 num%2 来调整每隔几帧抽出一张图片,最终手动删除空白的照片即可。
import os
import cv2
import numpy as np
import time
#写一个python读取h265编码的视频文件,将其分割成图片
def h265_to_jpg():
    video_path = './2023-04-19_18-48-20.h265'
    cap = cv2.VideoCapture(video_path)
    #cap = cv2.VideoCapture(0)
    num = 0
    while True:
        ret, frame = cap.read()
        if ret:
            if  num%2:
                cv2.imwrite('./Downloads/2021-04-28-16-02-22-%d.jpg' % num, frame)
            num += 1
        else:
            break
    cap.release()
    cv2.destroyAllWindows()

if name == '__main__':
    h265_to_jpg()    # split_video()
划分数据集
第一步:拉取工程文件,在里面创建一个 people_data 文件夹(名字可以自定义)
第二步:将 VOC2007 文件夹里面的三个文件复制粘贴进去(有个坑:把 JPEGImages 文件名改为 images即可,后续相关的也要进行更改)
第三步:划分数据集,创建 split_train_val.py 文件并更改自己的 xml 和 txt 文件夹目录。
import random
import os
import argparse


# annotations_path and save_txt_path
def get_opt():
    parser = argparse.ArgumentParser()
    parser.add_argument('--xml_path', default='/home/prophetmu/archive2/people_data/Annotations/',
                        type=str, help='input xml file ')
    parser.add_argument('--txt_path', default="/home/prophetmu/archive2/people_data/ImageSets/Main/",
                        type=str, help='output txt file')
    opt = parser.parse_args()
    return opt


opt = get_opt()
# xml_path
xml_file = opt.xml_path
# save_txt_path
save_txt_file = opt.txt_path
# 若save_txt_path不存在,则手动创建
if not os.path.exists(save_txt_file):
    os.makedirs(save_txt_file)
# 迭代xml_path路径下所有的文件返回包含该目录下所有文件的list(无序)
total_xml = os.listdir(xml_file)
# 获取包含所有数据list的长度
num = len(total_xml)
# list的范围,后续用于迭代向txt文件中写入数据(image)
list_index = range(num)
# 采集的数据集中训练数据和验证数据的总占比
train_val_percent = 1
# 训练数据的占比
train_percent = 0.99
# 采集的数据集中训练数据和验证数据的数量
tv = int(num * train_val_percent)
# 训练数据的数量,int()向下取整
tr = int(tv * train_percent)
# 从总数据中随机抽取训练集和验证集数据
train_val = random.sample(list_index, tv)
# 从训练集和验证集中随机抽取训练集数据
train = random.sample(train_val, tr)

# 创建train_val.txt,train.txt,test.txt,val.txt
file_train_vale = open(save_txt_file + 'train_val.txt', 'w')
file_train = open(save_txt_file + "train.txt", 'w')
file_test = open(save_txt_file + "test.txt", 'w')
file_val = open(save_txt_file + "val.txt", 'w')
# train_val.txt将训练集和验证集数据写入
# train.txt将训练集数据写入
# test.txt将测试集数据写入
# val.txt将验证集数据写入
for i in list_index:
    # [:-4]将图片格式去掉,比如.jpg
    data_name = total_xml[i][:-4] + '\n'
    # 若该index存在于train_val中,则写入
    if i in train_val:
        file_train_vale.write(data_name)
        if i in train:
            file_train.write(data_name)
        else:
            file_val.write(data_name)
    else:
        file_test.write(data_name)

# 文件流关闭
file_train_vale.close()
file_train.close()
file_test.close()
file_val.close()
python split_train_val.py #运行- 生成 yolo 的 txt 文件
第一步:创建 label.py
# -*- coding: utf-8 -*-
import xml.etree.ElementTree as ET
import os
from os import getcwd

sets = ['train', 'val', 'test']
classes = ["pedestrians", "riders",'partially','ignore','crowd']   # 改成自己的类别
abs_path = os.getcwd()
print(abs_path)

def convert(size, box):
    dw = 1. / (size[0])
    dh = 1. / (size[1])
    x = (box[0] + box[1]) / 2.0 - 1
    y = (box[2] + box[3]) / 2.0 - 1
    w = box[1] - box[0]
    h = box[3] - box[2]
    x = x * dw
    w = w * dw
    y = y * dh
    h = h * dh
    return x, y, w, h

def convert_annotation(image_id):
    in_file = open('/home/prophetmu/arhive2/people_data/Annotations/%s.xml' % (image_id), encoding='UTF-8')
    out_file = open('/home/prophetmu/achive2/people_data/labels/%s.txt' % (image_id), 'w')
    tree = ET.parse(in_file)
    root = tree.getroot()
    size = root.find('size')
    w = int(size.find('width').text)
    h = int(size.find('height').text)
    for obj in root.iter('object'):
        # difficult = obj.find('difficult').text
        difficult = obj.find('difficult').text
        cls = obj.find('name').text
        if cls not in classes or int(difficult) == 1:
            continue
        cls_id = classes.index(cls)
        xmlbox = obj.find('bndbox')
        b = (float(xmlbox.find('xmin').text), float(xmlbox.find('xmax').text), float(xmlbox.find('ymin').text),
             float(xmlbox.find('ymax').text))
        b1, b2, b3, b4 = b
        # 标注越界修正
        if b2 > w:
            b2 = w
        if b4 > h:
            b4 = h
        b = (b1, b2, b3, b4)
        bb = convert((w, h), b)
        out_file.write(str(cls_id) + " " + " ".join([str(a) for a in bb]) + '\n')

wd = getcwd()
for image_set in sets:
    if not os.path.exists('/home/prophetmu/achive2/people_data/labels/'):
        os.makedirs('/home/prophetmu/achive2/people_data/labels/')
    image_ids = open('/home/prophetmu/achive2/people_data/ImageSets/Main/%s.txt' % (image_set)).read().strip().split()
    list_file = open('people_data/%s.txt' % (image_set), 'w')
    for image_id in image_ids:
        list_file.write( '/home/prophetmu/achive2/people_data/JPEGImages/%s.jpg\n' % (image_id))
        convert_annotation(image_id)
    list_file.close()
第二步:创建训练用 yaml 文件
path: /root/prophetmu/achive2/people_data
train: train.txt
val: val.txt
names:
  0: person
转换数据集
第一步:先拉取仓库,仓库中有下文出现的脚本文件。
git clone https://github.com/prophet-mu/ax_tracker.git
cd ax_tracker第二步:整理出 jpg 和 xml。
- 将数据集整理成图片和
xml文件,运行下面的python文件三次。 - 第一遍运行
train.txt,第二遍运行val.txt,第三遍运行test.txt。
注意:除了第一次都要注释掉make_voc_dir函数的调用,我们可根据场景需要进行数据集筛选,第三遍运行test.txt文件并注释掉with open(label_path) as file和with open(xml_path, ‘wb’) as f里面的内容。
下文为:trans.pyimport os
import numpy as np
import scipy.io as sio
import shutil
from lxml.etree import Element, SubElement, tostring
from xml.dom.minidom import parseString
import cv2
def make_voc_dir():
# labels 目录若不存在,创建labels目录。若存在,则清空目录
if not os.path.exists('../VOC2007/Annotations'):
os.makedirs('../VOC2007/Annotations')
if not os.path.exists('../VOC2007/ImageSets'):
os.makedirs('../VOC2007/ImageSets')
os.makedirs('../VOC2007/ImageSets/Main')
if not os.path.exists('../VOC2007/JPEGImages'):
os.makedirs('../VOC2007/JPEGImages')
if __name__ == '__main__':
# < class_label =1: pedestrians > 行人
# < class_label =2: riders > 骑车的
# < class_label =3: partially-visible persons > 遮挡的部分行人
# < class_label =4: ignore regions > 一些假人,比如图画上的人
# < class_label =5: crowd > 拥挤人群,直接大框覆盖了
classes = {'1': 'pedestrians',
'2': 'riders',
'3': 'partially',
'4':'ignore',
'5':'crowd'
}#这里如果自己只要人,可以把1-5全标记为people,也可以根据自己场景需要筛选
VOCRoot = '../VOC2007'
widerDir = '/home/prophetmu/archive2/WiderPerson' # 数据集所在的路径
wider_path = '/home/prophetmu/archive2WiderPerson/train.txt'#这里第一次train,第二次test
#这个函数第一次用注释掉,后面就要加注释了
make_voc_dir()
with open(wider_path, 'r') as f:
imgIds = [x for x in f.read().splitlines()]
for imgId in imgIds:
objCount = 0 # 一个标志位,用来判断该img是否包含我们需要的标注
filename = imgId + '.jpg'
img_path = '../WiderPerson/images/' + filename
print('Img :%s' % img_path)
img = cv2.imread(img_path)
width = img.shape[1] # 获取图片尺寸
height = img.shape[0] # 获取图片尺寸 360
node_root = Element('annotation')
node_folder = SubElement(node_root, 'folder')
node_folder.text = 'JPEGImages'
node_filename = SubElement(node_root, 'filename')
node_filename.text = 'VOC2007/JPEGImages/%s' % filename
node_size = SubElement(node_root, 'size')
node_width = SubElement(node_size, 'width')
node_width.text = '%s' % width
node_height = SubElement(node_size, 'height')
node_height.text = '%s' % height
node_depth = SubElement(node_size, 'depth')
node_depth.text = '3'
label_path = img_path.replace('images', 'Annotations') + '.txt'
with open(label_path) as file:
line = file.readline()
count = int(line.split('\n')[0]) # 里面行人个数
line = file.readline()
while line:
cls_id = line.split(' ')[0]
xmin = int(line.split(' ')[1]) + 1
ymin = int(line.split(' ')[2]) + 1
xmax = int(line.split(' ')[3]) + 1
ymax = int(line.split(' ')[4].split('\n')[0]) + 1
line = file.readline()
cls_name = classes[cls_id]
obj_width = xmax - xmin
obj_height = ymax - ymin
difficult = 0
if obj_height <= 6 or obj_width <= 6:
difficult = 1
node_object = SubElement(node_root, 'object')
node_name = SubElement(node_object, 'name')
node_name.text = cls_name
node_difficult = SubElement(node_object, 'difficult')
node_difficult.text = '%s' % difficult
node_bndbox = SubElement(node_object, 'bndbox')
node_xmin = SubElement(node_bndbox, 'xmin')
node_xmin.text = '%s' % xmin
node_ymin = SubElement(node_bndbox, 'ymin')
node_ymin.text = '%s' % ymin
node_xmax = SubElement(node_bndbox, 'xmax')
node_xmax.text = '%s' % xmax
node_ymax = SubElement(node_bndbox, 'ymax')
node_ymax.text = '%s' % ymax
node_name = SubElement(node_object, 'pose')
node_name.text = 'Unspecified'
node_name = SubElement(node_object, 'truncated')
node_name.text = '0'
image_path = VOCRoot + '/JPEGImages/' + filename
xml = tostring(node_root, pretty_print=True) # 'annotation'
dom = parseString(xml)
xml_name = filename.replace('.jpg', '.xml')
xml_path = VOCRoot + '/Annotations/' + xml_name
with open(xml_path, 'wb') as f:
f.write(xml)
# widerDir = '../WiderPerson' # 数据集所在的路径
shutil.copy(img_path, '../VOC2007/JPEGImages/' + filename)
训练模型
训练模型的步骤可参考前面 YOLOv8 部署系列章节的资料,这里不重复阐述。
YOLOv8 目标检测:训练自定义数据集并部署到爱芯派(一)
YOLOv8 目标检测:训练自定义数据集并部署到爱芯派(二)
在爱芯派上部署
完成训练模型后我们将需要把模型转换并导出,然后在硬件上(爱芯派)进行部署将训练好的模型应用到实际场景中,真正意义上的完成我们的场景实战体验。
接下来将详细介绍如何将模型部署到爱芯派。
模型导出以及转换
模型导出以及转换可参考前面 YOLOv8 部署系列章节的资料,这里不重复阐述。
YOLOv8 目标检测:训练自定义数据集并部署到爱芯派(一)
YOLOv8 目标检测:训练自定义数据集并部署到爱芯派(二)
在部署前先来了解我们前文提到的算法知识以及如何实现:
SORT 算法以及实现
- 原理
首先要了解的是卡尔曼滤波:
卡尔曼滤波(Kalman Filter)是一种高效的自回归滤波器,它能在存在诸多不确定性情况的组合信息中估计动态系统的状态,是一种强大的、通用性极强的工具。它利用系统的动态模型,已知的控制输入和多个顺序的测量值,来形成对系统变量(其状态)更好的估计,其精度比仅使用一种测量获得的估算值高。它是一种常见的感知器融合和数据融合算法。卡尔曼滤波器使用加权平均值生成系统状态的估计值,作为系统预测状态和新测量值的平均值。权重的目的是估计值具有更好(即较小)的不确定性的值会被更多“信任”。卡尔曼滤波器可以递归地工作,并且只需要系统状态的最后“最佳猜测”而不是整个历史,就可以计算新状态。
图说卡尔曼滤波,一份通俗易懂的教程
卡尔曼滤波(Kalman Filter)原理与公式推导
匈牙利算法
匈牙利算法是一种在多项式时间内求解任务分配问题的组合优化算法,广泛应用在运筹学领域。美国数学家哈罗德·库恩于 1955 年提出该算法。 该算法之所以被称作匈牙利算法,是因为算法很大一部分是基于以前匈牙利数学家Dénes Kőnig 和Jenő Egerváry 的工作之上创建起来的。
该算法主要用于解决一些与二分图匹配有关的问题,所以我们先来了解一下二分图。 二分图(Bipartite graph)是指一个图可以分割成两个部分,使得每个部分内部没有边,即顶点只有与另一个部分的顶点相连的边。
浅谈匈牙利算法
Hungarian algorithm (匈牙利算法)的实现原理是什么?
两者结合在一起
SORT 算法是于 2016 年提出一种简单的多目标跟踪(MOT)算法,全称为 Simple Online and Realtime Tracking。它的核心思想是利用卡尔曼滤波和匈牙利算法,对每一帧的检测结果进行预测和匹配,从而实现目标的跟踪和标识。
SORT 算法的主要步骤如下:
- 对于每一个新的视频帧运行一个目标检测器,得到一组目标的边界框。
- 对于每一个已经跟踪的目标,使用卡尔曼滤波对其状态进行预测得到一个预测的边界框。
- 使用匈牙利算法将预测的边界框和检测的边界框进行匹配,根据边界框之间的重叠度(IOU)作为代价函数,求解最佳匹配方案。
- 对于匹配成功的目标使用检测的边界框更新其卡尔曼滤波状态,并保留其标识。
- 对于未匹配的检测结果,创建新的目标并初始化其卡尔曼滤波状态和标识。
- 对于未匹配的预测结果,删除过期的目标并释放其标识。
SORT 算法的优点是简单、快速、实时,可以达到 20Hz 以上的帧率;缺点是对检测结果依赖性高,无法处理目标遮挡、外观变化、相机抖动等情况,容易出现轨迹断裂和身份切换。
- 算法实现
我们需要在 爱芯派 上安装 numpy、scipy、Matplotlib、filterpy 等依赖包。
我们可以用 pip 安装他们
pip install scipy也可以用 apt 安装
apt-get install python3-matplotlib第一步:首先安装 cython 包
pip install cython -i https://pypi.tuna.tsinghua.edu.cn/simple第二步:更新依赖包
pip install --upgrade wheel -i https://pypi.tuna.tsinghua.edu.cn/simple
pip install --upgrade setuptools -i https://pypi.tuna.tsinghua.edu.cn/simple
pip install --upgrade hypothesis -i https://pypi.tuna.tsinghua.edu.cn/simple第三步:安装 matplotlib、scipy 包
apt-get install python3-matplotlib
apt-get install python3-scipy
apt-get install python3-numpy第四步:filterpy 依赖于 scipy、numpy
pip install filterpy -i https://pypi.tuna.tsinghua.edu.cn/simple安装完成即可
以下是 sort 算法的 python 实现
from __future__ import print_function
# 对for循环有姮好的效果
import numpy as np
# 用于线性分配,匈牙利匹配的实现
# from sklearn.utils.linear_assignment_ import linear_assignment
from scipy.optimize import linear_sum_assignment
# 使用卡尔曼滤波器
from filterpy.kalman import KalmanFilter

def iou(bb_test, bb_gt):
    """
    在两个box间计算IOU
    :param bb_test: box1 = [x1y1x2y2]
    :param bb_gt: box2 = [x1y1x2y2]
    :return: 交并比IOU
    """
    xx1 = np.maximum(bb_test[0], bb_gt[0])
    yy1 = np.maximum(bb_test[1], bb_gt[1])
    xx2 = np.minimum(bb_test[2], bb_gt[2])
    yy2 = np.minimum(bb_test[3], bb_gt[3])
    w = np.maximum(0., xx2 - xx1)
    h = np.maximum(0., yy2 - yy1)
    wh = w * h
    o = wh / ((bb_test[2] - bb_test[0]) * (bb_test[3] - bb_test[1]) + (bb_gt[2] - bb_gt[0]) * (
            bb_gt[3] - bb_gt[1]) - wh)
    return o


def convert_bbox_to_z(bbox):
    """
    将[x1,y1,x2,y2]形式的检测框转为滤波器的状态表示形式[x,y,s,r]。其中x,y是框的中心,s是比例/区域,r是宽高比
    :param bbox: [x1,y1,x2,y2] 分别是左上角坐标和右下角坐标
    :return: [ x, y, s, r ] 4行1列,其中x,y是box中心位置的坐标,s是面积,r是纵横比w/h
    """
    w = bbox[2] - bbox[0]
    h = bbox[3] - bbox[1]
    x = bbox[0] + w / 2.
    y = bbox[1] + h / 2.
    s = w * h
    r = w / float(h)
    return np.array([x, y, s, r]).reshape((4, 1))


def convert_x_to_bbox(x, score=None):
    """
    将[cx,cy,s,r]的目标框表示转为[x_min,y_min,x_max,y_max]的形式
    :param x:[ x, y, s, r ],其中x,y是box中心位置的坐标,s是面积,r
    :param score: 置信度
    :return:[x1,y1,x2,y2],左上角坐标和右下角坐标
    """
    w = np.sqrt(x[2] * x[3])
    h = x[2] / w
    if score is None:
        return np.array([x[0] - w / 2., x[1] - h / 2., x[0] + w / 2., x[1] + h / 2.]).reshape((1, 4))
    else:
        return np.array([x[0] - w / 2., x[1] - h / 2., x[0] + w / 2., x[1] + h / 2., score]).reshape((1, 5))


"""
# 表示观测目标框bbox所对应的单个跟踪对像的内部状态
"""

class KalmanBoxTracker(object):
    count = 0

    def __init__(self, bbox):
        """
        初始化边界框和跟踪器
        :param bbox:
        """
        # 定义等速模型
        # 内部使用KalmanFilter,7个状态变量和4个观测输入
        self.kf = KalmanFilter(dim_x=7, dim_z=4)
        # F是状态变换模型
        self.kf.F = np.array(
            [[1, 0, 0, 0, 1, 0, 0], [0, 1, 0, 0, 0, 1, 0], [0, 0, 1, 0, 0, 0, 1], [0, 0, 0, 1, 0, 0, 0],
             [0, 0, 0, 0, 1, 0, 0], [0, 0, 0, 0, 0, 1, 0], [0, 0, 0, 0, 0, 0, 1]])
        # H是观测函数
        self.kf.H = np.array(
            [[1, 0, 0, 0, 0, 0, 0], [0, 1, 0, 0, 0, 0, 0], [0, 0, 1, 0, 0, 0, 0], [0, 0, 0, 1, 0, 0, 0]])
        # R是观测函数
        self.kf.R[2:, 2:] *= 10.
        # P是协方差矩阵
        self.kf.P[4:, 4:] *= 1000.  # give high uncertainty to the unobservable initial velocities
        self.kf.P *= 10.
        # Q是过程噪声矩阵
        self.kf.Q[-1, -1] *= 0.01
        self.kf.Q[4:, 4:] *= 0.01
        # 内部状态估计
        self.kf.x[:4] = convert_bbox_to_z(bbox)
        self.time_since_update = 0
        self.id = KalmanBoxTracker.count
        KalmanBoxTracker.count += 1
        self.history = []
        self.hits = 0
        self.hit_streak = 0
        self.age = 0

    def update(self, bbox):
        """
        使用观察到的目标框更新状态向量。filterpy.kalman.KalmanFilter.update 会根据观测修改内部状态估计self.kf.x。
        重置self.time_since_update,清空self.history。
        :param bbox:目标框
        :return:
        """
        self.time_since_update = 0
        self.history = []
        self.hits += 1
        self.hit_streak += 1
        self.kf.update(convert_bbox_to_z(bbox))

    def predict(self):
        """
        推进状态向量并返回预测的边界框估计。
        将预测结果追加到self.history。由于 get_state 直接访问 self.kf.x,所以self.history没有用到
        :return:
        """
        if (self.kf.x[6] + self.kf.x[2]) <= 0:
            self.kf.x[6] *= 0.0
        self.kf.predict()
        self.age += 1
        if self.time_since_update > 0:
            self.hit_streak = 0
        self.time_since_update += 1
        self.history.append(convert_x_to_bbox(self.kf.x))
        return self.history[-1]

    def get_state(self):
        """
        返回当前边界框估计值
        :return:
        """
        return convert_x_to_bbox(self.kf.x)


def associate_detections_to_trackers(detections, trackers, iou_threshold=0.3):
    """
    将检测框bbox与卡尔曼滤波器的跟踪框进行关联匹配
    :param detections:检测框
    :param trackers:跟踪框,即跟踪目标
    :param iou_threshold:IOU阈值
    :return:跟踪成功目标的矩阵:matchs
            新增目标的矩阵:unmatched_detections
            跟踪失败即离开画面的目标矩阵:unmatched_trackers
    """
    # 跟踪目标数量为0,直接构造结果
    if (len(trackers) == 0) or (len(detections) == 0):
        return np.empty((0, 2), dtype=int), np.arange(len(detections)), np.empty((0, 5), dtype=int)

    # iou 不支持数组计算。逐个计算两两间的交并比,调用 linear_assignment 进行匹配
    iou_matrix = np.zeros((len(detections), len(trackers)), dtype=np.float32)
    # 遍历目标检测的bbox集合,每个检测框的标识为d
    for d, det in enumerate(detections):
        # 遍历跟踪框(卡尔曼滤波器预测)bbox集合,每个跟踪框标识为t
        for t, trk in enumerate(trackers):
            iou_matrix[d, t] = iou(det, trk)
    # 通过匈牙利算法将跟踪框和检测框以[[d,t]...]的二维矩阵的形式存储在match_indices中
    # 为什么是负号:linear_assignment的输入是成本矩阵,IOU越大对应的分配代价应越小
    # matched_indices = linear_assignment(-iou_matrix)
    result = linear_sum_assignment(-iou_matrix)
    matched_indices = np.array(list(zip(*result)))

    # 记录未匹配的检测框及跟踪框
    # 未匹配的检测框放入unmatched_detections中,表示有新的目标进入画面,要新增跟踪器跟踪目标
    unmatched_detections = []
    for d, det in enumerate(detections):
        if d not in matched_indices[:, 0]:
            unmatched_detections.append(d)
    # 未匹配的跟踪框放入unmatched_trackers中,表示目标离开之前的画面,应删除对应的跟踪器
    unmatched_trackers = []
    for t, trk in enumerate(trackers):
        if t not in matched_indices[:, 1]:
            unmatched_trackers.append(t)
    # 将匹配成功的跟踪框放入matches中
    matches = []
    for m in matched_indices:
        # 过滤掉IOU低的匹配,将其放入到unmatched_detections和unmatched_trackers
        if iou_matrix[m[0], m[1]] < iou_threshold:
            unmatched_detections.append(m[0])
            unmatched_trackers.append(m[1])
        # 满足条件的以[[d,t]...]的形式放入matches中
        else:
            matches.append(m.reshape(1, 2))
    # 初始化matches,以np.array的形式返回
    if len(matches) == 0:
        matches = np.empty((0, 2), dtype=int)
    else:
        matches = np.concatenate(matches, axis=0)

    return matches, np.array(unmatched_detections), np.array(unmatched_trackers)


class Sort(object):
    """
    Sort 是一个多目标跟踪器,管理多个 KalmanBoxTracker 对象
    """
    def __init__(self, max_age=1, min_hits=3):
        """
        初始化:设置SORT算法的关键参数
        :param max_age: 最大检测数:目标未被检测到的帧数,超过之后会被删除
        :param min_hits:
        """
        self.max_age = max_age
        self.min_hits = min_hits
        self.trackers = []   # ?
        self.frame_count = 0  # ?

    def update(self, dets):
        """
        该方法实现了SORT算法,输入是当前帧中所有物体的检测框的集合,包括目标的score,
        输出是当前帧目标的跟踪框集合,包括目标的跟踪的id
        要求是即使检测框为空,也必须对每一帧调用此方法,返回一个类似的输出数组,最后一列是目标对像的id
        注意:返回的目标对象数量可能与检测框的数量不同
        :param dets:以[[x1,y1,x2,y2,score],[x1,y1,x2,y2,score],...]形式输入的numpy.array
        :return:
        """
        self.frame_count += 1
        # 在当前帧逐个预测轨迹位置,记录状态异常的跟踪器索引
        # 根据当前所有的卡尔曼跟踪器个数(即上一帧中跟踪的目标个数)创建二维数组:行号为卡尔曼滤波器的标识索引,列向量为跟踪框的位置和ID
        trks = np.zeros((len(self.trackers), 5))  # 存储跟踪器的预测
        to_del = []   # 存储要删除的目标框
        ret = []    # 存储要返回的追踪目标框
        # 循环遍历卡尔曼跟踪器列表
        for t, trk in enumerate(trks):
            # 使用卡尔曼跟踪器t产生对应目标的跟踪框
            pos = self.trackers[t].predict()[0]
            # 遍历完成后,trk中存储了上一帧中跟踪的目标的预测跟踪框
            trk[:] = [pos[0], pos[1], pos[2], pos[3], 0]
            # 如果跟踪框中包含空值则将该跟踪框添加到要删除的列表中
            if np.any(np.isnan(pos)):
                to_del.append(t)
        # numpy.ma.masked_invalid 屏蔽出现无效值的数组(NaN 或 inf)
        # numpy.ma.compress_rows 压缩包含掩码值的2-D 数组的整行,将包含掩码值的整行去除
        # trks中存储了上一帧中跟踪的目标并且在当前帧中的预测跟踪框
        trks = np.ma.compress_rows(np.ma.masked_invalid(trks))
        # 逆向删除异常的跟踪器,防止破坏索引
        for t in reversed(to_del):
            self.trackers.pop(t)
        # 将目标检测框与卡尔曼滤波器预测的跟踪框关联获取跟踪成功的目标,新增的目标,离开画面的目标
        matched, unmatched_dets, unmatched_trks = associate_detections_to_trackers(dets, trks)

        # 将跟踪成功的目标框更新到对应的卡尔曼滤波器
        for t, trk in enumerate(self.trackers):
            if t not in unmatched_trks:
                d = matched[np.where(matched[:, 1] == t)[0], 0]
                # 使用观测的边界框更新状态向量
                trk.update(dets[d, :][0])

        # 为新增的目标创建新的卡尔曼滤波器对象进行跟踪
        for i in unmatched_dets:
            trk = KalmanBoxTracker(dets[i, :])
            self.trackers.append(trk)

        # 自后向前遍历,仅返回在当前帧出现且命中周期大于self.min_hits(除非跟踪刚开始)的跟踪结果;如果未命中时间大于self.max_age则删除跟踪器。
        # hit_streak忽略目标初始的若干帧
        i = len(self.trackers)
        for trk in reversed(self.trackers):
            # 返回当前边界框的估计值
            d = trk.get_state()[0]
            # 跟踪成功目标的box与id放入ret列表中
            if (trk.time_since_update < 1) and (trk.hit_streak >= self.min_hits or self.frame_count <= self.min_hits):
                ret.append(np.concatenate((d, [trk.id + 1])).reshape(1, -1))  # +1 as MOT benchmark requires positive
            i -= 1
            # 跟踪失败或离开画面的目标从卡尔曼跟踪器中删除
            if trk.time_since_update > self.max_age:
                self.trackers.pop(i)
        # 返回当前画面中所有目标的box与id,以二维矩阵形式返回
        if len(ret) > 0:
            return np.concatenate(ret)
        return np.empty((0, 5))
只需要将检测框(x1,y1,x2,y2)和置信度传入到跟踪器内 Sort 算法会输出跟踪的结果,再对结果进行绘制。
- 加载模型和配置文件。
- 循环读取视频帧。
- 对每一帧进行目标检测。
- 将检测出的目标框转化为像素坐标。
- 使用 Sort 算法进行目标跟踪,并绘制目标框和 ID 号。
- 将跟踪结果渲染到图像上,用于显示。
以下为调用代码
import time
from kalmansort import *
import numpy as np
from ax import pipeline
from PIL import Image, ImageDraw
pipeline.load([
    'libsample_vin_ivps_joint_vo_sipy.so',
    '-p', '/home/yolov8.json',
    '-c', '2',
])
lcd_width, lcd_height = 854, 480
img = Image.new('RGBA', (lcd_width, lcd_height))
# ui = ImageDraw.ImageDraw(img)
def rgba2argb(rgba):
    r,g,b,a = rgba.split()
    return Image.merge("RGBA", (a,b,g,r))
canvas_argb = rgba2argb(img)
tracker = Sort()
colours = np.random.rand(32, 3) * 255
while pipeline.work():
    time.sleep(0.001)
    tmp = pipeline.result()
    argb = canvas_argb.copy()
    boxes = []
    if tmp and tmp['nObjSize']:
        ui = ImageDraw.ImageDraw(argb)
        for i in tmp['mObjects']:
            if i['label'] == 2:
                print(i['bbox'])
                print(i['label'])
                x = i['bbox']['x'] * lcd_width
                y = i['bbox']['y'] * lcd_height
                w = i['bbox']['w'] * lcd_width
                h = i['bbox']['h'] * lcd_height
                boxes.append([x,y,x+w,y+h,i['prob']])
                objlabel = i['label']
                objprob = i['prob']
                print(boxes)
        boxes = np.asarray(boxes)
        if np.size(boxes) == 0:
            continue
        else:
            tracks = tracker.update(boxes)
        for d in tracks:
            x1 = int(float(d[0]))
            y1 = int(float(d[1]))
            x2 = int(float(d[2]))
            y2 = int(float(d[3]))
            pred_id = str(int(d[4]))
            rgb = colours[int(d[4]) % 32]
            # pred_cls = d[5]

            ui.rectangle((x1,y1,x2,y2), fill=(100,0,0,255), outline=(255,0,0,255))
            ui.text((x,y), str(pred_id))
    pipeline.config("ui_image", (lcd_width, lcd_height, "ARGB", argb.tobytes()))
        # if tmp['nObjSize'] > 10: # try exit
        #     pipeline.free()
pipeline.free()
ByteTrack 算法以及实现
Tracking-by-detection 是 MOT 中的一个经典高效的流派,通过相似度(位置、外观、运动等信息)来关联帧间的检测框得到跟踪轨迹。不过,由于实际场景的复杂性,检测器往往无法得到完美的检测结果。为了权衡真假正例,目前大部分 MOT 方法会选择一个阈值(threshold),只保留高于这个阈值的检测结果来做关联得到跟踪结果,低于这个阈值的检测框就直接丢弃。作者认为这种策略是不合理的,就如黑格尔所说:“存在即合理。” 低分检测框往往预示着物体的存在(例如遮挡严重的物体)。简单地把这些物体丢弃会给 MOT 带来不可逆转的错误,包括大量的漏检和轨迹中断,降低整体跟踪性能。因此作者提出了一种新的数据关联方法 BYTE,将高分框和低分框分开处理,利用低分检测框和跟踪轨迹之间的相似性,从低分框中挖掘出真正的物体,过滤掉背景。简单来说,是一个二次匹配的过程。
前面有说过 ReID 方法是一种基于目标识别的方法,即对于同一类别的目标,通过提取其特征向量,计算不同目标之间的相似度,从而实现目标的识别。在目标追踪中ReID 方法可以用于解决 ID 重复问题。所以想做 DeepSort 来填补一下 ReID 的方法的,但是这个工作介绍到,如果检测器的性能足够强大,就不需要做 ReID 的工作了,作者也在实验中尝试过了,并不会有明显的提升,并且因为 ReID 方法需要对每个目标进行特征提取,然后再进行匹配,这样会增加计算量,降低实时性。而 ByteTrack 算法是一种基于目标检测的追踪算法,仅仅使用目标追踪所得到的 bbox 进行追踪,这样可以减少计算量提高实时性。这就让我把目光放到了这个近年来的新工作上。
- 原理
ByteTrack 算法是一种基于目标检测的追踪算法,和其他非 ReID 的算法一样,仅仅使用目标追踪所得到的 bbox 进行追踪,它使用了卡尔曼滤波预测边界框,然后使用匈牙利算法进行目标和轨迹间的匹配。
ByteTrack 算法是一种简单高效的数据关联方法,利用检测框和跟踪轨迹之间的相似性,在保留高分检测结果的同时从低分检测结果中去除背景,挖掘出真正的前景目标。
ECCV2022 ByteTrack: Multi-Object Tracking by Associating Every Detection Box
多目标跟踪 | ByteTrack 算法核心原理详解
ByteTrack: Multi-Object Tracking by Associating Every Detection Box
ByteTrack 算法的优点如下:
- ByteTrack 算法是一种简单高效的数据关联方法,利用检测框和跟踪轨迹之间的相似性,在保留高分检测结果的同时,从低分检测结果中去除背景,挖掘出真正的前景目标。
- ByteTrack 算法在处理大量目标时不会出现 ID 重复问题。
- ByteTrack 算法在实时目标追踪方面表现优异。
ByteTrack 算法和 SORT 算法的区别如下:
- SORT 算法是一种基于卡尔曼滤波的多目标跟踪算法,而 ByteTrack 算法是一种基于目标检测的追踪算法。
- SORT 算法使用卡尔曼滤波预测边界框,然后使用匈牙利算法进行目标和轨迹间的匹配,而 ByteTrack 算法使用了卡尔曼滤波预测边界框,然后使用匈牙利算法进行目标和轨迹间的匹配,并且利用检测框和跟踪轨迹之间的相似性,在保留高分检测结果的同时,从低分检测结果中去除背景,挖掘出真正的前景目标。
- SORT 算法在处理大量目标时会出现ID重复问题,而 ByteTrack 算法则不会出现这个问题。
- 算法实现
请确保你已经验证过 Sort 算法的流程,保证有 numpy 等相关环境。
我们需要在爱芯派上安装 cython、lap、cython_bbox、wheel、setuptools 等依赖包。
使用 pip 安装这些依赖包
 pip install lap
pip install cython_bbox
如果你的 numpy 版本大于 1.23 需要修改 cython_bbox 的源码在板子上重新进行编译。
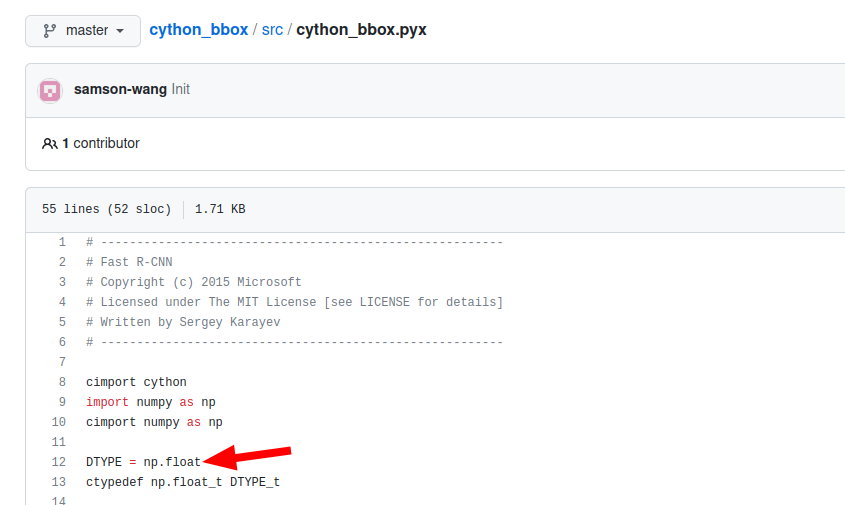
第一步:在爱芯派上的 git clone https://github.com/samson-wang/cython_bbox.git 这个 cython_bbox 主要用于检测框的交叉 iou 的计算。
第二步:修改 cython_bbox 的源码,把代码里的 np.float 改成 np.float64。
第三步:在板子上编译 cyhon_bbox 并在终端输入 python3 setup.py bdist_wheel 你会在 dist 文件夹下看到 whl 包后用 pip 安装他。
以下为 bytetracker python 实现
import numpy as np
from collections import deque
import os
import os.path as osp
import copy

from kalman_filter import KalmanFilter
import matching
from basetrack import BaseTrack, TrackState

class STrack(BaseTrack):
    shared_kalman = KalmanFilter()
    def __init__(self, tlwh, score):

        # wait activate
        self._tlwh = np.asarray(tlwh, dtype=np.float64)
        self.kalman_filter = None
        self.mean, self.covariance = None, None
        self.is_activated = False

        self.score = score
        self.tracklet_len = 0

    def predict(self):
        mean_state = self.mean.copy()
        if self.state != TrackState.Tracked:
            mean_state[7] = 0
        self.mean, self.covariance = self.kalman_filter.predict(mean_state, self.covariance)

    @staticmethod
    def multi_predict(stracks):
        if len(stracks) > 0:
            multi_mean = np.asarray([st.mean.copy() for st in stracks])
            multi_covariance = np.asarray([st.covariance for st in stracks])
            for i, st in enumerate(stracks):
                if st.state != TrackState.Tracked:
                    multi_mean[i][7] = 0
            multi_mean, multi_covariance = STrack.shared_kalman.multi_predict(multi_mean, multi_covariance)
            for i, (mean, cov) in enumerate(zip(multi_mean, multi_covariance)):
                stracks[i].mean = mean
                stracks[i].covariance = cov

    def activate(self, kalman_filter, frame_id):
        """Start a new tracklet"""
        self.kalman_filter = kalman_filter
        self.track_id = self.next_id()
        self.mean, self.covariance = self.kalman_filter.initiate(self.tlwh_to_xyah(self._tlwh))

        self.tracklet_len = 0
        self.state = TrackState.Tracked
        if frame_id == 1:
            self.is_activated = True
        # self.is_activated = True
        self.frame_id = frame_id
        self.start_frame = frame_id

    def re_activate(self, new_track, frame_id, new_id=False):
        self.mean, self.covariance = self.kalman_filter.update(
            self.mean, self.covariance, self.tlwh_to_xyah(new_track.tlwh)
        )
        self.tracklet_len = 0
        self.state = TrackState.Tracked
        self.is_activated = True
        self.frame_id = frame_id
        if new_id:
            self.track_id = self.next_id()
        self.score = new_track.score

    def update(self, new_track, frame_id):
        """
        Update a matched track
        :type new_track: STrack
        :type frame_id: int
        :type update_feature: bool
        :return:
        """
        self.frame_id = frame_id
        self.tracklet_len += 1

        new_tlwh = new_track.tlwh
        self.mean, self.covariance = self.kalman_filter.update(
            self.mean, self.covariance, self.tlwh_to_xyah(new_tlwh))
        self.state = TrackState.Tracked
        self.is_activated = True

        self.score = new_track.score

    @property
    # @jit(nopython=True)
    def tlwh(self):
        """Get current position in bounding box format `(top left x, top left y,
                width, height)`.
        """
        if self.mean is None:
            return self._tlwh.copy()
        ret = self.mean[:4].copy()
        ret[2] *= ret[3]
        ret[:2] -= ret[2:] / 2
        return ret

    @property
    # @jit(nopython=True)
    def tlbr(self):
        """Convert bounding box to format `(min x, min y, max x, max y)`, i.e.,
        `(top left, bottom right)`.
        """
        ret = self.tlwh.copy()
        ret[2:] += ret[:2]
        return ret

    @staticmethod
    # @jit(nopython=True)
    def tlwh_to_xyah(tlwh):
        """Convert bounding box to format `(center x, center y, aspect ratio,
        height)`, where the aspect ratio is `width / height`.
        """
        ret = np.asarray(tlwh).copy()
        ret[:2] += ret[2:] / 2
        ret[2] /= ret[3]
        return ret

    def to_xyah(self):
        return self.tlwh_to_xyah(self.tlwh)

    @staticmethod
    # @jit(nopython=True)
    def tlbr_to_tlwh(tlbr):
        ret = np.asarray(tlbr).copy()
        ret[2:] -= ret[:2]
        return ret

    @staticmethod
    # @jit(nopython=True)
    def tlwh_to_tlbr(tlwh):
        ret = np.asarray(tlwh).copy()
        ret[2:] += ret[:2]
        return ret

    def __repr__(self):
        return 'OT_{}_({}-{})'.format(self.track_id, self.start_frame, self.end_frame)


class BYTETracker(object):
    def __init__(self, frame_rate=20):
        self.tracked_stracks = []  # type: list[STrack]
        self.lost_stracks = []  # type: list[STrack]
        self.removed_stracks = []  # type: list[STrack]

        self.frame_id = 0
        self.det_thresh = 0.5 + 0.1
        self.buffer_size = int(frame_rate / 30.0 * 25)
        self.max_time_lost = self.buffer_size
        self.kalman_filter = KalmanFilter()

    def update(self, output_results):
        self.frame_id += 1
        activated_starcks = []
        refind_stracks = []
        lost_stracks = []
        removed_stracks = []

        if output_results.shape[1] == 5:
            scores = output_results[:, 4]
            bboxes = output_results[:, :4]
        else:
            output_results = output_results.cpu().numpy()
            scores = output_results[:, 4] * output_results[:, 5]
            bboxes = output_results[:, :4]  # x1y1x2y2

        remain_inds = scores > 0.5
        inds_low = scores > 0.1
        inds_high = scores < 0.5

        inds_second = np.logical_and(inds_low, inds_high)
        dets_second = bboxes[inds_second]
        dets = bboxes[remain_inds]
        scores_keep = scores[remain_inds]
        scores_second = scores[inds_second]

        if len(dets) > 0:
            '''Detections'''
            detections = [STrack(STrack.tlbr_to_tlwh(tlbr), s) for
                          (tlbr, s) in zip(dets, scores_keep)]
        else:
            detections = []

        ''' Add newly detected tracklets to tracked_stracks'''
        unconfirmed = []
        tracked_stracks = []  # type: list[STrack]
        for track in self.tracked_stracks:
            if not track.is_activated:
                unconfirmed.append(track)
            else:
                tracked_stracks.append(track)

        ''' Step 2: First association, with high score detection boxes'''
        strack_pool = joint_stracks(tracked_stracks, self.lost_stracks)
        # Predict the current location with KF
        STrack.multi_predict(strack_pool)
        dists = matching.iou_distance(strack_pool, detections)

        dists = matching.fuse_score(dists, detections)
        matches, u_track, u_detection = matching.linear_assignment(dists, thresh=0.8)

        for itracked, idet in matches:
            track = strack_pool[itracked]
            det = detections[idet]
            if track.state == TrackState.Tracked:
                track.update(detections[idet], self.frame_id)
                activated_starcks.append(track)
            else:
                track.re_activate(det, self.frame_id, new_id=False)
                refind_stracks.append(track)

        ''' Step 3: Second association, with low score detection boxes'''
        # association the untrack to the low score detections
        if len(dets_second) > 0:
            '''Detections'''
            detections_second = [STrack(STrack.tlbr_to_tlwh(tlbr), s) for
                          (tlbr, s) in zip(dets_second, scores_second)]
        else:
            detections_second = []
        r_tracked_stracks = [strack_pool[i] for i in u_track if strack_pool[i].state == TrackState.Tracked]
        dists = matching.iou_distance(r_tracked_stracks, detections_second)
        matches, u_track, u_detection_second = matching.linear_assignment(dists, thresh=0.5)
        for itracked, idet in matches:
            track = r_tracked_stracks[itracked]
            det = detections_second[idet]
            if track.state == TrackState.Tracked:
                track.update(det, self.frame_id)
                activated_starcks.append(track)
            else:
                track.re_activate(det, self.frame_id, new_id=False)
                refind_stracks.append(track)

        for it in u_track:
            track = r_tracked_stracks[it]
            if not track.state == TrackState.Lost:
                track.mark_lost()
                lost_stracks.append(track)

        '''Deal with unconfirmed tracks, usually tracks with only one beginning frame'''
        detections = [detections[i] for i in u_detection]
        dists = matching.iou_distance(unconfirmed, detections)

        dists = matching.fuse_score(dists, detections)
        matches, u_unconfirmed, u_detection = matching.linear_assignment(dists, thresh=0.7)
        for itracked, idet in matches:
            unconfirmed[itracked].update(detections[idet], self.frame_id)
            activated_starcks.append(unconfirmed[itracked])
        for it in u_unconfirmed:
            track = unconfirmed[it]
            track.mark_removed()
            removed_stracks.append(track)

        """ Step 4: Init new stracks"""
        for inew in u_detection:
            track = detections[inew]
            if track.score < self.det_thresh:
                continue
            track.activate(self.kalman_filter, self.frame_id)
            activated_starcks.append(track)
        """ Step 5: Update state"""
        for track in self.lost_stracks:
            if self.frame_id - track.end_frame > self.max_time_lost:
                track.mark_removed()
                removed_stracks.append(track)

        # print('Ramained match {} s'.format(t4-t3))

        self.tracked_stracks = [t for t in self.tracked_stracks if t.state == TrackState.Tracked]
        self.tracked_stracks = joint_stracks(self.tracked_stracks, activated_starcks)
        self.tracked_stracks = joint_stracks(self.tracked_stracks, refind_stracks)
        self.lost_stracks = sub_stracks(self.lost_stracks, self.tracked_stracks)
        self.lost_stracks.extend(lost_stracks)
        self.lost_stracks = sub_stracks(self.lost_stracks, self.removed_stracks)
        self.removed_stracks.extend(removed_stracks)
        self.tracked_stracks, self.lost_stracks = remove_duplicate_stracks(self.tracked_stracks, self.lost_stracks)
        # get scores of lost tracks
        output_stracks = [track for track in self.tracked_stracks if track.is_activated]

        return output_stracks


def joint_stracks(tlista, tlistb):
    exists = {}
    res = []
    for t in tlista:
        exists[t.track_id] = 1
        res.append(t)
    for t in tlistb:
        tid = t.track_id
        if not exists.get(tid, 0):
            exists[tid] = 1
            res.append(t)
    return res


def sub_stracks(tlista, tlistb):
    stracks = {}
    for t in tlista:
        stracks[t.track_id] = t
    for t in tlistb:
        tid = t.track_id
        if stracks.get(tid, 0):
            del stracks[tid]
    return list(stracks.values())


def remove_duplicate_stracks(stracksa, stracksb):
    pdist = matching.iou_distance(stracksa, stracksb)
    pairs = np.where(pdist < 0.15)
    dupa, dupb = list(), list()
    for p, q in zip(*pairs):
        timep = stracksa[p].frame_id - stracksa[p].start_frame
        timeq = stracksb[q].frame_id - stracksb[q].start_frame
        if timep > timeq:
            dupb.append(q)
        else:
            dupa.append(p)
    resa = [t for i, t in enumerate(stracksa) if not i in dupa]
    resb = [t for i, t in enumerate(stracksb) if not i in dupb]
    return resa, resb
同样的道理把检测器的输出,输入进去。
调用代码
import time
from byte_tracker import BYTETracker
import numpy as np
from ax import pipeline
from PIL import Image, ImageDraw
pipeline.load([
    'libsample_vin_ivps_joint_vo_sipy.so',
    '-p', '/home/tracker/yolov8.json',
    '-c', '2',
])
lcd_width, lcd_height = 854, 480
img = Image.new('RGBA', (lcd_width, lcd_height))
# ui = ImageDraw.ImageDraw(img)
def rgba2argb(rgba):
    r,g,b,a = rgba.split()
    return Image.merge("RGBA", (a,b,g,r))
canvas_argb = rgba2argb(img)
tracker = BYTETracker()
colours = np.random.rand(32, 3) * 255
while pipeline.work():
    time.sleep(0.001)
    tmp = pipeline.result()
    argb = canvas_argb.copy()
    boxes = []
    if tmp and tmp['nObjSize']:
        ui = ImageDraw.ImageDraw(argb)
        for i in tmp['mObjects']:
            if i['label'] == 0:
                print(i['bbox'])
                print(i['label'])
                x = i['bbox']['x'] * lcd_width
                y = i['bbox']['y'] * lcd_height
                w = i['bbox']['w'] * lcd_width
                h = i['bbox']['h'] * lcd_height
                boxes.append([x,y,x+w,y+h,i['prob']])
                objlabel = i['label']
                objprob = i['prob']
        boxes = np.asarray(boxes)
        if np.size(boxes) == 0:
            continue
        else:
            online_targets = tracker.update(boxes)
            online_tlwhs = []
            online_ids = []
            online_scores = []
            for t in online_targets:
                tlwh = t.tlwh
                tid = t.track_id
                vertical = tlwh[2] / tlwh[3] > 1.6
                if tlwh[2] * tlwh[3] > 10 and not vertical:
                    online_tlwhs.append(tlwh)
                    online_ids.append(tid)
                    online_scores.append(t.score)
                ui.rectangle((tlwh[0],tlwh[1],tlwh[0]+tlwh[2],tlwh[1]+tlwh[3]), fill=(100,0,0,255), outline=(255,0,0,255))
                ui.text((x,y), str(tid))
            print(online_tlwhs, online_ids, online_scores)


    pipeline.config("ui_image", (lcd_width, lcd_height, "ARGB", argb.tobytes()))
        # if tmp['nObjSize'] > 10: # try exit
        #     pipeline.free()
pipeline.free()
Python 部署
准备工作:爱芯派硬件
参考资料说明:浏览以下文章快速了解
爱芯派硬件以及上手指南。M3axpi 官方介绍:wiki.sipeed.com/m3axpi
MAIX-III AXera-Pi 系列文章:开箱之硬件初体验
MAIX-III AXera-Pi 系列文章:上手之丝滑玩转 AI 板卡【一】
MAIX-III AXera-Pi 系列文章:上手之丝滑玩转 AI 板卡【二】
本文以 Windows10 系统为例,首先参考以下三篇文章学习连接爱芯派(推荐使用 SSH 进行登录).
如何使用爱芯派网口进行 SSH 通信(推荐)
爱芯派系统使用手册
如何在 Mobaxterm 使用 SSH
第一步:将文件拷入爱芯派的 home 目录
第二步:进入爱芯派的 home 目录
cd ..
cd home第三步:运行代码
python3 yolov8_sort.pypython3 yolov8_track.py第四步:找测试物或实时画面进行测试效果。
铛铛:部署完成后我们就可以在 爱芯派 上体验多目标行人跟踪的效果啦
To Be Continue
新的一篇实战章节的内容又结束啦!学习完相信你一定对传统算法有了基础的认知,联动前文一起构建属于你的从训练到部署再到实战的学习之旅;后续文章会更详细的讲解如何检测更多类别更多标签,如何制作一个实际的功能与应用,下次见!
常见问题
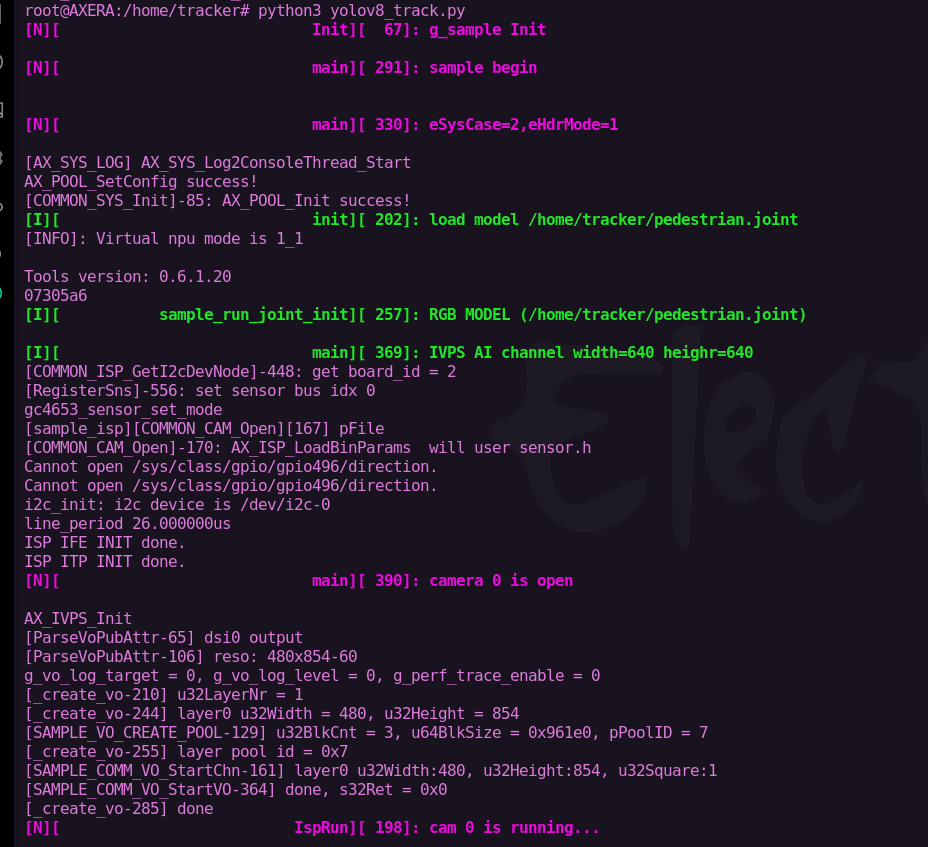
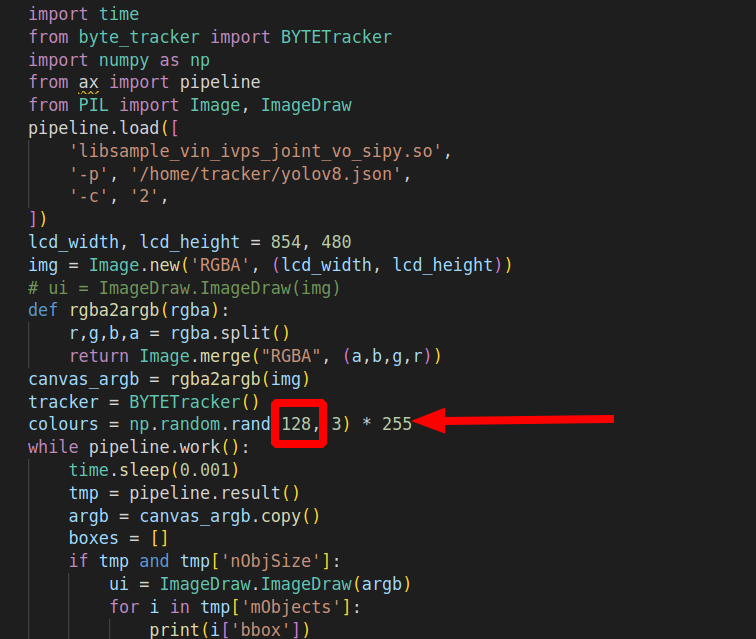
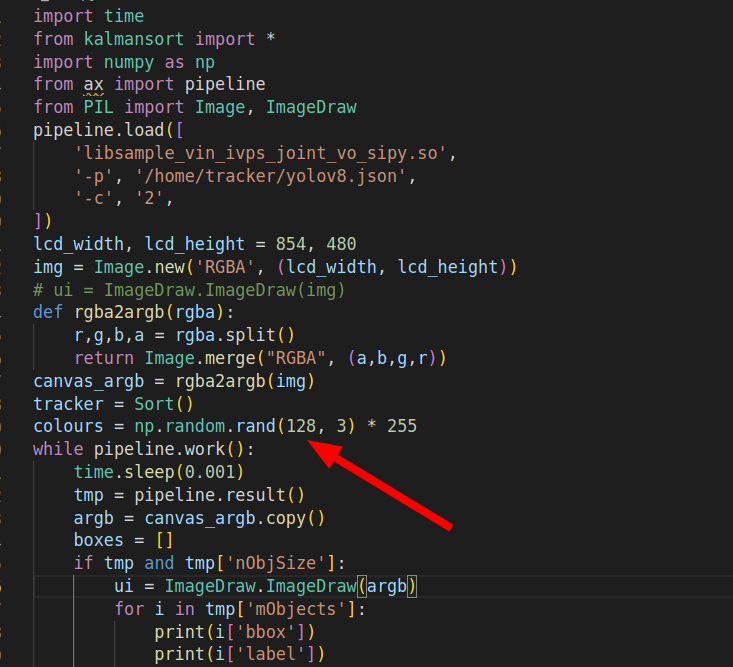
- 如果出现下图情况:跟踪的目标太多,随机数用完了
可以根据下图操作给多一点随机数。
回顾往期文章
MAIX-III AXera-Pi 系列文章(1):新一代 3.6T 视觉 AI Linux 板卡面世
MAIX-III AXera-Pi 系列文章(2):丰富多采的 AI 应用
MAIX-III AXera-Pi 系列文章(3):Debian 系统 & 开箱案例
MAIX-III AXera-Pi 系列文章:开箱之硬件初体验
MAIX-III AXera-Pi 系列文章:上手之丝滑玩转 AI 板卡【一】
MAIX-III AXera-Pi 系列文章:上手之丝滑玩转 AI 板卡【二】
YOLOv8 目标检测:训练自定义数据集并部署到爱芯派(一)
YOLOv8 目标检测:训练自定义数据集并部署到爱芯派(二)
还想了解更多内容?
| 内容 | 链接 |
|---|---|
| AXera-Pi 产品介绍 | https://mp.weixin.qq.com/s/JIvVprWlQPvE7bTxozAG_Q |
| AXera-Pi 产品资料 | wiki.sipeed.com/m3axpi |
| 海外购买渠道 | https://fr.aliexpress.com/item/1005005016931077.html |
| 国内购买渠道 | https://item.taobao.com/item.htm?id=682169792430 |
| AI 开发工具链 | https://pulsar-docs.readthedocs.io/ |
| AI 示例仓库 | https://github.com/AXERA-TECH/ax-samples |
| Python API | https://github.com/junhuanchen/ax-pipeline-api |
| 系统 BSP SDK | https://github.com/sipeed/axpi_bsp_sdk |
| 基础 C++ SDK | https://github.com/sipeed/libmaix |
| 进阶 C++ SDK | https://github.com/AXERA-TECH/ax-pipeline |
| AXERA 技术交流群 | 专供 AI ISP 技术交流:139953715 |
| 荔枝 MaixPy3 AI 交流群 | 产品开箱小白答疑:756313869 |
| AI 训练平台 | http://maixhub.com |
| 在线文档 | http://wiki.sipeed.com |
| 交流社区 | http://bbs.sipeed.com |
| 开源组织 | http://github.com/sipeed |
| 官方推特 | https://twitter.com/SipeedIO |
| 商业邮箱 | support@sipeed.com |

