
Google Veo 3作为当前最先进的文本到视频生成系统,能够根据文本提示生成高质量、高分辨率的视频内容并同步生成音频。该系统在性能上已超越OpenAI SORA等同类模型,代表了视频生成领域的最新技术水平。
Google最近发布了Veo 3技术报告和模型规格说明,详细阐述了系统架构、训练流程等核心技术细节。本文将基于这些技术文档,从零开始复现Veo 3的实现方法,构建我们自己的小规模Veo 3模型。
Veo 3系统架构概览
根据Google提供的Veo 3高层架构图,我们可以了解其工作流程:

整个训练过程可以分解为四个主要阶段:首先,系统对输入提示进行编码,文本提示通过UL2编码器处理生成语义嵌入向量。同时系统还可以包含图像提示并进行编码以丰富输入信息。其次,这些嵌入向量被组合成嵌入提示,作为条件输入。系统初始化噪声压缩视频来模拟模型训练的生成空间。接下来,潜在扩散模型学习使用嵌入提示作为指导对压缩视频进行去噪处理,逐步生成精细化的压缩视频。最后,该输出通过解码器重建全分辨率视频,例如清晰的1080p向日葵绽放延时摄影。
这个高层图表隐藏了训练、预处理和安全措施等组件的技术细节。基于模型规格说明和技术报告,我们重新构建了Veo 3架构的详细分解图: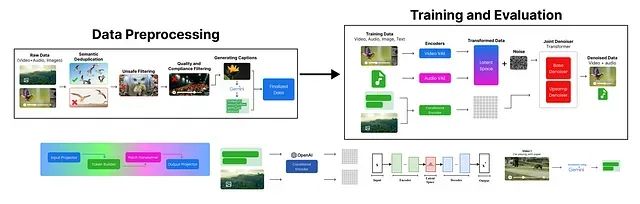
将Veo 3架构分解为四个核心阶段:数据预处理阶段负责输入数据的准备和预处理;训练阶段使用预处理后的数据训练Veo 3模型;评估阶段在各种指标上对训练后的模型进行性能评估。接下来我们将详细分析每个阶段的技术实现。
JAX框架及其重要性分析
AI模型训练涉及大量矩阵运算,随着训练过程的进行,内存消耗不断增加。Google在Veo 3模型规格说明中表示他们采用了JAX框架。
JAX是Google开发的开源数值计算库,专门用于高性能数值计算。为了演示JAX的性能优势,我们使用以下多项式方程进行测试:
我们将比较在NumPy和JAX中实现该函数的执行时间差异。首先导入必要的库并创建两个函数实现:
# 导入必要的库
import jax

# 定义NumPy函数实现
def f_np(x):
  return x**2 + 3*x + 2

# 定义采用JIT编译的JAX函数实现
@jax.jit
def f_jax(x):
  return x**2 + 3*x + 2
可以看到JAX版本使用了
@jax.jit装饰器,该装饰器用于编译函数以实现性能优化。
接下来创建包含1000万元素的数组并测量两个函数的执行时间:
# 导入性能测量所需的额外库
import numpy as np
import time
import jax.numpy as jnp

# 创建输入数组
x_np = np.arange(10_000_000, dtype=np.float32)     # 为NumPy创建大型数组
x_jax = jnp.arange(10_000_000, dtype=jnp.float32)  # 为JAX创建大型数组

# 测量NumPy函数性能
start_np = time.time()
result_np = f_np(x_np)
time_np = time.time() - start_np

# 测量JAX函数性能(首次调用)
start_jax_first = time.time()
result_jax_first = f_jax(x_jax)
time_jax_first = time.time() - start_jax_first

# 再次测量JAX函数性能以观察JIT编译效果
start_jax_second = time.time()
result_jax_second = f_jax(x_jax)
time_jax_second = time.time() - start_jax_second

# 输出时间测量结果
print(f"Numpy time: {time_np:.4f} seconds")
print(f"JAX first call time: {time_jax_first:.4f} seconds")
print(f"JAX second call time: {time_jax_second:.4f} seconds")
输出结果
Numpy time: 0.0493 seconds
JAX first call time: 0.1019 seconds
JAX second call time: 0.0148 seconds
JAX函数的首次调用由于JIT编译过程而耗时较长,但后续调用的性能显著提升。这种性能优化对于大规模计算场景至关重要,因为首次调用后无需重复编译开销。
此外,JAX还通过
jax.grad支持反向模式微分(即反向传播),以及自动向量化和并行化等高级功能,进一步增强了复杂计算的性能表现。
虽然JAX支持众多训练组件,但在我们的实现中将使用PyTorch和NumPy,以保持代码的清晰性和可理解性。
TPU与ML Pathways技术栈
OpenAI和Meta通常采用NVIDIA GPU进行训练,而Google一直偏好TPU架构。他们在Veo 3训练以及许多其他模型中都采用了这种技术路线。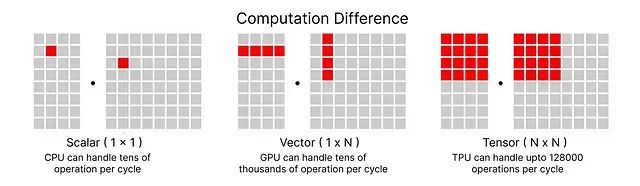
通过使用TPU,必须考虑ML Pathways这一Google的另一个项目,该项目旨在跨TPU Pod进行扩展,支持数千个TPU芯片而无需大量协调开销。该系统同时支持数据并行和模型并行。
在后续章节中,我们将深入了解为什么要使用JAX、TPU和ML Pathways的组合,因为Veo 3架构具有稀疏性特点,涉及多个模型和组件,而非单一模型训练。
数据预处理
第一阶段是
数据预处理,此环节对于训练 Veo 3 模型前的数据准备工作至关重要。其目标是构建一个高质量、多样化且内容安全的数据集,为后续模型训练奠定基础。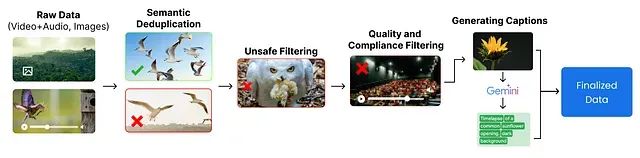
具体流程包括:
- 首先,从 YouTube、Google 搜索及其他平台(例如包含鸟类喂食场景的视频)收集
原始数据。 - 随后,执行
语义去重,以移除内容高度相似的冗余条目,保留多样性的样本(例如,保留一张清晰的鸟类图像,移除其他相似图像)。 - 接着,应用
不安全内容过滤机制,剔除有害或不适宜的内容(例如,移除一张描绘猫头鹰捕食的图像)。 - 之后,进行
质量与合规性筛选,舍弃低质量、模糊或不符合规范的数据(例如,一段昏暗且不清晰的剧院录像)。 - 数据清洗完毕后,利用 Gemini 等模型生成
字幕,以准确描述视频内容(例如,“向日葵盛开的延时摄影”)。
经过上述步骤,最终得到一个高质量、安全且带有标签的数据集,可直接用于模型训练。首先,导入数据预处理阶段所需的 Python 库:
# Google Generative AI SDK
# Google Generative AI SDK
import google.generativeai as genai

# Progress bar utility
# 进度条工具
from tqdm import tqdm

# File system operations
# 文件系统操作
import os

# Plotting and image display
# 绘图和图像显示
import matplotlib.pyplot as plt
import matplotlib.image as mpimg

# Pickle for loading/saving Python objects
# 用于加载/保存 Python 对象的 Pickle
import pickle

# Parallel processing utilities
# 并行处理工具
from concurrent.futures import ThreadPoolExecutor, as_completed

# Encoding/decoding utilities
# 编码/解码工具
import base64

# OpenAI API
# OpenAI API
from openai import OpenAI

# Computer vision library
# 计算机视觉库
import cv2

# Request handling
# 请求处理
import requests
原始数据收集
数据预处理的首要环节是收集原始数据,涵盖视频与图像。虽然存在大量公开的 Hugging Face 数据集,但考虑到本项目旨在学习和演示,我们将主要从 Pexels 等免费资源平台随机抓取视频,并存储于本地。
Veo 3 的训练依赖于海量数据,以捕捉广泛的物体类别与多样化的场景。在本实现中,我们将目标聚焦于特定类别,如自然风光、动物以及城市场景。以下是用于从 Pexels 获取视频的预设类别:
search_queries = [
'cats', # 🐱 animals # 🐱 动物
'people walking', # 🚶♀️ humans / activity # 🚶♀️ 人类 / 活动
'cars', # 🚗 vehicles / objects # 🚗 车辆 / 物体
'hunting', # 🏹 activity / nature # 🏹 活动 / 自然
]我们设定了有限的查询范围。接下来将使用 Pexels API 获取原始数据,需要配置相关参数。用户可从 Pexels 官网获取免费的 API 密钥(允许商业用途),并将其赋值给
PEXELS_API_KEY变量。
根据设定的搜索查询及其他参数(如每类10个视频),预计总共将获取约
40 个视频。视频的画面方向设定为横向(主要适用于笔记本/桌面端观看),尺寸选择为小尺寸(高清画质)。
通过遍历预设的搜索查询,可以利用 Pexels API 获取视频,并将其下载至本地目录。
# Create directory for downloaded videos and set up headers for API requests
# 为下载的视频创建目录,并为API请求设置请求头
os.makedirs('pexels_videos', exist_ok=True)
headers = {'Authorization': PEXELS_API_KEY}

total_videos_downloaded = 0  # Initialize counter for total videos downloaded  # 初始化已下载视频总数计数器

# Download videos for each search query
# 为每个搜索查询下载视频
for q in search_queries:
    # Search for videos using Pexels API
    # 使用 Pexels API 搜索视频
    r = requests.get('https://api.pexels.com/videos/search',
                     headers=headers,
                     params={'query': q, 'per_page': per_page, 'orientation': orientation, 'size': size})

    # Download each video from search results
    # 从搜索结果中下载每个视频
    for i, v in enumerate(r.json().get('videos', []), 1):

        # Get highest quality video file
        # 获取最高质量的视频文件
        f = max(v['video_files'], key=lambda x: x['width'])
        out = f'pexels_videos/{q.replace(" ", "_")}_{i}.mp4'

        # Download and save video file
        # 下载并保存视频文件
        with requests.get(f['link'], stream=True) as s, open(out, 'wb') as o:
            for chunk in s.iter_content(8192):
                o.write(chunk)

        total_videos_downloaded += 1  # Increment counter  # 递增计数器

print(f"Total videos downloaded: {total_videos_downloaded}")

#### OUTPUT ####
Total videos downloaded: 40
40 个原始视频数据已准备就绪。接下来,我们将参照 Google 的处理流程,在获取原始数据后执行语义去重操作。
语义去重
语义去重旨在识别并移除数据集中内容相似或重复的条目,以确保信息的独特性。此步骤对于处理 PB 级别的大规模数据集尤为关键,有助于节约存储资源。这是
Google在收集原始数据后执行的首要处理步骤。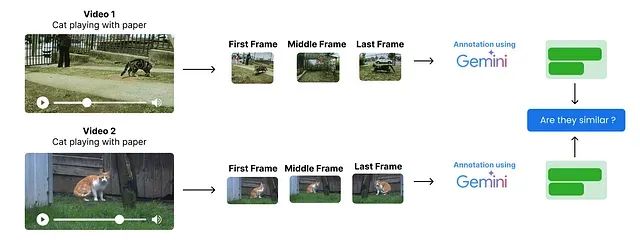
虽然本示例仅处理 40 个视频,但去重原则同样适用。其核心思路如下:
- 并非分析视频的每一帧,而是从各视频中提取起始帧、中间帧及结束帧作为关键帧。
- 利用多模态模型(如 Gemini、GPT、Claude 等)对这些关键帧进行标注,获取每帧的场景描述。
- 通过比较这些帧描述的相似性来识别潜在的重复视频。
逐帧处理视频的计算成本极高,尤其是在面对大规模数据集时。因此,本实现仅从每个视频中提取三帧进行分析。
首先,从视频中提取关键帧。以下函数实现了从每个视频中提取首、中、尾三帧的功能。
def extract_key_frames(video_path, output_dir):
    cap = cv2.VideoCapture(video_path)  # Open video file  # 打开视频文件
    if not cap.isOpened():
        print(f"Failed to open {video_path}")
        return []

    frame_count = int(cap.get(cv2.CAP_PROP_FRAME_COUNT))  # Get total frame count  # 获取总帧数
    indices = [0, frame_count // 2, frame_count - 1]  # Indices for key frames  # 关键帧的索引
    frame_paths = []

    for i, idx in enumerate(indices):
        cap.set(cv2.CAP_PROP_POS_FRAMES, idx)  # Set frame position  # 设置帧位置
        ret, frame = cap.read()  # Read frame  # 读取帧
        if ret:
            out_path = os.path.join(
                output_dir,
                f"{os.path.basename(video_path).split('.')[0]}_frame_{i+1}.png"
            )  # Output path for frame  # 帧的输出路径
            cv2.imwrite(out_path, frame)  # Save frame as PNG  # 将帧保存为 PNG 格式
            frame_paths.append(out_path)  # Add path to list  # 将路径添加到列表

    cap.release()  # Release video capture  # 释放视频捕获对象
    return frame_paths  # Return list of saved frame paths  # 返回保存的关键帧路径列表
执行该函数,从已下载的视频中提取关键帧。
os.makedirs('pexels_frames', exist_ok=True)  # Create directory for frames if it doesn't exist  # 如果帧目录不存在则创建

# Get list of all downloaded video files
# 获取所有已下载视频文件的列表
video_files = [os.path.join('pexels_videos', f) for f in os.listdir('pexels_videos') if f.endswith('.mp4')]
all_frame_paths = {}  # Dictionary to store extracted frame paths for each video  # 用于存储每个视频提取的关键帧路径的字典

# Use tqdm to show progress
# 使用 tqdm 显示进度
for video in tqdm(video_files, desc="Extracting key frames"):
    frames = extract_key_frames(video, 'pexels_frames')  # Extract key frames from video  # 从视频中提取关键帧
    all_frame_paths[video] = frames  # Store frame paths  # 存储帧路径
关键帧提取完成后,打印其中一个视频及其对应的关键帧,以验证提取过程的正确性。 # Pick a sample video and its frames #选取一个示例视频及其帧 sample_video = video_files[0] sample_frames = all_frame_paths[sample_video]
print(f"Sample video: {sample_video}")
print("Extracted key frames:")

plt.figure(figsize=(15, 5))
for i, frame_path in enumerate(sample_frames):
    img = mpimg.imread(frame_path)
    plt.subplot(1, 3, i + 1)
    plt.imshow(img)
    plt.title(f"Frame {i + 1}")
    plt.axis('off')
plt.show()
然后将这些图像帧转换为有意义的文本表示,以便进行去重和相似性比较。为便于代码复现,此处选择使用兼容 OpenAI API 格式的开源大型语言模型(LLM)(例如通过 Ollama 或其他支持此 API 格式的服务调用 Mistral-24B vision 模型),而非必须使用 Gemini。
本例采用 Mistral-24B vision 模型进行图像内容的描述。
client = OpenAI(
    base_url="https://api.studio.nebius.com/v1/",
    api_key="YOUR_LLM_PROVIDER_API_KEY"  # Replace with your OpenAI API key or any other API provider key (I am using Nebius AI)  # 请替换为您的 OpenAI API 密钥或任何其他 API 提供商的密钥(此处使用 Nebius AI)
)
 #Encode image file to base64 string
 # 将图像文件编码为 Base64 字符串
 def encode_image_to_base64(image_path):
     with open(image_path, "rb") as img_file:
     return base64.b64encode(img_file.read()).decode('utf-8')
# Get a concise scene description for a frame using Nebius API
# 使用 Nebius API 获取帧的简洁场景描述
def describe_frame(image_b64):
    response = client.chat.completions.create(
        model="mistralai/Mistral-Small-3.1-24B-Instruct-2503",
        messages=[
            {"role": "system", "content": "You generate concise scene descriptions for video frames."},
            {
                "role": "user",
                "content": [
                    {"type": "text", "text": "Describe the scene in this frame in one line."},
                    {"type": "image_url", "image_url": {"url": f"data:image/png;base64,{image_b64}"}}
                ]
            }
        ]
    )
    return response.choices[0].message.content.strip()
运行场景描述生成过程,并将结果存储于字典中。 # Generate scene descriptions for each video's key frames with progress bar # 为每个视频的关键帧生成场景描述,并显示进度条 video_descriptions = {}
for video, frames in tqdm(all_frame_paths.items(), desc="Describing frames"):
    descriptions = []
    for frame in frames:
        img_b64 = encode_image_to_base64(frame)
        desc = describe_frame(img_b64)
        descriptions.append(desc)
    video_descriptions[video] = descriptions
查看第一个视频生成的描述。
video_descriptions['pexels_videos\\cars_1.mp4']

#### OUTPUT ####
['A congested multi-lane highway filled ....',
    'Heavy traffic flows on a rainy highway ...',
'A busy, multi-lane highway filled with various cars ...']接下来,对视频描述进行语义去重。一种方法是利用嵌入模型 (embedding model) 将描述转换为向量表示,然后通过计算余弦相似度并设定阈值来识别重复项。
另一种方法是直接利用大型语言模型(LLM)进行语义去重。LLM 能够以类似人类的方式理解描述的上下文和深层含义。本实现将采用 LLM 来比较视频描述的语义相似性。
# Define the prompt template where two video descriptions are compared
# 定义比较两个视频描述的提示模板
compare_prompt_template = """
Compare the two videos based on their key frame descriptions.
Respond 'Yes' if they are near-duplicates, 'No' if different.

Video 1:
{desc1}

Video 2:
{desc2}

Is Video 2 a semantic duplicate of Video 1?
"""
此处将使用 LLaMA-3.3–70B 模型,通过一个比较函数来执行视频描述的语义去重。
# Use LLM to compare two videos' scene descriptions for semantic deduplication
# 使用 LLM 比较两个视频的场景描述以进行语义去重
def compare_descriptions(desc1, desc2):
    """
    Returns 'Yes' if videos are semantic duplicates, 'No' otherwise.
    # 如果视频在语义上重复,则返回 'Yes',否则返回 'No'。
    """

    response = client.chat.completions.create(
        model="meta-llama/Llama-3.3-70B-Instruct",
        max_tokens=10,
        temperature=0,
        messages=[
            {"role": "system", "content": "Answer strictly Yes or No."},
            {"role": "user", "content": compare_prompt_template.format(
                desc1=desc1,
                desc2=desc2
            )}
        ]
    )
    return response.choices[0].message.content.strip()
为加速视频描述的成对比较过程,避免因串行比较耗时过长,此处采用并行处理。具体实现将借助 concurrent.futures 库,并结合 tqdm 进行进度可视化。
# Prepare video list and names for pairwise comparison
# 准备视频列表和名称以进行成对比较
video_list = list(video_descriptions.keys())
video_names = [os.path.basename(v) for v in video_list]
n = len(video_list)

# Build all unique video pairs (including self-pairs)
# 构建所有唯一的视频对(包括自身与自身的比较)
pairs = [(i, j) for i in range(n) for j in range(i, n)]

# Function to compare two videos using their scene descriptions
# 使用场景描述比较两个视频的函数
def compare_pair(i, j):
    vid1 = video_list[i]
    vid2 = video_list[j]
    if i == j:
        return (video_names[i], video_names[j], "Self")

    desc1_text = "\n".join([f"Frame {k+1}: {d}" for k, d in enumerate(video_descriptions[vid1])])
    desc2_text = "\n".join([f"Frame {k+1}: {d}" for k, d in enumerate(video_descriptions[vid2])])

    result = compare_descriptions(desc1_text, desc2_text)
    return (video_names[i], video_names[j], result)

# Run pairwise comparisons in parallel and collect results
# 并行执行成对比较并收集结果
results = []
with ThreadPoolExecutor(max_workers=10) as executor:  # adjust max_workers as needed  # 根据需要调整 max_workers
    futures = {executor.submit(compare_pair, i, j): (i, j) for i, j in pairs}
    for f in tqdm(as_completed(futures), total=len(futures), desc="Comparing pairs"):
        results.append(f.result())
#### OUTPUT ####
Comparing pairs: 100%|██████████| 820/820 [00:40<00:00, 20.44it/s]
成对比较完成后,分析结果以识别重复项。
# check if any pairs are duplicates
# 检查是否存在重复的视频对
[r for r in results if r[2] == "Yes"]

#### OUTPUT ####
[ ]
通过上述基于 LLM 的场景描述比较,我们成功地对视频对进行了语义相似性评估,并识别了潜在的重复项。根据提供的描述,结果显示当前数据集中不存在被判定为语义重复的视频对。因此,在此阶段无需移除任何视频。
接下来,我们将着手构建一个有害内容过滤系统。
不安全内容过滤
与语义去重环节相似,不安全内容过滤同样基于对视频关键帧(此处仍选用首、中、尾三帧)的分析。合并这些关键帧的描述可以形成对视频内容的概览,从而用于识别并过滤潜在的有害内容。
尽管可以进一步将视频划分为更多(如5至7个)关键帧以提升准确性,但这将显著增加处理成本。当前采用的三帧策略是在成本与准确性之间寻求平衡的折衷方案。
这些描述将用于识别并过滤潜在的有害内容。其流程可图示如下: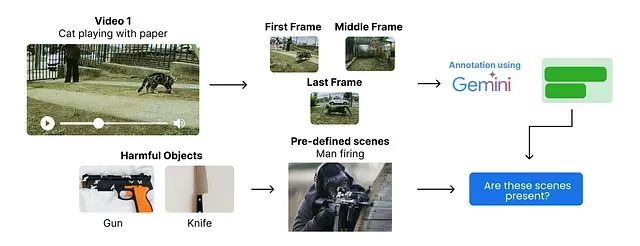
该过程的核心步骤包括:
- 从每个视频中提取首、中、尾三帧(此步骤已在语义去重环节完成)。
- 利用多模态模型为每个关键帧生成场景描述(此步骤同样已完成)。
- 根据预定义的有害内容类别(例如,涉及武器、血腥等场景),检查关键帧的场景描述是否匹配这些类别。
首先,定义基于场景描述的有害内容类别。以下为一个简化的示例列表;在实际应用中,应采用更全面的有害内容定义。
# Define harmful scenes to filter out
# 定义需要过滤的有害场景
harmful_scenes = ["man holding a gun and pointing it somewhere", "blood on the ground", "people fighting"]

# Or if you are targeting only categories of harmful content
# 或者,如果仅针对有害内容的类别
# harmful_categories = ["violence", "weapons", "blood", "fighting"]
我们已经定义了有害内容的标准。虽然可以直接采用基于有害物体识别的过滤方法,但这可能导致误将无害内容移除。
例如,若一把刀用于切割水果,而“刀”被列入有害物体清单,则包含此场景的视频将被错误删除。因此,本实现采用基于场景描述的方法进行有害内容过滤,这种方法通常更为准确,且不易产生误报。
创建一个函数来过滤有害内容,该函数将合并帧描述,并利用 LLM 判断是否包含任何有害关键词。
本例采用 LLaMA-3.3–70B 模型,通过一个比较函数对视频描述进行不安全内容过滤。
def classify_harmfulness(descriptions):
    prompt = f"""
    You are given descriptions of three key frames from a video.
    Check if any of the following harmful scenes (or anything very close to them) are present in the descriptions:

    Harmful scenes:
    {chr(10).join(f"- {scene}" for scene in harmful_scenes)}

    Frame descriptions:
    {chr(10).join([f"Frame {i+1}: {desc}" for i, desc in enumerate(descriptions)])}

    If any harmful scene or something very similar is present, respond strictly with 'Harmful'. Otherwise, respond strictly with 'Safe'.
    """
    response = client.chat.completions.create(
        model="meta-llama/Llama-3.3-70B-Instruct",
        max_tokens=10,
        temperature=0,
        messages=[
            {"role": "system", "content": "Answer strictly Safe or Harmful."},
            {"role": "user", "content": prompt}
        ]
    )
    return response.choices[0].message.content.strip()
与去重步骤类似,可以采用并行处理来对视频描述中的有害内容进行分类。
with ThreadPoolExecutor(max_workers=10) as executor:
    futures = {
        executor.submit(classify_harmfulness, descriptions): video
        for video, descriptions in video_descriptions.items()
    }
    for future in tqdm(as_completed(futures), total=len(futures), desc="Classifying harmful content"):
        video = futures[future]
        result = future.result()
        if result == "Harmful":
            harmful_videos_llm.append(video)

# Total harmful videos identified by LLM
# LLM 识别出的有害视频总数
print(f"Total harmful videos identified by LLM: {len(harmful_videos_llm)}")
#### OUTPUT ####
Total harmful videos identified by LLM: 3
根据场景描述分析,已识别出 3 个视频 包含有害内容。打印这些视频的 ID。
print(harmful_videos_llm)

#### OUTPUT ####
 ['pexels_videos\\hunting_1.mp4',
     'pexels_videos\\hunting_4.mp4',
'pexels_videos\\hunting_9.mp4']此结果符合预期。回顾原始数据收集阶段,我们曾使用搜索查询“hunting”。因此部分视频包含狩猎场景的可能性较高,而这类场景在某些标准下可能被视为有害。
打印其中一个被识别为有害的视频,以查看其描述信息。
# Plot the first frame of each harmful video detected by the LLM
# 绘制 LLM 检测到的每个有害视频的第一帧
n = len(harmful_videos_llm)
fig, axes = plt.subplots(1, n, figsize=(5 * n, 5))

if n == 1:
    axes = [axes]

# Display the first frame for each harmful video
# 显示每个有害视频的第一帧
for ax, video in zip(axes, harmful_videos_llm):
    frames = all_frame_paths[video]
    if frames:
        img = mpimg.imread(frames[0])
        ax.imshow(img)
        ax.set_title(f"Harmful Video: {os.path.basename(video)}")
        ax.axis('off')
    else:
        ax.set_visible(False)

plt.tight_layout()
plt.show()
这些视频各不相同,尽管它们可能源自同一创作者。LLM 准确地将它们识别为有害内容,因为我们的有害场景列表中包含了“man holding a gun and pointing it somewhere.”(男性持枪指向某处)。接下来,从数据集中移除这些视频。
完成不安全内容过滤后,下一步是进行质量与合规性筛选。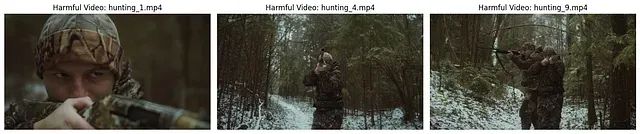
质量与合规性过滤
质量与合规性过滤是预处理流程中在数据标注之前的关键步骤,在此阶段将依据特定要求对数据进行进一步的分析与筛选。
例如,若目标是构建高质量视频数据集,则需依据特定标准(如模糊度、分辨率等)剔除低质量视频。或者,若目标是特定类型的内容,则需过滤掉不符合要求(例如,包含知名人物、名人等)的视频。
其流程可图示如下: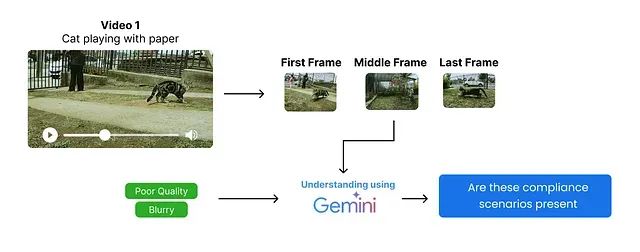
该过程的核心步骤包括:
- 从每个视频中提取首、中、尾三帧(此步骤已完成)。
- 根据具体需求定义质量与合规标准(例如,是否包含车牌、名人,视频是否模糊等)。
- 基于场景描述识别预定义的质量与合规问题,并检查关键帧的场景描述是否触发这些标准。
与不安全内容过滤步骤类似,可以分析多个关键帧以评估质量,但为简化起见,本实现仍聚焦于首、中、尾三帧。
以下为一个简化的质量标准定义;在
Veo 3这样的实际大规模应用中,需要采用更全面的标准列表。
# We are focusing on Blurry, and Poor lighting as quality compliance issues
# 我们关注模糊和光照不足作为质量合规问题
quality_compliance = [
    "Blurry: The video is so out of focus that the primary objects or subjects cannot be clearly seen or identified.",
    "Poor lighting: The video is too dark, too bright, or has uneven lighting, making it difficult to see or recognize key objects or actions."
]
定义一个函数
check_frame_quality,该函数利用多模态 LLM 对每帧的质量进行分类。本例采用 Mistral 24B 模型执行此任务。
def check_frame_quality(image_b64):
    issues = ", ".join(quality_compliance)
    response = client.chat.completions.create(
        model="mistralai/Mistral-Small-3.1-24B-Instruct-2503",
        messages=[
            {"role": "system", "content": (
                f"You are an expert in video quality assessment. "
                f"If the frame has {issues}, reply 'Non-compliant'. Else reply 'Compliant'."
            )},
            {"role": "user", "content": [
                {"type": "text", "text": (
                    f"Does this frame have {issues}? Reply 'Compliant' or 'Non-compliant'."
                )},
                {"type": "image_url", "image_url": {"url": f"data:image/png;base64,{image_b64}"}}
            ]}
        ],
        max_tokens=10,
        temperature=0
    )
    return response.choices[0].message.content.strip()
质量合规性检查主要关注中间帧。因此创建一个函数从每个视频中提取中间帧。
def classify_middle_frame(video_path, frames):
    # Try to check the quality of the middle frame (frame 2)
    # 尝试检查中间帧(第2帧)的质量
    try:
        # Ensure frames list is not empty and has at least 2 elements (index 1)
        # 确保帧列表不为空且至少包含2个元素(索引1)
        if frames and len(frames) > 1:
            image_b64 = encode_image_to_base64(frames[1])  # Encode middle frame to base64  # 将中间帧编码为base64
            # Return video path if frame is non-compliant
            # 如果帧不符合规定,则返回视频路径
            return video_path if check_frame_quality(image_b64) == "Non-compliant" else None
        else:
            # If frames list is empty or too short, mark as non-compliant
            # 如果帧列表为空或太短,则标记为不符合规定
            return video_path
    except Exception as e:
        print(f"Error processing {video_path}: {e}")
        # On error, mark as non-compliant for safety
        # 发生错误时,为安全起见标记为不符合规定
        return video_path
为避免处理时间过长,此处同样采用多线程并行处理。
# Non compliant videos list
# 不合规视频列表
non_compliant_videos = []

# Use ThreadPoolExecutor to classify middle frames in parallel
# 使用 ThreadPoolExecutor 并行分类中间帧
with ThreadPoolExecutor(max_workers=10) as executor:
    # Create a dictionary to map futures to video paths for easier error tracking if needed
    # 创建一个字典,将 future 映射到视频路径,以便在需要时更轻松地进行错误跟踪
    future_to_video = {executor.submit(classify_middle_frame, v, f): v for v, f in all_frame_paths.items() if v not in harmful_videos_llm}

    # Use tqdm for progress bar
    # 使用 tqdm 显示进度条
    for future in tqdm(as_completed(future_to_video), total=len(future_to_video), desc="Checking frame quality"):
        result = future.result()
        if result:
            non_compliant_videos.append(result)

print(f"Total non-compliant videos found: {len(non_compliant_videos)}")
#### OUTPUT ####
Total non-compliant videos found: 8
根据中间帧质量检查,共发现 8 个不合规视频。可视化其中一个不合规视频的中间帧以分析问题。
# Pick the random non-compliant video
# 随机选取一个不合规的视频
video_path = non_compliant_videos[6]
middle_frame_path = all_frame_paths[video_path][1]  # Middle frame is at index 1  # 中间帧的索引为1

img = mpimg.imread(middle_frame_path)
plt.imshow(img)
plt.title(f"Middle Frame: {video_path}")
plt.axis('off')
plt.show()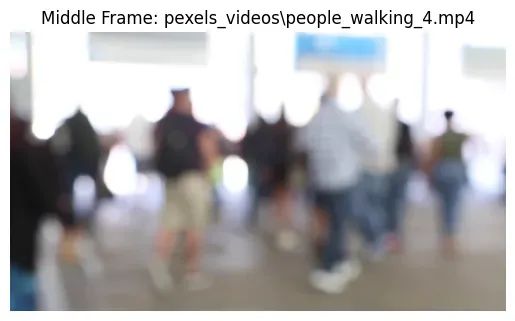
该帧确实存在模糊问题,所用方法已将其正确识别为不合规。接下来,从数据集中移除这些不合规视频。
for video in non_compliant_videos:
    try:
        os.remove(video)  # Remove the video file  # 删除视频文件
        print(f"Removed non-compliant video: {video}")
    except Exception as e:
        print(f"Error removing {video}: {e}")  # Handle any errors during removal  # 处理删除过程中的任何错误
至此,数据集中所有有害及不合规的视频均已移除。统计筛选后剩余的视频数量。
# Count the number of videos remaining after filtering
# 统计筛选后剩余的视频数量
video_paths = [os.path.join('pexels_videos', f) for f in os.listdir('pexels_videos') if f.endswith('.mp4')]
print(f"Total remaining videos after filtering: {len(video_paths)}")
#### OUTPUT ####
Total remaining videos after filtering: 28
当前训练视频的长度各异。为统一输入,需将训练视频修剪至固定长度。
Veo 3能够生成长达 8 秒的视频。为简化实现,本例将所有视频统一修剪为
5秒。
此举有助于减小数据集规模,并解决因视频过长导致的训练时间和资源消耗增加的问题。
执行视频修剪操作。
# Function to trim videos to a specified duration (in seconds)
# 将视频修剪到指定时长(秒)的函数
def trim_video(input_path, output_path, duration=5):
    # Open the input video file
    # 打开输入视频文件
    cap = cv2.VideoCapture(input_path)
    fps = cap.get(cv2.CAP_PROP_FPS)  # Get frames per second  # 获取帧率
    total_frames = int(cap.get(cv2.CAP_PROP_FRAME_COUNT))  # Total number of frames in the video  # 视频总帧数
    target_frames = int(fps * duration)  # Number of frames to keep for the specified duration  # 指定时长对应的帧数

    # If the video is shorter than the target duration, skip trimming
    # 如果视频时长短于目标时长,则跳过修剪
    if total_frames < target_frames:
        print(f"Video {input_path} is shorter than {duration} seconds. Skipping.")
        cap.release()
        return

    # Set up the video writer for the output trimmed video
    # 为输出的修剪后视频设置 VideoWriter
    fourcc = cv2.VideoWriter_fourcc(*'mp4v')
    out = cv2.VideoWriter(output_path, fourcc, fps, (int(cap.get(3)), int(cap.get(4))))

    # Write frames up to the target duration
    # 写入帧直至达到目标时长
    for _ in range(target_frames):
        ret, frame = cap.read()
        if not ret:
            break
        out.write(frame)

    # Release resources
    # 释放资源
    cap.release()
    out.release()
对所有视频执行此修剪函数。
os.makedirs('trimmed_videos', exist_ok=True)

def process_video(input_path):
    output_path = os.path.join('trimmed_videos', os.path.basename(input_path))
    trim_video(input_path, output_path, duration=5)

with ThreadPoolExecutor(max_workers=8) as executor:
    list(tqdm(executor.map(process_video, video_paths), total=len(video_paths), desc="Trimming videos"))
视频已修剪至 5 秒并存储于 trimmed_videos 目录。可进一步执行筛选步骤,例如,仅保留文件大小小于 20 MB 的视频。这有助于确保视频文件轻量化,便于后续处理与分发。
执行此步骤,移除文件体积较大的视频,仅保留较小者。
# Remove videos that are more than 20MB in size with progress bar
# 移除体积大于20MB的视频,并显示进度条
def remove_large_videos(video_paths, max_size_mb=20):
    for video in tqdm(video_paths, desc="Checking video sizes"):
        if os.path.getsize(video) > max_size_mb * 1024 * 1024:  # Convert MB to bytes  # 将MB转换为字节
            try:
                os.remove(video)
                print(f"Removed large video: {video}")
            except Exception as e:
                print(f"Error removing {video}: {e}")

# Call the function to remove large videos
# 调用函数移除大体积视频
remove_large_videos(trimmed_video_paths, max_size_mb=20)
# get all trimmed video paths
# 获取所有修剪后视频的路径
trimmed_video_paths = [os.path.join('trimmed_videos', f) for f in os.listdir('trimmed_videos') if f.endswith('.mp4')]
print(f"Total trimmed videos: {len(trimmed_video_paths)}")
#### OUTPUT ####
Total trimmed videos: 22
经过有害内容及不合规视频的过滤,最终剩余 22 个视频。现在进入预处理流程的最后一步:对这些经过筛选的视频进行内容标注。
数据标注
在
Veo 3的实际构建流程中,前述的各项过滤步骤可能会迭代执行多次。数据预处理的最终环节是数据标注。尽管在先前步骤中尝试使用开源模型以控制成本,但高质量的视频内容标注通常需要依赖具备强大视频理解能力的模型,如 Google 的 Gemini 系列。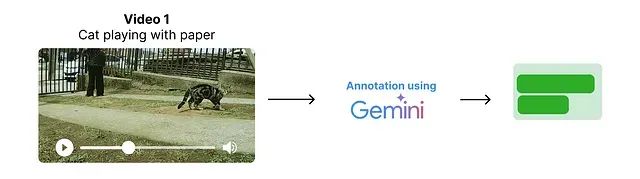
Veo 3 的训练数据预处理,包括标注环节,均多次迭代进行,其中标注任务主要由 Gemini 模型完成。本实现将遵循类似流程。用户可从 Gemini 官网获取免费 API 密钥(允许商业用途),并将其配置到
GEMINI_API_KEY环境变量或代码变量中。
genai.configure(api_key="YOUR_GEMINI_API_KEY")  # Replace with your Gemini API key  # 请替换为您的 Gemini API 密钥

model = genai.GenerativeModel("gemini-2.0-flash") # We are using Gemini 2.0 Flash model # 本示例使用 Gemini 2.0 Flash 模型
对修剪后的视频进行标注。
# Iterate through each trimmed video and generate a summary annotation
# 遍历每个修剪后的视频并生成摘要式标注
for video_file_name in tqdm(trimmed_video_paths, desc="Annotating videos"):
    with open(video_file_name, 'rb') as f:
        video_bytes = f.read()
    try:
        # Use Gemini model to generate a 3-sentence summary for the video
        # 使用 Gemini 模型为视频生成一个三句话的摘要
        response = model.generate_content([
            {
                "mime_type": "video/mp4",
                "data": video_bytes
            },
            "Summarize the video in 3 sentences. Provide only the summary and nothing else."
        ])
        # Extract summary text from the response
        # 从响应中提取摘要文本
        summary = response.text if hasattr(response, "text") else str(response)
    except Exception as e:
        # Handle errors and store the error message as summary
        # 处理错误并将错误信息作为摘要存储
        summary = f"Error: {e}"
    # Append the annotation result to the list
    # 将标注结果追加到列表中
    video_annotations.append({"video_path": video_file_name, "summary": summary})
  # 打印一个标注示例
  video_annotations[0]
  #### OUTPUT ####
 {'video_path': 'trimmed_videos\\cars_10.mp4',
   'summary': 'The video shows two cars drifting in a parking lot track marked with tires, with a crowd watching from a building in the background. The yellow car takes the initial lead but is overtaken by the dark colored car, which then drifts around the tires leaving smoke. The cars continue to drift around the track marked with tires.\n'}
对生成的摘要进行必要的清理,例如移除固定的前缀(如 “The video shows”)并确保摘要的简洁性。
# Removing 'The video shows' prefix from summaries
# 从摘要中移除 "The video shows" 前缀
for annotation in video_annotations:
    if annotation['summary'].startswith("The video shows"):
        annotation['summary'] = annotation['summary'][len("The video shows"):].strip()
至此,已按照 Veo 3 的规范对数据进行了预处理,包括去重、质量合规检查及生成简洁标注。为适应 Veo 3 模型的训练需求,仍需对数据结构进行进一步调整。
此步骤属于 Veo 3 模型训练流程的一部分,将在后续章节中详细介绍。
Veo 3 模型架构
第二阶段是
Veo 3 模型架构的编码实现。此阶段是整个项目的核心与难点所在,涉及 Veo 3 模型具体架构的设计与代码实现。
Veo 3 支持通过以下两种类型的输入生成高质量视频:
文本提示 (Text prompts):对期望视频内容的自然语言描述,例如“向日葵绽放的延时摄影 (A timelapse of a sunflower blooming)。”图像提示 + 文本提示 (Image prompts + Text prompts):图像与文本描述的组合,例如,提供一张向日葵图片,并配合文本“向日葵绽放的延时摄影 (A timelapse of a sunflower blooming)”。
其核心流程可图示如下: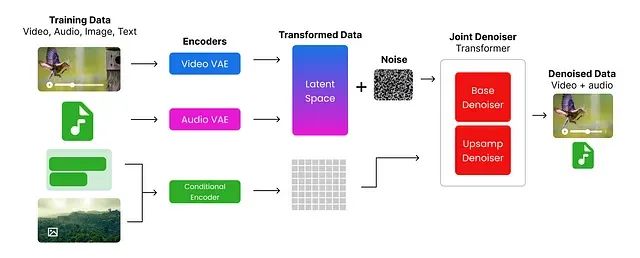
流程概述:
- 视频与音频分别通过
视频编码器 (Video Encoder)与音频编码器 (Audio Encoder)进行编码。 - 图像与文本则利用 Google 提供的 UL2 编码器进行编码。
- 编码后的视频与音频(通常会加入一定的噪声),连同嵌入式图像与文本信息,共同输入到一个基于 Transformer 架构的联合去噪器 (Joint Denoiser)。
- 该联合去噪器处理这些多模态输入,并生成视频与音频的联合表示。
接下来将逐步实现这些组件。首先,导入此阶段所需的 Python 库。
import imageio  # For reading/writing images  # 用于读写图像
from PIL import Image  # For image manipulation  # 用于图像处理

import torch  # Core PyTorch library  # PyTorch 核心库
import torch.nn as nn  # For neural network modules  # PyTorch 神经网络模块
import torch.nn.functional as F  # Functional API (e.g., activation functions)  # PyTorch 函数式 API (如激活函数)
import torch.optim as optim  # Optimizers (e.g., Adam, SGD)  # PyTorch 优化器 (如 Adam, SGD)
from torch.optim.lr_scheduler import CosineAnnealingLR  # Learning rate scheduler  # 学习率调度器
from torch.utils.data import Dataset, DataLoader  # For creating datasets and loading data  # 用于创建数据集和数据加载器
import torchaudio  # For audio processing  # 用于音频处理

from torchvision import transforms  # For common image transformations  # 用于常见图像变换

from diffusers import DDPMScheduler  # For diffusion models scheduling  # Diffusers 库中的 DDPMScheduler
from transformers import CLIPProcessor, CLIPModel  # For CLIP model and processor  # Transformers 库中的 CLIP 模型和处理器

from einops import rearrange  # For tensor reshaping and repetition  # einops 库,用于张量重排和重复

import numpy as np  # For numerical operations  # NumPy 库,用于数值运算

import skimage.transform # For image transformations (e.g., resizing, cropping)  # scikit-image 库,用于图像变换 (如缩放、裁剪)

# Set computation device to GPU if available, otherwise CPU
# 设置计算设备,优先使用 GPU (如果可用),否则使用 CPU
DEVICE = torch.device("cuda" if torch.cuda.is_available() else "cpu")
数据重组
在数据预处理阶段,最终的数据集仅包含视频文件。然而,Veo 3 模型支持图像与文本结合的输入方式,并且音频数据需要单独处理。因此,首要任务是对数据集进行重组,为每种数据类型建立清晰的结构。
目标数据结构如下: 📁 dataset/ ├── 📁 t2v_pairs/ # dir containing text to videos pairs training data # 包含文本到视频对训练数据的目录 │ ├── 📄 video_1.mp4 # video file # 视频文件 │ ├── 📄 video_1.wav # audio file (extracted from video_1.mp4) # 音频文件 (从 video_1.mp4 提取) │ ├── 📄 video_1.txt # text prompt or annotation for video_1.mp4 # video_1.mp4 的文本提示或标注 │ └── ... └── 📁 i2v_pairs/ # dir containing image to videos pairs training data # 包含图像到视频对训练数据的目录 ├── 📄 image_1.jpg # input image # 输入图像 ├── 📄 video_1.mp4 # generated video file # 生成的视频文件 ├── 📄 video_1.wav # audio file (extracted from video_1.mp4) # 音频文件 (从 video_1.mp4 提取) └── ...
此步骤主要涉及常规的 Python 文件操作与数据组织,其具体代码实现已整合至
transform_data.py文件中,可用于将前述处理得到的修剪后视频数据转换为上述
dataset/目录结构。此处不再赘述其实现细节。
dataset/目录准备就绪后,需进一步依据音频、图像和视频文件的路径,创建结构化的数据集变量。这将便于在模型训练和推理阶段高效地访问数据。
首先,定义包含成对数据集的目录路径: # Paths # 路径定义 i2v_dir = 'dataset/i2v_pairs' t2v_dir = 'dataset/t2v_pairs'
# Collect files
# 收集文件列表
i2v_files = os.listdir(i2v_dir)
t2v_files = os.listdir(t2v_dir)
构建文本到视频 (Text-to-Video, T2V) 的数据对信息。
# Build T2V_INFO
# 构建 T2V_INFO 列表
t2v_info = []
t2v_videos = [f for f in t2v_files if f.endswith('.mp4')]

for idx, video_file in enumerate(t2v_videos, start=1):
    base_name = os.path.splitext(video_file)[0]
    audio_file = f"{base_name}.wav"

    # Find matching annotation
    # 查找匹配的标注信息
    annotation = next((a for a in video_annotations if a['video_path'].split('\\')[-1] == video_file), None)
    caption = annotation['summary'] if annotation else ''

    t2v_info.append({
        'id': f"t2v_{idx:03d}",
        'video_path': video_file,
        'audio_path': audio_file,
        'initial_caption': caption
    })
类似地,构建图像加文本到视频 (Image+Text-to-Video, I2V) 的数据对信息。
# Build I2V_INFO
# 构建 I2V_INFO 列表
i2v_info = []
i2v_images = [f for f in i2v_files if f.endswith('.jpg')]

for idx, image_file in enumerate(i2v_images, start=1):
    base_name = os.path.splitext(image_file)[0]
    video_file = f"{base_name}.mp4"
    audio_file = f"{base_name}.wav"

    # Find matching annotation
    # 查找匹配的标注信息
    annotation = next((a for a in video_annotations if a['video_path'].split('\\')[-1] == video_file), None)
    prompt = annotation['summary'] if annotation else ''

    i2v_info.append({
        'id': f"i2v_{idx:03d}",
        'image_path': image_file,
        'target_video_path': video_file,
        'target_audio_path': audio_file,
        'prompt': prompt
    })
检查生成的数据对数量。
len(i2v_info), len(t2v_info)  # Check the lengths of the info lists  # 检查信息列表的长度

#### OUTPUT ####
(5, 17)
为进行模型训练,需将训练数据(包括视频、音频、图像)转换为
张量 (tensors)。张量是可供模型处理并在训练过程中优化的多维数组。本实现将使用 torch 库完成数据到张量的转换。
定义两个核心的预处理函数:一个用于视频数据,另一个用于音频数据。同时,声明一些后续流程中将使用的常量与参数。
# Base video frames (meaning the number of frames to extract from each video)
# 基础视频帧数 (即从每个视频中提取的帧数)
BASE_VIDEO_FRAMES = 16

# Function to preprocess video files into tensors
# 将视频文件预处理为张量的函数
def preprocess_video(path, target_height, target_width):
    # Read video frames using imageio
    # 使用 imageio 读取视频帧
    reader = imageio.get_reader(path, 'ffmpeg')
    frames = []
    for i, f in enumerate(reader):
        if i >= BASE_VIDEO_FRAMES:
            break
        # Resize each frame to (target_height, target_width) and convert to tensor (C, H, W)
        # 将每帧调整大小至 (target_height, target_width) 并转换为张量 (通道, 高, 宽)
        resized = skimage.transform.resize(f, (target_height, target_width), anti_aliasing=True)
        tensor = torch.from_numpy(resized).permute(2, 0, 1).float()
        frames.append(tensor)
    # Pad with black frames if not enough frames are present
    # 如果帧数不足,则用黑色帧进行填充
    if len(frames) < BASE_VIDEO_FRAMES and frames:
        pad_frame = torch.zeros_like(frames[0])
        frames.extend([pad_frame] * (BASE_VIDEO_FRAMES - len(frames)))
    # Stack frames into a tensor of shape (C, T, H, W)
    # 将帧堆叠为形状为 (通道, 帧数, 高, 宽) 的张量
    return torch.stack(frames, dim=1) if frames else None
视频预处理函数定义完毕,其中包含一个关键参数
BASE_VIDEO_FRAMES。接下来定义音频文件的预处理函数,并设定音频相关的特定参数。
# Audio parameters
# 音频参数
AUDIO_SAMPLE_RATE = 16000 # Standard sample rate for audio processing (meaning the number of samples per second)  # 音频处理的标准采样率 (即每秒采样数)
AUDIO_DURATION_SEC = 2 # Duration of audio clips in seconds (meaning how long each audio clip should be)  # 音频片段时长 (秒) (即每个音频片段的长度)
AUDIO_SAMPLES = AUDIO_SAMPLE_RATE * AUDIO_DURATION_SEC # Total number of audio samples (meaning the total number of audio samples in the clip)  # 音频样本总数 (即片段中的总音频采样点数)

# This function preprocesses audio files to ensure they are in the correct format and length
# 此函数对音频文件进行预处理,以确保其格式和长度符合要求
def preprocess_audio(path):
    w, sr = torchaudio.load(path)
    # Keep only the first channel if multi-channel
    # 如果是多声道音频,则仅保留第一个声道
    if w.shape[0] > 1:
        w = w[:1, :]
    # Resample if needed
    # 如果采样率不匹配,则进行重采样
    if sr != AUDIO_SAMPLE_RATE:
        w = torchaudio.transforms.Resample(sr, AUDIO_SAMPLE_RATE)(w)
    # Pad or trim to fixed length
    # 填充或裁剪至固定长度
    if w.shape[1] < AUDIO_SAMPLES:
        w = F.pad(w, (0, AUDIO_SAMPLES - w.shape[1]))
    else:
        w = w[:, :AUDIO_SAMPLES]
    # Normalize
    # 归一化处理
    max_val = torch.max(torch.abs(w))
    if max_val > 0:
        w = w / max_val
    return w
训练过程关注两种视频张量:基础视频张量 (base video tensor) 与上采样视频张量 (upsampled video tensor)。基础视频张量由原始视频帧构成,而上采样视频张量则通过重复帧以匹配目标帧数来创建。
为统一处理图像、视频和音频数据,需在现有预处理函数的基础上构建两个新的数据加载函数。
# Define constants for video dimensions
# 定义视频尺寸常量
UPSAMPLED_VIDEO_HEIGHT = 64 # Height of the upsampled video frames (meaning the height of the video frames after upsampling)  # 上采样视频帧的高度 (即上采样后视频帧的高度)
UPSAMPLED_VIDEO_WIDTH = 64 # Width of the upsampled video frames (meaning the width of the video frames after upsampling)  # 上采样视频帧的宽度 (即上采样后视频帧的宽度)
BASE_VIDEO_HEIGHT = 32 # Height of the base video frames (meaning the height of the original video frames before upsampling)  # 基础视频帧的高度 (即上采样前原始视频帧的高度)
BASE_VIDEO_WIDTH = 32 # Width of the base video frames (meaning the width of the original video frames before upsampling)  # 基础视频帧的宽度 (即上采样前原始视频帧的宽度)

T2V_DATA_DIR = 'dataset/t2v_pairs' # Directory for T2V pairs (meaning the directory where the text-to-video pairs are stored)  # T2V 数据对目录 (即存储文本到视频数据对的目录)
I2V_DATA_DIR = 'dataset/i2v_pairs' # Directory for I2V pairs (meaning the directory where the image-to-video pairs are stored)  # I2V 数据对目录 (即存储图像到视频数据对的目录)
参数定义完成后,编写 T2V 和 I2V 数据集的加载逻辑。
def load_i2v_item(info):
    # Load a base and upsampled version of the input image
    # 加载输入图像的基础分辨率版本和上采样版本
    img_pil = Image.open(
        os.path.join(I2V_DATA_DIR, info['image_path'])
    ).convert('RGB')
    img_base = transforms.ToTensor()(
        img_pil.resize((BASE_VIDEO_WIDTH, BASE_VIDEO_HEIGHT))
    )
    img_upsampled = transforms.ToTensor()(
        img_pil.resize((UPSAMPLED_VIDEO_WIDTH, UPSAMPLED_VIDEO_HEIGHT))
    )

    # Preprocess target video at base and upsampled resolutions
    # 在基础分辨率和上采样分辨率下预处理目标视频
    vid_base = preprocess_video(
        os.path.join(I2V_DATA_DIR, info['target_video_path']),
        BASE_VIDEO_HEIGHT, BASE_VIDEO_WIDTH
    )
    vid_upsampled = preprocess_video(
        os.path.join(I2V_DATA_DIR, info['target_video_path']),
        UPSAMPLED_VIDEO_HEIGHT, UPSAMPLED_VIDEO_WIDTH
    )

    # Preprocess target audio
    # 预处理目标音频
    aud = preprocess_audio(
        os.path.join(I2V_DATA_DIR, info['target_audio_path'])
    )

    # Return a dictionary containing all modalities and metadata
    # 返回一个包含所有模态数据和元数据的字典
    return {
        'modality': 'i2v',
        'input_image_base': img_base,
        'input_image_upsampled': img_upsampled,
        'target_video_base': vid_base,
        'target_video_upsampled': vid_upsampled,
        'target_audio': aud,
        'caption': info['prompt'],
        'id': info['id']
    }
以及 T2V 数据项的加载逻辑:
def load_t2v_item(info):
    base_vid = preprocess_video(
        os.path.join(T2V_DATA_DIR, info['video_path']),
        BASE_VIDEO_HEIGHT, BASE_VIDEO_WIDTH
    )
    upsampled_vid = preprocess_video(
        os.path.join(T2V_DATA_DIR, info['video_path']),
        UPSAMPLED_VIDEO_HEIGHT, UPSAMPLED_VIDEO_WIDTH
    )
    audio = preprocess_audio(
        os.path.join(T2V_DATA_DIR, info['audio_path'])
    )
    if base_vid is not None and upsampled_vid is not None and audio is not None:
        return {
            'modality': 't2v',
            'video_base': base_vid,
            'video_upsampled': upsampled_vid,
            'audio': audio,
            'caption': info['initial_caption'],
            'id': info['id']
        }
    return None
至此,数据重组的最后一步——将数据转换为适合训练的张量格式——已准备就绪。
# Load Text-to-Video (T2V) data:
# 加载文本到视频 (T2V) 数据:
# - For each entry in t2v_info, call load_t2v_item to preprocess video, audio, and caption.
# - 对 t2v_info 中的每个条目,调用 load_t2v_item 函数预处理视频、音频和字幕。
# - Only keep non-None results.
# - 仅保留非 None 的结果。
t2v_data = [
    d for d in [
        load_t2v_item(i) for i in tqdm(t2v_info, desc="Loading T2V data")
    ] if d
]

# Load Image-to-Video (I2V) data:
# 加载图像到视频 (I2V) 数据:
# - For each entry in i2v_info, call load_i2v_item to preprocess image, video, audio, and prompt.
# - 对 i2v_info 中的每个条目,调用 load_i2v_item 函数预处理图像、视频、音频和提示。
# - Only keep non-None results.
# - 仅保留非 None 的结果。
i2v_data = [
    d for d in [
        load_i2v_item(i) for i in tqdm(i2v_info, desc="Loading I2V data")
    ] if d
]
将更新后的张量数据合并为一个统一的数据变量。
raw_data = t2v_data + i2v_data # Combine both datasets # 合并两个数据集原始数据已成功转换为适合训练的格式。在进入视频或音频编码器实现之前,需创建一个
MultiModalDataset类,用于统一管理数据加载与批处理。该类将以结构化方式封装所有转换后的数据,便于访问不同模态(视频、音频、图像、文本)及其对应的字幕信息。
创建多模态数据集 (MultiModalDataset)
采用面向对象编程(OOP)是组织训练数据的恰当方式。此处将创建一个
MultiModalDataset类,负责 T2V 和 I2V 数据集的数据加载与处理。
BATCH_SIZE = 1  # Batch size for DataLoader (how many samples to process in one batch)  # DataLoader 的批处理大小 (即单批次处理的样本数量)

class MultiModalDataset(Dataset):
    def __init__(self, data_list):
        # Store the list of data samples (each sample is a dict for t2v or i2v)
        # 存储数据样本列表 (每个样本是一个用于 t2v 或 i2v 的字典)
        self.data = data_list

    def __len__(self):
        # Return the number of samples in the dataset
        # 返回数据集中的样本总数
        return len(self.data)

    def __getitem__(self, idx):
        # Get the sample at the given index
        # 获取指定索引处的样本
        item = self.data[idx]
        # Use the caption (should be set in your data)
        # 使用样本中的字幕信息
        caption_string = item['caption']

        if item['modality'] == 't2v':
            # For text-to-video: return video, audio, and a dummy image tensor
            # 对于文本到视频 (t2v) 模态:返回视频、音频和一个占位图像张量
            return {
                'modality': 't2v',
                'video_base': item['video_base'],
                'video_upsampled': item['video_upsampled'],
                'audio': item['audio'],
                'raw_caption': caption_string,
                # Dummy image tensor (all zeros) for t2v, shape matches a single video frame
                # 为 t2v 提供的占位图像张量 (全零),其形状与单帧视频匹配
                'input_image_base': torch.zeros_like(item['video_base'][:, 0]),
            }
        else:  # For image-to-video  # 对于图像到视频 (i2v) 模态
            return {
                'modality': 'i2v',
                'video_base': item['target_video_base'],
                'video_upsampled': item['target_video_upsampled'],
                'audio': item['target_audio'],
                'raw_caption': caption_string,
                # Use the actual input image tensor for i2v
                # 为 i2v 使用实际的输入图像张量
                'input_image_base': item['input_image_base'],
            }
通过在原始数据之上实例化 MultiModalDataset 类,即可构建数据集对象。该类继承自
torch.utils.data.Dataset,后者是 PyTorch 提供的标准接口,用于以批处理方式加载和处理数据。
# Create the dataset and dataloader for training
# 为训练创建数据集和数据加载器
# - train_dataset: wraps the raw_data list using the MultiModalDataset class
# - train_dataset: 使用 MultiModalDataset 类封装 raw_data 列表
# - train_dataloader: DataLoader for batching and shuffling during training
# - train_dataloader: 用于训练时进行批处理和数据打乱的 DataLoader
train_dataset = MultiModalDataset(raw_data)
train_dataloader = DataLoader(train_dataset, batch_size=BATCH_SIZE, shuffle=True)
至此,数据已准备就绪。接下来,我们将着手实现 Veo 3 模型的具体架构,包括视频编码器、音频编码器、条件编码器、联合去噪器等多个核心组件。
视频变分自编码器 (Video VAE)
原始数据经过预处理并重组为 PyTorch Dataset 后,为训练视频生成模型奠定了基础。现在,我们开始构建模型的第一个组件:视频变分自编码器 (Video Variational Autoencoder, Video VAE)。
变分自编码器(VAE)是一种广泛应用于无监督学习,特别是生成模型领域的神经网络架构。它主要由两部分构成:
- 编码器 (Encoder):将输入数据(如图像或视频)映射到一个低维的潜在空间 (Latent Space) 表示。
- 解码器 (Decoder):将潜在空间表示映射回原始数据空间,从而实现对输入数据的重建。
其基本架构如下图所示: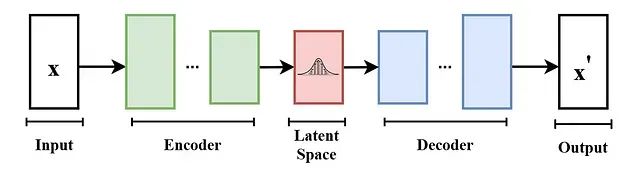
其工作流程如下:
- 编码器接收输入张量,并将其编码为一个潜在向量 (Latent Vector)。该向量捕获了输入数据的关键特征(例如,图像或视频帧的形状、颜色、纹理等)。
- 编码器通常由一系列卷积层组成,这些卷积层在提取特征的同时,逐步对输入张量进行下采样。
- 解码器接收此潜在向量,并重建原始输入数据。它通常采用转置卷积层 (Transposed Convolutional Layers) 将潜在表示上采样回原始维度。
以下是 VideoVAE 的代码实现
VIDEO_LATENT_CHANNELS = 4 # Number of channels in the latent space for video (meaning the number of feature maps in the latent representation)  # 视频潜在空间中的通道数 (即潜在表示中特征图的数量)

class VideoVAE(nn.Module):
    def __init__(self):
        super().__init__()
        # Encoder: Input shape (B, 3, F, H, W) -> Latent (B, C_lat, F/2, H/8, W/8)
        # 编码器: 输入形状 (批量大小, 3, 帧数, 高, 宽) -> 潜在表示 (批量大小, 潜在通道数, 帧数/2, 高/8, 宽/8)
        self.e = nn.Sequential(
            # First 3D conv: downsample F, H, W by 2, output channels 32
            # 第一个3D卷积层: 帧数、高、宽均下采样2倍,输出通道数为32
            nn.Conv3d(3, 32, kernel_size=3, stride=(2, 2, 2), padding=1), nn.SiLU(),
            # Second 3D conv: downsample H, W by 2, output channels 64
            # 第二个3D卷积层: 高、宽下采样2倍,输出通道数为64
            nn.Conv3d(32, 64, kernel_size=3, stride=(1, 2, 2), padding=1), nn.SiLU(),
            # Third 3D conv: downsample H, W by 2, output channels 128
            # 第三个3D卷积层: 高、宽下采样2倍,输出通道数为128
            nn.Conv3d(64, 128, kernel_size=3, stride=(1, 2, 2), padding=1), nn.SiLU(),
            # Final 3D conv: output latent channels, no downsampling
            # 最后一个3D卷积层: 输出潜在通道,无下采样
            nn.Conv3d(128, VIDEO_LATENT_CHANNELS, kernel_size=3, stride=1, padding=1)
        )
        # Decoder: Latent -> Output (reverse of encoder)
        # 解码器: 潜在表示 -> 输出 (编码器的逆过程)
        self.d = nn.Sequential(
            # First transpose conv: keep shape, output channels 128
            # 第一个转置卷积层: 保持形状,输出通道数为128
            nn.ConvTranspose3d(VIDEO_LATENT_CHANNELS, 128, kernel_size=3, stride=1, padding=1), nn.SiLU(),
            # Second transpose conv: upsample H, W by 2, output channels 64
            # 第二个转置卷积层: 高、宽上采样2倍,输出通道数为64
            nn.ConvTranspose3d(128, 64, kernel_size=3, stride=(1, 2, 2), padding=1, output_padding=(0, 1, 1)), nn.SiLU(),
            # Third transpose conv: upsample H, W by 2, output channels 32
            # 第三个转置卷积层: 高、宽上采样2倍,输出通道数为32
            nn.ConvTranspose3d(64, 32, kernel_size=3, stride=(1, 2, 2), padding=1, output_padding=(0, 1, 1)), nn.SiLU(),
            # Final transpose conv: upsample F, H, W by 2, output channels 3 (RGB)
            # 最后一个转置卷积层: 帧数、高、宽均上采样2倍,输出通道数为3 (RGB)
            nn.ConvTranspose3d(32, 3, kernel_size=3, stride=(2, 2, 2), padding=1, output_padding=1), nn.Sigmoid()
        )

    def encode(self, x):
        # Pass input through encoder
        # 将输入数据传递给编码器
        return self.e(x)

    def decode(self, x):
        # Pass latent through decoder
        # 将潜在表示传递给解码器
        return self.d(x)
所设计的 VideoVAE 包含一个编码器(encoder)和一个解码器(decoder)。编码器负责将输入视频压缩为低维的潜在表示(latent representation),而解码器则从该潜在表示重建原始视频。编码器采用 3D 卷积处理时间维度(帧)以及空间维度(高和宽),解码器则利用转置卷积将潜在表示上采样回原始视频的形状。
Veo 3 同样具备音频生成能力,因此,我们接下来为音频数据构建一个类似的 VAE。
音频变分自编码器 (Audio VAE)
音频数据的处理方式与 VideoVAE 类似,但由于音频是一维时序数据,因此采用 1D 卷积。编码器接收音频输入并将其压缩为潜在表示,解码器则从该潜在表示重建音频。
定义 AudioVAE 类,其功能与 VideoVAE 类似,但专用于处理音频数据。
AUDIO_LATENT_CHANNELS = 16  # Number of channels in the latent space for audio (meaning the number of feature maps in the latent representation)  # 音频潜在空间中的通道数 (即潜在表示中特征图的数量)

class AudioVAE(nn.Module):
    def __init__(self):
        super().__init__()
        # Encoder: Input shape (B, 1, 32000) -> Latent (B, AUDIO_LATENT_CHANNELS, 1000)
        # 编码器: 输入形状 (批量大小, 1, 32000) -> 潜在表示 (批量大小, 音频潜在通道数, 1000)
        self.e = nn.Sequential(
            # First 1D conv: downsample audio, output 16 channels
            # 第一个1D卷积层: 下采样音频,输出16个通道
            nn.Conv1d(1, 16, kernel_size=32, stride=8, padding=12), nn.SiLU(),
            # Second 1D conv: further downsample, output latent channels
            # 第二个1D卷积层: 进一步下采样,输出潜在通道
            nn.Conv1d(16, AUDIO_LATENT_CHANNELS, kernel_size=32, stride=4, padding=14)
        )
        # Decoder: Latent -> Output (reverse of encoder)
        # 解码器: 潜在表示 -> 输出 (编码器的逆过程)
        self.d = nn.Sequential(
            # First transpose conv: upsample, output 16 channels
            # 第一个转置卷积层: 上采样,输出16个通道
            nn.ConvTranspose1d(AUDIO_LATENT_CHANNELS, 16, kernel_size=32, stride=4, padding=14), nn.SiLU(),
            # Second transpose conv: upsample to original length, output 1 channel
            # 第二个转置卷积层: 上采样至原始长度,输出1个通道
            nn.ConvTranspose1d(16, 1, kernel_size=32, stride=8, padding=12),
            nn.Tanh()  # Output in range [-1, 1]  # 输出范围在 [-1, 1] 之间
        )

    def encode(self, x):
        # Pass input through encoder
        # 将输入数据传递给编码器
        return self.e(x)

    def decode(self, x):
        # Pass latent through decoder
        # 将潜在表示传递给解码器
return self.d(x)AudioVAE类专为处理音频数据而设计,特别是针对采样率为 16kHz、时长为 2 秒的音频文件。该模型将音频编码为潜在表示,并能将其解码回原始音频格式。
至此,
Veo 3的
VideoVAE和
AudioVAE两个核心组件已实现。接下来,需要实现负责处理文本和图像输入的编码器。
条件编码器 Conditional Encoder (采用 CLIP替代 UL2)
Google Veo 3 采用 UL2 模型进行条件编码。考虑到 UL2 模型规模较大,不易在本地设备运行,本实现将采用 OpenAI 的 CLIP 模型作为替代。CLIP 模型相对轻量,且同样具备强大的文本与图像编码能力。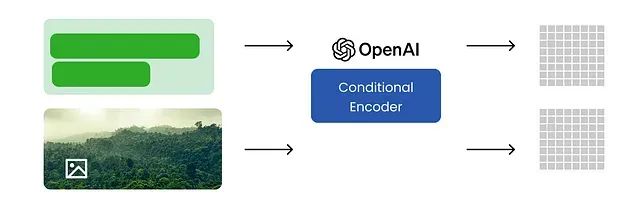
训练过程中的文本与图像数据将输入条件编码器,该编码器负责将文本和图像编码为统一的联合表示 (Joint Representation)。此联合表示随后将作为条件,引导视频生成模型的行为。
创建一个条件编码器类,能够接收字幕和图像作为输入,并输出编码后的文本与图像特征。
TEXT_MAX_LENGTH = 77 # Maximum length for text inputs (meaning the maximum number of tokens in the text)  # 文本输入的最大长度 (即文本中的最大词元数量)

class ConditioningEncoder(nn.Module):
    def __init__(self, model_name="openai/clip-vit-large-patch14"):
        super().__init__()
        # Load the pretrained CLIP model and processor
        # 加载预训练的 CLIP 模型和处理器
        self.model = CLIPModel.from_pretrained(model_name)
        self.processor = CLIPProcessor.from_pretrained(model_name)

    def get_text_embeds(self, text):
        # Preprocess the input text and move tensors to the configured device
        # 预处理输入文本并将张量移至配置的设备
        inputs = self.processor(
            text=text,
            return_tensors="pt",
            padding=True,
            truncation=True,
            max_length=TEXT_MAX_LENGTH
        ).to(DEVICE)
        # Get text embeddings from the CLIP model
        # 从 CLIP 模型获取文本嵌入
        return self.model.get_text_features(**inputs)

    def get_image_embeds(self, image):
        # If input is a torch tensor, avoid rescaling (already preprocessed)
        # 如果输入是 PyTorch 张量,则避免重新缩放 (假设已预处理)
        if isinstance(image, torch.Tensor):
            inputs = self.processor(
                images=image,
                return_tensors="pt",
                do_rescale=False
            ).to(DEVICE)
        else:
            # Otherwise, preprocess the image normally
            # 否则,正常预处理图像
            inputs = self.processor(
                images=image,
                return_tensors="pt"
            ).to(DEVICE)
        # Get image embeddings from the CLIP model
        # 从 CLIP 模型获取图像嵌入
        return self.model.get_image_features(**inputs)
处理不同类型数据(视频、音频、文本、图像)的编码器类均已定义完毕。根据 Google 的技术报告,Veo 3 架构中采用了一个基于 Transformer 的去噪组件。接下来,我们将构建一个基于 Transformer 的模型,负责对视频、音频和文本嵌入进行去噪处理。该模型将接收来自 VideoVAE、AudioVAE 和 ConditioningEncoder 的潜在表示,并通过一系列 Transformer 层进行处理。
Transformer 模块 (Transformer Block)
Transformer 是一种基于自注意力机制的神经网络架构,最初为处理序列数据(如文本)而设计,现已广泛应用于图像、视频等多种模态。它通过自注意力机制权衡输入序列中不同部分的重要性,从而有效捕捉数据内部的长程依赖关系。
Transformer 的具体实现可以非常复杂,也可以相对简化,具体取决于应用场景和可用训练数据量。考虑到本项目为学习性质,我们将为多模态模型实现一个简化版的 Transformer 架构。
本实现的 Transformer 模型包含以下核心组件:
- ConditioningEncoder (条件编码器):已在前述章节定义,负责将文本和图像输入编码为嵌入向量。
- TransformerBlock (Transformer 模块):实现多头自注意力机制和带有自适应层归一化(Adaptive LayerNorm)调制的前馈网络。
- FinalLayer (最终层):对 Transformer 模块的输出进行归一化处理,并通过线性投影将其映射到期望的输出维度(例如,补丁大小),同样应用调制。
这是一个相对简化的 Transformer 实现,但已涵盖了处理文本和图像输入所需的基本要素。
时间步嵌入生成 (Timestep Embedding Generation)
在扩散模型中,时间步嵌入 (Timestep Embedding) 至关重要,它负责对扩散过程中的各个时间步进行编码,使模型能够感知和利用去噪过程的进展信息。
该模块通常基于时间步索引生成正弦位置编码(Sinusoidal Positional Encoding),然后通过一个小型多层感知机(MLP)将其投影到一个更高维度的空间,以便有效地作为模型的条件输入。
TimestepEmbedding 类实现了计算时间步正弦嵌入的功能。其
forward方法负责生成嵌入向量,并通过一个 MLP 将其投影到更高维度。
联合去噪模型 (Joint Denoising Model, JDM)
接下来,将实现
JointDenoisingTransformer类,它将集成前述定义的所有组件。
JointDenoisingTransformer的核心功能是接收带噪声的视频和音频输入、当前的时间步信息以及上下文(文本或图像嵌入),并输出去噪后的视频和音频。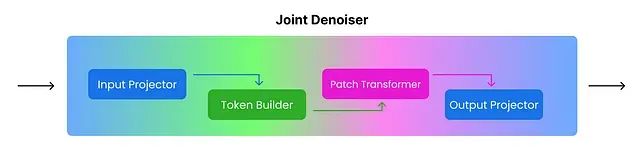
JointDenoisingTransformer的实现将分解为以下几个关键组件:
InputProjector:负责将带噪声的输入(视频和音频)投影为补丁 (Patches) 并进行嵌入,即将其转换为适合后续处理的格式。TokenBuilder:基于投影得到的补丁构建词元 (Tokens) 序列,其中包含代表视频和音频补丁的词元,以及特殊的模态指示词元。PatchTransformer:将 Transformer 架构应用于这些词元序列,通过自注意力机制捕捉序列内部的关系与依赖。OutputProjector:将经过 Transformer 处理的词元序列投影回视频和音频的输出空间,即将处理后的词元转换回期望的去噪后视频和音频格式。JointDenoisingTransformer:作为主类,集成上述所有组件并定义完整的前向传播逻辑,协调整个去噪过程。
首先定义 InputProjector 类,负责处理带噪声视频和音频输入的补丁化与嵌入,以及时间步和上下文信息的嵌入。
InputProjector类实现了以下功能:
- 将带噪声的视频和音频输入投影为补丁。
- 对补丁进行嵌入,并将其与时间步和上下文嵌入相结合。
接下来定义
TokenBuilder类,负责从投影的补丁创建词元序列。该类将处理视频和音频的特殊模态词元的创建,并在上采样模式下可选地为低分辨率视频创建特殊词元。
TokenBuilder类实现了以下功能:
- 为视频和音频补丁创建特殊的模态指示词元。
- 在上采样模式下,可选择为低分辨率视频补丁创建特殊的模态指示词元。
现在定义
PatchTransformer类,它将 Transformer 架构应用于
TokenBuilder创建的词元序列。该类负责处理位置嵌入以及对词元序列进行 Transformer 模块的堆叠处理。
PatchTransformer类实现了以下功能:
- 将位置嵌入应用于词元序列。
- 通过多个 Transformer 模块处理词元序列,以捕捉序列内部的关系和依赖性。
第四个组件是
OutputProjector类,它负责将经过 Transformer 处理的词元序列投影回期望的去噪后视频和音频输出。该类将处理最终的层归一化和线性投影操作。
OutputProjector类实现了以下功能:
- 将经过 Transformer 处理的词元序列投影回视频和音频的输出空间。
- 执行最终的层归一化和线性投影,生成去噪后的输出。
最后,将上述所有组件整合到主类
JointDenoisingTransformer中,该类将输入投影、词元构建、补丁转换和输出投影等步骤串联起来,形成完整的前向传播逻辑。
class JointDenoisingTransformer(nn.Module):
    def __init__(self, is_upsampler=False):
        super().__init__()
        self.is_upsampler = is_upsampler
        self.embed_dim = DIT_EMBED_DIM
        # Projects noisy inputs into patch embeddings and combines with timestep/context
        # 将带噪输入投影为补丁嵌入,并与时间步/上下文信息结合
        self.input_proj = InputProjector(is_upsampler, self.embed_dim)
        # Builds token sequence from patch embeddings (with special tokens)
        # 从补丁嵌入构建词元序列 (包含特殊模态词元)
        self.token_builder = TokenBuilder(is_upsampler, self.embed_dim)
        # Processes tokens with transformer blocks and conditioning
        # 使用 Transformer 模块和条件信息处理词元序列
        self.patch_transformer = PatchTransformer(is_upsampler, self.embed_dim)
        # Projects transformer output tokens back to video/audio latent space
        # 将 Transformer 输出的词元投影回视频/音频潜在空间
        self.output_proj = OutputProjector(
            is_upsampler, self.embed_dim,
            self.input_proj.video_patch_size,
            self.input_proj.audio_patch_size
        )

    def forward(self, noisy_video, noisy_audio, t, context, low_res_video=None):
        B = noisy_video.shape[0]
        # Project noisy video/audio into patch embeddings and get conditioning embedding
        # 将带噪视频/音频投影为补丁嵌入,并获取条件嵌入
        video_patches, audio_patches, cond_emb, low_res_patches = self.input_proj(
            noisy_video, noisy_audio, t, context, low_res_video
        )
        # Build token sequence from patches (and low-res patches if upsampler)
        # 从补丁 (如果是上采样器,则包括低分辨率补丁) 构建词元序列
        x = self.token_builder(B, video_patches, audio_patches, low_res_patches)
        # Process tokens through transformer blocks with conditioning
        # 通过带条件的 Transformer 模块处理词元序列
        x = self.patch_transformer(x, cond_emb)
        # Project tokens back to denoised video/audio predictions
        # 将词元投影回预测的去噪后视频/音频
        vid_pred, aud_pred = self.output_proj(
            x, cond_emb,
            video_patches.shape, audio_patches.shape, noisy_audio.shape,
            low_res_patches.shape if low_res_patches is not None else None
        )
return vid_pred, aud_predJointDenoisingTransformer类已定义完毕。它是一个用于对视频和音频数据进行去噪的神经网络模型,集成了输入投影、词元构建、补丁转换和输出投影等多个组件。该模型能够处理基础分辨率和上采样分辨率的任务,通过处理带噪声的视频和音频输入来生成去噪后的输出。
VideoVAE、
AudioVAE、
ConditioningEncoder和
JointDenoisingTransformer等核心类均已定义。接下来,将进入模型训练阶段,实例化这些组件,并利用先前准备的数据集来优化模型参数。
https://avoid.overfit.cn/post/636514c2565946bb85ca5fce57577ddb

