流程一览
1.配置docker开发环境
2.训练水果分类模型
3.准备校正数据集
4.准备输入样本
5.修改目录内容及配置文件
6.运行仿真并验证结果
7.文件下载
1.配置docker开发环境
这个过程按照官方的教程来进行即可:
- 首先下载docker镜像(自行解决网络问题):
sudo docker pull zepan/zhouyi - 第一次运行镜像时:
sudo docker run -i -t zepan/zhouyi /bin/bash 后面再次进入容器前,首先查看容器的ID:
docker ps,可以看到类似如下的信息,容器ID为ecf9748d25c7,可以只用前几位来表示它,如ecf:CONTAINER ID IMAGE COMMAND ecf9748d25c7 zepan/zhouyi "/bin/bash"- 用
docker start ecf可以启动容器,docker stop ecf可以关闭容器 - 容器运行后,输入命令
docker exec -it ecf /bin/bash即可进入容器 在部署过程中可能要在容器和主机之间拷贝文件,可以参考以下命令:
# 从主机拷贝文件到容器下的/root/目录 docker cp /Users/Desktop/output_ref.bin ecf:/root/ # 从容器拷贝文件到主机桌面目录 docker cp ecf:/root/output_ref.bin /Users/Desktop/- 在容器的
/root/demos/目录下有tflite和pb的例程,可以运行进行环境的测试,这里我们将tflite文件夹复制到/root目录下,在此基础上进行后面的部署:cp /root/demos/tflite /root/tflite
2.训练水果分类模型
这里我使用了Kaggle上的一个项目作为参考,用Keras训练了一个MobileNetV2模型,可以用来对水果和蔬菜做分类,验证集准确率为98%左右。然后可以很方便地用Keras将模型保存为.h5文件,再用TFLiteConverter将其转换为.tflite文件。参考代码:
# 保存Keras模型
keras_file = 'keras_model.h5'
tf.keras.models.save_model(model, keras_file)

# 转换模型为tflite格式
converter = tf.compat.v1.lite.TFLiteConverter.from_keras_model_file(keras_file)
tflite_model = converter.convert()

# 保存模型
with open('model.tflite', 'wb') as f:
  f.write(tflite_model)
注意:在运行训练代码和转换代码时,最好把tensorflow版本设为1.15.5,以免后面发生其它错误。
✅ 获得keras_model.h5和model.tflite文件
3.准备校正数据集
校正数据集的处理方法要跟模型训练时输入数据的处理方法保持一致。
在模型训练时,输入数据集处理的方法为:
train_generator = tf.keras.preprocessing.image.ImageDataGenerator(
    # 将图像像素点的值从(0, 255)缩放到(-1, 1)
    preprocessing_function = lambda x: (x / 127.5) - 1
)
所以在准备校正数据集时,也要将图像像素缩放到(-1, 1):
import cv2
print(train_images.class_indices)
base_dir = '../input/fruit-and-vegetable-image-recognition/train/'

filename_list = []
label_list = []

for item in train_images.class_indices:
    class_dir = base_dir + item
#     print(train_images.class_indices[item])
    filenames = os.listdir(class_dir)
    for j in range(5):
        filename_list.append(f'{class_dir}/{filenames[j]}')
        label_list.append(train_images.class_indices[item])

img_num = len(label_list)
# print(img_num, label_list)

input_height = 224
input_width = 224
input_channel = 3

images = np.zeros([img_num, input_height, input_width, input_channel], np.float32)
for file_name, img_idx in zip(filename_list, range(img_num)):
    image = cv2.imread(file_name)
#     print(file_name, label_list[img_idx])
    image = cv2.resize(image, (input_height, input_width))
    image = np.array(image, dtype=np.float32)
    image = image / 127.5
    image = image - 1
    images[img_idx] = image

np.save('dataset.npy', images)

labels = np.array(label_list)
np.save('label.npy', labels)
✅ 获得dataset.npy和label.npy文件
4.准备输入样本
选取一张图片,对其做浮点预测,并将输出结果保存为output_ref.bin,将图片保存为input.bin
预测并生成output_ref.bin
model = tf.keras.models.load_model('./keras_model.h5')
img_name = "../input/fruit-and-vegetable-image-recognition/train/mango/Image_13.jpg"
img = tf.keras.preprocessing.image.load_img(
  img_name, target_size=(224, 224), color_mode='rgb',
)
img_array = tf.keras.preprocessing.image.img_to_array(img)
img_array /= 127.5
img_array -= 1
print(img_array.max())
img_array = tf.expand_dims(img_array, 0)

predictions = model.predict(img_array, verbose=1, steps=1)
pred = 255 * predictions
pred = pred.astype(np.uint8)
fw=open('output_ref.bin', 'wb')
fw.write(pred)
fw.close()
将样本保存为input.bin
from PIL import Image
from matplotlib import pyplot as plt
import numpy as np

input_height=224
input_width=224
input_channel = 3
mean = [127.5, 127.5, 127.5]
var = 1

img = Image.open(img_name)

img1 = img.resize((input_width, input_height),Image.ANTIALIAS)
img_arr = (np.array(img1)-mean)/var
img_arr=img_arr.astype(np.int8)

# 保存成仿真需要的bin文件
import struct
data=b''
for y in range(img_arr.shape[1]):
  for x in range(img_arr.shape[0]):
      data += struct.pack('bbb',img_arr[y,x,0],img_arr[y,x,1],img_arr[y,x,2])

fw = open("input.bin", "wb")
fw.write(data)
fw.close()
print("save to input.bin OK")
✅ 获得output_ref.bin和input.bin文件
5.修改目录内容及配置文件
经过上述步骤,我们得到了以下文件,将它们放到对应的文件夹(注意
/root/tflite是我们在第一步时复制出来的文件夹):文件 路径 model.tflite /root/tflite/model dataset.npy /root/tflite/dataset label.npy /root/tflite/dataset output_ref.bin /root/tflite input.bin /root/tflite/model 在
/root/tflite/目录下新建fruit_classes.py,内容为:class_names = '''apple banana beetroot bell pepper cabbage capsicum carrot cauliflower chilli pepper corn cucumber eggplant garlic ginger grapes jalepeno kiwi lemon lettuce mango onion orange paprika pear peas pineapple pomegranate potato raddish soy beans spinach sweetcorn sweetpotato tomato turnip watermelon'''.split("\n")修改
/root/tflite/quant_predict.pyfrom PIL import Image import cv2 from matplotlib import pyplot as plt import matplotlib.patches as patches import numpy as np import os import fruit_classes as class_name current_dir = os.getcwd() label_offset = 0 outputfile = current_dir + '/output_mobilenet_v2.bin' # 这里的np.uint8是根据模型实际的输出数据类型来确定的 # 可以在生成量化模型后,到/tmp目录下查看类型 npyoutput = np.fromfile(outputfile, dtype=np.uint8) outputclass = npyoutput.argmax() print(npyoutput.sum()) head5p = npyoutput.argsort()[-5:][::-1] labelfile = current_dir + '/output_ref.bin' npylabel = np.fromfile(labelfile, dtype=np.uint8) labelclass = npylabel.argmax() print(npylabel.sum()) head5t = npylabel.argsort()[-5:][::-1] print("predict first 5 label:") for i in head5p: print(" index %4d, prob %3d, name: %s"%(i, npyoutput[i], class_name.class_names[i-label_offset])) print("true first 5 label:") for i in head5t: print(" index %4d, prob %3d, name: %s"%(i, npylabel[i], class_name.class_names[i-label_offset])) # Show input picture print('Detect picture save to result.jpeg') input_path = './model/input.bin' npyinput = np.fromfile(input_path, dtype=np.int8) image = np.clip(np.round(npyinput)+128, 0, 255).astype(np.uint8) image = np.reshape(image, (224, 224, 3)) im = Image.fromarray(image) im.save('result.jpeg')修改cfg文件,build和run文件均只需要修改
[Parser]部分内容:[Parser] model_type = tflite input_data_format = NHWC model_name = mobilenet_v2 detection_postprocess = model_domain = image_classification input_model = ./model/model.tflite input = input_2 input_shape = [1, 224, 224, 3] output = dense_8/Softmax output_dir = ./其中
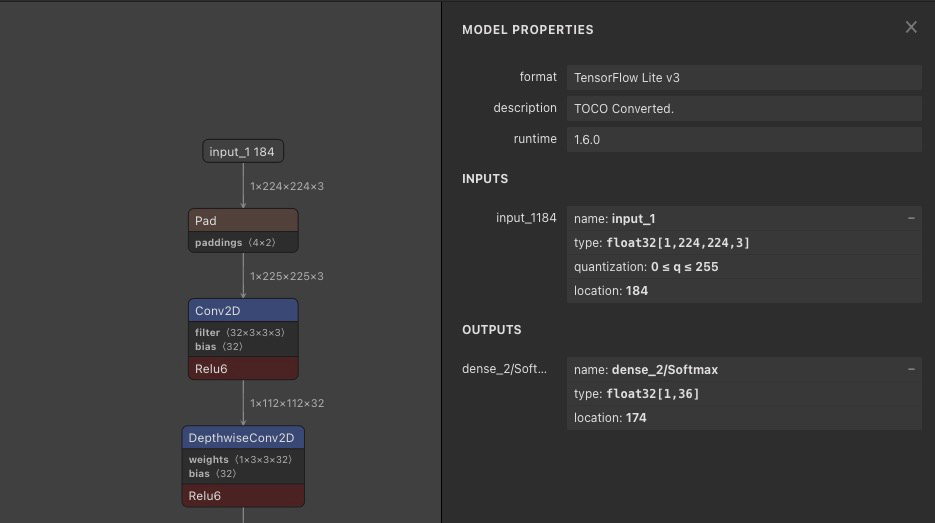
input = input_2和output = dense_8/Softmax需要与模型的实际输入输出保持一致,可以通过这个网页来可视化模型结构
6.运行仿真并验证结果
运行仿真:
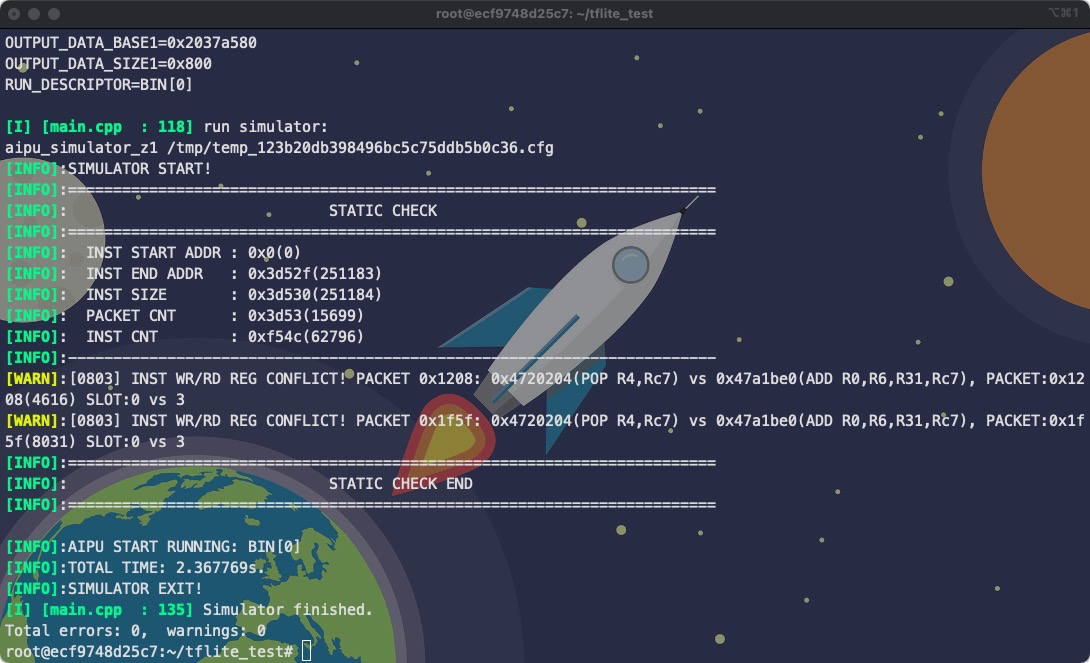
aipubuild config/tflite_mobilenet_v2_run.cfg
对比结果:
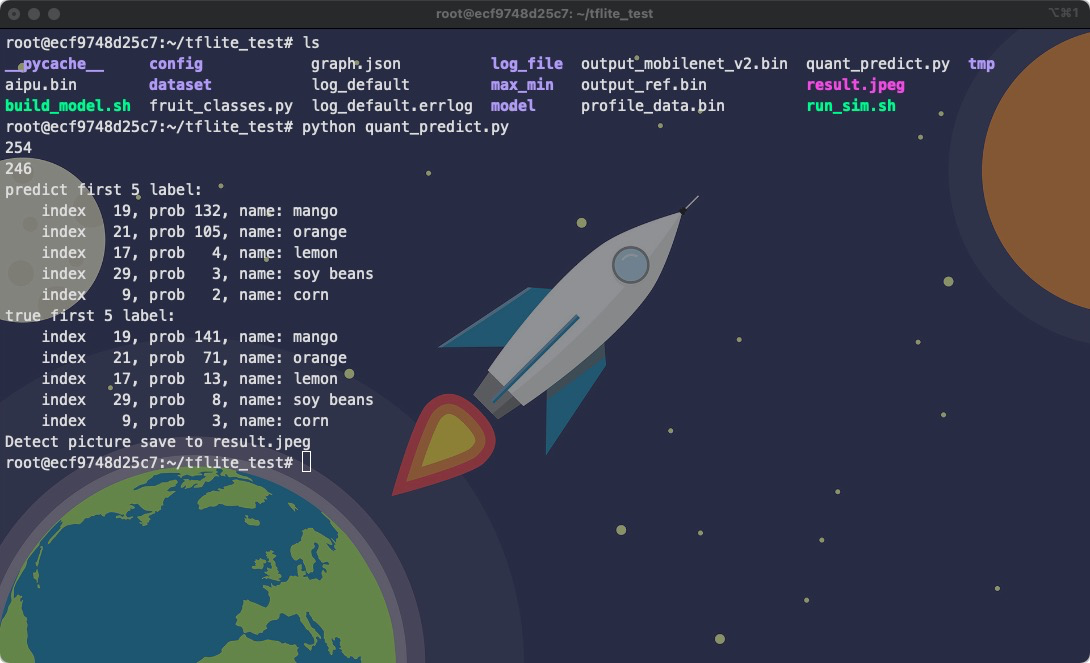
python quant_predict.py
可以看到,量化后模型的预测结果与量化前模型的预测结果的top5一致,且top1的概率接近
7.文件下载
本文提到的所有文件及代码,可以从这里下载: tflite.zip(提取码: s9ri)
说明:
- 压缩包内的
fruit-and-vegetable-classification.ipynb展示了模型的训练过程和各个重要文件的生成过程,可以在Kaggle上运行 - 压缩包内的
tflite_test文件夹,请将其复制到docker下运行


