【GiantPandaCV】前几天洪滨介绍了他们PLCT的Buddy MLIR项目,感觉是一项比较有趣的项目。正值端午就看了一下这个项目并且大致理清了代码结构并且把相关的例子都跑了跑,这中间还发现了一些小BUG并提了一些小的修复的PR。所以这篇文章用来记录一下在我的视角下,Buddy-MLIR为什么是一个优秀的项目,它能为做编译器开发的同行或者小白用户带来什么样的帮助,Let's Go!
也欢迎关注 https://github.com/BBuf/tvm_mlir_learn 了解和学习更多 MLIR 相关的知识。笔者最近也在基于 MLIR 做量化训练相关的项目,也期待和大家更多的交流。
0x0. 前言
整个Buddy-MLIR项目给我的最大感觉就是,无论结果怎么样,我们都可以先 run 起来。虽然 MLIR 已经出现了几年并且也有一些明星项目比如 IREE 获得了成功。但相比于 TVM 的用例丰富度来说我个人感觉还是有一点差距的,特别是在中文社区。这样就造成了一个问题,如果一个人对 MLIR 感兴趣或者要基于 MLIR 从事一些开发工作,就必须要啃 MLIR 的官方文档的 Toy Tutorial 来速成。我不否认官方文档十分详尽并且结构组织也比较得当,但对于一个完全新手的用户来说,的确是不那么友好。有没有办法在对 MLIR 相关基础概念进行了解之后就快速进入到MLIR这个世界里用它提供的组件去构建一个真实的应用呢?
我个人认为最近推出的Buddy-MLIR缓解了这一痛点,我们可以很轻易的跑起来基于 MLIR 做的一个应用然后一边学习 MLIR 的相关概念一边进行魔改来构建自己的应用。Buddy-MLIR 的另外一个亮点在于整个工程的组织结构和 LLVM/MLIR 项目本身一样十分清晰,使得把握整个工程的难度以及阅读相关代码的难度降低了很多。接下来,我会从 Run 起来和工程结构解析两方面进行讲解。实际上这种组织结构在OneFlow仓库里的IR部分也是完全一样的,不过由于OneFlow 的计算图和 IR 进行了交互所以目前没有把 IR 部分独立出一个仓库,不然大家会看到 Buddy-MLIR 和 OneFlow-MLIR 的工程结构也是完全一样的。
0x1. How to run?
怎么跑起来?这应该是拿到一个项目最重要的问题之一。实际上跟随 Buddy-MLIR 的 README 就可以,不过实际操作的时候还有一些细节需要注意。为了小白用户考虑,我这里记录一下我在一台Ubuntu20.04的完整编译和Run Buddy-MLIR 的流程。
Buddy-MLIR 项目是基于 LLVM/MLIR 项目扩展的,或者说 LLVM 是 Buddy-MLIR 的一个依赖,所以首先需要安装这个依赖。具体操作过程如下:
`$ git clone git@github.com:buddy-compiler/buddy-mlir.git
$ cd buddy-mlir
$ git submodule update --init

$ cd buddy-mlir
$ mkdir llvm/build
$ cd llvm/build
$ cmake -G Ninja ../llvm \
    -DLLVM_ENABLE_PROJECTS="mlir" \
    -DLLVM_TARGETS_TO_BUILD="host;RISCV" \
    -DLLVM_ENABLE_ASSERTIONS=ON \
    -DCMAKE_BUILD_TYPE=RELEASE
$ ninja
$ ninja check-mlir
`
按照上面的命令操作就可以完成 LLVM 项目的编译,编译结果存放在 llvm/build 文件中。接下来就可以在 Buddy-MLIR 的工程目录下基于 LLVM 编译结果提供的库完成 Buddy-MLIR 本身的编译了。对 Buddy-MLIR 工程编译的如下:
`$ cd buddy-mlir
$ mkdir build
$ cd build
$ cmake -G Ninja .. \
    -DMLIR_DIR=$PWD/../llvm/build/lib/cmake/mlir \
    -DLLVM_DIR=$PWD/../llvm/build/lib/cmake/llvm \
    -DLLVM_ENABLE_ASSERTIONS=ON \
    -DCMAKE_BUILD_TYPE=RELEASE
$ ninja check-buddy
`
编译完成后如果出现类似下面的输出,即 FileCheck 成功则可以证明 Buddy-MLIR 的构建流程已经成功了。
`Testing Time: 0.06s
  Passed: 3
`
在 Buddy-MLIR 开源工程中目前有三种 Dialect 即 Bud Dialect,DIP Dialect 以及 RVV Dialect。从项目相关的介绍目前还不理解 RVV Dialect,所以本文只会涉及 Bud Dialect 以及 DIP Dialect。其中DIP Dialect是为数字图像处理(digital image processing ) 进行的抽象。由于 Buddy-MLIR C/C++ 前端依赖了 OpenCV 来做图片的编解码 ,所以 Buddy-MLIR 引入了 OpenCV 第三方库。如果你没有编译OpenCV 可以使用如下的命令进行编译:
`$ sudo apt-get install libgtk2.0-dev pkg-config  libcanberra-gtk-module
$ git clone https://github.com/opencv/opencv.git
$ cd opencv && mkdir build && cd build
$ cmake -D CMAKE_BUILD_TYPE=RELEASE -D CMAKE_INSTALL_PREFIX=/usr/local ..
$ make -j$(nproc)
$ sudo make install
`
这里可以把 /usr/local 换成任意自定义目录。后续在构建 DIP Dialect 相关的应用时需要指明 -DBUDDY_ENABLE_OPENCV=ON 这个选项启用OpenCV。
接下来我们看一下 Buddy-MLIR 中提供了哪些有趣的例子。
1. IR 级别的例子
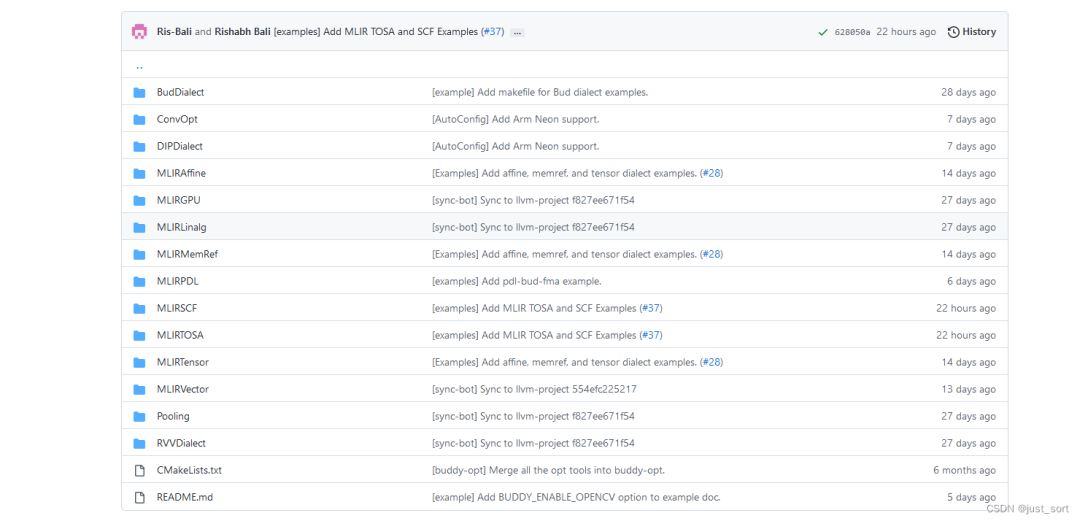
IR 级别示例展示了如何在上游 MLIR 和 Buddy-MLIR 中使用 pass,其中一些示例来自 MLIR 集成测试。 大多数情况可以直接使用 MLIR JIT 引擎 mlir-cpu-runner 运行。 递降管道和工具链配置在 makefile 目标中指定。 我们可以选择一个感兴趣的 Dialect 并到对应的目录下找到要运行的目标。Buddy-MLIR 中所有的示例都在 https://github.com/buddy-compiler/buddy-mlir/tree/main/examples 这个目录中:
Buddy-MLIR 示例分类
点开任意一种 Dialect 示例的MakeFile,可以发现里面主要有三种测试:
<Dialect Name>-<Operation Name>-lower。这个测试用来展示递降管道。它会产生log.mlir文件。<Dialect Name>-<Operation Name>-translate。这个测试用来展示从当前Dialect文件产生的LLVM IR。它会生成一个log.ll文件。<Dialect Name>-<Operation Name>-run。这个测试会使用MLIR JIT Engine 执行 LLVM IR 产生结果。
以 MemRef Dialect 里面的 memref.dim Op 为例,编译测试方法如下:
`$ cd buddy-mlir/examples/MLIRMemRef
$ make memref-dim-lower
$ make memref-dim-translate
$ make memref-dim-run
`
原始的 memref.dim 长这样:
`func.func @main() {
  %c0 = arith.constant 0 : index
  %c1 = arith.constant 1 : index
  %mem0 = memref.alloc() : memref<2x3xf32>
  %mem1 = memref.cast %mem0 : memref<2x3xf32> to memref<?x?xf32>
  %dim0 = memref.dim %mem0, %c0 : memref<2x3xf32>
  %dim1 = memref.dim %mem0, %c1 : memref<2x3xf32>
  %dim2 = memref.dim %mem1, %c0 : memref<?x?xf32>
  %dim3 = memref.dim %mem1, %c1 : memref<?x?xf32>
  vector.print %dim0 : index
  vector.print %dim1 : index
  vector.print %dim2 : index
  vector.print %dim3 : index
  memref.dealloc %mem0 : memref<2x3xf32>
  func.return

}
`
使用 JIT Eagine 执行的输出:
`2
3
2
3
`
2. Convolution Vectorization Examples
Buddy-MLIR 中提供了一个 2D 向量化卷积的 Pass conv-vectorization , 这个 Pass 实现了 Coefficients Broadcasting algorithm with Strip Mining 算法,然后 strip mining size 是可以配置的。这里将其配置为 256 进行演示:
`$ cd buddy-mlir/build/bin
$ ./buddy-opt ../../examples/ConvOpt/conv2d.mlir -conv-vectorization="strip-mining=256"
`
原始的 conv2d.mlir 长这样:
`func.func @conv_2d(%arg0: memref<?x?xf32>, %arg1: memref<?x?xf32>, %arg2: memref<?x?xf32>) {
  linalg.conv_2d ins (%arg0, %arg1: memref<?x?xf32>, memref<?x?xf32>)
                 outs (%arg2: memref<?x?xf32>)
  return
}
`
经过上面的可执行命令后产生的 MLIR 文件结果如下:
`#map0 = affine_map<(d0) -> (d0)>
#map1 = affine_map<(d0) -> (d0 ceildiv 256)>
module {
  func.func @conv_2d(%arg0: memref<?x?xf32>, %arg1: memref<?x?xf32>, %arg2: memref<?x?xf32>) {
    %c0 = arith.constant 0 : index
    %c1 = arith.constant 1 : index
    %c256 = arith.constant 256 : index
    %cst = arith.constant 0.000000e+00 : f32
    %0 = vector.splat %cst : vector<256xf32>
    %1 = memref.dim %arg1, %c0 : memref<?x?xf32>
    %2 = memref.dim %arg1, %c1 : memref<?x?xf32>
    %3 = memref.dim %arg2, %c0 : memref<?x?xf32>
    %4 = memref.dim %arg2, %c1 : memref<?x?xf32>
    affine.for %arg3 = #map0(%c0) to #map0(%3) {
      affine.for %arg4 = #map0(%c0) to #map0(%1) {
        affine.for %arg5 = #map0(%c0) to #map0(%2) {
          affine.for %arg6 = #map0(%c0) to #map1(%4) {
            // 对应下面的步骤1
            %5 = affine.vector_load %arg1[%arg4, %arg5] : memref<?x?xf32>, vector<1xf32>
            %6 = vector.broadcast %5 : vector<1xf32> to vector<256xf32>
            %7 = arith.muli %arg6, %c256 : index
            %8 = arith.subi %4, %7 : index
            %9 = arith.cmpi sge, %8, %c256 : index
            scf.if %9 {
              // 对应下面的步骤二
              %10 = affine.vector_load %arg0[%arg3 + %arg4, %arg5 + %arg6 * 256] : memref<?x?xf32>, vector<256xf32>
              // 对应下面的步骤三
              %11 = affine.vector_load %arg2[%arg3, %arg6 * 256] : memref<?x?xf32>, vector<256xf32>
              // 对应下面的步骤四
              %12 = vector.fma %10, %6, %11 : vector<256xf32>
              // 对应下面的步骤五
              affine.vector_store %12, %arg2[%arg3, %arg6 * 256] : memref<?x?xf32>, vector<256xf32>
            } else {
              %10 = vector.create_mask %8 : vector<256xi1>
              %11 = arith.addi %arg3, %arg4 : index
              %12 = arith.muli %arg6, %c256 : index
              %13 = arith.addi %arg5, %12 : index
              %14 = vector.maskedload %arg0[%11, %13], %10, %0 : memref<?x?xf32>, vector<256xi1>, vector<256xf32> into vector<256xf32>
              %15 = vector.maskedload %arg2[%arg3, %12], %10, %0 : memref<?x?xf32>, vector<256xi1>, vector<256xf32> into vector<256xf32>
              %16 = vector.fma %14, %6, %15 : vector<256xf32>
              vector.maskedstore %arg2[%arg3, %12], %10, %16 : memref<?x?xf32>, vector<256xi1>, vector<256xf32>
            }
          }
        }
      }
    }
    return
  }
}
`
初步看到这个变换可能还比较懵,我们结合这个算法和 Pass 实现进行理解一下。
Coefficients broadcasting(CB)算法是 2D 卷积的一种高效实现。Buddy-MLIR 基于 MLIR 基础设施完成了对这个算法的实现。实现这个算法涉及到的 MLIR Dialect 以及 Op 这里列一下:
affine.for:执行指定次数循环体的操作。affine.vector_load:从缓冲区切片中返回一个向量 (MLIR MemRef格式)。affine.vector_store:将一个向量写到缓存区切片中(MLIR MemRef格式)。vector.broadcast:将标量或向量值广播为 N-维 结果向量。vector.fma:向量化类型的乘加混合指令。
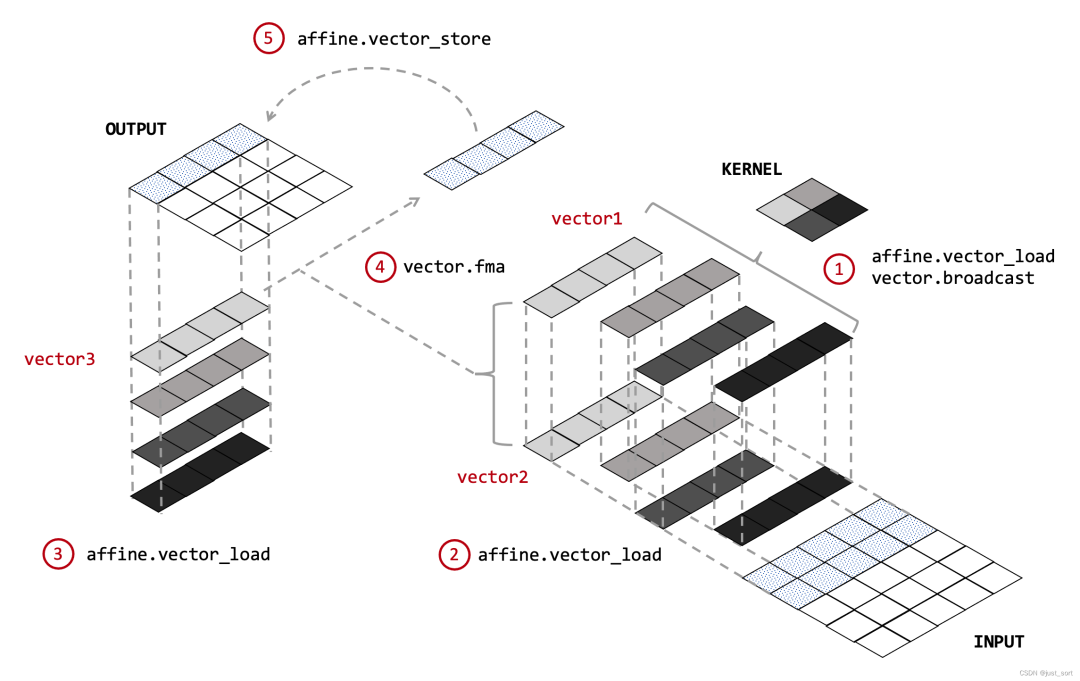
然后 CB 算法的过程如下图所示:
CB 算法流程
注意输入是一个通道数为 1 的图片或者特征图,然后 kernel 的通道数也是1。算法的执行流程大概为:
- 首先将 kernel 的每个元素使用
vector_load加载到缓冲区中 并使用vector.broadcast广播到vector1中。 - 然后将特征图的元素使用
vector_load加载到vector2中。 - 第三步将输出特征图的元素使用
vector_load加载到vector3中。 - 然后使用
vector.fma将vector1和vector2相乘并加到vector3上。 - 最后使用
vector_store将上述结果写回缓冲区中。
注意,经过 conv-vectorization Pass之后产生的 MLIR 文件中有2个部分。另外一个部分使用了vector.create_mask 和 vector.maskedstore ,这对应了上图中特征图在每一行最后加载的元素字节不够 fma 指令需要的 256Bit (这个256是通过 -conv-vectorization="strip-mining=256" 指定的),所以需要一个 Mask 来补齐然后进行计算。
- Edge detection example
Buddy-MLIR 还提供了一个边缘检测示例来展示优化。 conv-vectorization pass 负责使用我们的算法递降 linalg.conv_2d。 然后我们使用 mlir-translate 和 llc 工具生成目标文件。 最后,我们在 C++ 程序中调用这个 MLIR 卷积函数(在第二节会详细介绍这个过程)。再运行这个示例前需要保证 OpenCV 已经安装好了,安装方法上面介绍了。
这个例子还展示了 AutoConfig 机制的“魔力”,它可以帮助末指定strip mining size、ISA SIMD/Vector extension 和 target triple。 您只需要启用 BUDDY_EXAMPLES 选项,无需担心工具链配置。操作命令如下:
`$ cd buddy-mlir/build
$ cmake -G Ninja .. -DBUDDY_EXAMPLES=ON -DBUDDY_ENABLE_OPENCV=ON
$ ninja edge-detection
`
当然,我们也可以使用自己的配置值 -DBUDDY_CONV_OPT_STRIP_MINING(例如 64)和 -DBUDDY_OPT_ATTR(例如 avx2)。
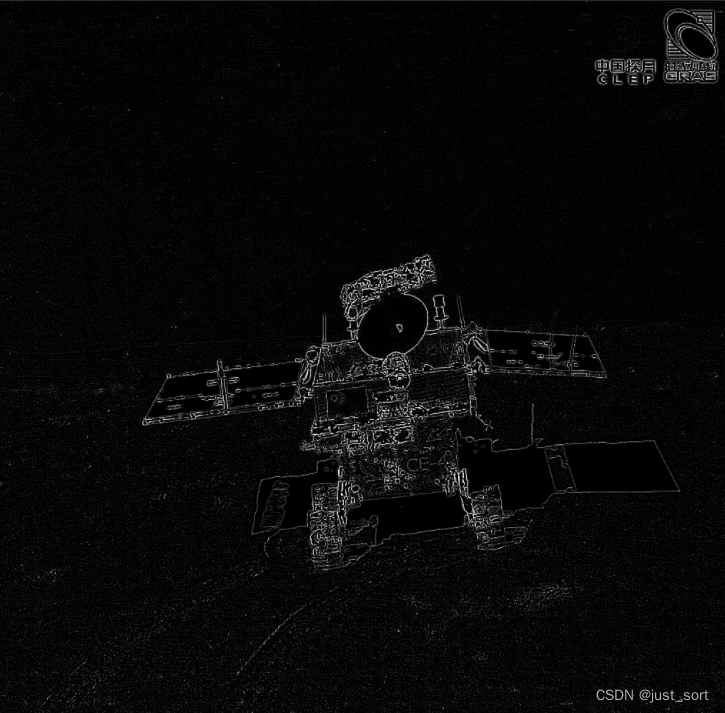
仓库提供了一张图片,路径为 buddy-mlir/examples/ConvOpt/images/YuTu.png ,这是构成中国嫦娥三号任务一部分的机器人月球车。然后运行下面的命令对其进行边缘检测。
`$ cd bin
$ ./edge-detection ../../examples/ConvOpt/images/YuTu.png result.png
`
原图
边缘检测后的图
3. Digital Image Processing Examples
Buddy-MLIR 还提供了 DIP Dialect 相关的展示例子,具体就是给一张图片进行 Constant Padding 或者 Replicate Padding 然后做卷积 。操作步骤和上面类似,这里就不再展示了。感兴趣的读者可以自行体验。链接:[https://github.com/buddy-compiler/buddy-mlir/tree/main/examples#digital-image-processing-examples](https://github.com/buddy-compiler/buddy-mlir/tree/main/examples#digital-image-processing-examples) 。
0x2. How to Understand?
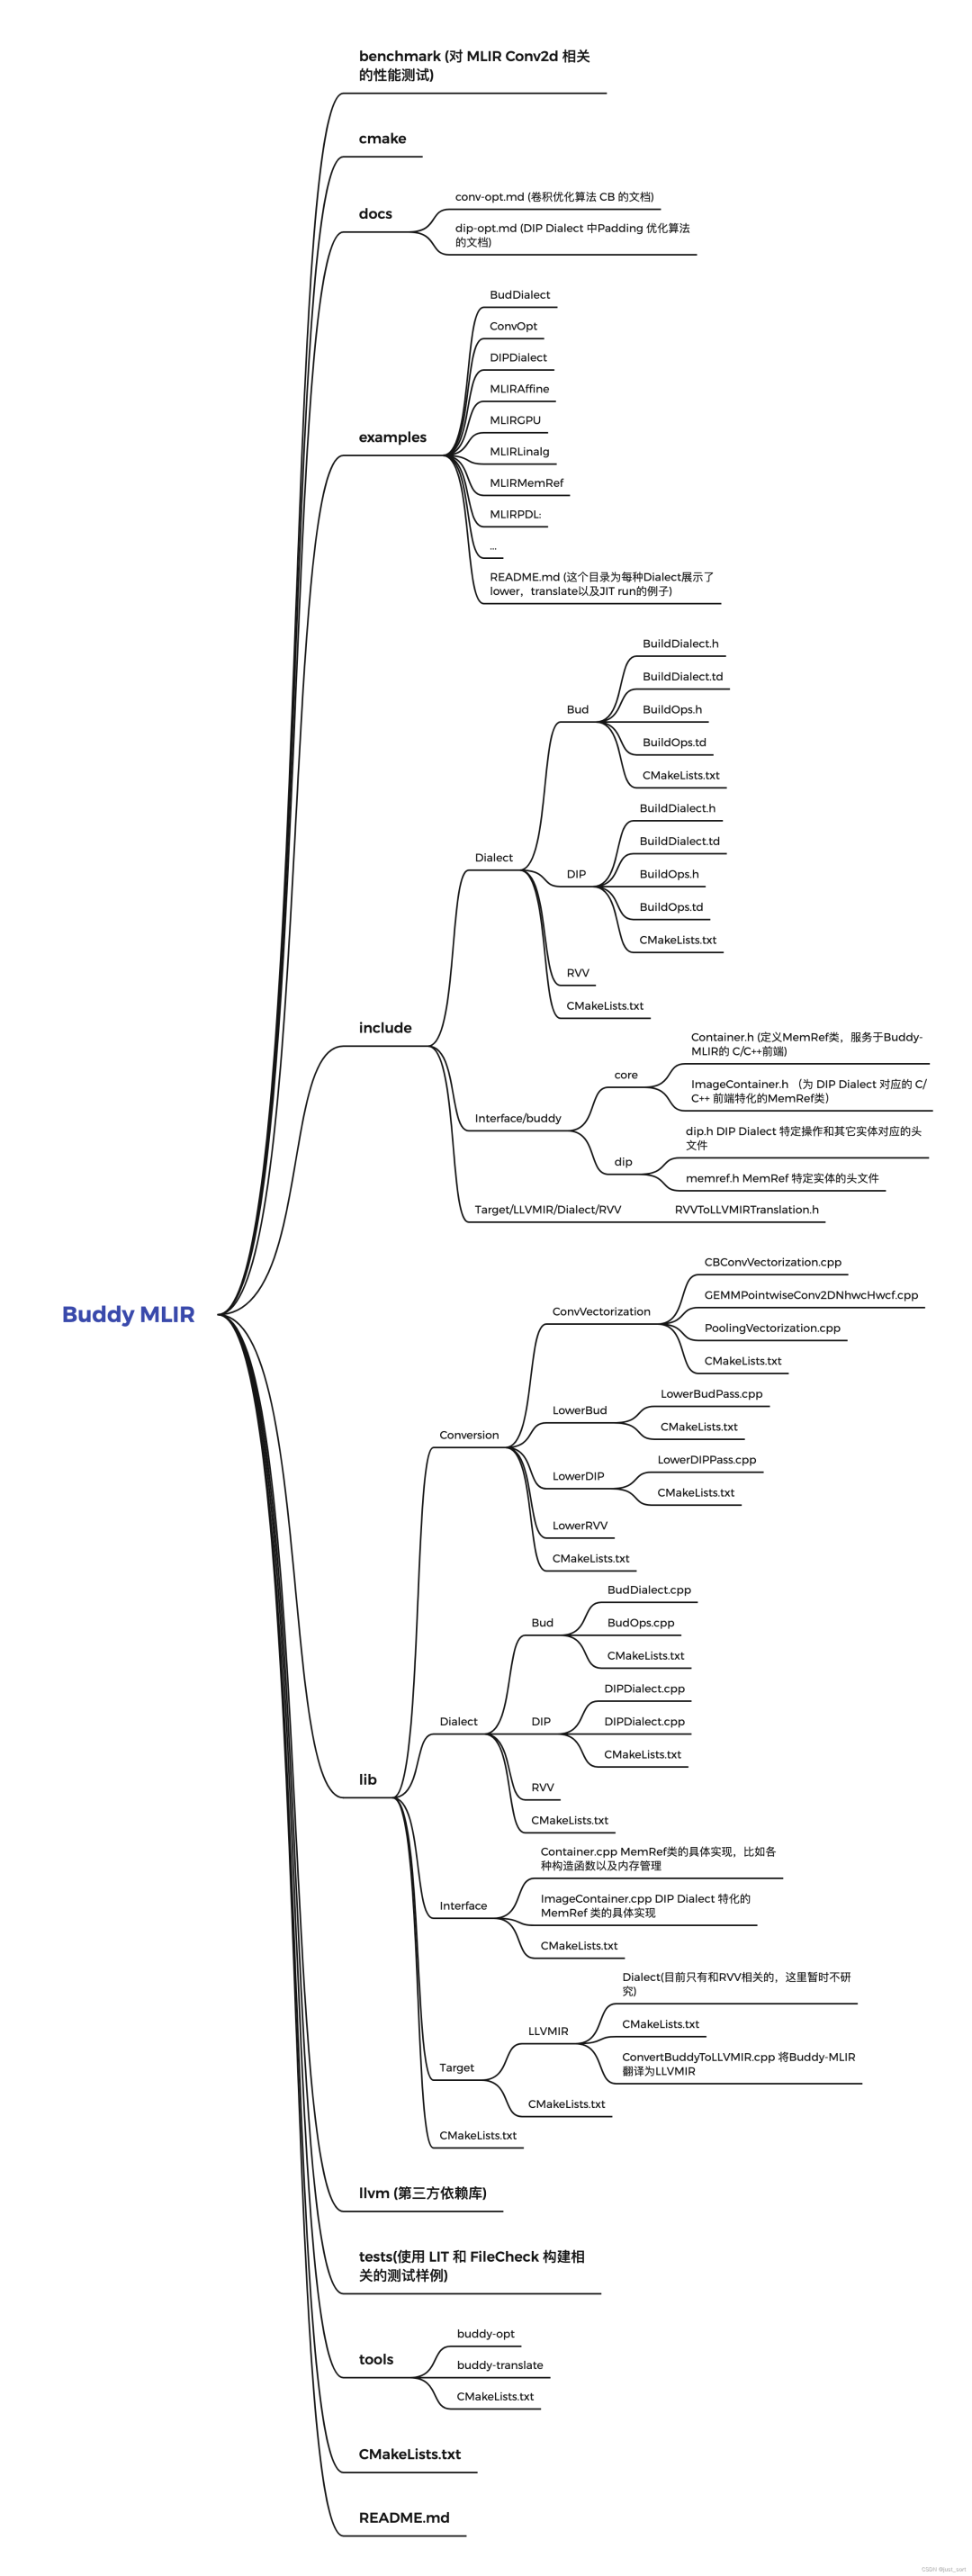
上面一节主要展示了在 Buddy-MLIR 中怎么把构建的应用跑起来,这一节我将带大家从 Buddy-MLIR 的结构出发来理解这个工程。工程的整体结构可以总结为:
Buddy-MLIR 工程结构
我们主要把目光放在 include 和 lib 两个文件夹上,其它的文档,测试以及工具类的源码读者可以有选择的进行查看。
2.1 Bud Dialect
从上图可以看出,Buddy-MLIR 主要有三种 Dialect ,即:Bud Dialect,DIP Dialect 还有 RVV Dialect。对于 Dialect 的定义遵循了和 LLVM 上游 Dialect 一样的文件结构和方法,因此这里不再赘述。如果你想了解更多细节可以查看 https://github.com/BBuf/tvm_mlir_learn 仓库中的 MLIR:摩尔定律终结的编译器基础结构 论文解读 文章。
我们这里主要关注一下 Bud Dialect 中定义了哪些操作。从 buddy-mlir/include/Dialect/Bud/BudOps.td 中可以看到 Bud Dialect 主要定义了 4 种类型的操作:
- Bud_TestConstantOp。这个 Op 用于测试常量Op。
- Bud_TestPrintOp 。这个Op 用于测试打印Op。
- Bud_TestEnumAttrOp 。在 Op 中测试枚举属性。
- Bud_TestArrayAttrOp 。在 Op 中测试数组属性。
构建了基础操作之后,我们需要为 Bud Dialect 注册一个递降的 Pipline,也即 lib/Conversion/LowerBud/LowerBudPass.cpp 中实现的 LowerBudPass 。
对 bud::TestConstantOp 的实现如下:
`class BudTestConstantLowering : public OpRewritePattern<bud::TestConstantOp> {
public:
  using OpRewritePattern<bud::TestConstantOp>::OpRewritePattern;

  LogicalResult matchAndRewrite(bud::TestConstantOp op,
                                PatternRewriter &rewriter) const override {
    auto loc = op.getLoc();
    // Get type from the origin operation.
    Type resultType = op.getResult().getType();
    // Create constant operation.
    Attribute zeroAttr = rewriter.getZeroAttr(resultType);
    Value c0 = rewriter.create<mlir::arith::ConstantOp>(loc, resultType, zeroAttr);

    rewriter.replaceOp(op, c0);
    return success();
  }
};
`
可以看到在匹配到 bud::TestConstantOp 后会将其重写为 mlir::arith::ConstantOp 。我们可以在buddy-mlir/examples/BudDialect 下执行 make bud-constant-lower 。得到的结果为:
`module {
  %i0 = bud.test_constant : i32
}

=>
module {
  %c0_i32 = arith.constant 0 : i32
}
`
其它的几个操作类似,都是将 Bud Dialect 定义的几个操作 Lower 到指定的几个上游 Dialect 上。这个 LowerBudPass 的具体实现为:
`namespace {
class LowerBudPass : public PassWrapper<LowerBudPass, OperationPass<ModuleOp>> {
public:
MLIR_DEFINE_EXPLICIT_INTERNAL_INLINE_TYPE_ID(LowerBudPass)
LowerBudPass() = default;
LowerBudPass(const LowerBudPass &) {}
StringRef getArgument() const final { return "lower-bud"; }
StringRef getDescription() const final { return "Lower Bud Dialect."; }
void runOnOperation() override;
void getDependentDialects(DialectRegistry ®istry) const override {
// clang-format off
registry.insert<
buddy::bud::BudDialect,
func::FuncDialect,
vector::VectorDialect,
memref::MemRefDialect>();
// clang-format on
}
};
} // end anonymous namespace.
void LowerBudPass::runOnOperation() {
MLIRContext *context = &getContext();
ModuleOp module = getOperation();
ConversionTarget target(*context);
// clang-format off
target.addLegalDialect<
arith::ArithmeticDialect,
func::FuncDialect,
vector::VectorDialect,
memref::MemRefDialect>();
// clang-format on
target.addLegalOp<ModuleOp, func::FuncOp, func::ReturnOp>();
RewritePatternSet patterns(context);
populateLowerBudConversionPatterns(patterns);
if (failed(applyPartialConversion(module, target, std::move(patterns))))
signalPassFailure();
}
`可以看到 Bud Dialect 的操作主要会被 Lower 到 arith::ArithmeticDialect, func::FuncDialect, vector::VectorDialect, memref::MemRefDialect 上。
从上面的介绍也可以看到,Buddy Dialect 实际上只是起一个演示作用,也许是教一下初学者怎么快速定义一个新的 Dialect 并接入 MLIR 的生态。
2.2 DIP Dialect
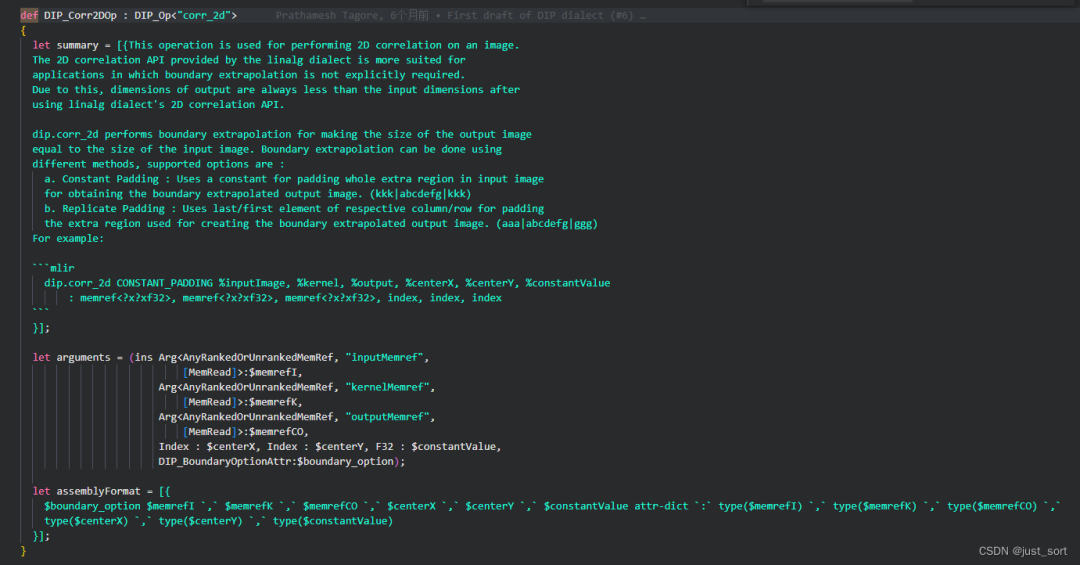
DIP Dialect 是数组图像处理的一个抽象。这里展示一下 DIP Dialect 目前定义的操作。
`def DIP_ConstantPadding : I32EnumAttrCase<"ConstantPadding", 0, "CONSTANT_PADDING">;
def DIP_ReplicatePadding : I32EnumAttrCase<"ReplicatePadding", 1, "REPLICATE_PADDING">;

def DIP_BoundaryOption : I32EnumAttr<"BoundaryOption",
    "Specifies desired method of boundary extrapolation during image processing.",
    [
      DIP_ConstantPadding,
      DIP_ReplicatePadding
    ]>{
  let genSpecializedAttr = 0;
  let cppNamespace = "::buddy::dip";
}

def DIP_BoundaryOptionAttr : EnumAttr<DIP_Dialect, DIP_BoundaryOption, "boundary_option">;
DIP Dialect 的 Corr2DOp
DIP Dialect定义了唯一的一个操作 DIP_Corr2DOp ,这个 Op 在做 2D 卷积之前会先将输入进行 Padding 使得卷积后的输出特征图大小和输入一致。这里还涉及到了很多优化技巧,具体体现在 https://github.com/buddy-compiler/buddy-mlir/blob/main/docs/dip-opt.md 这篇文档以及 https://github.com/buddy-compiler/buddy-mlir/blob/main/lib/Conversion/LowerDIP/LowerDIPPass.cpp 这个 Pass 实现中。我没有完全理清楚这个算法的逻辑,所以这里就不再讲解这部分,感兴趣的读者可以自行研究。
2.3 Interface
上面介绍了 Buddy-MLIR 项目中定义的两种 Dialect ,这一节需要解答这样一个问题。即,我们如基于 Buddy-MLIR 构建的算法在 C/C++ 前端中进行调用来实现一个完整的应用程序呢?
为了实现这一目的,Buddy-MLIR 实现了一个为 C/C++ 前端服务的数据结构 MemRef,https://github.com/buddy-compiler/buddy-mlir/blob/main/include/Interface/buddy/core/Container.h 。
``// MemRef descriptor.
// - T represents the type of the elements.
// - N represents the number of dimensions.
// - The storage order is NCHW.
template <typename T, size_t N> class MemRef {
public:
  // Constructor from shape.
  MemRef(intptr_t sizes[N], T init = T(0));
  // Constructor from data.
  MemRef(const T *data, intptr_t sizes[N], intptr_t offset = 0);
  // Copy constructor.
  MemRef(const MemRef<T, N> &other);
  // Copy assignment operator.
  MemRef<T, N> &operator=(const MemRef<T, N> &other);
  // Move constructor.
  MemRef(MemRef<T, N> &&other) noexcept;
  // Move assignment operator.
  MemRef<T, N> &operator=(MemRef<T, N> &&other) noexcept;
  // Desctrutor.
  ~MemRef();
  // Get the data pointer.
  T *getData();
  // Get the sizes (shape).
  const intptr_t *getSizes() { return sizes; }
  // Get the strides.
  const intptr_t *getStrides() { return strides; }
  // Get the rank of the memref.
  size_t getRank() const { return N; }
  // Get the size (number of elements).
  size_t getSize() const { return size; }
  // Get the element at index.
  const T &operator[](size_t index) const;
  T &operator[](size_t index);

protected:
  // Default constructor.
  // This constructor is desinged for derived domain-specific constructor.
  MemRef() {};
  // Set the strides.
  // Computes the strides of the transposed tensor for transpose=true.
  void setStrides();
  // Compute the product of array elements.
  size_t product(intptr_t sizes[N]) const;

  // Data.
  // The `aligned` and `allocated` members point to the same address, `aligned`
  // member is responsible for handling data, and `allocated` member is
  // resposible for handling the memory space.
  T *allocated;
  T *aligned;
  // Offset.
  intptr_t offset = 0;
  // Shape.
  intptr_t sizes[N];
  // Strides.
  intptr_t strides[N];
  // Number of elements.
  size_t size;
};
``具体的实现在:https://github.com/buddy-compiler/buddy-mlir/blob/main/lib/Interface/core/Container.cpp 。我们这里主要梳理一下这个自定义的 MemRef 类是如何服务于 C/C++ 前端的。这里以边缘检测为例。核心代码实现如下:
`#include <iostream>
#include <opencv2/imgcodecs.hpp>
#include <time.h>

#include "Interface/buddy/core/ImageContainer.h"
#include "kernels.h"

using namespace cv;
using namespace std;

// Declare the conv2d C interface.
extern "C" {
void _mlir_ciface_conv_2d(Img<float, 2> *input, MemRef<float, 2> *kernel,
                          MemRef<float, 2> *output);
}

int main(int argc, char *argv[]) {
  printf("Start processing...\n");

  // Read as grayscale image.
  Mat image = imread(argv[1], IMREAD_GRAYSCALE);
  if (image.empty()) {
    cout << "Could not read the image: " << argv[1] << endl;
    return 1;
  }
  Img<float, 2> input(image);

  // Define the kernel.
  float *kernelAlign = laplacianKernelAlign;
  int kernelRows = laplacianKernelRows;
  int kernelCols = laplacianKernelCols;
  intptr_t sizesKernel[2] = {kernelRows, kernelCols};
  MemRef<float, 2> kernel(kernelAlign, sizesKernel);

  // Define the output.
  int outputRows = image.rows - kernelRows + 1;
  int outputCols = image.cols - kernelCols + 1;
  intptr_t sizesOutput[2] = {outputRows, outputCols};
  MemRef<float, 2> output(sizesOutput);

  // Run the convolution and record the time.
  clock_t start, end;
  start = clock();

  // Call the MLIR conv2d function.
  _mlir_ciface_conv_2d(&input, &kernel, &output);

  end = clock();
  cout << "Execution time: " << (double)(end - start) / CLOCKS_PER_SEC << " s"
       << endl;

  // Define a cv::Mat with the output of the conv2d.
  Mat outputImage(outputRows, outputCols, CV_32FC1, output.getData());

  // Choose a PNG compression level
  vector<int> compression_params;
  compression_params.push_back(IMWRITE_PNG_COMPRESSION);
  compression_params.push_back(9);

  // Write output to PNG.
  bool result = false;
  try {
    result = imwrite(argv[2], outputImage, compression_params);
  } catch (const cv::Exception &ex) {
    fprintf(stderr, "Exception converting image to PNG format: %s\n",
            ex.what());
  }
  if (result)
    cout << "Saved PNG file." << endl;
  else
    cout << "ERROR: Can't save PNG file." << endl;

  return 0;
}
`
注意这里的 Img 类的基类也是 MemRef类。
`// Image container.
// - T represents the type of the elements.
// - N represents the number of dimensions.
template <typename T, size_t N> class Img : public MemRef<T, N> {
public:
  Img(cv::Mat image);
};
`
然后在上面的应用程序中定义了 conv2d Op 的 C 前端函数:
`// Declare the conv2d C interface.
extern "C" {
void _mlir_ciface_conv_2d(Img<float, 2> *input, MemRef<float, 2> *kernel,
                          MemRef<float, 2> *output);
}
`
这个全局的 C 函数会在执行 buddy-opt 的过程中被翻译成 llvm.call 指令,即 CMakeLists.txt 中这一部分:
`add_custom_command(OUTPUT conv2d.o
  COMMAND ${BUDDY_BINARY_DIR}/buddy-opt ${BUDDY_EXAMPLES_DIR}/ConvOpt/conv2d.mlir -conv-vectorization="strip-mining=${SPLITING_SIZE}" -lower-affine -convert-scf-to-cf -convert-vector-to-llvm -convert-memref-to-llvm -convert-func-to-llvm='emit-c-wrappers=1' -reconcile-unrealized-casts |
          ${LLVM_MLIR_BINARY_DIR}/mlir-translate --mlir-to-llvmir |
          ${LLVM_MLIR_BINARY_DIR}/llc -mtriple=${BUDDY_TARGET_TRIPLE} -mattr=${BUDDY_OPT_ATTR} --filetype=obj -o ${BUDDY_BINARY_DIR}/../examples/ConvOpt/conv2d.o
  DEPENDS buddy-opt)
`
conv2d 操作的原始 MLIR 文件内容是:
`func.func @conv_2d(%arg0: memref<?x?xf32>, %arg1: memref<?x?xf32>, %arg2: memref<?x?xf32>) {
  linalg.conv_2d ins (%arg0, %arg1: memref<?x?xf32>, memref<?x?xf32>)
                 outs (%arg2: memref<?x?xf32>)
  return
}
在执行 -convert-func-to-llvm='emit-c-wrappers=1' 这个 Pass 时会将上面的 Func Dialect 下的 conv2d 操作翻译为 LLVM IR 并将其包装为一个 llvm.call 指令。这里的详细交互过程在 buddy-mlir/llvm/mlir/docs/TargetLLVMIR.md 这个文档中可以看到,也即 MLIR 提供了一个 C/C++ 的前端接口功能, Buddy-MLIR 应用了这个前端接口功能完成了端到端的应用构建。
上面获得了 LLVM IR,然后从 cmake 的命令可以看到又调用了 LLVM llc命令编译LLVM源文件到用于指定的体系结构的汇编语言。然后,汇编语言输出可以通过本机汇编器和链接器传递,以生成本机可执行文件。这里可以指定执行架构以及一些优化参数等。
0x3. buddy-opt 和 buddy-translate
将上面介绍的实现的 Pass 添加到 MLIR 的上游 Pass 管理机制中就实现了 buddy-opt 工具。
而 buddy-translate 则只扩展了一个 Buddy Dialect 到 LLVMIR 翻译的一项功能。
0x4. 总结
总的来说,Buddy-MLIR 是入门 MLIR 或者以 MLIR 为基础设施构建自己应用一个比较好的示例。推荐有需要的读者或者开发者学习和探索更多可能。本文没有讲任何 RVV Dialect 的相关知识,因为我目前也不太了解,希望后面洪滨可以讲讲这个 Dialect 的动机和细节。
0x5. 链接
https://github.com/buddy-compiler/buddy-mlir
文章转载于:GiantPandaCV
作者:BBuf
推荐阅读
- 基于CNN的区域特定多尺度特征提取的两阶段停车位检测
- MindSpore AI科学计算系列(18):化合物亲和性预测模型GraphDTA
- LITv2来袭 | 使用HiLo Attention实现高精度、快速度的变形金刚,下游任务均实时
更多嵌入式AI相关技术干货请关注嵌入式AI专栏。欢迎添加极术小姐姐微信(id:aijishu20)加入技术交流群,请备注研究方向。

