文章转载于微信公众号:GiantPandaCV
作者: 阿呆
【GiantPandaCV导读】这篇文章包含与PyTorch模型部署相关的两部分内容:
- PyTorch-YOLOv3模型的Web页面展示程序的编写
- 模型的服务接口相关工具的使用
0. 环境依赖:
系统:Ubuntu 18.04
Python版本:3.7
依赖Python包:1. PyTorch==1.3 2. Flask==0.12 3. Gunicorn
需要注意的是Flask 0.12中默认的单进程单线程,而最新的1.0.2则不是(具体是多线程还是多进程尚待考证),而中文博客里面能查到的资料基本都在说Flask默认单进程单线程。
依赖工具 1. nginx 2. apache2-utils
nginx 用于代理转发和负载均衡,apache2-utils用于测试接口
1. 制作模型演示界面
图像识别任务的展示这项工程一般是面向客户的,这种场景下不可能把客户拉到你的电脑前面,敲一行命令,等matplotlib弹个结果窗口出来。总归还是要有个图形化界面才显得有点诚意。
为了节约时间,我们选择了Flask框架来开发这个界面。
上传页面和展示页面
做识别演示需要用到两个html页面,代码也比较简单,编写如下:
上传界面
<!DOCTYPE html><html lang="en"><head> <meta charset="UTF-8"> <title>Flask上传图片演示</title></head><body> <h1>使用Flask上传本地图片</h1> <form action="" enctype='multipart/form-data' method='POST'> <input type="file" name="file" style="margin-top:20px;"/> <br> <input type="submit" value="上传" class="button-new" style="margin-top:15px;"/> </form></body></html>展示界面
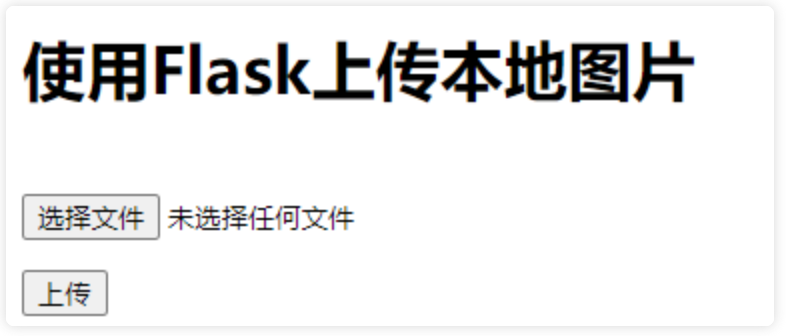
<!DOCTYPE html><html lang="en"><head> <meta charset="UTF-8"> <title>Flask上传图片演示</title></head><body> <h1>使用Flask上传本地图片</h1> <form action="" enctype='multipart/form-data' method='POST'> <input type="file" name="file" style="margin-top:20px;"/> <br> <input type="submit" value="上传" class="button-new" style="margin-top:15px;"/> </form> <img src="{{ url_for('static', filename= path,_t=val1) }}" width="400" height="400" alt="图片识别失败"/></body></html>上传界面如下图所示,觉得丑的话可以找前端同事美化一下:
flask上传图片及展示功能
然后就可以编写flask代码了,为了更好地展示图片,可以向html页面传入图片地址参数。
from flask import Flask, render_template, request, redirect, url_for, make_response, jsonifyfrom werkzeug.utils import secure_filenameimport osimport cv2import timefrom datetime import timedeltafrom main import run, confALLOWED_EXTENSIONS = set([ "png","jpg","JPG","PNG", "bmp"])def is_allowed_file(filename): return '.' in filename and filename.rsplit('.', 1)[1] in ALLOWED_EXTENSIONSapp = Flask(__name__)# 静态文件缓存过期时间app.send_file_max_age_default = timedelta(seconds=1)@app.route("/upload",methods = ['POST', 'GET'])def upload(): if request.method == "POST": f = request.files['file'] if not ( f and is_allowed_file(f.filename)): return jsonify({ "error":1001, "msg":"请检查上传的图片类型,仅限于png、PNG、jpg、JPG、bmp" }) user_input = request.form.get("name") basepath = os.path.dirname(__file__) upload_path = os.path.join(basepath, "static/images",secure_filename(f.filename)) f.save(upload_path) detected_path = os.path.join(basepath, "static/images", "output" + secure_filename(f.filename)) run(upload_path, conf, detected_path) # return render_template("upload_ok.html", userinput = user_input, val1=time.time(), path = detected_path) path = "/images/" + "output" + secure_filename(f.filename) return render_template("upload_ok.html", path = path, val1 = time.time()) return render_template("upload.html")if __name__ == "__main__": app.run(host='0.0.0.0', port=8888, debug=True)目标检测函数
原项目中提供了detection.py来做批量的图片检测,需要稍微修改一下才能用来做flask代码中的接口。
from __future__ import divisionfrom models import *from utils.utils import *from utils.datasets import *import osimport sysimport timeimport datetimeimport argparsefrom PIL import Imageimport torchfrom torchvision import datasetsfrom torch.autograd import Variableimport matplotlib.pyplot as pltimport matplotlib.patches as patchesfrom matplotlib.ticker import NullLocatorclass custom_dict(dict): def __init__(self, d = None): if d is not None: for k,v in d.items(): self[k] = v return super().__init__() def __key(self, key): return "" if key is None else key.lower() def __str__(self): import json return json.dumps(self) def __setattr__(self, key, value): self[self.__key(key)] = value def __getattr__(self, key): return self.get(self.__key(key)) def __getitem__(self, key): return super().get(self.__key(key)) def __setitem__(self, key, value): return super().__setitem__(self.__key(key), value)conf = custom_dict({ "model_def":"config/yolov3.cfg", "weights_path":"weights/yolov3.weights", "class_path":"data/coco.names", "conf_thres":0.8, "nms_thres":0.4, "img_size":416})def run(img_path, conf, target_path): device = torch.device("cuda" if torch.cuda.is_available() else "cpu") os.makedirs("output", exist_ok=True) classes = load_classes(conf.class_path) model = Darknet(conf.model_def, img_size=conf.img_size).to(device) if conf.weights_path.endswith(".weights"): # Load darknet weights model.load_darknet_weights(conf.weights_path) else: # Load checkpoint weights model.load_state_dict(torch.load(conf.weights_path)) model.eval() img = Image.open(img_path).convert("RGB") img = img.resize(((img.size[0] // 32) * 32, (img.size[1] // 32) * 32)) img_array = np.array(img) img_tensor = pad_to_square(transforms.ToTensor()(img),0)[0].unsqueeze(0) conf.img_size = img_tensor.shape[2] with torch.no_grad(): detections = model(img_tensor) detections = non_max_suppression(detections, conf.conf_thres, conf.nms_thres)[0] cmap = plt.get_cmap("tab20b") colors = [cmap(i) for i in np.linspace(0, 1, 20)] plt.figure() fig, ax = plt.subplots(1) ax.imshow(img_array) if detections is not None: # Rescale boxes to original image detections = rescale_boxes(detections, conf.img_size, img_array.shape[:2]) unique_labels = detections[:, -1].cpu().unique() n_cls_preds = len(unique_labels) bbox_colors = random.sample(colors, n_cls_preds) for x1, y1, x2, y2, conf, cls_conf, cls_pred in detections: print("\t+ Label: %s, Conf: %.5f" % (classes[int(cls_pred)], cls_conf.item())) box_w = x2 - x1 box_h = y2 - y1 color = bbox_colors[int(np.where(unique_labels == int(cls_pred))[0])] # Create a Rectangle patch bbox = patches.Rectangle((x1, y1), box_w, box_h, linewidth=2, edgecolor=color, facecolor="none") # Add the bbox to the plot ax.add_patch(bbox) # Add label plt.text( x1, y1, s=classes[int(cls_pred)], color="white", verticalalignment="top", bbox={"color": color, "pad": 0}, ) # Save generated image with detections plt.axis("off") plt.gca().xaxis.set_major_locator(NullLocator()) plt.gca().yaxis.set_major_locator(NullLocator()) filename = img_path.split("/")[-1].split(".")[0] plt.savefig(target_path, bbox_inches='tight', pad_inches=0.0) plt.close()if __name__ == "__main__": run("data/samples/dog.jpg",conf)展示效果
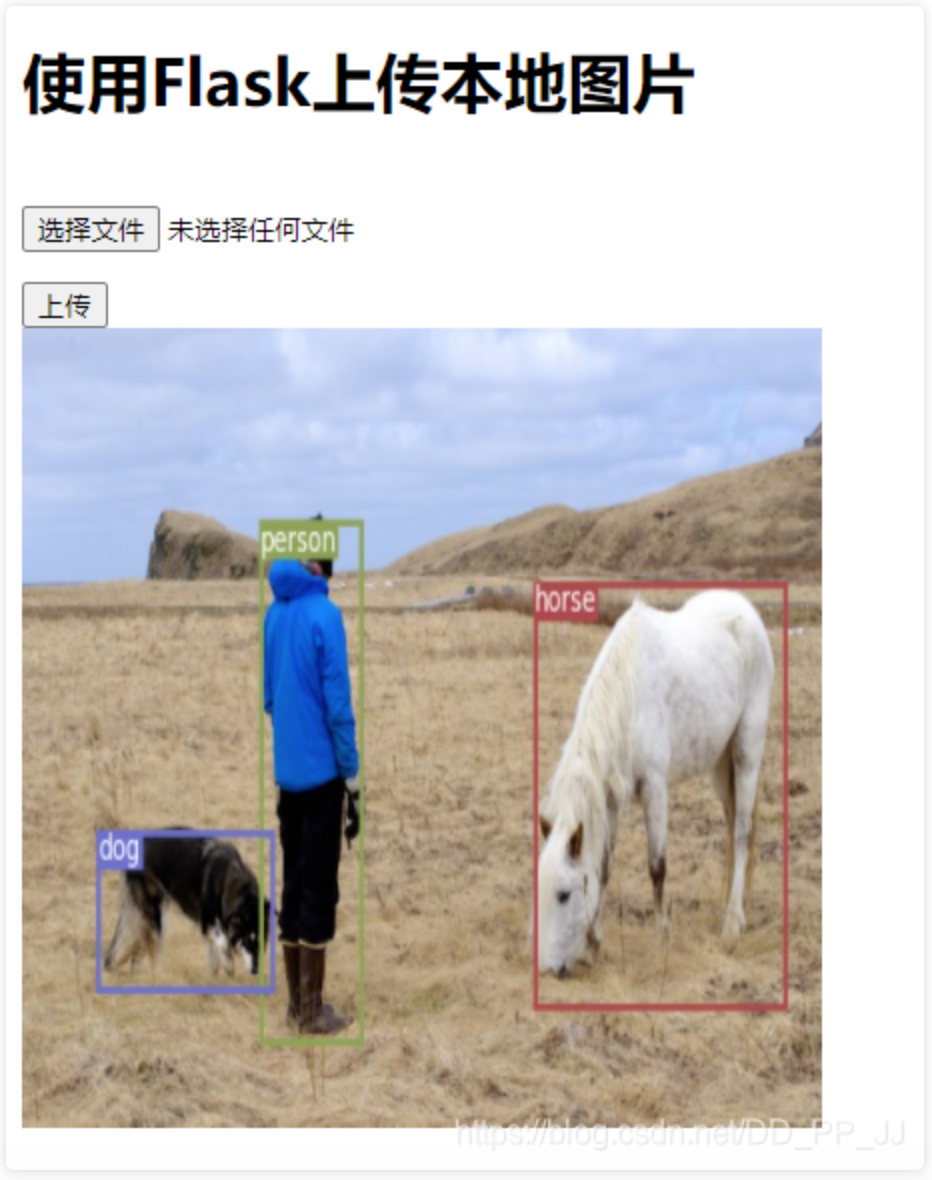
编写好了之后,启动server.py,在本地打开localhost:8888/upload就可以看到如下界面了,把图片上传上去,很快就能得到检测结果。
结果如下图所示:
2. 深度学习的服务接口编写
接下来介绍的是在生产环境下的部署,使用的是flask+gunicorn+nginx的方式,可以处理较大规模的请求。
下面以图像分类模型为例演示一下深度学习服务接口如何编写。
对于深度学习工程师来说,学习这些内容主要是了解一下自己的模型在生产环境的运行方式,便于在服务出现问题的时候与开发的同事一起进行调试。
flask服务接口
接口不需要有界面显示,当然也可以添加一个API介绍界面,方便调用者查看服务是否已经启动。
from flask import Flask, requestfrom werkzeug.utils import secure_filenameimport uuidfrom PIL import Imageimport osimport timeimport base64import jsonimport torchfrom torchvision.models import resnet18from torchvision.transforms import ToTensorfrom keys import keyapp = Flask(__name__)net = resnet18(pretrained=True)net.eval()@app.route("/",methods=["GET"])def show(): return "classifier api"@app.route("/run",methods = ["GET","POST"])def run(): file = request.files['file'] base_path = os.path.dirname(__file__) if not os.path.exists(os.path.join(base_path, "temp")): os.makedirs(os.path.join(base_path, "temp")) file_name = uuid.uuid4().hex upload_path = os.path.join(base_path, "temp", file_name) file.save(upload_path) img = Image.open(upload_path) img_tensor = ToTensor()(img).unsqueeze(0) out = net(img_tensor) pred = torch.argmax(out,dim = 1) return "result : {}".format(key[pred])if __name__ == "__main__": app.run(host="0.0.0.0",port=5555,debug=True)在命令行输入python server.py即可启动服务。
gunicorn启动多个实例
新版的flask已经支持多进程了,不过用在生产环境还是不太稳定,一般生产环境会使用gunicorn来启动多个服务。
使用如下命令即可启动多个图像分类实例
gunicorn -w 4 -b 0.0.0.0:5555 server:app输出如下内容代表服务创建成功:
[2020-02-11 14:50:24 +0800] [892] [INFO] Starting gunicorn 20.0.4[2020-02-11 14:50:24 +0800] [892] [INFO] Listening at: http://0.0.0.0:5555 (892)[2020-02-11 14:50:24 +0800] [892] [INFO] Using worker: sync[2020-02-11 14:50:24 +0800] [895] [INFO] Booting worker with pid: 895[2020-02-11 14:50:24 +0800] [896] [INFO] Booting worker with pid: 896[2020-02-11 14:50:24 +0800] [898] [INFO] Booting worker with pid: 898[2020-02-11 14:50:24 +0800] [899] [INFO] Booting worker with pid: 899如果配置比较复杂,也可以将配置写入一个文件中,如:
bind = '0.0.0.0:5555'timeout = 10workers = 4然后运行:
gunicorn -c gunicorn.conf sim_server:appnginx负载均衡
如果有多个服务器,可以使用nginx做请求分发与负载均衡。
安装好nginx之后,修改nginx的配置文件
worker_processes auto;error_log /var/log/nginx/error.log;pid /run/nginx.pid;# Load dynamic modules. See /usr/share/nginx/README.dynamic.include /usr/share/nginx/modules/*.conf;events { worker_connections 1024;}http { server { listen 5556; # nginx端口 server_name localhost; location / { proxy_pass http://localhost:5555/run; # gunicorn的url } }}然后按配置文件启动
sudo nginx -c nginx.conf测试一下服务是否正常
启动了这么多服务之后,可以使用apache2-utils来测试服务的并发性能。
使用apache2-utils进行上传图片的post请求方法参考:
https://gist.github.com/chill...
严格参照,注意一个标点,一个符号都不要错。使用这种方法传输图片的base64编码,在服务端不需要解码也能使用
然后使用下面的方式访问
gunicorn 接口
ab -n 2 -c 2 -T "multipart/form-data; boundary=1234567890" -p turtle.txt http://localhost:5555/runnginx 接口
ab -n 2 -c 2 -T "multipart/form-data; boundary=1234567890" -p turtle.txt http://localhost:5556/run- END -
推荐阅读
更多嵌入式AI技术干货请关注嵌入式AI专栏。


