在H100发布之际,英伟达还带来一个“重磅产品”——Transformer Engine。在Transformer大火之际推出这么一个产品,无疑是炼丹师福音。
当时我还在猜测它会以怎么样的一种形式呈现给用户,直到最近公开了仓库 NVIDIA/TransformerEngine
这其实就是PyTorch的一个拓展,为了利用FP8的特性,针对Transformer里面的Kernel进行了重写,包含了一系列LayerNorm, GeLU, ScaledSoftmax等。
使用方式也是比较简单,使用该拓展额外包的一层Module来搭建网络,即可,最后再包一层混合精度训练作用域:
import torch
import transformer_engine.pytorch as te
from transformer_engine.common import recipe

# Set dimensions.
in_features = 768
out_features = 3072
hidden_size = 2048

# Initialize model and inputs.
model = te.Linear(in_features, out_features, use_bias=True)
inp = torch.randn(hidden_size, in_features, device="cuda")

# 创建FP8训练的配置
fp8_recipe = recipe.DelayedScaling(margin=0, interval=1, fp8_format=recipe.Format.E4M3)

# FP8的autocast
with te.fp8_autocast(enabled=True, fp8_recipe=fp8_recipe):
    out = model(inp)

loss = out.sum()
loss.backward()
本篇博客就简单介绍下Transformer Engine及其对应实现原理
官方文档:https://docs.nvidia.com/deeplearning/transformer-engine/user-guide/index.html
Transfromer Engine 是干啥的?
在各种以Transformer为基础的语言模型如GPT3大火后,语言模型的参数量还在以指数形式增长:
那么优化Transformer性能就显得格外重要了,其中混合精度训练是一个很实用的技巧
在FP16下,其数据范围还是足够大的,因此在AMP下,我们只在最后的Loss做了一个scaling,这个步骤足以保证在整个模型运算过程中不会产生溢出
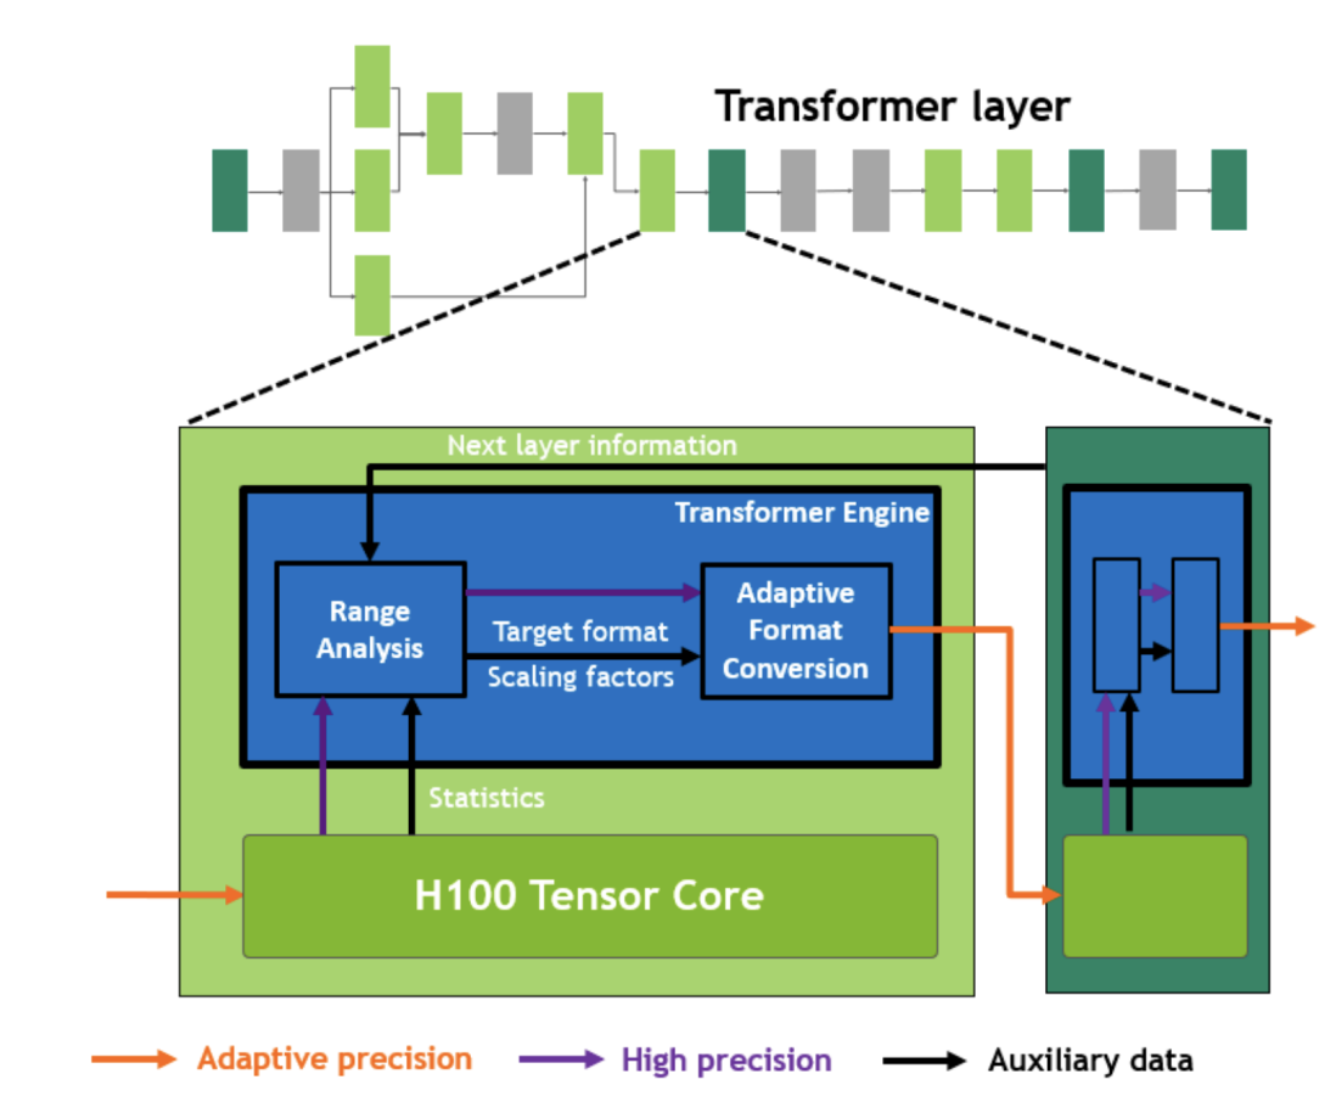
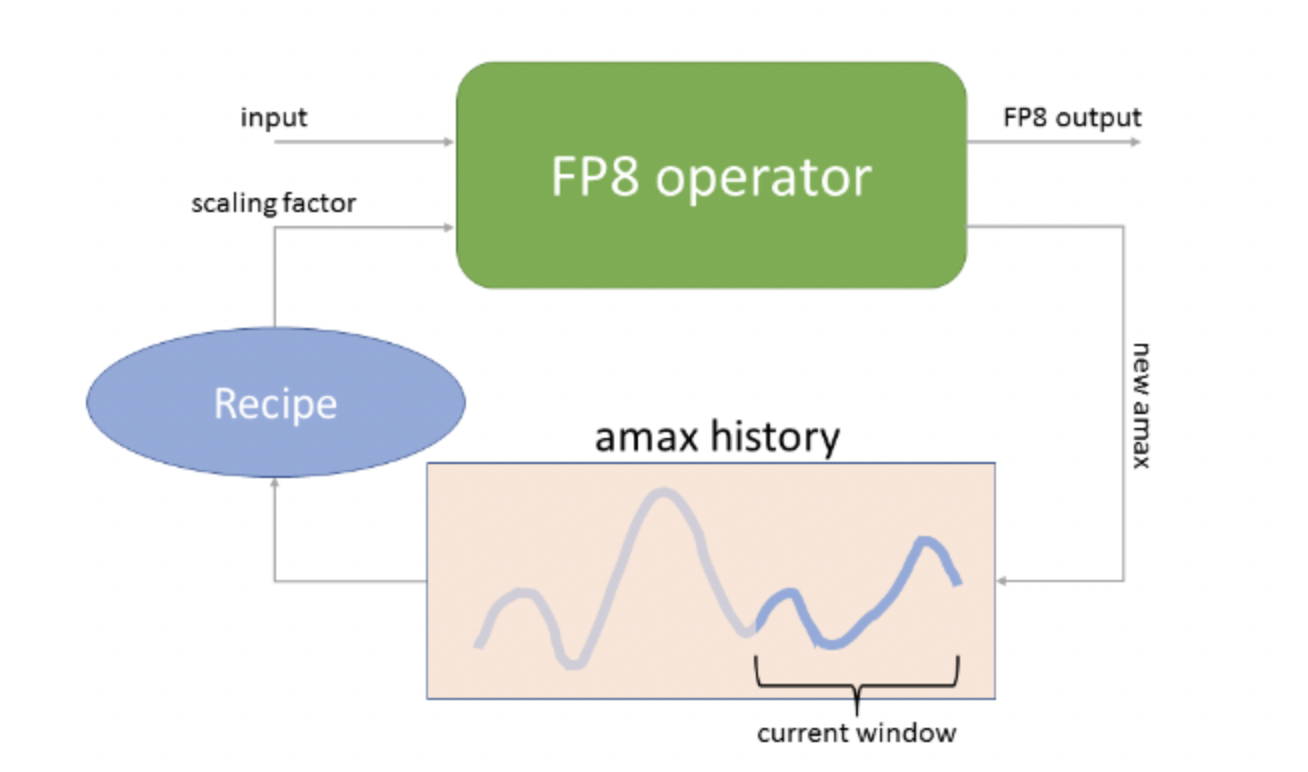
而FP8相比FP16减少了更多有效位,因此不能简单地复用FP16下的策略,需要给每个FP8 Tensor单独设置一个合适的scale factor。Transformer Engine 需要动态地对输入范围进行调整,如图所示:
上图来自H100白皮书内(当时我还天真的以为有一个专门的硬件做这个处理。。。)
下面我们简单看下其代码和实现原理
Kernel实现
具体到每一个算子实现动态范围调整的原理其实很简单,通过记录历史的abs max值,来去调整最终缩放的范围。
其主要的Kernel实现都放在了 common 目录下,我们以gelu这个kernel为例,最终它会调用到 vectorized_pointwise.h这个文件,我们主要看 unary_kernel
unary_kernel
这个核函数模板跟常规的elementwise向量化模板是类似的。
首先会让每个线程获取到scale值
ComputeType s = 0;
if constexpr (is_fp8<OutputType>::value) {
    // 获取scale值
    if (scale != nullptr) s = *scale;
    // 将scale取倒数写回scale_inv
    if (blockIdx.x == 0 && threadIdx.x == 0 && scale_inv != nullptr) {
      reciprocal<ComputeType>(scale_inv, s);
    }
}
其中在循环里,线程会不断更新他运算结果的最大值,并且最终运算结果要乘上scale值:
// 实际运算发生
ComputeType temp = OP(val, p);
if constexpr (is_fp8<OutputType>::value) {
  __builtin_assume(max >= 0);
  max = fmaxf(fabsf(temp), max);

  // 缩放
  temp = temp * s;
}
当Kernel主体运算完毕后,再也warp为单位做一个reduce\_max,获取到线程束内的最大值,再通过atomicMax原子操作,不断更新全局最大值:
if constexpr (is_fp8<OutputType>::value) {
  /* warp tile amax reduce*/
  max = reduce_max<unary_kernel_threads / THREADS_PER_WARP>(max, warp_id);

  if (threadIdx.x == 0 && amax != nullptr) {
      static_assert(std::is_same<ComputeType, float>::value);
      // 更新全局最大值
      atomicMaxFloat(amax, max);
  }
}
其他layernorm等Kernel也是诸如类似的逻辑,这里就不再展开了
Python API
(1) DelayedScaling
从前面的示例代码我们可以看到一个比较重要的API是DelayedScaling,我们可以根据官方文档查看各个参数含义:
- margin 计算scale的偏移量
- interval 控制计算scale factor的频率
- fp8_format 使用FP8的格式,FP8有E4M3和E5M2,但是现在不支持纯E5M2的格式训练
- amax_history_len 记录abs maxval的历史窗口大小
- amax_compute_algo 在窗口里选择absmax的算法,'max'则是选择历史窗口里最大值,'most_recent'则是选择近期的值,当然你也可以传一个自定义的函数
相关代码为:
@torch.jit.script
def _default_get_amax(
    amax_history: torch.Tensor,
    amax_compute_algo: str,
) -> Tuple[torch.Tensor, torch.Tensor]:
    """Default function to obtain amax from history."""
    if amax_compute_algo == "max":
        amax = torch.max(amax_history, dim=0).values
    else:  # amax_compute_algo == "most_recent"
        amax = amax_history[0]

    amax_history = update_amax_history(amax_history)
return amax_history, amax- scaling_factor_compute_algo 计算scale factor的算法
@torch.jit.script
def _default_sf_compute(
    amax: torch.Tensor,
    scale: torch.Tensor,
    fp8_max: float,
    margin: int,
) -> torch.Tensor:
    """Default function to convert amax to scaling factor."""
    exp = torch.floor(torch.log2(fp8_max / amax)) - margin
    sf = torch.round(torch.pow(2, torch.abs(exp)))
    sf = torch.where(amax > 0.0, sf, scale)
    sf = torch.where(torch.isfinite(amax), sf, scale)
    sf = torch.where(exp < 0, 1 / sf, sf)

return sf- override_linear_precision 由3个bool值,分别控制fprop前向,dgrad,wgrad三个矩阵乘是否用更高的精度来计算,默认都为False
(2) TransformerEngineBaseModule
相关的Kernel除了要完成自己的计算任务,也得实时维护amax这些值,因此也需要对应修改nn.Module,这里TransformerEngine继承了nn.Module,并且增加了一些buffer维护的机制,这些buffer用于存储动态scale的信息:
class TransformerEngineBaseModule(torch.nn.Module, ABC):
    def __init__(self) -> None:
        ...
        self.fp8 = False
        self.fp8_meta = {}
        self.fp8_meta["fp8_group"] = None
        self.fp8_meta["recipe"] = get_default_fp8_recipe()
    def fp8_init(self, num_gemms: int = 1) -> None:
        """Initialize fp8 related metadata and tensors during fprop."""
        # If fp8 isn't enabled, turn off and return.
        if not is_fp8_enabled():
            self.fp8 = False
            return

        # FP8 is already enabled and recipe is the same, don't do anything.
        if self.fp8 and get_fp8_recipe() == self.fp8_meta["recipe"]:
            return

        # Set FP8, recipe, and other FP8 metadata
        self.fp8 = True
        self.fp8_meta["recipe"] = get_fp8_recipe()
        self.fp8_meta["num_gemms"] = num_gemms
        self.fp8_meta["fp8_group"] = get_fp8_group()

        # Set FP8_MAX per tensor according to recipe
        self.fp8_meta["fp8_max_fwd"] = self.fp8_meta["recipe"].fp8_format.value.max_fwd
        self.fp8_meta["fp8_max_bwd"] = self.fp8_meta["recipe"].fp8_format.value.max_bwd

        # Allocate scales and amaxes
        self.init_fp8_meta_tensors()
而相关Module如LayerNormMLP继承该Module,并且传入fp8_meta信息更新:
class LayerNormMLP(TransformerEngineBaseModule):

  def forward(...):
  out = _LayerNormMLP.apply(
            ...,
            self.fp8,
            self.fp8_meta,
        )
总结
大致浏览完其实思路不复杂,但感觉还是FP8技术的不稳定,整个项目还是加入了很多限制。得益于PyTorch灵活的外部扩展形式,只要不去触碰框架底层运行机制,仅仅在算子层面上的修改还是相当简单。虽然不具备通用性,但是运算主体就这几个算子,为了性能也是可以接受的
作者:zzk
文章来源:GiantPandaCV
推荐阅读
更多嵌入式AI干货请关注 嵌入式AI 专栏。欢迎添加极术小姐姐微信(id:aijishu20)加入技术交流群,请备注研究方向。


