
原文:知乎
作者:圈圈虫
YOLOv5 自从问世以来,让多目标检测任务在速度和精度上都达到了非常好的表现效果。

今天我们试着基于 AI 边缘计推理框架 Tengine 在 Khadas VIM3 的 AI 加速器上部署 YOLOv5s。
准备 YOLOv5s 模型
我们选取 github 开源项目中预训练好的 YOLOv5s onnx 版本的模型。
github.com/ultralytics/yolov5/releasesgithub.com
Focus结构
Focus 是 YOLOv5 新增的操作,将原始 3*640*640 的图像输入 Focus 结构,采用切片操作,输出 12*320*320 的特征图,再送入后续卷积神经网络。
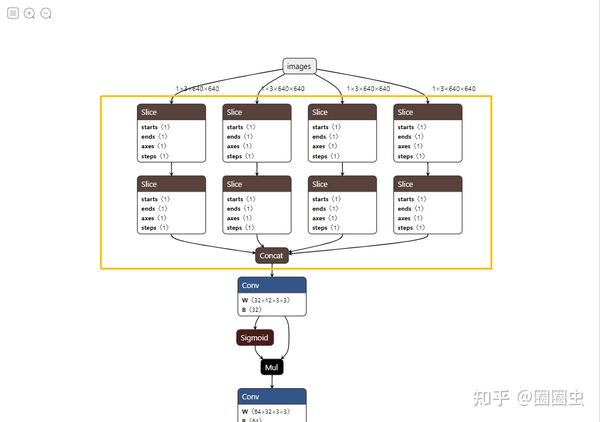
Focus 降维处理?
HardSwish
YOLOv5s 中卷积之后的激活操作由 YOLOv4 的 mish 换成了另一种奇怪的 HardSwish:
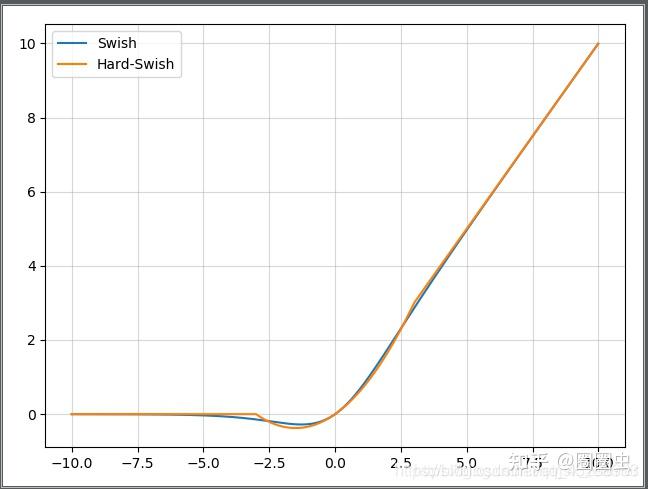
看一眼就知道在 NPU 上效率不太行
原始的 PyTorch 使用 ONNX 转出后是这样的:
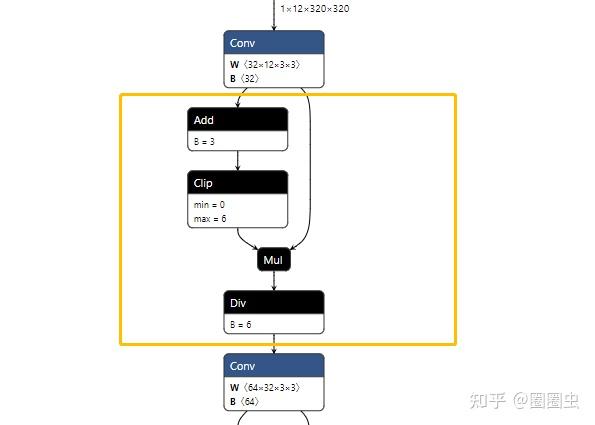
这就更离谱了,被 ONNX 打散了!
本次使用的 YOLOv5s 预训练好提供的 ONNX 模型中是这样的:

对于 NPU君 来说,还是太难了
而对于 NPU 来讲,她~喜欢这样的:
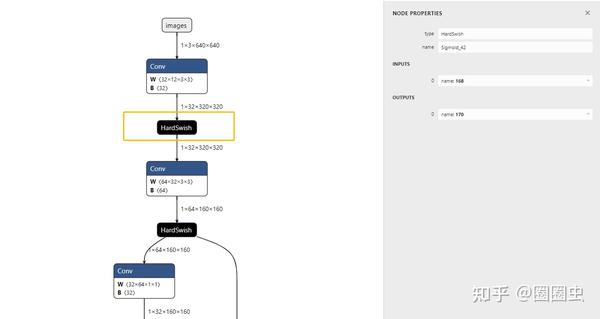
反正全网找了一圈,没有找到完整的 HardSwish OP,为什么会这样呢?询问过 ONNX 官方“十八罗汉” 之一 大老师 给的非官方答复是“你们自己想办法捏回去吧!因为 ONNX 标准 OP 中没有这个 HardSwish OP......”
离谱.jpg
YOLOv5s 的后处理结构
好大一坨,大概率 NPU 也搞不定
模型优化
当虫叔想放弃的时候,星大师 过来瞅了一眼,说道:
简单!写个 python 脚本而已,分分钟的事情。
Focus、Hardswish、Postprocess 的非常规计算对于边缘计算设备,特别是需要量化操作的 NPU 芯片来说,在速度和精度上未知数太多了。
因此,我们提供了一个 python脚本(文末提供传送门),一键完成以下姿势:
- Focus 裁减;
- Postprocess 裁减;
- HardSwish 合并(针对 sigmod + mul 组合)
关键函数(虫叔 python 不精通,轻喷~)
def cut_focus_output(input_node, in_name, out_name, out_num):
    """
    cut the focus and postprocess nodes
    Args:
        input_node: input_node: the nodes of ONNX model
        in_name:    input cut node name
        out_name:   output cut node names
        out_num:    output num
    Returns:
        new_nodes:  the new node
    """
    node_dict = {}
    for i in range(len(input_node)):
        node_dict[input_node[i].output[0]] = i

    # cut output nodes
    output_pass = np.zeros((len(input_node)), dtype=np.int)
    for i in range(out_num):
        output_pass[node_dict[out_name[i]]] = 2

    for i in range(len(input_node)):
        for j in input_node[i].input:
            if j in node_dict:
                if output_pass[node_dict[j]] == 2 or output_pass[node_dict[j]] == 1:
                    output_pass[node_dict[input_node[i].output[0]]] = 1

    # cut focus node
    for i in range(len(output_pass)-1, -1, -1):
        if output_pass[i] == 1:
            del input_node[i]

    new_nodes = input_node[(node_dict[in_name] + 1):]

    return new_nodes


def fusion_hardswish(input_node):
    """
    using HardSwish replace the Sigmoid and Mul
    Args:
        input_node: the nodes of ONNX model
    Returns:
        the new node
    """
    del_list = []
    for i in range(len(input_node) - 1):
        if(input_node[i].op_type == 'Sigmoid' and input_node[i+1].op_type == 'Mul'):
            input_node[i].output[0] = input_node[i+1].output[0]
            input_node[i].op_type = 'HardSwish'
            del_list.append(i + 1)

    for i in range(len(del_list)-1, -1, -1):
        del input_node[del_list[i]]

    return input_node
优化前后的 onnx 模型可视化结果,可以参考这里面的对比(图片有点大)

Khadas VIM3 介绍
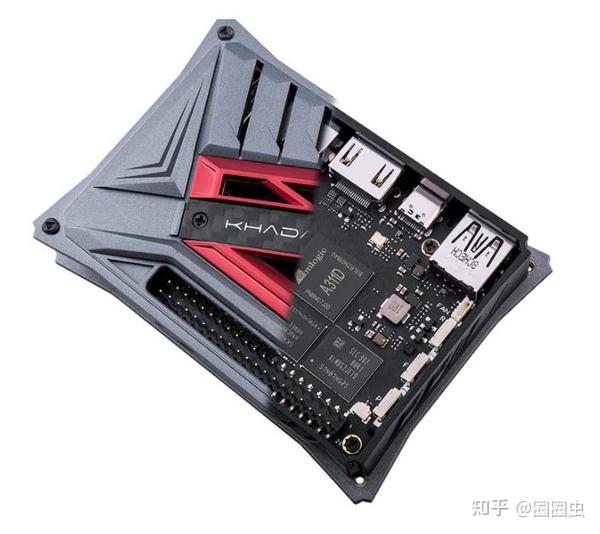
前面几篇文章已经介绍了很多了,主要是采用 TIM-VX 对接其 5Tops 的 AI 加速器。当然,相同的方案理论上支持以下平台。
厂家
芯片型号
https://zhuanlan.zhihu.com/p/350327223

Tengine 推理框架运行 YOLOv5s
依赖 Tengine uint8 tmfile,因此需要两步完成,首先通过 Tengine 模型转换工具将 yolov5s-opt.onnx 转换成 yolov5s.tmfile。
$ ./tm_convert_tool -f onnx -m yolov5s-opt.onnx -o yolov5s.tmfile

---- Tengine Convert Tool ----

Version     : v1.0, 20:25:28 Mar 25 2021
Status      : float32
Create tengine model file done: yolov5s.tmfile
再使用开放的 Tengine 量化工具 quant\_tool\_uint8,校准数据随机从 COCO 数据集中抽取的 10 张,将 yolov5s.tmfile 压缩量化成 yolov5s\_uint8.tmfile。
./quant_tool_uint8 -m yolov5s-relu.tmfile -i coco_1/ -o yolov5s_uint8.tmfile -g 12,320,320 -w 0,0,0 -s 0.0039
21,0.003921,0.003921 -c 0 -k 1 -t 2

---- Tengine Post Training Quantization Tool ----

Version     : v1.1, 09:33:45 Mar 26 2021
Status      : uint8, per-layer, asymmetric
Input model : yolov5s.tmfile
Output model: yolov5s_uint8.tmfile
Calib images: coco/
Algorithm   : MIN MAX
Dims        : 12 320 320
Mean        : 0.000 0.000 0.000
Scale       : 0.004 0.004 0.004
BGR2RGB     : ON
Center crop : OFF
Letter box  : OFF
YOLOv5 focus: ON
Thread num  : 2

[Quant Tools Info]: Step 0, load FP32 tmfile.
[Quant Tools Info]: Step 0, load FP32 tmfile done.
[Quant Tools Info]: Step 0, load calibration image files.
[Quant Tools Info]: Step 0, load calibration image files done, image num is 10.
[Quant Tools Info]: Step 1, find original calibration table.
[Quant Tools Info]: Step 1, images 00010 / 00010
[Quant Tools Info]: Step 1, find original calibration table done, output ./table_minmax.scale
[Quant Tools Info]: Step 2, find calibration table.
[Quant Tools Info]: Step 2, images 00001 / 00010
[Quant Tools Info]: Step 2, find calibration table done, output ./table_kl.scale
[Quant Tools Info]: Thread 2, image nums 10, total time 3678.77 ms, avg time 367.88 ms
[Quant Tools Info]: Calibration file is using table_minmax.scale
[Quant Tools Info]: Step 3, load FP32 tmfile once again
[Quant Tools Info]: Step 3, load FP32 tmfile once again done.
[Quant Tools Info]: Step 3, load calibration table file table_minmax.scale.
[Quant Tools Info]: Step 4, optimize the calibration table.
[Quant Tools Info]: Step 4, quantize activation tensor done.
[Quant Tools Info]: Step 5, quantize weight tensor done.
[Quant Tools Info]: Step 6, save Int8 tmfile done, yolov5s_uint8.tmfile

---- Tengine Int8 tmfile create success, best wish for your INT8 inference has a low accuracy loss...\(^0^)/ ----
执行流程
初始化 -> 启用 TIM-VX 后端 -> 加载模型 -> 加载图片 -> 预处理 -> 运行计算图 -> 后处理 -> 绘制结果(完整代码见本文末尾)
    /* set runtime options */
    struct options opt;
    opt.num_thread = num_thread;
    opt.cluster = TENGINE_CLUSTER_ALL;
    opt.precision = TENGINE_MODE_UINT8;
    opt.affinity = 0;

    /* inital tengine */
    init_tengine()

    /* create VeriSilicon TIM-VX backend */
    context_t timvx_context = create_context("timvx", 1);
    int rtt = add_context_device(timvx_context, "TIMVX");

    /* create graph, load tengine model xxx.tmfile */
    graph_t graph = create_graph(timvx_context, "tengine", model_file);

    /* prerun graph, set work options(num_thread, cluster, precision) */
    prerun_graph_multithread(graph, opt);

    /* prepare process input data, set the data mem to input tensor */
    float input_scale = 0.f;
    int input_zero_point = 0;
    get_tensor_quant_param(input_tensor, &input_scale, &input_zero_point, 1);
    get_input_data_focas_uint8(image_file, input_data, img_h, img_w, mean, scale, input_scale, input_zero_point);

    /* run graph */
    run_graph(graph, 1);

    /* yolov5 postprocess */
    tensor_t p8_output = get_graph_output_tensor(graph, 0, 0);
    tensor_t p16_output = get_graph_output_tensor(graph, 1, 0);
    tensor_t p32_output = get_graph_output_tensor(graph, 2, 0);
预处理这里需要注意的地方是,需要做 letterbox 处理,将图片补齐到 640*640,应该是以下效果。
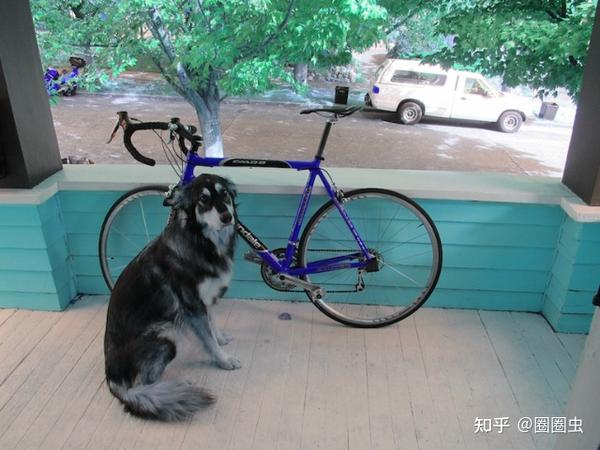
原始图片,BGR2RGB
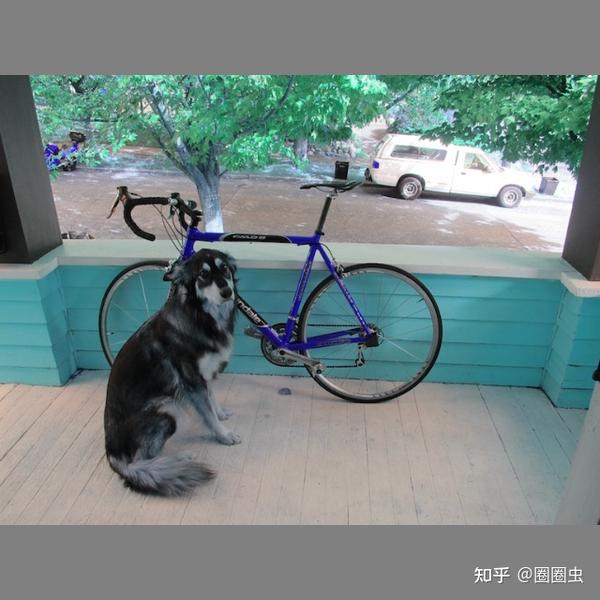
Letterbox 640 处理之后
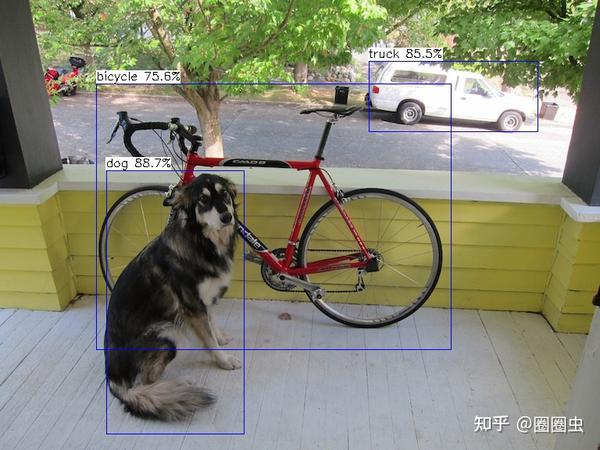
最终在 Khadas VIM3 上的耗时表现
khadas@Khadas:~/qtang/tengine-lite/build/examples$ ./tm_yolov5s_timvx -m yolov5s_uint8.tmfile -i ssd_dog.jpg -r 5
Tengine plugin allocator TIMVX is registered.
tengine-lite library version: 1.2-dev
TIM-VX prerun.
Repeat 5 times, thread 1, avg time 71.51 ms, max_time 74.49 ms, min_time 68.43 ms
--------------------------------------
detection num: 3
16: 88%, [ 135,  224,  313,  547], dog
 7: 86%, [ 472,   73,  693,  171], truck
 1: 73%, [ 130,  108,  574,  439], bicycle
Float32模型与 Int8模型输出结果对比,感觉还行。
Float32 模型检测结果

Khadas VIM3 NPU Uint8 量化模型检测结果
总结
主要贡献:
- 提供了一个“一键”优化 YOLOv5s ONNX 开源版本模型的 python 脚本;
- 再一次迭代了量化工具,支持 Focus 处理(精度居然没蹦,也是意外收获)
至于在 Khadas VIM3 上的部署,今年以来 Tengine 和 VSI 团队紧密联合开发,问题不大,官方支持。
遗留问题:
- YOLOv5s 的原始网络结构可进一步优化,在精度不掉的情况下,速度提升 15% - 20%(溜了……)
- 更高效的 Focus 计算方案。
相关链接传送门
我是圈圈虫,一个热爱技术的中年大叔。快加入 OPEN AI LAB 开发者技术 QQ 群(829565581)来找我吧!溜了~~
入群秘令:CNN
更多Tengine相关内容请关注Tengine-边缘AI推理框架专栏。

